17.4 Migrating File System Using GUI
After you have completed the prerequisites procedures in Preparing for File System Migration, you are ready to migrate the source server.
-
Launch the Migration Tool from the target server, using either of the following methods:
Desktop: Click to launch the Migration GUI.
Terminal Prompt: Log in as the root user and at a terminal prompt, enter miggui
-
Enter authentication credentials for the source server.
(Optional) Is Cluster Resource: This option supports only Migrate scenario and does not support Transfer ID. If you want to migrate data in a cluster environment, you can perform either of the following:
-
Migrating Cluster Volumes: In the screen, specify the cluster resource IP and select the option. On configuring file system the Volume Information tab displays all cluster volumes from the cluster resource as part of the source volume.
-
Migrating Non Cluster Volumes from a Cluster Node: In the screen, specify the cluster node IP and do not select the option. On configuring file system the Volume Information tab displays all non cluster volumes present on the source server.
-
-
Enter your authentication credentials for the target server
-
Depending on the type of migration to perform, select the migration type as or .
-
In the panel, click and select .
The of the file system service is .
IMPORTANT:File system is listed in the Service panel list only if it installed and configured on the target server.
-
To configure migration parameters for the file system, select , then click .
Tabs
Purpose
Identify the volumes or folders that you want to move from the selected source server to a selected target server. By default, all of the data in the volumes or folders that you select for migration in the source server tree is migrated to the target server.
Customize the files and quotas that are migrating to the target server. You can also specify the home directory location and set options to synchronize the file system.
You can migrate the trustee rights of the users and groups from the source server to target server. You can also specify the global password for the new users created on the target server.
This tab is enabled only in a Different Tree scenario.
You can specify which users to migrate and how to handle the migration if the user already exists on the target server.
This tab is enabled when you select the Custom User mapping option in the Trustee Options page.
-
In the tab, in the tree, select volumes or folders that you want to migrate, then drag and drop it in the tree. The names of the source cluster volumes can only include “_” as a special character to be listed in the tree.
IMPORTANT:You cannot migrate a DFS junction. A DFS junction is displayed under the source tree as a folder because this junction appears in the file structure as a directory. Under , the DFS junction can be dragged to the target server tree, but actually, the junction and the data are not migrated to the target server and migration fails.
On migrating a directory to an existing file system (NSS, NCP volume, or Linux POSIX volume), there are access rights set on the target location that can be inherited by the folder and its contents after migration (either the trustees and trustee rights in the case of NSS and NCP, or the ACLs (access control lists) for Linux POSIX). You must modify the settings as needed to ensure that the files are available only to authorized users before you allow users to access the data in the new location.
In the tree, you cannot expand volumes or folders that are copied to the tree.
For explanation on different tasks that can be performed in the Volume Information tab, refer to the table below, else proceed with default settings to Step 8.
Task
Description
Target Location
After you have selected volumes and folders for migration, you might want to identify the path of the folder or volume moved to the target server.
In the tree, right-click the volume or folder that is selected for migration, then click from the drop-down menu. The tree in the view expands to display the volume or folder that was copied from the source server.
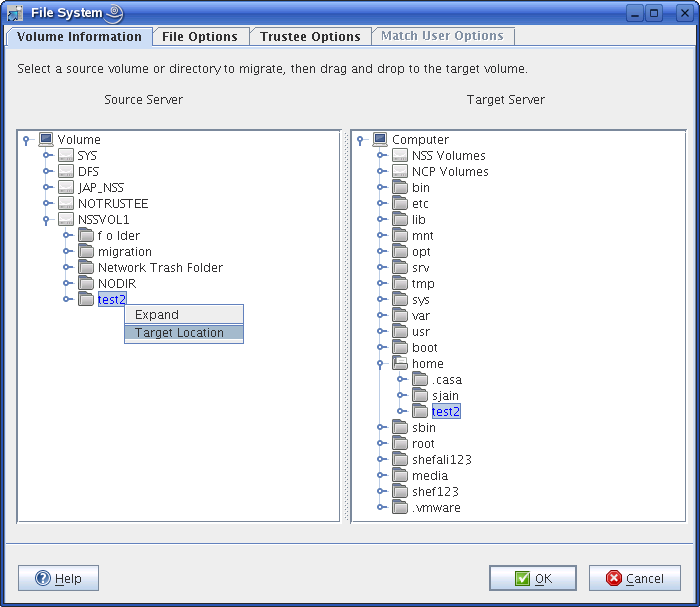
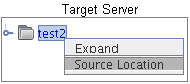
Source Location
After you have selected volumes and folders for migration, you might want to identify the path of the folder or volume moved from the source Server.
In the tree, right-click the volume or folder that is highlighted for migration, then click from the drop-down menu. The tree in the view expands to display the volume or folder that was copied to the .
Volumes or Folders selected for migration
The volumes or folders that are selected for migration are highlighted in blue in the Source Server tree and the Target Server tree.
Removing Volumes or Folders from the Target Server
In the target server tree, right-click the volume or folder that you have decided not to migrate, then select . The folder no longer appears under the target server tree and is no longer a candidate for migration.
Follow Cluster Resource
Select this option to perform uninterrupted migration when cluster resources migrate to different cluster nodes. This option is valid only on the source server clusters.
For example, when a failure occurs on one node of the cluster, the resources are relocated to another node in the cluster. The migration tool connects to the cluster instead of individual server and performs uninterrupted migration during this failure.
If this option is not selected, migration stops when the resource migrates to a different node. When the resource comes up on a different node, run the migration project again, the migration tool ensures that the migration process resumes from the state where it had stopped.
On migrating data to cluster volume on the target server, migration stops when the resource migrates to a different node. To continue migration you must make the resource active on the target server.
-
Click the tab, then click to accept the defaults.
or
Use the options to customize the files and quotas to migrate to the target server, then click to save the settings.
For explanation of the different tasks that can be performed in the File Options page, refer to the Table below.
Task
Description
Duplicate File Resolution
Determines what action to take when a file copied from the source server has the same filename as an existing file on the target server. Specify one of the following resolutions:
-
Always Copy Source File (default): The migrated file always overwrites the existing file.
-
Never Overwrite Existing File: The file from the source server is not migrated, if a file of the same name exists on the target server.
-
Copy if Newer: The migrated file overwrites the existing file on the target server, only if its last modified date is newer than the existing file’s date. This option is applicable only for data migration.
Quotas
This option is applicable only for data migration.
NOTE:If you are migrating to a different file system (NSS to NCP volumes or from NSS to Linux POSIX volumes) on the target server, user quotas and directory quotas are not valid.
-
Exclude User Quotas on Source: The user quotas from the source server are not copied to the target server.
-
Exclude Directory Quotas on Source: The directory quotas from the source server are not copied to the target server.
-
Disable Quota Checks on Target: The user and directory quotas set on the target server are ignored by the migration tool on performing data copy.
File Filters
Determines which files to include for migration. If no filters are set, all files are migrated. You can specify the files that you want to migrate by specifying the date range or you can exclude the files from migrating by specifying the filenames or file extensions.
-
Last Accessed/ Last Modified: The date range to include files for migration.
-
Exclude File(s): The filenames or file extensions to exclude from migration. Wildcards (*) are permitted. For example: *.mp3, *.mov, *.tmp, samplefile.txt,
my sample file.txt.
Specifying *.mp3 excludes all files with an extension of .mp3 from being migrated. Specifying samplefile.txt excludes all samplefile.txt from being migrated.
Home Directory Options
Specify the target server path for the users whose home directory you are migrating from the source server.
For example, If the users’s home directory path on the source server is /media/nss/VOL1/users and the target path where the users will be migrated is /media/nss/VOL2/users, then specify the path in the Home Directory Options as /media/nss/VOL2/users. On successful migration, the home directory of the users is updated with the new target server path.
NOTE:If you are performing migration across multiple volumes, you cannot specify multiple home directory paths.
Sync Options
The option performs synchronization of the target server with the source server. After completion of file system migration, if the source server is updated with new information, you can use the option for synchronizing the servers. The option is available in the main Migration GUI window.
Delete Files Not On Source: During synchronization of the servers, additional files or folders on the target servers are deleted that are not available on the source server.
Delete Trustees Not On Source: This option is enabled only for same tree migration. Set this option to update trustee information on target server when trustees are deleted on the source volume on completion of migration or synchronization. Trustee information that is not on the source server is deleted from the target server.
Copy Trustees Only At The Directory Level: Synchronizes trustees only at the directory level. Trustees for files are not synchronized.
Do Not Copy Trustees: The user rights on the source server folders are not synced to the target server.
Login Options
This option indicates whether you want users to be logged in during the data migration.
Disable Login On Source: If you disable user login, the users cannot log in to the network and modify the open files during the file copy. Users already logged in to the source server are not logged out, but no new logins are allowed until the migration completes.
-
-
Click the tab, then click to accept the defaults and migrate the trustee rights of users and groups on the source server to target server.
or
Use the options to customize the files trustee options to migrate to the target server, then click to save the settings.
For explanation on different tasks that can be performed in the tab, refer to the table below.
NOTE:In the Same Tree scenario, the tab is disabled.
Task
Description
Trustee Migration
Specify an option to migrate trustee rights of users and groups from the source server to the target server.
-
Do Not Migrate Trustees (default): The user rights to the access folder on the source server are not migrated to the target server.
-
Flatten Trustees: The users on the source server are migrated to a selected context on the target server, irrespective of whether the users are in a different context on the source server.
-
Target Context to flatten the users: Select the context on the target server to migrate all the users.
-
-
Custom User Mapping: Users on the source volume are mapped with the users on the target server. When you select this option, the tab is enabled, which enables you to select the users from the source server or the target server, and then assign migration options.
-
Search Context to map users: Select the context on the target server to match the users.
-
Existing User Options
A username on the source server has a corresponding username on the target server. You can overwrite the trustee details of the user on the target server, or ignore the user.
-
Ignore All: Do not create users on the target server.
-
Overwrite All: Overwrite the users on the target server.
New User Options
Specify the global password for the new users created on the target server.
eDirectory Password: Specify the password for the users to use, when they log in for the first time on the target server.
IMPORTANT:If password restrictions are set for users on the source tree, you must specify a default password, else migrating users in a different tree scenario might fail.
-
-
(Conditional) If the tab is enabled, click it, then continue with Step 10.a to specify which users to migrate and how to handle the migration if the user already exists on the target server.
or
If the tab is not enabled, click to save your file system migration setup and return to the main Migration Tool window then continue with Step 12.
-
To view the list of users on the source server and target server, click , then select how to handle the users.
NOTE:In a migration project, if you select multiple volumes for migration that are associated with same users, then on mapping users the source displays duplicate user list.
-
Existing or Mapped Users: A username on the source server has a corresponding username on the target server. If the users are mapped, only the trustee details are migrated.
-
New Users: Users do not exist on the target server. Create new users on the target server, or ignore the users.
-
-
This is a global setting for all the users. Specify one of the following options to migrate users or ignore users.
-
Ignore All: Do not migrate the new users. Only existing users are migrated to the target server.
-
Create All: Create all users on the target server.
-
-
(Optional) To specify settings for individuals and groups that override the global handling of user migration, click the username, then assign one of the migration options from the drop-down menu:
-
Create: Create users on the target server and assign the trustee rights.
The users are created on the target server that is using the same FDN as the source server. The search context is used only to match the source server users to target server users in that context.
-
Ignore: Ignore the user and do not assign the trustee rights of the source user.
-
Browse: Assign an equivalent user by browsing the same context or a different context on the target server and assigning trustee rights.
-
-
-
After you have finished configuring the parameters in each tab, click to save your file system migration setup and return to the main Migration window.
-
Click on the main migration window to begin the migration.
The log files for the file system are located at /var/opt/novell/migration/<project name>/log. Following log files are created during file system migration:
filesystem.log: This stores the information about the command sequence and errors encountered during migration.
filesystem.success.log: This stores the list of all successfully migrated files.
filesystem.delete.log: This stores list of files deleted from the target server which are not available on the source server when performing sync. This log file is updated with list of deleted files, if you have selected the option in the tab.