7.1 Using the Java Management Console to Manage DHCP (OES Linux)
This section provides details on using the Java Management Console for DHCP (OES Linux) to manage objects in eDirectory.
IMPORTANT:Make a forced exit from Java Management console if you observe any of the following three scenarios:
-
Unable to reach eDirectory after establishing a connection.
-
If there is any network interruption.
-
Viewing of leases takes more time than usual.
7.1.1 Installing Java Management Console
Install the Java Management Console on client computers to administer DNS and DHCP services.
Installing Java Console on Windows
-
Download Java Console for windows from the Client Software Link in the welcome page.
The filename for 32-bit Windows is DNSDHCP_SA.zip and for 64-bit Windows is DNSDHCP_SA-x64.zip.
NOTE:You can view the Welcome Page by using http://IP_or_DNS/welcome to access the server.
-
After downloading the required file, extract or unzip the files.
-
For 32-bit windows, run from the extracted files. Follow the on-screen instructions. The InstallShield guides you through the rest of the setup process.
For 64-bit windows, launch Java Console using the DNSDHCP.exe file in the unzipped folder.
NOTE:Java Console is not supported on Windows XP SP3 64-bit platform.
IMPORTANT:Java Runtime Environment (JRE 1.5 or later) is required for running Java Console on Windows. Download JRE from the web if it is not available on your Windows.
Installing Java Console on Linux
-
Download Java Console for Linux appropriately from the Client Software Link in the welcome page.
The zip file name for 32-bit linux is dnsdhcp-jc-i586.tar.gz and for 64-bit linux is dhsdhcp-jc-x86_64.tar.gz
-
After downloading the required file, untar these files using the tar -xzvf <filename> command.
-
The appropriate RPMs for these files are untarred. The 32-bit RPM is novell-dnsdhcp-jc-1.0.1-0.6.i586.rpm and the 64-bit RPM is novell-dnsdhcp-jc-1.0.1-0.6.x86_64.rpm.
-
Install the Java Console with the rpm -ivh <rpm name> command.
Starting Java Console
Starting the Console on Windows:
Double-click the ![]() icon on the desktop or click >> > to launch the login window.
icon on the desktop or click >> > to launch the login window.
Starting the Console on Linux (Gnome):
In Gnome, double-click the ![]() in > > to launch the login window.
in > > to launch the login window.
Starting the Console on Linux (KDE): In KDE, double-click the icon in .
Logging in to Java Console
-
Launch the Java Console login window. The following window is displayed for Windows:
A similar login window is displayed for Linux.
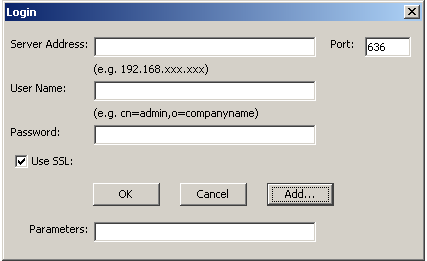
-
Specify the IP address of the server in the field.
-
Specify the and to log in to this server.
-
For a secured login, select the check box.
-
(Optional) Click to specify the command line options in the field.
Command Line Options
The following are the command line options that can be specified while launching the Java Management console:
Table 7-1 Command Line Options
|
Option |
Use |
|---|---|
|
-c |
Specifies the context in which the DNS/DHCP locator object is present. When you use this option, you can eliminate the search for the DNS/DHCP Locator object and obtain a quicker startup for the DNS/DHCP Java Management Console. For example, if the context in which the locator object is present is ou=wgp,o=novell, then using -c option you can specify the following: -c ou=wgp,o=novell. -c ou=wgp,o=novell The -c option is used to specify the netware tree context in which the locator object is present. |
|
-s |
Limits the administrative scope of the DNS Java Management console. If you manage only objects under the ctp.novell context, you can set the option as –s ctp.novell and launch the Management Console. With this option set, you can view only those DNS objects that are under the ctp.novell eDirectory context. Using this option might improve the server performance because not all DNS objects are read. If you do not set this option, all the DNS objects in the tree are displayed. |
|
-l |
Specifies the Locator context. The -l option is used to specify the linux tree context in which locator object is present. For example, if the context in which the locator object is present is ou=wgp,o=novell, then using -l option you can specify the following: -l ou=wgp,o=novell. -l ou=wgp,o=novell |
|
-p |
Specifies the Port. |
7.1.2 Service Management
The Service object acts as a container object for subnet, shared network, host, zone, class, and TSIG key.
To create a service
-
Click the tab of Java Management Console window main panel.
-
Click
 on the toolbar to open the window.
-
Select in the , then click . The Create Service window opens.
-
Specify the .
-
Specify the eDirectory context or use the browse button to select the context.
-
Select the default DHCP server from the drop-down list.
-
Click . The DHCP (OES Linux) Service object is created on the left pane of Java Management Console.
You can manage the DHCP (OES Linux) Service on the right pane of the Java Management Console by using the , , and tabs.
For more information on managing objects, see Section 7.1.13, Managing DHCP (OES Linux) Objects in the Java Management Console.
7.1.3 Server Management
The Dynamic Host Configuration Protocol (DHCP) uses the client/server structure to allocate network addresses to a host. The DHCP server reads its configuration information from eDirectory and stores the information in its cache.
To create a server
-
Click tab of the Java Management Console.
-
Click
on the toolbar to open the window.
-
Select in the window, then click . The Create Server window opens.
-
Specify the server name.
-
Specify the eDirectory context or browse to select the context.
-
Click .
The server is now created and added to the list.
You can manage the DHCP (OES Linux) server on the right pane of the Java Management Console by using the and tabs.
For more information on managing objects, see Section 7.1.13, Managing DHCP (OES Linux) Objects in the Java Management Console.
7.1.4 Starting or Stopping a DHCP Server
-
Click Start/Stop Service
 on the toolbar.
Depending on the state of the DHCP Server, one of the following operations occurs:
-
Start action: If the DHCP Server is in Stop mode, the Server is started.
-
Stop action: If the DHCP Server is in Start mode, the Server is stopped.
You must ensure that you have configured the IP address of a DHCP server to start or stop the server. To configure the IP address of the DHCP server, select the tab of the server object, then click to specify the IP address.
7.1.5 Shared Network Management
All subnets that share the same physical network can be grouped under a Shared Network object.
To create a shared network object:
-
Click the tab of the Java Management Console.
-
Select the service for which the shared network needs to be created.
-
Click
on the toolbar to open the window.
-
Select from the , then click .The Create Shared Network window opens.
-
Specify the name of the Shared Network object.
-
Click .The Shared Network is now created.
You can manage the DHCP (OES Linux) Shared Network on the right pane of the Java Management Console by using the , , and tabs.
For more information on managing objects, see Section 7.1.13, Managing DHCP (OES Linux) Objects in the Java Management Console.
7.1.6 Subnet Management
The Subnet object is the most fundamental DHCP object. It enables you to distribute IP addresses and DHCP options to each network.
The Subnet object acts as a container object for Host and Pool objects.
A Subnet object's specific DHCP options and configuration parameters apply to the entire subnet and override global options.
To create a Subnet
-
Click the tab of the Java Management Console.
-
Select the shared network or the service for which the subnet needs to be created.
-
Click
on the toolbar to open the window.
-
Select from the window, then click OK.
-
Specify a unique and in the fields provided.
-
Click .
The Subnet is created.
You can manage the DHCP (OES Linux) Subnet on the right pane of the Java Management Console by using the , , , tabs.
For more information on managing objects, see Section 7.1.13, Managing DHCP (OES Linux) Objects in the Java Management Console.
7.1.7 Pool Management
A Pool is a designated range of IP addresses used to specify a range type assignment.
The Pool object represents a range of addresses for dynamic address assignment or for exclusion from the address assignment.
To create a Pool
-
Click the tab of the Java Management Console.
-
Select a service or a shared network from the list where you want to create a pool. All of the subnets created under the service and the service or shared network hierarchy are displayed. Select the subnet under which you want to create the pool.
-
Click
on the toolbar to open the window.
-
Select pool from the window, then click . The Create Pool window opens.
-
Specify the name of the pool.
-
Specify the .
-
Specify the .
-
Click .
The pool is created.
You can manage the DHCP (OES Linux) Pool on the right pane of the Java Management Console by using the , , tabs.
For more information on managing objects, see Section 7.1.13, Managing DHCP (OES Linux) Objects in the Java Management Console.
7.1.8 Host Management
Hosts are a system of domain names in the network. They are used to identify DHCP clients. Host objects have an associated IP address.
For clients with statically assigned addresses or for installation where only known clients are served, each client must have a host.
Creating a Host
-
Click the tab of the Java Management Console.
-
Select the service or the subnet where you want to create the host.
-
Click
on the toolbar to open the window.
-
Select host from the window, then click . The Create Host window opens.
-
Specify the name by which you want to identify the host in the field.
-
Specify the IP address of the host in the field.
-
Specify the client identifier. This uniquely identifies the client.
-
Select the MAC type from the drop-down list.
-
Specify the hardware address of the NIC (Network Interface Card) in thefield.
-
Click . The host is now created below the required service.
You can manage the DHCP (OES Linux) host on the right pane of the Java Management Console by using the , , , and tabs.
For more information on managing objects, see Section 7.1.13, Managing DHCP (OES Linux) Objects in the Java Management Console.
7.1.9 Class Management
The Class object helps in segregating clients into classes. These clients are treated differently depending on the class they are in.
To create a Class
-
Click the tab of the Java Management Console.
-
Select the service for which the class needs to be created.
-
Click
on the toolbar to open the window.
-
Select from the window, then click . The Create Class window opens.
-
Specify the name of the class in the field.
-
Click .
The Class is created for the specified Service.
You can manage the DHCP (OES Linux) Class on the right pane of the Java Management Console by using the , , and tabs.
For more information on managing objects, see Section 7.1.13, Managing DHCP (OES Linux) Objects in the Java Management Console.
7.1.10 Zone Management
The DHCP Zone object defines the Domain Name System (DNS).
A DHCP server uses this information to perform dynamic updates for the zone objects. A DNS server must be configured to allow updates for the zone that the DHCP server is updating.
To create a Zone
-
Click the tab of the Java Management Console.
-
Select the service for which the Zone needs to be created.
-
Click
on the toolbar. The window opens.
-
Select the zone from the window, then click . The Create Zone window opens.
-
Specify the name of the zone in the field.
-
In the field, specify the IP address of the DNS server that will receive updates from an authorized DHCP server.
-
Click .
The zone is created for the specified service.
You can manage the DHCP (OES Linux) zone on the right pane of the Java Management Console by using the tab.
For more information on managing objects, see Section 7.1.13, Managing DHCP (OES Linux) Objects in the Java Management Console.
7.1.11 TSIG Key Management
TSIG key can be used to secure DDNS updates between DNS and DHCP servers. For a successful secure DDNS update between DNS and DHCP servers, you must ensure the following:
-
Zones (both forward and reverse) are assigned TSIG key.
-
Both DNS and DHCP key name and it's secret must be the same.
Creating a TSIG key
-
Click the tab of the Java Management Console.
-
Select the service for which the TSIG key needs to be created.
-
Click
on the toolbar. The window opens.
-
Select from the window, then click . The Create TSIG Key window opens.
-
Specify the name of the TSIG key in the field.
-
Specify the name of the algorithm in the field.
-
Specify the .
NOTE:The number of characters in the secret key must be in multiples of 4.
-
Click .
The TSIG key is now created below the specified service.
You can manage the DHCP (OES Linux) TSIG key on the right pane of the Java Management Console by using the tab.
For more information on managing objects, see Section 7.1.13, Managing DHCP (OES Linux) Objects in the Java Management Console.
7.1.12 Failover Peer Management
The Failover Peer protocol allows only two DHCP servers to share a common address pool. This ensures continuous availability. The process defines a role of a Primary Server and a Secondary Server.
Each server has about half of the available IP addresses in the Pool at any given time for allocation. During a prolonged failure of the primary server, the secondary server recovers all the addresses that the primary server had available for allocation, and begins to reuse them.
Creating a Failover Peer
-
Click the tab of the Java Management Console.
-
Create a To create a service. For example, myService1. Assign the service to one of the two DHCP servers in the tree.
-
Create a second Service. For example, myService2. Assign the service to the second DHCP server in the tree.
-
Create two identical subnets (one for each Service) To create a Subnet. When you create a subnet, a drop-down menu allows you to select the service to be assigned to the each subnet.
-
Create two identical pools (one under each Subnet) To create a Pool. When creating the pool, select the appropriate service.
-
Create a Failover object under each service. The name of the Failover object under each service must be identical. For example, if a failover object named FailOver1 is created under service DHCPService1, then under DHCPService2, the failover object created should also be named as FailOver1. If the failover object names are not identical, DHCP server will fail to start.
The same port can be used for the primary and secondary servers. As the RFC does not currently specify a reserved port for DHCP Failover Peer setups, specify the port(s) of your choice that is unused
-
On the left pane of the Java Management Console, select the Service for which you want to create the Failover.
-
Click
on the toolbar. The window opens.
-
Select , then click .
-
Specify a name to identify the Failover.
-
Specify the .
-
Specify the port number of the primary server in the field.
-
Specify the .
-
Specify the port number of the secondary server in the field.
-
Specify the . This is the length of time for which a lease may be renewed by either server without contacting the other. (Specify this on the Primary Server; it cannot be specified on the Secondary Server).
-
Specify the Failover Split. This specifies the split between the Primary and Secondary Servers for the purpose of load balancing.
-
Click . The Failover Peer is now created.
-
-
Edit each pool involved in the failover and choose the Failover Peer from the drop down list.
-
Restart DHCP and monitor /var/log/message for any errors.
Managing a Failover Peer
You can manage the Failover Peer by using the tab in the right pane of the Java Management Console:
-
Primary Server IP Address: Modify the primary server IP Address appropriately if required.
-
Primary Port: Modify the port number of the primary Server if required.
-
Secondary Server IP Address: Modify the secondary server IP Address appropriately if required.
-
Secondary Port: Modify the port number of the secondary server if required.
-
Failover Split: Specify the split between the primary and secondary for the purpose of load balancing.
-
Max Client Lead Time: The length of time for which a lease can be renewed by either server without contacting the other. (Specify this on the primary; and it cannot be specified on the secondary).
-
Unacked Updates: Notifies the primary server of the number of messages it can send before it receives from the Failover secondary server.
-
Response Delay: Refers to the amount of information that needs to be processed.
-
Load Balance Time: Refers to the time (seconds) set so that if one of the failover peers is in a state where it responds to the failover messages but does not respond to some client requests, the other failover peer takes over its client load automatically as the clients retry.
-
Comments: Specify comments if any.
7.1.13 Managing DHCP (OES Linux) Objects in the Java Management Console
You can manage the DHCP (OES Linux) objects by using the tabs on the right pane of the Java Management Console. The following description provide more information about the tabs:
General Tab
Use the tab to select the preferred Server object and add comments for the DHCP (OES Linux) object. This tab must be used to manage a Service.
-
Select a server from the default drop-down list. The selected server is now associated with the service.
-
Type your comments about the service in the field.
-
Click to save the settings.
Settings Tab
These settings are used to define the configuration for an object.
To add or modify a setting:
-
Click . The Modify DHCP Settings dialog box opens.
-
Select a setting from the list.
-
Click . To add the entire list, Click .
-
Click to add the settings.
To remove setting name:
-
Select the setting from the list, then click .
or
To remove all the settings, click .
To delete a setting:
-
Select the setting from the list, then click .
or
To remove multiple settings, use Ctrl+Shift to select the settings you want to remove, then click .
Configured Options Tab
You can define values for the predefined options that are declared in the list.For example,is a predefined option in the list. Use the task to set a value for the option.
To add a configured option:
-
Click . The Modify DHCP Options dialog box is displayed.
-
Select an option from the list.
-
Click .To add the entire list, Click .
-
Click .
To remove a setting:
-
Select the option from the list, then click .
or
To remove all the options, click .
To delete a setting:
-
To delete an option, select the option from the list, then click .
or
To remove multiple options, use Ctrl+Shift to select the options you want to remove, then click .
Lease Type Tab
The Lease Type specifies the length of time for an address assignment. A lease type can be either permanent or timed. This tab must be used to manage the subnet and host objects.
Permanent leases never expire; the client is assigned an IP address for an indefinite period.
Timed leases are defined in days, hours, or minutes. Timed leases expire, unless the client renews the lease.
Set Boot Parameter Option
Select this option to specify the , , and for the BOOTP service. This information is provided at boot time. If the option is selected, you need to specify the entire boot sequence.
IP Address Utilization Tab
The tab displays the details for IP addresses in a subnet or a pool.
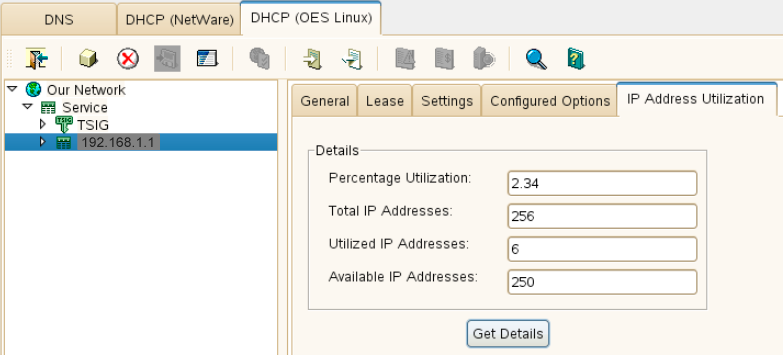
-
Percentage Utilization: The IP addresses that are in use as a percentage of the total IP addresses available in the subnet or pool.This value is equal to (Utilized IP Addresses / Total IP Addresses) * 100.
-
Total IP Addresses: The total number of IP addresses available in the subnet or pool, including the subnet or pool start and end addresses.
-
Utilized IP Addresses: The number of IP addresses that are currently assigned to static hosts and dynamic hosts from this subnet. Or, for a pool, the number of IP addresses that are currently assigned to dynamic hosts.
-
Available IP Addresses: The total number of IP addresses that are currently available for assignment in the network.This value is equal to (Total IP Addresses - Utilized IP Addresses).
You can view the details either by selecting a particular subnet or by selecting a server object which serves one or more subnets.
To determine the utilization of the IP addresses of a subnet
-
In the DHCP (OES Linux) tab, select the subnet for which you want the utilization details.
-
In the Subnet property pages, click the tab.
-
Click to view the IP address utilization details of the subnet.
To determine the IP address utilization of the subnets serviced by a particular DHCP server
-
In the tab, select the appropriate DHCP server.
-
On the DHCP server property page, click the tab.
-
From the subnets displayed under the , select one or more subnets to view the IP address utilization details:
-
Select the Select All option to view the details for all of the subnets or select Clear All option to clear the selection.
-
Check the following boxes to view only those subnets whose percentage utilization is more than or less than a particular value:
-
Show only subnets with percentage utilization more than
-
Show only subnets with percentage utilization less than
When the option is selected and a value is configured, only those subnets whose percentage utilization is more than or less than the configured value are displayed.
-
-
-
Click .
The IP address utilization details of the selected subnets are displayed.
You must wait for the complete details of all subnets to be loaded into the table. The status bar displays when the complete subnet details are loaded.
The details of the summarized utilization are also displayed. The summary details are sum of the values of all the subnets (except the percentage utilization).
-
Click to save the utilization details to a file.
To determine the utilization of the IP addresses of a pool:
-
In the DHCP (OES Linux) tab, select the pool for which you want the utilization details.
-
In the Pool property pages, click the tab.
-
Click to view the IP address utilization details of the pool.
7.1.14 Importing and Exporting the DHCP Configuration
The import or export operation is used to transfer the DHCP service configuration from files into eDirectory or from eDirectory to a text file in a dhcpd.conf format respectively. Only Linux DHCP configuration files should be used to import or export the DHCP configuration.
NOTE:Before importing a DHCP configuration file, check the syntax of the file with the rcnovell-dhcpd check-syntax command. The command reads /etc/dhcpd.conf and checks the syntax.
Importing the DHCP Configuration
The configuration file to import should be in DHCP V3 format. Importing the Linux DHCP configuration file overwrites the associated DNS server's settings.
To import the DHCP files:
-
Click the tab of the Java Management Console.
-
Click
 on the toolbar.
-
Click to select or specify the path for the DHCP database file.
-
Click to open the Import - File Input window.
-
Specify the service name in the text box.
-
In the Select NDS Context text box, browse to select or enter specify the context where the service is to be created.
-
(Optional) Select a from the drop-down list.
-
Click .
-
Click to complete the import operation.
If the import program encounters any error, the button is enabled in the error window. Click to view the error details.
Exporting the DHCP Configuration
The file is exported in a dhcpd.conf format. These files can be imported anywhere and can also be imported back to eDirectory by using the DNS/DHCP Java-based Management Console Utility.
-
Click the tab of the Java Management Console.
-
Click
 on the toolbar to open the window.
-
Specify the name of a destination file or browse to select a filename from the dialog box, then click .
-
Select the services by using the Export DHCP - Service List window.
-
Click to store your information in a file.
-
Click to complete the export.
If the export program encounters any error, the button is enabled in the error window. Click to view the error details.
7.1.15 Viewing Dynamic Leases
A DHCP-enabled client obtains a lease for an IP address from a DHCP server. Before the lease expires, the DHCP server must renew the lease for the client or the client must obtain a new lease.
Configuring steps to view leases
Configure the following parameter to view leases:
-
Configure omapi-key
-
Create a TSIG Key with service object as the container.
-
Select the server object which is associated with the service.
-
Select the tab of the server object.
-
Click . The Modify DHCP Settings dialog box displays. From the list of available settings select omapi-key.
-
From the drop-down, select the new TSIG key and click .
-
-
Configure omapi-port
-
Select the tab of the server object.
-
If omapi-port setting is not added to the server object, select it from the list of available settings and set it to the value of 7911 (Default omapi port or any other port).
-
Make sure that 7911 (or any other port configured as omapi-port) is added in the list of allowed services in firewall.
-
-
Configure DHCP Server IP address
-
Select the tab of the server object.
-
Click .
-
Add the DHCP server IP address in the dialog box.
-
Restart the DHCP Server. You can now view the Active/Abandoned leases under the Pool object, in Java Management Console. The Active leases are blue in color and the Abandoned leases are red in color.
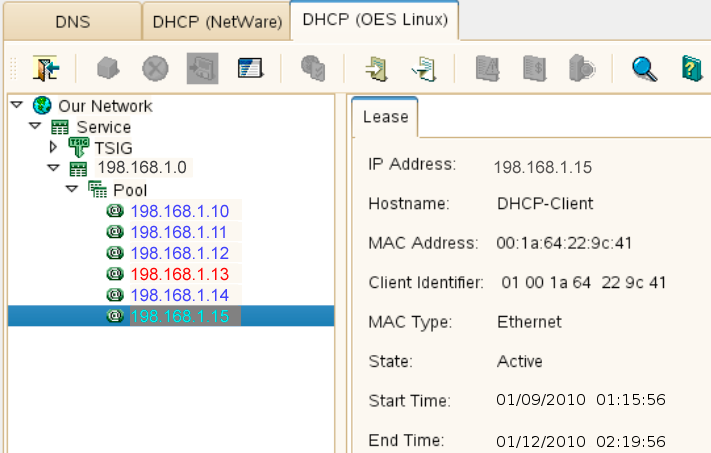
To determine the lease data, select the appropriate IP address of the lease displayed below the pool. The following details are displayed:
-
IP Address: The IP address leased to the client by the DHCP server.
-
Hostname: The hostname of the leased client.
-
MAC Address: The MAC address of the network interface on which the lease is used. It is specified as a series of hexadecimal octets, separated by colons.
-
Client Identifier: An arbitrary value that is used to identify a client instead of the hardware type and client hardware address. The client identifier is recorded as a colon-separated hexadecimal list or as a quoted string.
-
MAC Type: MAC types such as Ethernet, FDDI, and token ring.
-
State: Lists the state of the lease as Active or Abandoned. Active leases are colored blue and the abandoned leases are colored red.
-
Start Time: The date and time when the client lease begins.
-
End Time: The date and time when the lease expires.
NOTE:Lease times are specified in Universal Coordinated Time (UTC).
7.1.16 Deleting Dynamic Leases
-
Click the tab of the Java Management Console.
-
Under the pool object, select the lease that you want to delete.
-
Click the Delete
 button.
-
Click to confirm the deletion.
-
Release the lease from the client machine:
On Windows: # ipconfig /release
On Linux: # ifconfig eth0 down