16.2 Creating a Pool
-
In iManager, click .
For instructions, see Section 10.1.5, Accessing Roles and Tasks in iManager.
-
Select a server to manage.
For instructions, see Section 10.1.6, Selecting a Server to Manage.
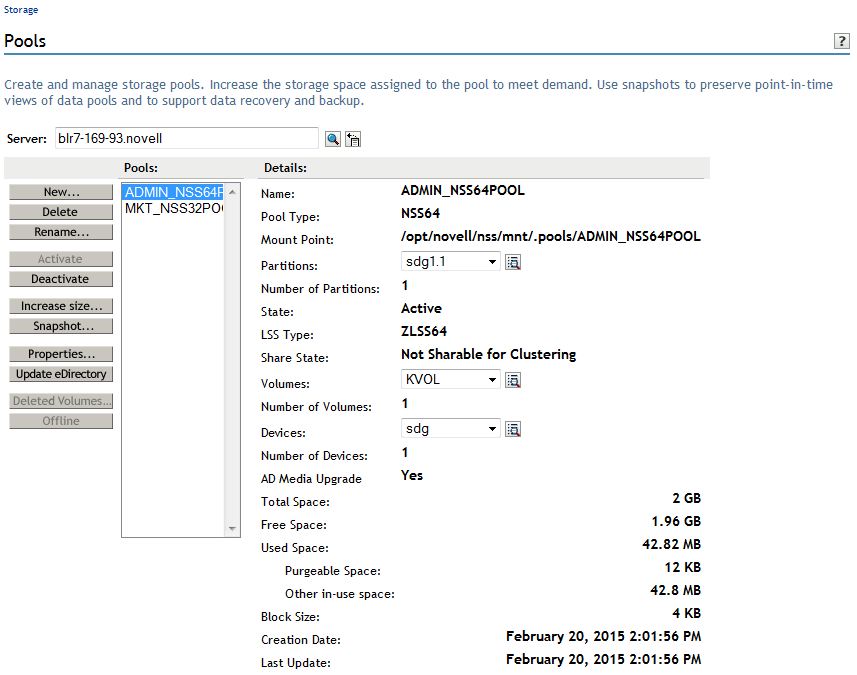
A list of pools appears in the list.
-
To create a new pool, click .
The New Pool Wizard opens to guide you through the process.
-
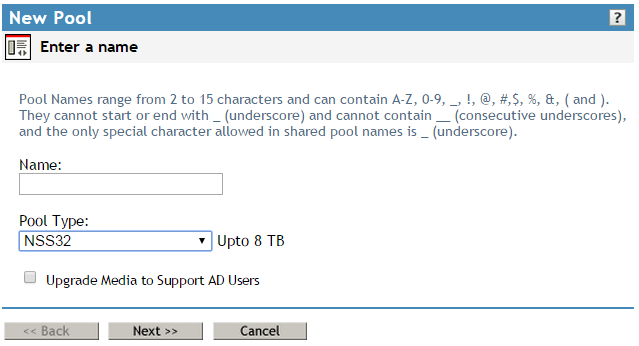
Specify a name for the new storage pool, pool type, then click .
NSS supports two types of pools: NSS32 and NSS64. NSS32 bit pools use 32-bit block addressing and supports upto 8 TB of pool size. On the other hand, NSS64 pools use 64-bit block addressing and supports upto 8 EB (exabyte) of pool size. While creating a pool, specify the pool type. If the latest iManager is used to manage OES servers earlier than OES 2015, the Pool Type option would be disabled. All pools prior to OES 2015 use 32-bit block addressing and they are of type NSS32. After you create the desired pool type, you can not change the pool type.
In OES 2015 or later, if you want an NSS32-bit pool to support AD users, select . All NSS64-bit pools are by default AD media upgraded.
For guidelines about naming pools, see Section 6.4, Naming NSS Storage Objects.
In the following example, the device is not shared, so the check box is not displayed.
-
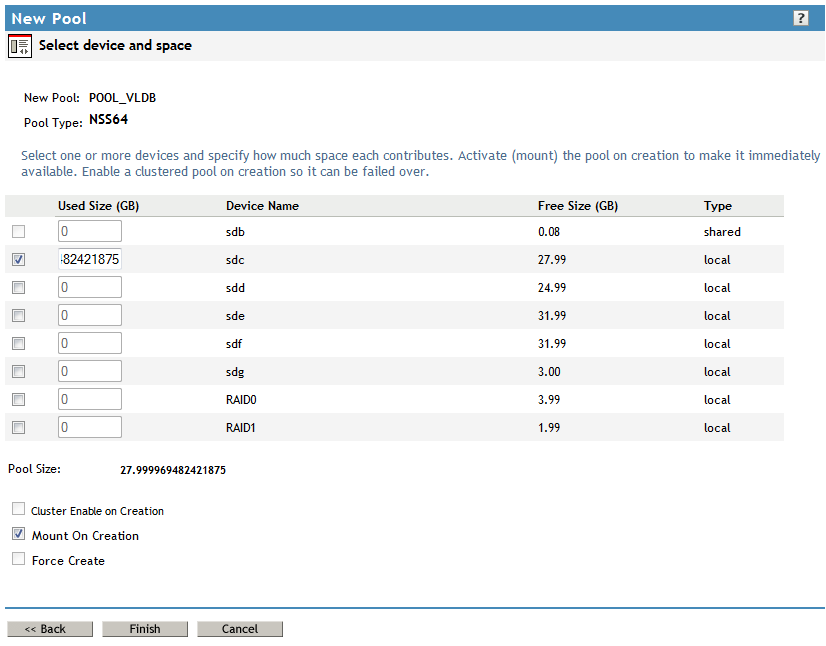
Specify device parameters and the space to use, then click .
-
Select the check box next to one or more of the available devices you want to use in the pool.
-
In , specify the amount of space in megabytes (MB) to add to the pool from each device you selected, up to the amount of free space available for that device.
To update the as you enter the device’s , click anywhere within the Wizard dialog box. If any entry exceeds a device’s available space, the pool expansion fails and returns an error message. When expanding a pool, the devices that have at least 1 MB of free space is displayed in the list because NSS pools can only be expanded on a MB boundary.
The pool can be up to 8 TB.
You can obtain space from one or more of the devices listed. Only devices that have free space appear in the list. If no devices are listed, it might be because you need to initialize a recently added device, or it might be that there is no space available on any devices. Cancel the Wizard, add more devices to the server or free up space on existing devices, then return to the page to increase the size of this pool.
-
Select ( for Linux) to activate (mount) the device automatically after it is created.
This parameter is automatically enabled. Deselect the check box to turn it off.
-
If the selected device is shareable, the check box is automatically selected so the pool can be shared in a cluster configuration. Deselect the check box if you do not want to cluster-enable this pool for sharing.

-
If the pool is cluster-enabled, click to specify its cluster parameters. Otherwise, skip ahead to Step 7.
-
Select , when you are creating a shared cluster pool that is media upgraded to support AD users, all cluster nodes from where the pool may be accessed must be upgraded to OES 2015 or later. If you have a mixed cluster node environment, where all your cluster nodes are not on OES 2015 or later, select the Force Create check box to force the pool creation. This shared cluster pool cannot be loaded on nodes earlier than OES 2015.
IMPORTANT:If all nodes in the cluster are not upgraded to OES 2015 or later, the pool will not load in cluster nodes older than OES 2015. As a workaround, configure preferred nodes for each media-upgraded cluster resource so that these resources load on OES 2015 or later nodes. For more information on
Configuring Preferred Nodes and Node Failover Order for a Resource
, see the OES 2015 SP1: Novell Cluster Services for Linux Administration Guide.
-
-
If the check box is selected, an additional page appears that allows you to specify the cluster information.

Specify the following shared pool clustering parameters:
-
NCP Virtual Server Name: The name assigned to the virtual server that represents the shared pool in the cluster.
When you cluster-enable a pool, a virtual Server object is automatically created in NetIQ eDirectory and given the name of the Cluster object plus the name of the cluster-enabled pool. For example, if the cluster name is cluster1 and the cluster-enabled pool name is pool1, then the default virtual server name will be cluster1_pool1_server. You can edit the field to change the default virtual server name.
-
CIFS Virtual Server Name: The name assigned to the virtual server for handling CIFS (Common Internet File System) requests. This is the name of the server as it appears in a Windows system. For CIFS Virtual Server Name, the maximum supported character length is 15.
NOTE:If the NCP Virtual Server Name is less than or equal to 15 characters and CIFS check-box is enabled under the , the CIFS Virtual Server Name is auto-populated with the same name as NCP Virtual Server Name. You can edit the field to change the CIFS virtual server name.
-
IP Address: The IP address that you want to assign the virtual server.
Each cluster-enabled NSS pool requires its own IP address. The IP address is used to provide access and failover capability to the cluster-enabled pool (virtual server). The IP address you assign to the pool remains assigned to the pool regardless of which server in the cluster is accessing the pool.
IMPORTANT:The IP address for the virtual server must be in the same IP subnet as the server nodes in the cluster where you plan to use it.
To specify an IP address, tab between the different entries; no dot is required in the fields. For example, if the IP address is 192.168.1.1, type the following:
192 168 1 1
-
Advertising Protocols: Protocols that give users native file access to data.
Specify one or more advertising protocols by selecting the check boxes of the protocols you want to enable for data requests to this shared pool.
NOTE:For OES 2 and earlier, Novell CIFS and Novell AFP are not available. CIFS and AFP check boxes can be selected, but CIFS and AFP functionality does not apply to Linux. Selecting the check boxes has no effect.
-
NetWare Core Protocol (NCP) is the Novell networking protocol used by the Novell Client. It is selected by default. Selecting NCP causes commands to be added to the pool-resource load and unload scripts to activate the NCP protocol on the cluster. This lets you ensure that the cluster-enabled pool you are creating is highly available to Novell clients.
-
CIFS is the Windows networking protocol. Selecting CIFS causes commands to be added to the pool-resource load and unload scripts to activate the CIFS protocol on the cluster. This lets you ensure that the cluster-enabled pool you are creating is highly available to CIFS/Samba clients.
-
Apple Filing Protocol (AFP) is the Macintosh networking protocol. Selecting AFP causes commands to be added to the pool-resource load and unload scripts to activate the AFP protocol on the cluster. This lets you ensure that the cluster-enabled pool you are creating is highly available to AFP clients.
-
-
-
Click .
For NSS, the create time might take longer than expected. Typically, the pool creation takes less than a minute, and the volume creation takes less than 10 seconds. However, if you have a large tree or the server does not hold an eDirectory replica, the create time can take up to 3 minutes.
-
Create a volume on the pool. For information, see Section 19.3, Creating Unencrypted NSS Volumes or Section 20.3, Creating an Encrypted Volume.