5.6 Meeting the Installation Requirements
Before you start the process of installation, ensure you have met the following prerequisites. These steps can be used to validate the state of the system before beginning the installation process.
5.6.2 Installation Prerequisites For a Non-Name-Mapped Setup
Domain Name and Name Server Configuration is Correct
Before installing DSfW, ensure the domain name is entered correctly in YaST. To verify and correct the domain name, do the following:
-
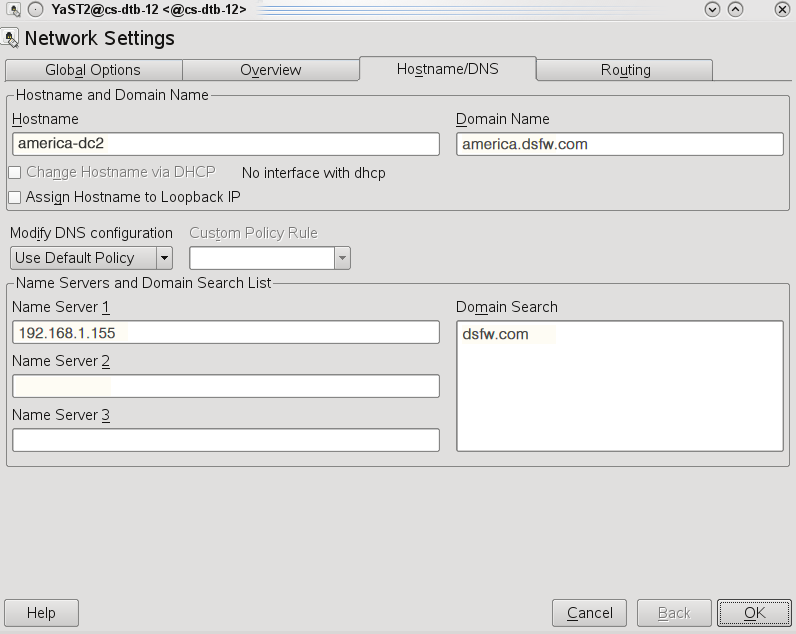
Open . Select the tab.
NOTE:You must ensure that the hostname in the properties of the active ethernet controller is a FQDN. For example, if the hostname in the tab is dsfw-dc1 and domain name is dsfw.com, then the hostname of the active ethernet controller must be dsfw-dc1.dsfw.com. You can modify the hostname of the active ethernet controller by using the option in the tab.
-
Verify that the domain name is correct.
-
Ensure that you follow the guidelines given below to configure the name server on a DSfW domain controller:
-
While configuring the forest root domain, for DNS name resolution during installation, the name server must point to a valid DNS server. After the DSfW server is configured successfully, the forest root domain controller will always act as the DNS server for the first DSfW domain. To ensure that the forest root domain DNS sever resolves other existing domains in your environment, complete the necessary forwarder settings.
-
To configure the subsequent DSfW domain controllers or DSfW domains, the entry must point to the forest root domain's IP address.
-
If the existing DNS infrastructure is running on OES DNS server and the zone for the DSfW domain being configured is already existing, the DSfW configuration has the built-in capability to extend the existing zone. Ensure that the correct DNS-DHCP locater object is specified during DSfW configuration in YaST. For more information, see Step 17.
IMPORTANT:In case of installation of a child domain, make sure you specify the name of the parent domain in the field for resolving hostnames.
-
-
Click to save the changes.
DNS Server is Installed
In a default configuration, there is only one DNS server in a DSfW forest which is the first domain controller of the first DSfW domain. You must ensure that the DNS configuration (/etc/resolv.conf) of all domain controllers in all domains of a DSfW forest point to this DNS server. This applies to all workstations or member servers joined to any DSfW domain.
To split the DNS information across a domain, you must do the following:
-
For every DSfW domain that is configured, specify one or more domain controllers of a given domain to host the DNS server.
-
Ensure that all the workstation or domain servers joined to a particular domain point to one of the DNS servers hosting the domain.
-
After the DNS information is split, verify that any name or address resolution to all domains of a DSfW forest works fine. To verify this, you must set up two-way forwarders between the DSfW domains.
Time is Synchronized
Ensure time is synchronized between all servers in the replica ring by executing the following command:
ndscheck -a <bind dn> -w <password>
This command in addition to displaying partition and replica health also displays time difference between servers in the replica ring. If you observe a time difference between the server, ensure that all the servers in the replica ring are referencing the same NTP server. After this is done, restart the NTP server by using the rcntp restart command.
Server State in the Replica Ring
Verify that the state of the servers in the replica ring is On by executing the following command:
ndsstat -r
The ndsstat utility displays information related to eDirectory servers, such as the eDirectory tree name, the fully distinguished server name, and the eDirectory version.