5.6 Channel Upgrade from OES 2018 SP1 to OES 2018 SP2
IMPORTANT:Stop OES Cluster service (NCS) on the node that is getting upgraded before proceeding with Channel Upgrade.
5.6.1 Channel Upgrade from OES 2018 SP1 to OES 2018 SP2 Via Wagon
-
Register the OES 2018 SP1 server with NCC using the following command:
suse_register -a email=<Email-Address> -a regcode-oes=<OES-activation-key> -L /root/.suse_register.log
-
Run the zypper lr command to ensure that OES2018-SP1-Pool, OES2018-SP1-Updates, OES2018-SP1-SLES12-SP3-Pool, OES2018-SP1-SLES12-SP3-Updates, OES2018-SP1-SLEModule-Containers12-Pool, and OES2018-SP1-SLEModule-Containers12-Updates catalogs are subscribed and enabled.
-
Apply all the available patches either using zypper update -t patch or yast2 online_update. In the list of available patches, ensure that the Enable update to Open Enterprise Server 2018 Service Pack 2 is selected. If this patch is not installed, you cannot proceed with the upgrade.
NOTE:If the patching requires a server reboot, do so when notified by the system.
-
Start the wagon upgrade module using the yast2 wagon command.
-
On the welcome screen, click .
-
In Registration Check screen, click if the “System not Registered” warning is displayed.
-
The Run Registration redirects to the NCC screen and click Wagon does a sync and pops up a message stating that the software repositories need not be changed. This happens as there are no updates at this stage.
-
In the Registration Check screen, ensure that the registration summary displays “Open Enterprise Server 2018 SP1 has a valid registration”. If the valid registration message is displayed, click and it resets the package manager.
-
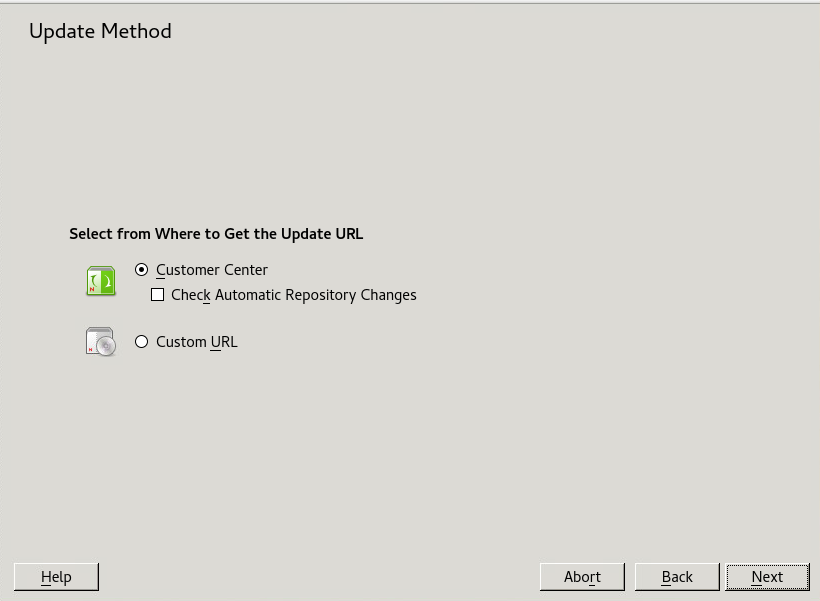
In the Update Method screen, select .
-
The NCC screen is displayed again. Click , and it does a sync and pops up a message stating that the configuration is successful. Click and ensure that the following repositories are enabled as shown in the following figure.
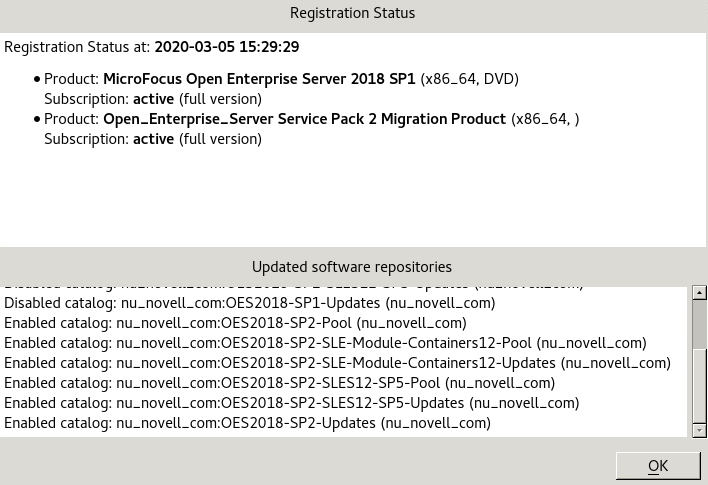
NOTE:If the repositories are not enabled, click t and redo the NCC registration until it is successful. If you are not able to do a successful NCC registration after multiple attempts, abort the process and roll back the server. For more information, see Section 5.6.4, Rolling Back the Server in the Middle of a Wagon-based Channel Upgrade.
-
In the Distribution Upgrade Settings screen, you must see the following content under the section.
-
Temporary migration product Open_Enterprise_Server Service Pack 2 Migration Product (Open_ Enterprise_Server-SP2-migration) will be removed
-
Product Micro Focus Open Enterprise Server 2018 SP1 (Open_Enterprise_Server) will be upgraded to Micro Focus Open Enterprise Server 2018 SP2 (Open_Enterprise_Server)
WARNING:If is not displayed, click and roll back the server.
NOTE:In the following screen shot, the number of packages to be updated may vary based on the patterns selected.
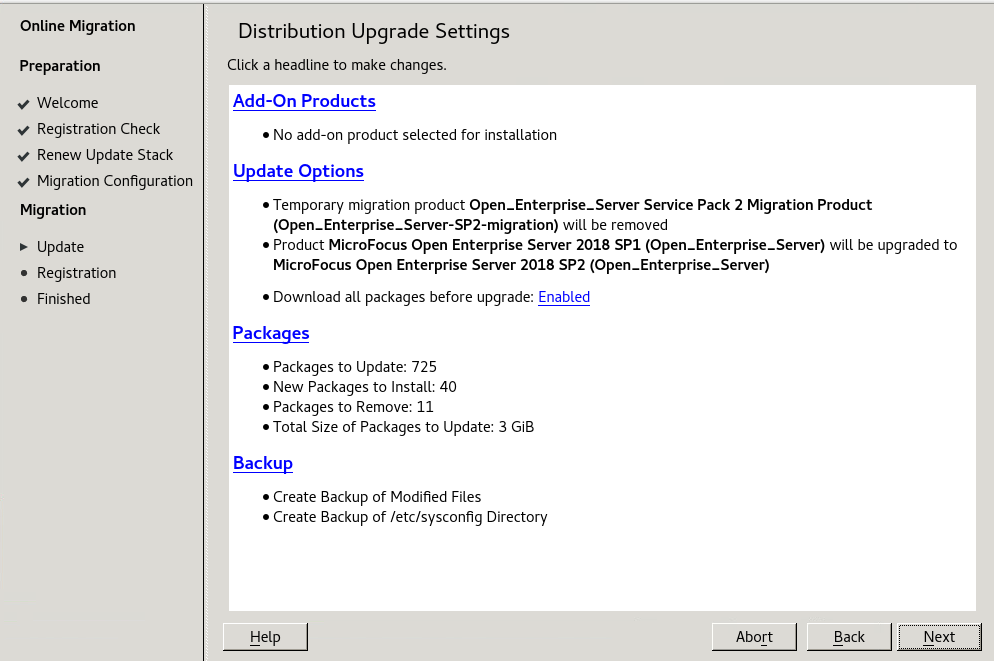
IMPORTANT:After clicking , you cannot revert the server to its old state.
-
-
Click and continue with the upgrade. Once the upgrade is complete, a pop up is displayed informing about a server reboot; click and continue with the upgrade.
-
The NCC screen is displayed once again, wherein the registration of the final product is triggered. Click and at the final success message dialog, click .
-
Reboot the server to get the new kernel.
-
IMPORTANT: After the reboot, log on to the server and run the following command to complete the OES services reconfiguration:
yast2 channel-upgrade-oes
This will prompt for eDirectory or DSfW password if the answer file is not created. Provide the password and continue. For more information on creating the answer file, see Section 5.5.2, Creating an Answer File to Provide the eDirectory and DSfW Passwords.
5.6.4 Rolling Back the Server in the Middle of a Wagon-based Channel Upgrade
After multiple failed attempts to do an NCC registration, follow this procedure to roll back the server to its previous state safely.
-
Click > .
-
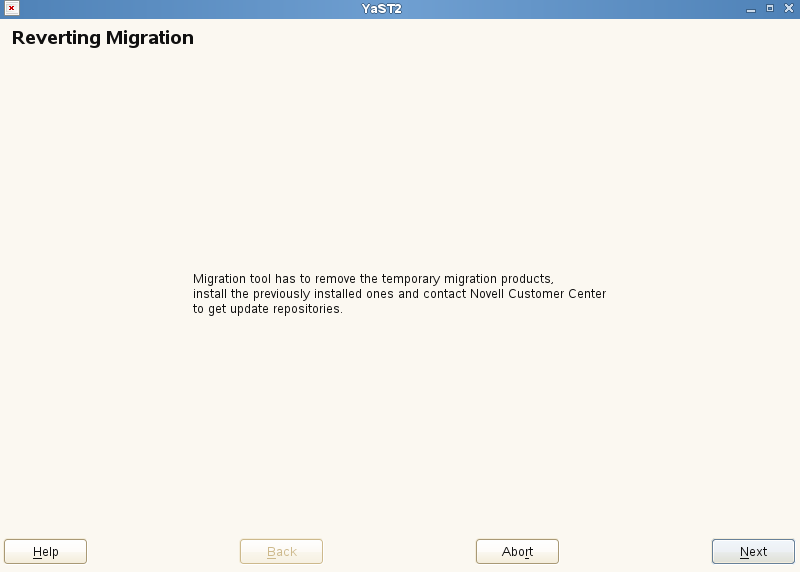
In the Reverting Migration screen, click .
IMPORTANT:Do not click in this screen as it will abort the revert process.
-
In NCC registration screen, click .
-
Follow the screen prompts and complete the revert process.