11.9 Configuring Tomboy Preferences
To modify preferences for Tomboy, right-click the Tomboy icon (
![]() ) on the GNOME panel, then select
. You can configure the following:
) on the GNOME panel, then select
. You can configure the following:
11.9.1 Editing Preferences
The Editing tabbed page lets you set preferences related to editing notes.
Figure 11-4 Tomboy Editing Preferences
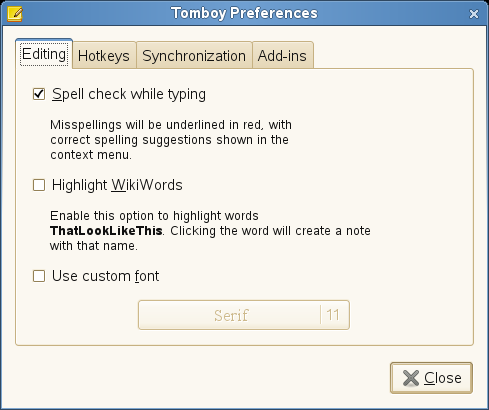
The Editing preferences include the following:
-
Spell check while typing: Underlines misspellings in red, and provides suggestions in the right-click context menu.
-
Highlight WikiWords: Creates links for phrases ThatLookLikeThis. Clicking the link creates a new note with the title corresponding to the link text.
-
Use custom font: Sets a custom font to be used in your notes. If this option is disabled, the default system font will be used.
11.9.2 Hotkey Preferences
The Hotkeys tabbed page lets you set global key combinations to perform different functions in Tomboy. To set key combinations, the checkbox must be selected. Press Alt+H to toggle this option on or off.
Figure 11-5 Tomboy Hotkey Preferences
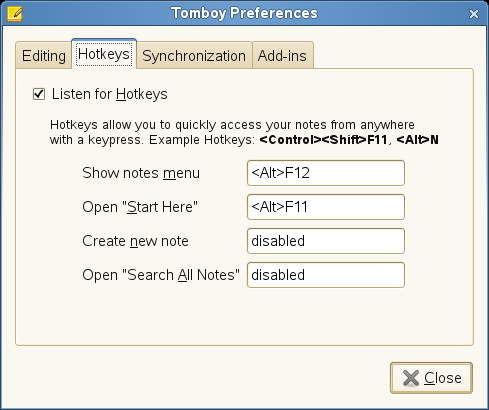
The Hotkey preferences include the following:
-
Show notes menu: Specify the key combination to open the notes menu.
-
Open
Start Here
: Specify the key combination to open theStart Here
note, which is preinstalled with Tomboy. -
Create new note: Specify the key combination to create a new note.
11.9.3 Synchronization Preferences
The Synchronization tabbed page lets you share notes, announce notes, receive announcements, and get notes from other instances of Tomboy. This can be useful, for example, if you want to work on a single set of notes in separate instances of Tomboy running on your desktop and your laptop.
Figure 11-6 Tomboy Synchronization Preferences
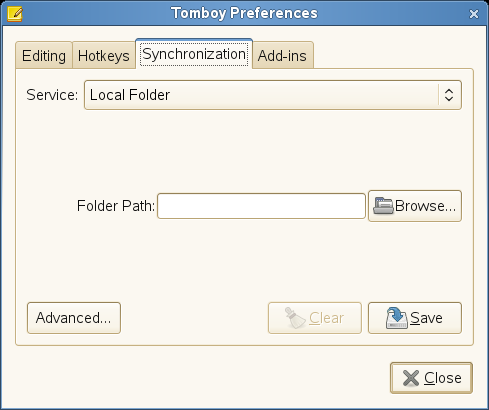
The Synchronization preferences include the following:
-
Service: Specify the location of the synchronized files. By default, you can select a local folder or WebDAV server. To synchronize to a remote location, click the tab, select , then click . This adds an option to the drop-down list.
Specify the information required for the Service you selected, then click .
-
Advanced: Specify what happens when a conflict is detected between a local note and a note on the configured synchronization server. You can choose to be prompted when a conflict occurs, to rename the local note, or to replace the local note with the note on the synchronization server.
-
Clear: Clears your current synchronization settings. If you choose to clear your synchronization settings, you might have to synchronize your notes again when you save new settings.
To synchronize your notes, click in any open note.
11.9.4 Add-ins Preferences
The Add-ins tabbed page lets you enable and configure Tomboy add-ins (formerly called plugins). Tomboy comes with several pre-installed add-ins, such as Backlinks, Bugzilla Links, Evolution Mail Integration, Export to HTML, Fixed Width, Note of the Day, Printing Support, and Sticky Notes Importer.
The list of installed add-ins is shown on the left of the Add-ins tabbed page. To enable or disable an add-in, select the plug-in you want, then click or .
Figure 11-7 Tomboy Add-ins Preferences
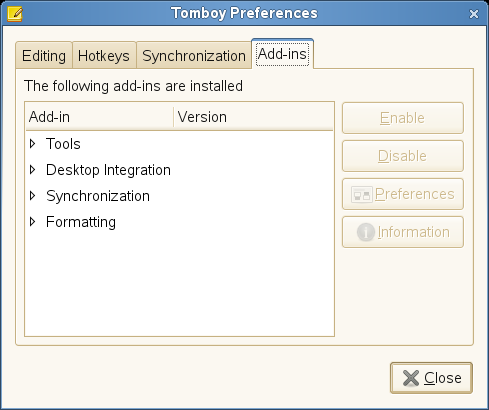
Additional add-ins can be found in the Tomboy Add-ins page. Place new add-ins in the $HOME/.tomboy/addins folder.