37.2 YaST Modules for CA Management
YaST provides two modules for basic CA management. The primary management tasks with these modules are explained here.
37.2.1 Creating a Root CA
The first step when setting up a PKI is to create a root CA. Do the following:
-
Start YaST and go to .
-
Click .
-
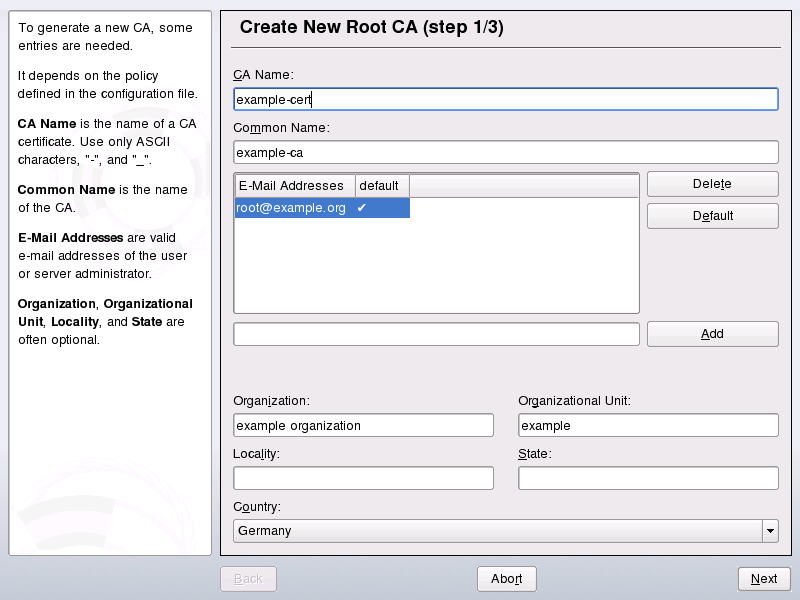
Enter the basic data for the CA in the first dialog, shown in Figure 37-1. The text fields have the following meanings:
Figure 37-1 YaST CA Module—Basic Data for a Root CA
-
Enter the technical name of the CA. Directory names, among other things, are derived from this name, which is why only the characters listed in the help can be used. The technical name is also displayed in the overview when the module is started.
-
Enter the name to use to refer to the CA.
-
Several e-mail addresses can be entered that can be seen by the CA user. This can be helpful for inquiries.
-
Select the country where the CA is operated.
- , , ,
-
Optional values
-
Click .
-
Enter a password in the second dialog. This password is always required when using the CA—when creating a sub-CA or generating certificates. The text fields have the following meaning:
-
contains a meaningful default and does not generally need to be changed unless an application cannot deal with this key length.
-
The in the case of a CA defaults to 3650 days (roughly ten years). This long period makes sense because the replacement of a deleted CA involves an enormous administrative effort.
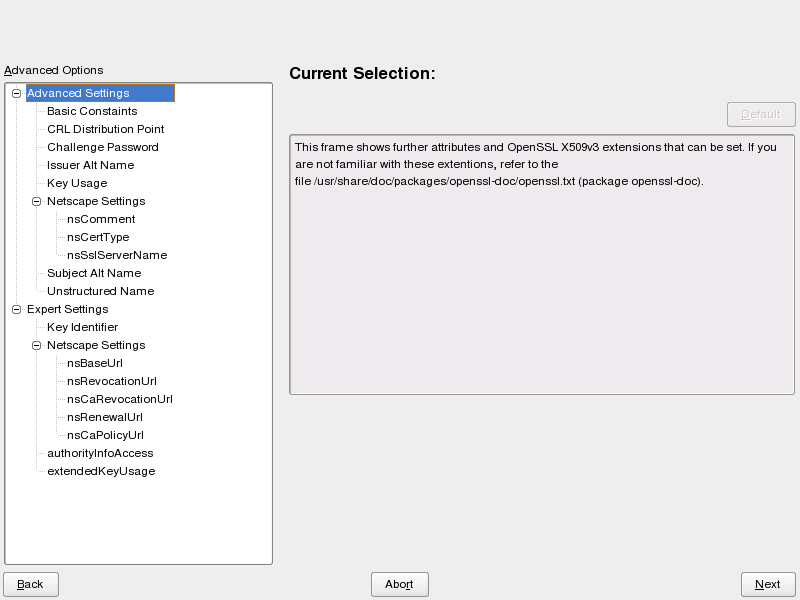
Clicking opens a dialog for setting different attributes from the X.509 extensions (Figure 37-4). These values have rational default settings and should only be changed if you are really sure of what you are doing.
-
YaST displays the current settings for confirmation. Click . The root CA is created then appears in the overview.
HINT: In general, it is best not to allow user certificates to be issued by the root CA. It is better to create at least one sub-CA and create the user certificates from there. This has the advantage that the root CA can be kept isolated and secure, for example, on an isolated computer on secure premises. This makes it very difficult to attack the root CA.
37.2.2 Creating or Revoking a Sub-CA
A sub-CA is created in exactly the same way as a root CA. Do the following:
-
Start YaST and open the CA module.
-
Select the required CA and click .
NOTE: The validity period for a sub-CA must be fully within the validity period of the
parent
CA. Because a sub-CA is always created after theparent
CA, the default value leads to an error message. To avoid this, enter a permissible value for the period of validity. -
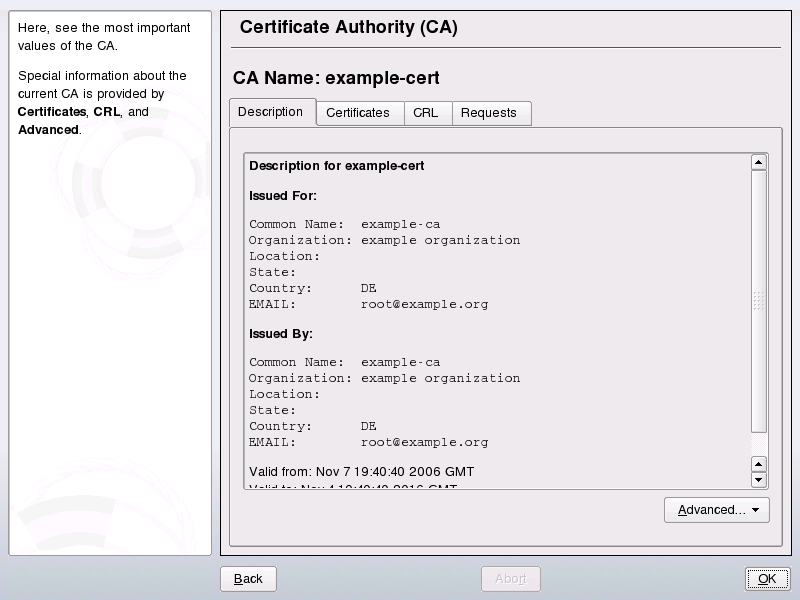
Enter the password if you entered a CA the first time. YaST displays the CA key information in the tab (see YaST CA Module—Using a CA).
Figure 37-2 YaST CA Module—Using a CA
-
Click and select . This opens the same dialog as for creating a root CA.
-
Proceed as described in Section 37.2.1, Creating a Root CA.
-
Select the tab . Reset compromised or otherwise unwanted sub-CAs here using . Revocation is not enough to deactivate a sub-CA on its own. Also publish revoked sub-CAs in a CRL. The creation of CRLs is described in Section 37.2.5, Creating CRLs.
-
Finish with
37.2.3 Creating or Revoking User Certificates
Creating client and server certificates is very similar to the one for creating CAs in Section 37.2.1, Creating a Root CA. The same principles apply here. In certificates intended for e-mail signature, the e-mail address of the sender (the private key owner) should be contained in the certificate to enable the e-mail program to assign the correct certificate. For certificate assignment during encryption, it is necessary for the e-mail address of the recipient (the public key owner) to be included in the certificate. In the case of server and client certificates, the hostname of the server must be entered in the field. The default validity period for certificates is 365 days.
To create client and server certificates, do the following:
-
Start YaST and open the CA module.
-
Select the required CA and click .
-
Enter the password if entering a CA for the first time. YaST displays the CA key information in the tab.
-
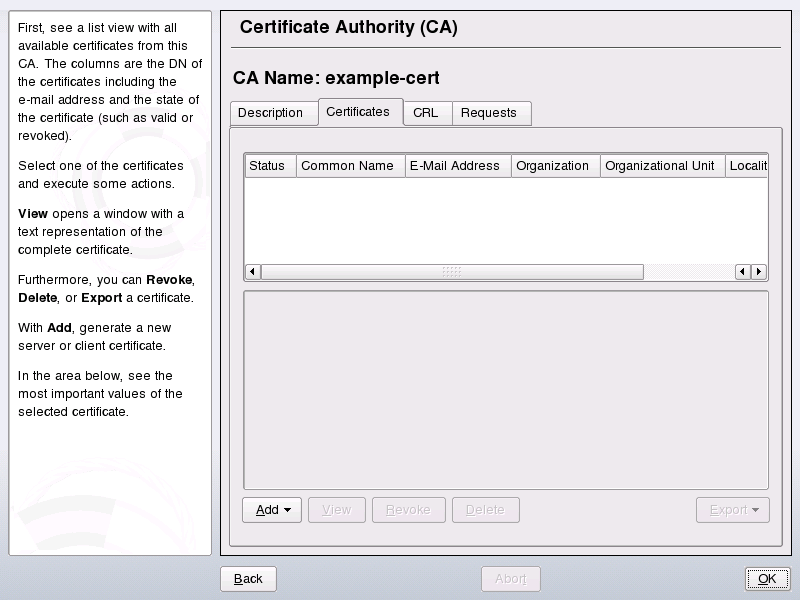
Click (see Figure 37-3).
Figure 37-3 Certificates of a CA
-
Click and create a server certificate.
-
Click and create a client certificate. Do not forget to enter an e-mail address.
-
Finish with
To revoke compromised or otherwise unwanted certificates, do the following:
-
Start YaST and open the CA module.
-
Select the required CA and click .
-
Enter the password if entering a CA the first time. YaST displays the CA key information in the tab.
-
Click (see Section 37.2.2, Creating or Revoking a Sub-CA.)
-
Select the certificate to revoke and click .
-
Choose a reason to revoke this certificate
-
Finish with .
NOTE:Revocation alone is not enough to deactivate a certificate. Also publish revoked certificates in a CRL. Section 37.2.5, Creating CRLs explains how to create CRLs. Revoked certificates can be completely removed after publication in a CRL with .
37.2.4 Changing Default Values
The previous sections explained how to create sub-CAs, client certificates, and server certificates. Special settings are used in the extensions of the X.509 certificate. These settings have been given rational defaults for every certificate type and do not normally need to be changed. However, it may be that you have special requirements for these extensions. In this case, it may make sense to adjust the defaults. Otherwise, start from scratch every time you create a certificate.
-
Start YaST and open the CA module.
-
Enter the required CA, as described in Section 37.2.2, Creating or Revoking a Sub-CA.
-
Click .
-
Choose the type the settings to change. The dialog for changing the defaults, shown in Figure 37-4, then opens.
Figure 37-4 YaST CA Module—Extended Settings
-
Change the associated value on the right side and set or delete the critical setting with .
-
Click to see a short summary.
-
Finish your changes with .
HINT: All changes to the defaults only affect objects created after this point. Already existing CAs and certificates remain unchanged.
37.2.5 Creating CRLs
If compromised or otherwise unwanted certificates should be excluded from further use, they must first be revoked. The procedure for this is explained in Section 37.2.2, Creating or Revoking a Sub-CA (for sub-CAs) and Section 37.2.3, Creating or Revoking User Certificates (for user certificates). After this, a CRL must be created and published with this information.
The system maintains only one CRL for each CA. To create or update this CRL, do the following:
-
Start YaST and open the CA module.
-
Enter the required CA, as described in Section 37.2.2, Creating or Revoking a Sub-CA.
-
Click . The dialog that opens displays a summary of the last CRL of this CA.
-
Create a new CRL with if you have revoked new sub-CAs or certificates since its creation.
-
Specify the period of validity for the new CRL (default: 30 days).
-
Click to create and display the CRL. Afterwards, you must publish this CRL.
HINT: Applications that evaluate CRLs reject every certificate if CRL is not available or expired. As a PKI provider, it is your duty always to create and publish a new CRL before the current CRL expires (period of validity). YaST does not provide a function for automating this procedure.
37.2.6 Exporting CA Objects to LDAP
The executing computer should be configured with the YaST LDAP client for LDAP export. This provides LDAP server information at runtime that can be used when completing dialog fields. Otherwise, although export may be possible, all LDAP data must be entered manually. You must always enter several passwords (see Table 37-3).
Table 37-3 Passwords during LDAP Export
|
Password |
Meaning |
|---|---|
|
LDAP Password |
Authorizes the user to make entries in the LDAP tree. |
|
Certificate Password |
Authorizes the user to export the certificate. |
|
New Certificate Password |
The PKCS12 format is used during LDAP export. This format forces the assignment of a new password for the exported certificate. |
Certificates, CAs, and CRLs can be exported to LDAP.
- Exporting a CA to LDAP
-
To export a CA, enter the CA as described in Section 37.2.2, Creating or Revoking a Sub-CA. Select in the subsequent dialog, which opens the dialog for entering LDAP data. If your system has been configured with the YaST LDAP client, the fields are already partly completed. Otherwise, enter all the data manually. Entries are made in LDAP in a separate tree with the attribute
caCertificate
. - Exporting a Certificate to LDAP
-
Enter the CA containing the certificate to export then select . Select the required certificate from the certificate list in the upper part of the dialog and select . The LDAP data is entered here in the same way as for CAs. The certificate is saved with the corresponding user object in the LDAP tree with the attributes
userCertificate
(PEM format) anduserPKCS12
(PKCS12 format). - Exporting a CRL to LDAP
-
Enter the CA containing the CRL to export and select . If desired, then create a new CRL and export this with . The LDAP data is also entered here in the same way as with CAs. Entries are then made in the LDAP at the same point as the associated CA, but using the
certificateRevocationList
attribute.
37.2.7 Exporting CA Objects as a File
If you have set up a repository on the computer for administering CAs, you can use this option to create the CA objects directly as a file at the correct location. Different output formats are available, such as PEM, DER, and PKCS12. In the case of PEM, it is also possible to choose whether a certificate should be exported with or without key and whether the key should be encrypted. In the case of PKCS12, it is also possible to export the certification path.
Export a file in the same way for certificates, CAs, and CRLs as with LDAP, described in Section 37.2.6, Exporting CA Objects to LDAP, except you should select instead of . This then takes you to a dialog for selecting the required output format and entering the password and filename. The certificate is stored at the required location after you click .
HINT: You can select any storage location in the file system. This option can also be used to save CA objects on a transport medium, such as a USB stick. The /media directory generally holds any type of drive except the hard drive of your system.
37.2.8 Importing Common Server Certificates
If you have exported a server certificate with YaST to your media on an isolated CA management computer, you can import this certificate on a server as a common server certificate. Do this during installation or at a later point with YaST.
NOTE:You need one of the PKCS12 formats to import your certificate successfully.
The general server certificate is stored in /etc/ssl/servercerts and can be used there by any CA-supported service. When this certificate expires, it can easily be replaced using the same mechanisms. To get things functioning with the replaced certificate, restart the participating services.
HINT:If you select here, you can select the source in the file system. This option can also be used to import certificates from a transport medium, such as a USB stick.
To import a common server certificate, do the following:
-
Start YaST and open under
-
View the data for the current certificate in the description field after YaST has been started.
-
Select and the certificate file.
-
Enter the password and click . The certificate is imported then displayed in the description field.
-
Close YaST with .