10.3 Using KNetworkManager
In KDE, the NetworkManager can be controlled with the KNetworkManager applet. The KNetworkManager applet should start automatically with the desktop environment an is shown as an icon in the system tray.
When it is running, an icon indicating the current network status is shown in the system tray. Hold the mouse cursor over it, to see details about the connection. Depending on the state of the network connection, the panel icon changes appearance:
-

-
A wired connection has been established.
-

-
Currently there is no connection to the Internet.
-

-
A wireless connection has been established. Blue bars show the strength of the signal. More blue bars means better signal strength.
-

-
A connection is being established or terminated.
If KNetworkManager is not running, start it with the command knetworkmanager.
Using the applet, choose a network to use explicitly at any time. Such a choice takes priority over automatically selected networks. The chosen network is used as long as it is available, meaning that plugging a network cable in does not switch to a wired network connection automatically.
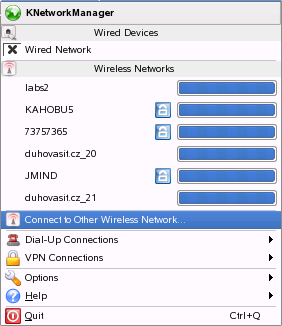
Right-clicking the icon opens the KNetworkManager menu with various options for managing network connections. See Figure 10-1. The menu contains available network connections for both wired and wireless devices. The currently used connection is checked in the menu.
Figure 10-1 Available Networks in the KNetworkManager Applet
Left-clicking the KNetworkManager icon opens a tabbed window with information about the currently used network device, the interface name and IP and hardware (MAC) addresses. Besides, network statistics including the transferred data, dropped packets and the transfer rate in KB/s.
10.3.1 Wired Networks
Available wired networks are listed in the KNetworkManager menu under . Hover the mouse pointer over a network in the list to get information about the used interface name, IP and hardware address, subnet mask, bandwidth and other data about the network. To activate a network click on it. The active network is checked.
10.3.2 Wireless Networks
Available visible wireless networks are listed in the KNetworkManager menu under . The signal strength of each network is indicated by a blue bar. Encrypted wireless networks are marked with a lock icon. To connect to a wireless network, choose it from the menu. If the chosen network is encrypted, choose the type of the network uses and enter the appropriate or in the dialog that opens.
HINT: Hidden Networks
To connect to a network that does not broadcast its service you have to set the identifier (ESSID) because it cannot be detected automatically. Choose . In the dialog that opens, enter the ESSID and set encryption parameters, if necessary.
To see a list of all known wireless networks, click . The networks are divided to two groups: and . NetworkManager will try to connect to networks in the fallback group even if they are not detected by the network card. This is useful for automatic connection to hidden networks.
10.3.3 Dial-Up Connections
To access dial-up connections, choose . If one or more dial-up connections were already defined, they are shown in the menu. Start the connection by clicking the connection to use.
To configure dial-up connections, right click the KNetworkManager icon and choose . Then click to open a configuration dialog, where you can define a new dial-up connection.
10.3.4 Using NetworkManager with VPN
NetworkManager supports several VPN technologies. To use them, first install NetworkManager support for your VPN technology. You can choose between:
-
NovellVPN
-
OpenVPN
-
vpnc (Cisco)
VPN support is included in the packages NetworkManager-novellvpn, NetworkManager-openvpn, and NetworkManager-vpnc. If you are using KNetworkManager you need the KNetworkManager specific packages NetworkManager-novellvpn-kde, NetworkManager-openvpn-kde, and NetworkManager-vpnc-kde as well.
To configure a new VPN connection with KNetworkManager, left-click the KNetworkManager applet and follow these steps:
-
Choose .
-
Press to start a configuration wizard.
-
Name your configuration in .
-
Choose the type of VPN connection to create in .
-
Insert all required information for your type of connection. For example, for an OpenVPN connection enter and choose the way to authenticate from . Complete the other required options depending on the connection chosen.
-
Press .
After the VPN is configured, you can select it from . To close a VPN connection, click .
10.3.5 NetworkManager and Security
NetworkManager distinguishes two types of wireless connections, trusted and untrusted. A trusted connection is any network that you explicitly selected in the past. All others are untrusted. Trusted connections are identified by the name and MAC address of the access point. Using the MAC address ensures that you cannot use a different access point with the name of your trusted connection.
NetworkManager scans for available wireless networks, if no wired connection is available. If multiple trusted networks are found, the most recently used is automatically selected. NetworkManager waits for your selection in case that all networks are untrusted.
If the encryption setting changes but the name and MAC address remain the same, NetworkManager attempts to connect, but first you are asked to confirm the new encryption settings and provide any updates, such as a new key.
In a system with a wireless connection only, NetworkManager does not automatically start the connection during boot. You must log in first to establish a connection. To make a wireless connection accessible without login, configure the trusted connection with YaST. Only wireless connections configured with YaST are sufficiently credible for NetworkManager to use them during boot.
If you switch to offline mode from using a wireless connection, NetworkManager blanks the ESSID. This ensures that the card is disconnected.
10.3.6 Switching Off the Network in KDE
If you are on an airplane or in any other environment where wireless networking is not allowed, you can switch it off easily using the KNetworkManager applet.
To switch off wireless networking in the KDE desktop, right-click the KNetworkManager applet then select , to switch it on again select respectively.
To switch off all networking in the KDE desktop, right-click the KNetworkManager applet then select , to switch it on again select .