2.5 Setting Up a Printer
YaST can be used to configure a local printer that is directly connected
to your machine (normally with USB or parallel port) or to set up printing
over the network. It is also possible to add PPD (PostScript Printer
Description) files for your printer with YaST. Further
information about printing (concepts, technical details, and
troubleshooting) is available in Section 7.0, Printer Operation,
(↑ Reference ).
2.5.1 Configuring Local Printers
If an unconfigured local printer is detected, YaST starts automatically to configure it. YaST can configure the printer automatically if the parallel or USB port can be set up automatically and the connected printer can be detected. The printer model must also be listed in the database used during the automatic hardware detection.
If the printer model is unknown or cannot be automatically detected, configure it manually. There are two possible reasons why a printer is not automatically detected:
-
The printer does not identify itself correctly. This may apply to very old devices. Try to configure your printer as described in Configuring Manually.
-
If the manual configuration does not work, communication between printer and computer is not possible. Check the cable and the plugs to make sure that the printer is properly connected. If this is the case, the problem may not be printer-related, but rather a USB or parallel port–related problem.
Configuring Manually
To manually configure the printer, select in the YaST control center. This opens the main
window, where the detected
devices are listed in the upper part. The lower part lists any queues
configured so far (refer to Section 7.1, The Workflow of the Printing System,
(↑ Reference ) for
more information about print queues). If no printer was detected, both
parts of the configuration window are empty. Use
to change the configuration of a listed printer or
to set up a printer not automatically detected. Editing an existing
configuration uses the same dialogs as in
Adding a Local Printer Manually.
In , you can also
an existing entry. Clicking
opens a list with advanced options. Select
, to manually start the automatic
printer detection. If more than one printer is connected to the machine or
more than one queue is configured for a printer, you can mark the active
entry as the default. and
are advanced configuration
options— refer to
Section 7.0, Printer Operation,
(↑ Reference ) for details.
Adding a Local Printer Manually
HINT: YaST Print Test
To make sure that everything works correctly, the crucial configuration steps can be checked with the print test function of YaST. The test page also provides important information about the configuration tested. If the output is garbled, for example, with several pages almost empty, you can stop the printer by first removing all paper then stopping the test from YaST.
-
Start YaST and choose to open the dialog.
-
Click to open the window.
-
Choose .
-
Select the port to which the printer is connected (usually USB or parallel port) and choose the device in the next configuration screen. It is recommended to at this point. If problems occur, select the correct device or choose to return to the previous dialog.
-
In , set up a print queue. Specifying a is mandatory. It is recommended to choose a recognizable name—with this name, you can later identify the printer in the printing dialogs of applications. Use and to further describe the printer. This is optional, but useful if you have more than one printer connected to the machine or if you set up a print server. should be checked—it is needed for local printers. To enable network access for this printer, check .
-
In , specify the printer by and . If your printer is not listed, you can try from the manufacturer list and select an appropriate standard language (the set of commands controlling the printer) from the model list (refer to your printer's documentation to find out which language your printer understands). If this does not work, refer to Adding PPD Files with YaST for another possible solution.
-
The screen lists a summary of the printer setup. This dialog is also shown when editing an existing printer configuration from the start screen of this YaST module.
Figure 2-3 Printer Configuration Summary
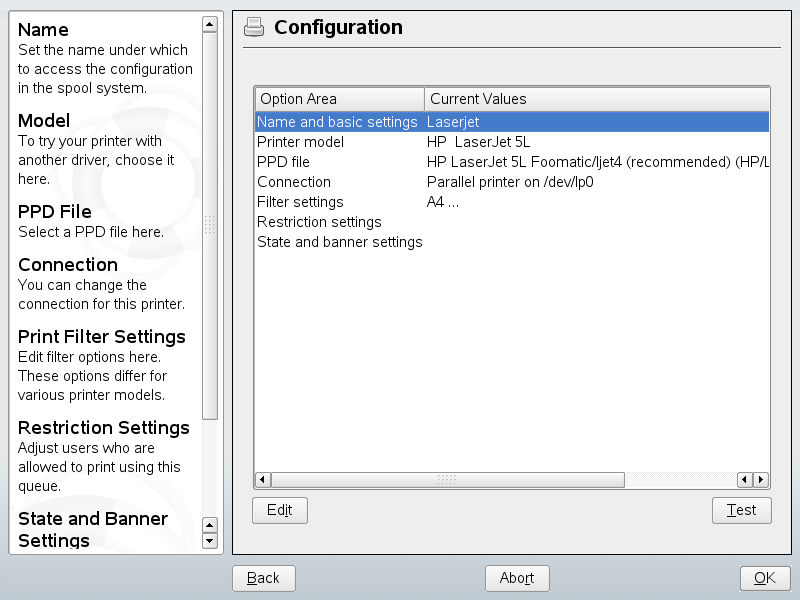
The summary contains the following entries, which you can also modify with :
-
, , and let you change entries made while following this procedure.
-
Refer to Choosing an Alternative PPD File with YaST for details on .
-
With fine-tune the printer setup. Configure options like , , and here.
-
By default, every user is able to use the printer. With , list users that are forbidden to use the printer or list users that are allowed to use it.
-
With you can, for example, deactivate the printer by changing its state and specify whether a page with a or is printed before or after each job (the default is not to print them).
-
Adding PPD Files with YaST
If your printer does not show up in the
dialog, a PPD (PostScript Printer Description) file for your model is
missing (see Section 7.3, Installing the Software,
(↑ Reference ) for more information about
PPD files). With ,
add a PPD file from the local file system or an FTP or HTTP server.
Get PPD files directly from your printer vendor or from the
driver CD of the printer (see Section 7.8.2, No Suitable PPD File Available for a PostScript Printer,
(↑ Reference ) for
details). An alternative source for PPD files is http://www.linuxprinting.org/, the Linux Printing
Database
. When downloading PPD files from linuxprinting.org,
keep in mind that it always shows the latest Linux support status,
which is not necessarily met by openSUSE.
Choosing an Alternative PPD File with YaST
For many printer models, several PPD files are available. When configuring the printer, YaST defaults to the one marked recommended as a general rule. To get a list of PPD files available for a printer, select in then click . See Figure 2-3.
Normally it should not be necessary to change the PPD file—the PPD file chosen by YaST should produce the best results. However, if you want a color printer to print only in black and white, for example, it is most convenient to use a PPD file that does not support color printing. If you experience performance problems with a PostScript printer when printing graphics, it may help to switch from a PostScript PPD file to a PCL PPD file (provided your printer understands PCL).
2.5.2 Configuring Network Printers
Network printers are not detected automatically. They must be configured manually using the YaST printer module. Depending on your network setup, you can print to a print server (CUPS, LPD, SMB, or IPX) or directly to a network printer (preferably via TCP). Ask your network administrator for details on configuring a network printer in your environment.
Configuring a Network Printer with YaST
-
Start YaST and choose to open the dialog.
-
Click to open the window.
-
Choose to open a dialog in which to specify further details that should be provided by your network administrator.
See Section 7.4, Network Printers,
(↑ Reference ) for detailed technical
information.