14.4 Configuring a Network Connection with YaST
There are many supported networking types on Linux. Most of them use different device names and the configuration files are spread over several locations in the file system. For a detailed overview of the aspects of manual network configuration, see Section 14.6, Configuring a Network Connection Manually.
During installation on a laptop, where NetworkManager is active by default, YaST configures all interfaces that have been detected. On other machines, only the first interface with link is automatically configured. Additional hardware can be configured any time after installation in the installed system. The following sections describe the network configuration for all types of network connections supported by openSUSE.
14.4.1 Configuring the Network Card with YaST
To configure your wired or wireless network card in YaST, select . After starting the module, YaST displays the Network Settings dialog with four tabs. The tab allows to set general networking options such as use of NetworkManager, IPv6 and global DHCP options. For more information, see Configuring Global Networking Options.
The tab contains information about installed network cards. Any properly detected network card is listed with its name. You can manually add new cards and remove or change their configuration in this dialog. If you want to manually add and configure a card that was not automatically detected, see Configuring an Undetected Network Card. If you want to change the configuration of an already configured card, see Changing the Configuration of a Network Card.
The tab allows to set the hostname of the machine and name servers to be used. For more information, see Configuring Hostname and DNS. The tab is used for configuration of routing. For more information about routing configuration, see Configuring Routing.
Figure 14-3 Configuring Network Settings
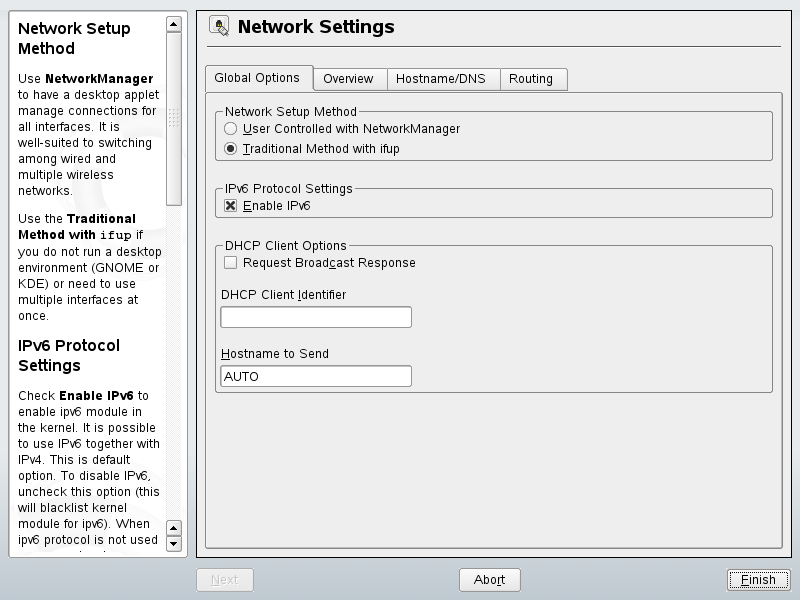
Configuring Global Networking Options
The tab of the YaST module allows to set important global networking options, such as the use of NetworkManager, IPv6 and DHCP client options. These settings are appicable for all network interfaces.
In the choose the way network
connections are managed. If you want a NetworkManager desktop applet to
manage connections for all interfaces, choose . This option is well suited for switching
between multiple wired and wireless networks. If you do not run a desktop
environment (GNOME or KDE) or your computer is a Xen server, virtual
system, or provides network services suuch as DHCP or DNS in your network,
use the . For more
information on NetworkManager, see Section 10.0, Managing Network Connections with NetworkManager,
(↑ Start-Up ).
In the choose whether you want to use IPv6 protocol. It is possible to use IPv6 together with IPv4. By default, IPv6 is activated. However, in networks not using IPv6 protocol, response times can be faster with IPv6 protocol disabled. If you want to disable IPv6, uncheck the option. This disables autoload of the kernel module for IPv6. The change will be applied after reboot.
In the configure options for the DHCP client. If you want the DHCP client to ask the server to always broadcast its responses, check . It may be needed if your machine is moving between different networks. must be different for each DHCP client on a single network. If left empty, it defaults to the hardware address of the network interface. However, if you are running several virtual machines using the same network interface and therefore the same hardware address, specify a unique free-form identifier here.
specifies a string used for the hostname option field when dhcpcd sends messages to DHCP server. Some DHCP servers update name server zones (forward and reverse records) according to this hostname (dynamic DNS). Also, some DHCP servers require the Hostname to Send option field to contain a specific string in the DHCP messages from clients. Leave AUTO to send the current hostname (i.e. the one defined in /etcc/HOSTNAME. Leave the option field empty for not sending any hostname. If yo do not want to change the default route according to the information from DHCP, uncheck .
Changing the Configuration of a Network Card
To change the configuration of a network card, select a card from the list of the detected cards in the tab of the YaST Network Settings module and click . The dialog appears in which to adjust the card configuration using the , , and tabs. For information about wireless card configuration, see Section 25.1.1, Configuration with YaST.
Configuring IP Addresses
You can set the IP adresss of the network card or the way its IP address is determined in the tab of the dialog. The network card can have (which is useful for bonding devices), , or assigned via and/or .
If possible, the first network card with link that is available during the installation is automatically configured to use automatic address setup via DHCP. In case of laptop computers where NetworkManager is active by default, all network cards are configured.
DHCP should also be used if you are using a DSL line but with no static IP assigned by the ISP (Internet Service Provider). If you decide to use DHCP, configure the details in on tab of the dialog of the YaST network card configuration module. Specify whether the DHCP client should ask the server to always broadcast its responses in . This option may be needed if your machine is a mobile client moving between networks. If you have a virtual host setup where different hosts communicate through the same interface, an is necessary to distinguish them.
DHCP is a good choice for client configuration but it is not ideal for server configuration. To set a static IP address, proceed as follows:
-
Select a card from the list of detected cards in the tab of the YaST network card configuration module and click .
-
In the tab, choose .
-
Enter and (usually 255.255.255.0).
Optionally, you can enter a fully qualified for this address, which will be written to the /etc/hosts configuration file.
-
Click .
-
To activate the configuration, click .
If you use the static address, the name servers and default gateway are not configured automatically. To configure name servers, proceed as described in Configuring Hostname and DNS. To configure a gateway, proceed as described in Configuring Routing.
Configuring Aliases
If NetworkManager is not being used, one network device can have multiple IP addresses, called aliases. To set an alias for your network card, proceed as follows:
-
Select a card from the list of detected cards in the tab of the YaST network card configuration module and click .
-
In the part of the tab, click .
-
Enter , , and . Do not include the interface name in the alias name.
-
Click .
-
Click .
-
To activate the configuration, click .
Changing the Device Name and Udev Rules
It is possible to change the device name of the network card when it is used. It is also possible to determine, whether the network card should be identified by udev via its hardware (MAC) address or bus ID. The later option is preferable in large servers to ease hot swapping of cards. To set these options with YaST, proceed as follows:
-
Select a card from the list of detected cards in the tab of the YaST Network Settings module and click .
-
Go to the tab. The current device name is shown in . Click .
-
Select whether udev should identify the card by its or . The current MAC address and bus ID of the card is shown in the dialog.
-
To change the device name, check the option and edit the name.
-
Click and .
-
To activate the configuration, click .
Changing Network Card Kernel Module
For some network cards, several kernel modules (drivers) may be available. If the card is already configured, YaST allows to select a kernel module to be used from a list of available suitable modules. It is also possible to specify options for the kernel module. To set these options with YaST, proceed as follows:
-
Select a card from the list of detected cards in the tab of the YaST Network Settings module and click .
-
Go to the tab.
-
Select the kernel module to be used in . Enter any options for the selected module in in the form option=value . If more options are used, they should be space separated.
-
Click and .
-
To activate the configuration, click .
Activating the Network Device
If you use the traditional method with ifup, you can configure your device to start during boot, on cable connection, on card detection, manually, or never. To change device start-up, proceed as follows:
-
Select a card from the list of detected cards in the YaST network card configuration module and click .
-
In the tab, select the desired entry from .
Choose to start the device during the system boot. With , the interface is watched for any existing physical connection. With , the interface is set as soon as available. It is similar to the option, but if the interfece is not present at boot time, no error occurs. Choose to control the interface manually with ifup or KInternet. Choose to not start the device at all. The is similar to , but the interface is never shut down with the command rcnetwork stop. Use this if you use a nfs or iscsi root filesystem.
-
Click .
-
To activate the configuration, click .
Usually, only the system administrator can activate and deactivate network interfaces. If you want any user to be able to activate this interface via KInternet, select .
Configuring the Firewall
Without having to enter the detailed firewall setup as described in Section 28.4.1, Configuring the Firewall with YaST, you can determine the basic firewall setup for your device as part of the device setup. Proceed as follows:
-
Select a card from the list of detected cards in the YaST network card configuration module and click .
-
Enter the tab of the network configuration dialog.
-
Determine the firewall zone to which your interface should be assigned. The following options are available:
- Firewall Disabled
-
This option is available only if the firewall is disabled. The firewall does not run at all. Only use this option if your machine is part of a greater network that is protected by an outer firewall.
- Automatically assign zone
-
This option is available only if the firewall is enabled. The firewall is running and the interface is automatically assigned to a firewall zone. The zone which contains the 'any' keyword or the external zone will be used for such an interface.
- Internal Zone (Unprotected)
-
The firewall is running, but does not enforce any rules to protect this interface. Use this option, if your machine part is part of a greater network that is protected by an outer firewall. It is also usefull when the machine has more network interfaces, for the interfaces connected to the internal network.
- Demilitarized Zone
-
A demilitarized zone is an additional line of defense in front of an internal network and the (hostile) Internet. Hosts assigned to this zone can be reached from the internal network and from the Internet, but cannot access the internal network.
- External Zone
-
The firewall is running on this interface and fully protects it against other (presumably hostile) network traffic. This is the default option.
-
Click .
-
Activate the configuration by clicking .
Configuring an Undetected Network Card
Your card may not be detected correctly. In this case, the card is not included in the list of the detected cards. If you are sure that your system includes a driver for your card, you can configure it manually. To configure an undetected network card, proceed as follows:
-
In the tab of the YaST Network Card module click .
-
In the dialog, set the of the interface from the available options and . If the network card is a PCMCIA or USB device, activate the respective check box and exit this dialog with . Otherwise, you can define the kernel to be used for the card and its , if necessary.
-
Click .
-
Configure any needed options, such as the IP address, device activation or firewall zone for the interface in the , , and tabs. For more information about the configuration options, see Changing the Configuration of a Network Card.
-
Click .
-
To activate the new network configuration, click .
Configuring Hostname and DNS
If you did not change the network configuration during installation and the wired card was available, a hostname was automatically generated for your computer and DHCP was activated. The same applies to the name service information your host needs to integrate into a network environment. If DHCP is used for network address setup, the list of domain name servers is automatically filled with the appropriate data. If a static setup is preferred, set these values manually.
To change the name of your computer and adjust the name server search list, proceed as follows:
-
Go to the tab of the YaST network card configuration.
-
Enter and, if needed, the . Note that the hostname is global and applies to all set network interfaces.
If you are using DHCP to get an IP address, the hostname of your computer will be automatically set by the DHCP. You may want to disable this behavior by unchecking if you connect to different networks which may assign different hostnames, because changing the hostname at runtime may confuse the graphical desktop.
If you are using DHCP to get an IP address, your hostname will be written to /etc/hosts by default and be resolvable as a 127.0.0.2 IP address. If you want to disable this, uncheck but note, that your hostname will not be resolvable without an active network.
-
Enter the name servers and domain search list. Name servers must be specified by IP addresses, such as 192.168.1.116, not hostnames. Search domains are domain names used for resolving hostnames without a specified domain. If more than one search domain is used, separate domains whith commas or whote space.
-
To activate the configuration, click .
Configuring Routing
To make your machine communicate with other machines and other networks, routing information must be given to make network traffic take the correct path. If DHCP is used, this information is automatically provided. If a static setup is used, this data must be added manually.
-
Go to the tab of the YaST Network Settings configuration module.
-
Enter the IP of the . The default gateway matches every possible destination, but poorly. If any other entry exists that matches the required address, it is used instead of the default route.
-
More entries can be entered into the the . Enter network IP address, IP address and . Select through which the traffic to defined network will be routed (the minus sign stands for any device). To omit any of these values, use minus sign -. To enter a default gateway into the table, use default for .
NOTE: If more default routes are used, it is possible to specify the metric option to determine which route has a higher priority. To specify the metric option, enter - metric number in . The route with the higher metric is used as default. When the network device is disconnected, it's route is removed and the next one is used. However the current kernel does not use metric in static routing, only routing daemons like multipathd do.
-
If the system is a router, enable the option.
-
To activate the configuration, click .
14.4.2 Modem
In the YaST Control Center, access the modem configuration under . If your modem was not automatically detected, open the dialog for manual configuration by clicking . Enter the interface to which the modem is connected under .
HINT: CDMA and GPRS Modems
Configure supported CDMA and GPRS modems with the YaST modem module just as you would configure regular modems.
Figure 14-4 Modem Configuration
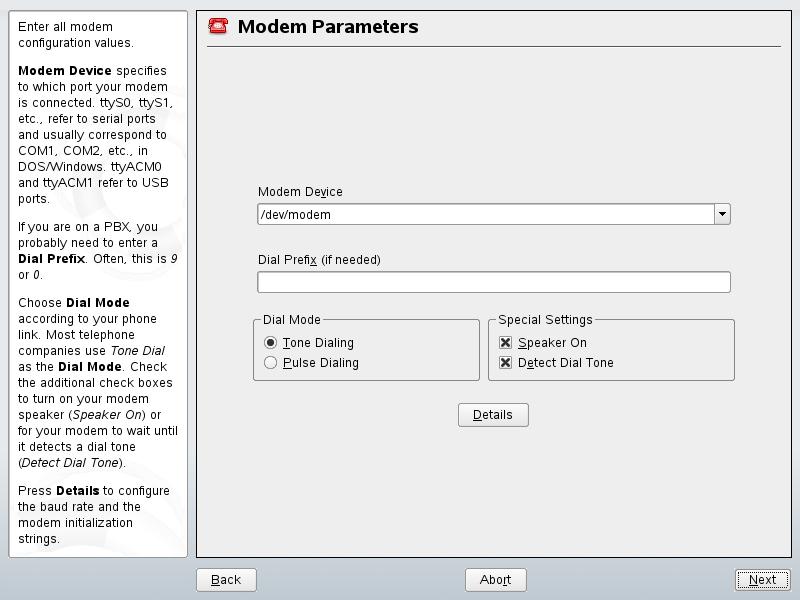
If you are behind a private branch exchange (PBX), you may need to enter a dial prefix. This is often a zero. Consult the instructions that came with the PBX to find out. Also select whether to use tone or pulse dialing, whether the speaker should be on, and whether the modem should wait until it detects a dial tone. The last option should not be enabled if the modem is connected to an exchange.
Under , set the baud rate and the modem initialization strings. Only change these settings if your modem was not detected automatically or if it requires special settings for data transmission to work. This is mainly the case with ISDN terminal adapters. Leave this dialog by clicking . To delegate control over the modem to the normal user without root permissions, activate . In this way, a user without administrator permissions can activate or deactivate an interface. Under , specify a regular expression. The in KInternet, which can be modified by the normal user, must match this regular expression. If this field is left empty, the user cannot set a different without administrator permissions.
In the next dialog, select the ISP. To choose from a predefined list of ISPs operating in your country, select . Alternatively, click to open a dialog in which to provide the data for your ISP. This includes a name for the dial-up connection and ISP as well as the login and password provided by your ISP. Enable to be prompted for the password each time you connect.
In the last dialog, specify additional connection options:
-
If you enable dial on demand, set at least one name server. Use this feature only if your Internet connection is inexpensive, because there are programs that periodically request data from the Internet.
-
This option is enabled by default, with the effect that the name server address is updated each time you connect to the Internet.
-
If the provider does not transmit its domain name server after connecting, disable this option and enter the DNS data manually.
-
If this options is enabled, the connection is automatically reestablished after failure.
-
This option disables the detection of any prompts from the dial-up server. If the connection build-up is slow or does not work at all, try this option.
-
Selecting this option activates the firewall and sets the interface as external. This way, you are protected from outside attacks for the duration of your Internet connection.
-
With this option, specify a period of network inactivity after which the modem disconnects automatically.
-
This opens the address configuration dialog. If your ISP does not assign a dynamic IP address to your host, disable then enter your host's local IP address and the remote IP address. Ask your ISP for this information. Leave enabled and close the dialog by selecting .
Selecting returns to the original dialog, which displays a summary of the modem configuration. Close this dialog with .
14.4.3 ISDN
Use this module to configure one or several ISDN cards for your system. If YaST did not detect your ISDN card, click on in the tab and manually select your card. Multiple interfaces are possible, but several ISPs can be configured for one interface. In the subsequent dialogs, set the ISDN options necessary for the proper functioning of the card.
Figure 14-5 ISDN Configuration

In the next dialog, shown in Figure 14-5, select the protocol to use. The default is , but for older or larger exchanges, select . If you are in the US, select . Select your country in the relevant field. The corresponding country code then appears in the field next to it. Finally, provide your and the if necessary. If you do not want to log all your ISDN traffic, uncheck the option.
defines how the ISDN interface should be started: causes the ISDN driver to be initialized each time the system boots. requires you to load the ISDN driver as root with the command rcisdn start. , used for PCMCIA or USB devices, loads the driver after the device is plugged in. When finished with these settings, select .
In the next dialog, specify the interface type for your ISDN card and add ISPs to an existing interface. Interfaces may be either the SyncPPP or the RawIP type, but most ISPs operate in the SyncPPP mode, which is described below.
Figure 14-6 ISDN Interface Configuration
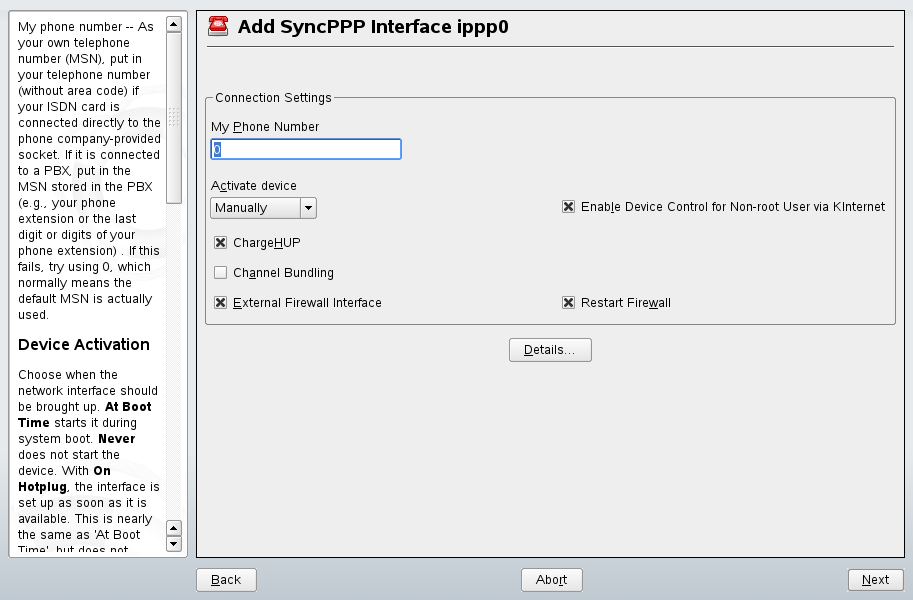
The number to enter for depends on your particular setup:
- ISDN Card Directly Connected to Phone Outlet
-
A standard ISDN line provides three phone numbers (called multiple subscriber numbers, or MSNs). If the subscriber asked for more, there may be up to 10. One of these MSNs must be entered here, but without your area code. If you enter the wrong number, your phone operator automatically falls back to the first MSN assigned to your ISDN line.
- ISDN Card Connected to a Private Branch Exchange
-
Again, the configuration may vary depending on the equipment installed:
-
Smaller private branch exchanges (PBX) built for home purposes mostly use the Euro-ISDN (EDSS1) protocol for internal calls. These exchanges have an internal S0 bus and use internal numbers for the equipment connected to them.
Use one of the internal numbers as your MSN. You should be able to use at least one of the exchange's MSNs that have been enabled for direct outward dialing. If this does not work, try a single zero. For further information, consult the documentation delivered with your phone exchange.
-
Larger phone exchanges designed for businesses normally use the 1TR6 protocol for internal calls. Their MSN is called EAZ and usually corresponds to the direct-dial number. For the configuration under Linux, it should be sufficient to enter the last digit of the EAZ. As a last resort, try each of the digits from 1 to 9.
-
For the connection to be terminated just before the next charge unit is due, enable . However, remember that may not work with every ISP. You can also enable channel bundling (multilink PPP) by selecting the corresponding option. Finally, you can enable firewall for your link by selecting and . To enable the normal user without administrator permissions to activate or deactivate the interface, select the .
opens a dialog in which to implement more complex connection schemes, which are not relevant for normal home users. Leave the dialog by selecting .
In the next dialog, make IP address settings. If you have not been given a static IP by your provider, select . Otherwise, use the fields provided to enter your host's local IP address and the remote IP address according to the specifications of your ISP. If the interface should be the default route to the Internet, select . Each host can only have one interface configured as the default route. Leave this dialog by selecting .
The following dialog allows you to set your country and select an ISP. The ISPs included in the list are call-by-call providers only. If your ISP is not in the list, select . This opens the dialog in which to enter all the details for your ISP. When entering the phone number, do not include any blanks or commas among the digits. Finally, enter your login and the password as provided by the ISP. When finished, select .
To use on a stand-alone workstation, also specify the name server (DNS server). Most ISPs support dynamic DNS, which means the IP address of a name server is sent by the ISP each time you connect. For a single workstation, however, you still need to provide a placeholder address like 192.168.22.99. If your ISP does not support dynamic DNS, specify the name server IP addresses of the ISP. If desired, specify a time-out for the connection—the period of network inactivity (in seconds) after which the connection should be automatically terminated. Confirm your settings with . YaST displays a summary of the configured interfaces. To activate these settings, select .
14.4.4 Cable Modem
In some countries it is quite common to access the Internet through the TV cable network. The TV cable subscriber usually gets a modem that is connected to the TV cable outlet on one side and to a computer network card on the other (using a 10Base-TG twisted pair cable). The cable modem then provides a dedicated Internet connection with a fixed IP address.
Depending on the instructions provided by your ISP, when configuring the network card either select or . Most providers today use DHCP. A static IP address often comes as part of a special business account.
For further information about the configuration of cable modems, read the Support Database article on the topic, which is available online at http://en.opensuse.org/SDB:Setting_Up_an_Internet_Connection_via_Cable_Modem_with_SuSE_Linux_8.0_or_Higher.
14.4.5 DSL
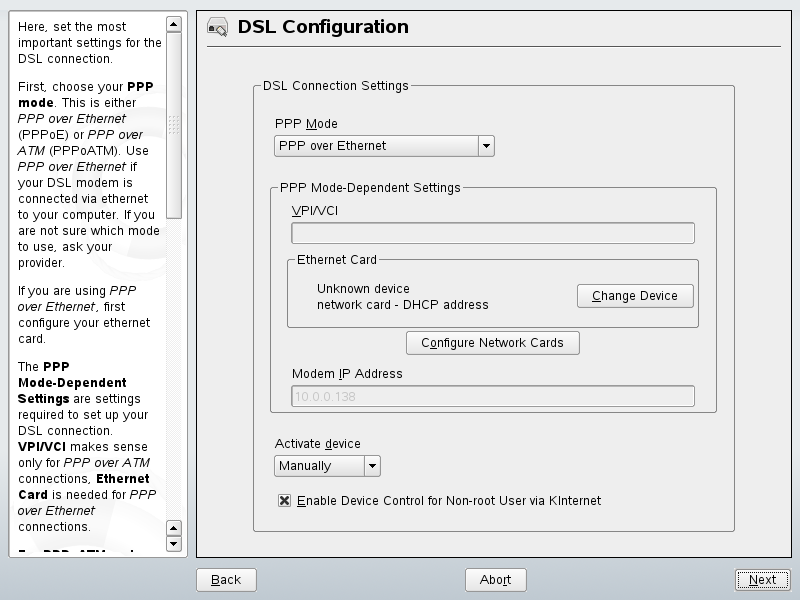
To configure your DSL device, select the module from the YaST section. This YaST module consists of several dialogs in which to set the parameters of DSL links based on one of the following protocols:
-
PPP over Ethernet (PPPoE)
-
PPP over ATM (PPPoATM)
-
CAPI for ADSL (Fritz Cards)
-
Point-to-Point Tunneling Protocol (PPTP)—Austria
In the tab of the dialog, you will find a list of installed DSL devices. To change the configuration of a DSL device, select it in the list and click . If you click , you can manually configure a new DSL device.
The configuration of a DSL connection based on PPPoE or PPTP requires that the corresponding network card has already been set up in the correct way. If you have not done so yet, first configure the card by selecting (see Section 14.4.1, Configuring the Network Card with YaST). In the case of a DSL link, addresses may be assigned automatically but not via DHCP, which is why you should not enable the option . Instead, enter a static dummy address for the interface, such as 192.168.22.1. In , enter 255.255.255.0. If you are configuring a stand-alone workstation, leave empty.
HINT: Values in and are only placeholders. They are only needed to initialize the network card and do not represent the DSL link as such.
In the first DSL configuration dialog (see Figure 14-7), select the and the to which the DSL modem is connected (in most cases, this is eth0). Then use to specify whether the DSL link should be established during the boot process. Click to authorize the normal user without root permissions to activate or deactivate the interface with KInternet.
In the next dialog you are able to select your country as well, and choose from a number of ISPs operating in it. The details of any subsequent dialogs of the DSL configuration depend on the options set so far, which is why they are only briefly mentioned in the following paragraphs. For details on the available options, read the detailed help available from the dialogs.
Figure 14-7 DSL Configuration
To use on a stand-alone workstation, also specify the name server (DNS server). Most ISPs support dynamic DNS—the IP address of a name server is sent by the ISP each time you connect. For a single workstation, however, provide a placeholder address like 192.168.22.99. If your ISP does not support dynamic DNS, enter the name server IP address provided by your ISP.
defines a period of network inactivity after which to terminate the connection automatically. A reasonable time-out value is between 60 and 300 seconds. If is disabled, it may be useful to set the time-out to zero to prevent automatic hang-up.
The configuration of T-DSL is very similar to the DSL setup. Just select as your provider and YaST opens the T-DSL configuration dialog. In this dialog, provide some additional information required for T-DSL—the line ID, the T-Online number, the user code, and your password. All of these should be included in the information you received after subscribing to T-DSL.