11.4 Copying Files between Linux Computers
Linux offers a rich set of protocols you can use to copy files between computers. Which protocol you use depends on how much effort you want to invest and whether you need to be compatible with future Windows installations. The following sections feature various methods to transfer files from and to Linux computers. Make sure that you have a working network connection, because otherwise they will not work. All scenarios rely on working name resolution in the network. If your network does not include a name service, use IP addresses directly or add the IP addresses along with respective hostnames to /etc/hosts on all clients.
The following example IP addresses and hostnames are used across this section:
|
Target Hostname |
jupiter.example.com |
|
Target IP |
192.168.2.100 |
|
Source Hostname |
venus.example.com |
|
Source IP |
192.168.2.101 |
|
User |
tux |
11.4.1 Copying Files with SSH
The following requirements must be met on both computers that are accessed via SSH:
-
If you use a hostname, make sure each hostname is listed in /etc/hosts on both computers (see
/etc/hosts,
(↑ Reference ).) If you use SSH with IP addresses, you do not need to change anything. -
If you use a firewall, open the SSH port. To do so, start YaST, and select . Go to and check whether is displayed as part of the list. If this is not the case, select SSH from and click . Apply your changes and leave YaST with and .
To copy files from one computer to another, you need to know where the files are located. For example, to copy a single file /srv/foo_file from computer jupiter.example.com to the current directory, use the scp command (the dot represents the current directory as the copy target location):
scp tux@jupiter.example.com:/srv/foo_file .
To copy a whole directory structure, use the recursive mode of scp:
scp -r tux@jupiter.example.com:/srv/foo_directory .
If your network does not provide name resolution, use the server's IP address directly:
scp tux@192.168.2.100:/srv/foo_file .
If you do not know exactly where your files are, use the sftp command. Copying files in KDE or GNOME with SFTP is very simple. Proceed as follows:
-
Press Alt+F2.
-
Enter the following at the address prompt:
sftp://tux@jupiter.example.com
-
Enter the password of tux on jupiter.example.com.
-
Drag and drop the desired files or directories to your desktop or a local directory.
KDE provides another protocol called fish that can be used if sftp is not available. The use of this protocol is similar to sftp. Just replace the sftp protocol prefix of the URL with fish:
fish://tux@jupiter.example.com
11.4.2 Transferring Files with rsync
Before using rsync to synchronize files and directories between different computers, make sure that the following requirements are met:
-
The package rsync is installed.
-
Identical users are available on both systems.
-
Enough disk space is available on the server.
-
If you want to benefit from rsync's full potential, make sure that rsyncd is installed on the system to use as the server.
rsync is useful for archiving or copying data and can also be used as a daemon to provide directories to the network (see Advanced Setup for rsync Synchronization).
rsync Basic Mode
The basic mode of operation of rsync does not require any special configuration. rsync mirrors complete directories onto another system. Its usage is not much different from a regular copying tool, such as scp. The following command creates a backup of the home directory of tux on a backup server called jupiter:
rsync -Hbaz -e ssh /home/tux/ tux@jupiter:backup
Use the following command to apply your backup:
rsync -Haz -e ssh tux@jupiter:backup /home/tux/
rsync Daemon Mode
Start the rsyncd daemon on one of your systems to make use of the full functionality of rsync. In this mode, it is possible to create synchronization points (modules) that can be accessed without an account. To use the rsyncd daemon, proceed as follows:
Advanced Setup for rsync Synchronization
-
Log in as root and install the rsync package.
-
Configure your synchronization points in /etc/rsyncd.conf. Add a point with its name in brackets and add the path keyword like in the following example:
[FTP]
  path = /srv/ftp
 comment = An Example
-
Start the rsyncd daemon as root with rcrsyncd start. To start the rsync service automatically during each system boot, run insserv rsyncd.
-
List all files located in the /srv/ftp directory (note the double colon):
rsync -avz jupiter::FTP
-
Initiate the transfer by providing a target directory (in this example, the current directory is represented by a dot):
rsync -avz jupiter::FTP .
By default, files are not deleted while synchronizing with rsync. To force file deletion, add the --delete option. To make sure that --delete does not accidentally remove newer files, use the --update option instead. Any conflicts that arise must be resolved manually.
11.4.3 Transferring Files with Unison
Before using Unison to synchronize files and directories between different computers, make sure that the following requirements are met:
-
The package unison is installed.
-
Enough disk space is available on your local and remote computer.
-
If you want to benefit from Unison's full potential, make sure that Unison is also installed and running on the remote computer.
In case you need help, run Unison with the -doc topics option to get a full list of available sections.
For permanent settings, Unison allows to create profiles that specify Unison preferences such as the directories (roots) to synchronize, which types of files to ignore, and other options. The profiles are stored as text files in ~/.unison with the file extension *.prf.
Using the GUI
To synchronize different directories with Unison's GUI, proceed as follows:
-
Start Unison by pressing Alt+F2 and entering unison.
-
If you run Unison for the first time and without any further option, you are prompted for a source directory. Enter the source directory you want to synchronize and click .
-
Enter the target directory. It can be either local or remote. If you want to synchronize to a remote directory, choose the method (SSH, RSH or Socket) and enter the hostname and an optional user.
-
If you have not synchronized these two directories before, a warning dialog appears, informing you that Unison will now compare the contents of those directories. Close the warning with and wait until Unison has collected the information from both directories and displays the differences in the main window.
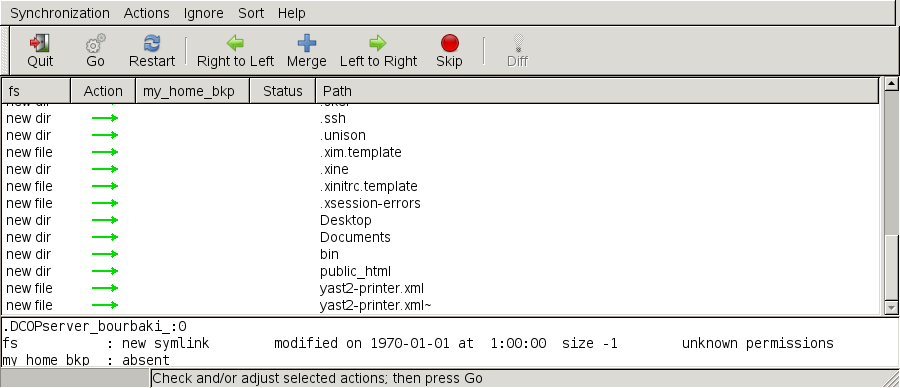
The left column shows the source directory you have selected, the third column shows the target directory. If there are differences between the directories, the column shows a symbol, proposing an action. A green arrow indicates that a file has been modified, added or deleted in the source or the target directory. The direction of the arrow indicates the direction that the change would be propagated if you performed the synchronization now. A question mark indicates a conflict (both files have been changed and Unison cannot decide which one to overwrite).
Figure 11-1 File Synchronization Proposal
-
To modify the proposals Unison shows for each file (for example, if you want to change the direction), select the file and click or . With , exclude a file from synchronization. The symbol in the column changes accordingly.
-
To start the synchronization, click .
The next time you start Unison, a dialog box shows the existing profiles, each specifying a pair of directories to be synchronized. Select a profile or create a new profile (for another pair of directories) and perform the synchronization as described above.
Using the Command Line
Unison can also be operated through the command line. To synchronize a local directory to a remote computer, proceed as follows:
-
Open a shell and enter the following command:
unison -ui text DIR
         ssh://tux@jupiter.example.com//PATH
Replace the placeholders with the respective values.
-
Unison asks you what to do with your files and directories, for example:
local jupiter <---- new file dir [f] -
Press F if you want to follow Unison's recommendation. For other commands, press ?.
-
Proceed with y, if you want to propagate your updates.
11.4.4 Copying Files with FTP
Before configuring your FTP server, make sure that the following requirements are met:
-
The package vsftp is installed.
-
You have root access to your FTP server.
-
Enough disk space is available on your computer.
WARNING: For Home Networks Only
This setup is suited for use in home networks only. Do not deploy it to sites unprotected by firewalls and do not enable world wide access.
To configure an FTP server, proceed as follows:
-
Prepare the FTP server:
-
Open a shell, log in as root, and save a backup copy of /etc/vsftpd.conf:
cp /etc/vsftpd.conf /etc/vsftpd.conf.bak
-
Create an access point for anonymous FTP
mkdir ~ftp/incoming
chown -R ftp:ftp ~ftp/incoming
-
-
Replace the configuration files according to the preferred scenario (refer to the manual page of vsftpd.conf for advanced configuration options):
- Allowing Anonymous Read and Write Access
#
listen=YES

# Enable anonymous access to FTP server
anonymous_enable=YES

#
local_enable=YES
# Enable write access
write_enable=YES
anon_upload_enable=YES
anon_mkdir_write_enable=YES
dirmessage_enable=YES
# Write log file
xferlog_enable=YES
connect_from_port_20=YES
chown_uploads=YES
chown_username=ftp
ftpd_banner=Welcome to FTP service.
anon_root=/srv/ftp
- Grant Restricted Permissions to FTP Users (Home Only)
chroot_local_users=YES
-
Restart the FTP server:
rcvsftp start
On the client, just enter the URL ftp://HOST in your browser or FTP client. Replace HOST with the hostname or IP address of your server. There are many graphical user interfaces available that are suited to browsing the contents of your FTP server. For a list of them, just enter FTP at the search prompt of the YaST package manager.