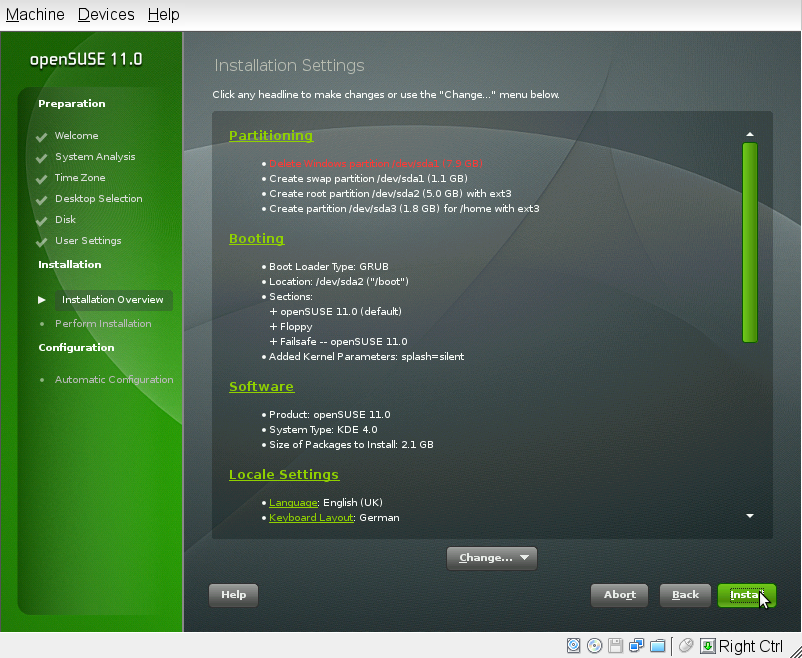
1.12 Installation Settings
On the last step before the real installation takes place, you can alter installation settings suggested by YaST and also review the settings you made so far. To modify the suggestions, either click and select the category to change or click on one of the headlines. After configuring any of the items presented in these dialogs, you are always returned to the Installation Settings window, which is updated accordingly.
Figure 1-10 Installation Settings
HINT: Restoring the Default Settings
You can reset all changes to the defaults by clicking . YaST then shows the original proposal again.
1.12.1
Review and—if necessary—change the partition setup you
configured earlier. Changing the partition setup opens the Expert
Partitioner described in Section 2.1, Using the YaST Partitioner,
(↑ Reference ).
1.12.2
YaST proposes a boot configuration for your system. Other operating
systems found on your computer, such as Microsoft Windows or other Linux
installations, will automatically be detected and added to the boot
loader. However, openSUSE will be booted by default. Normally, you can
leave these settings unchanged. If you need a custom setup, modify the
proposal for your system. For information, see
Section 9.3, Configuring the Boot Loader with YaST,
(↑ Reference ). The boot
method should only be changed by experienced users.
1.12.3
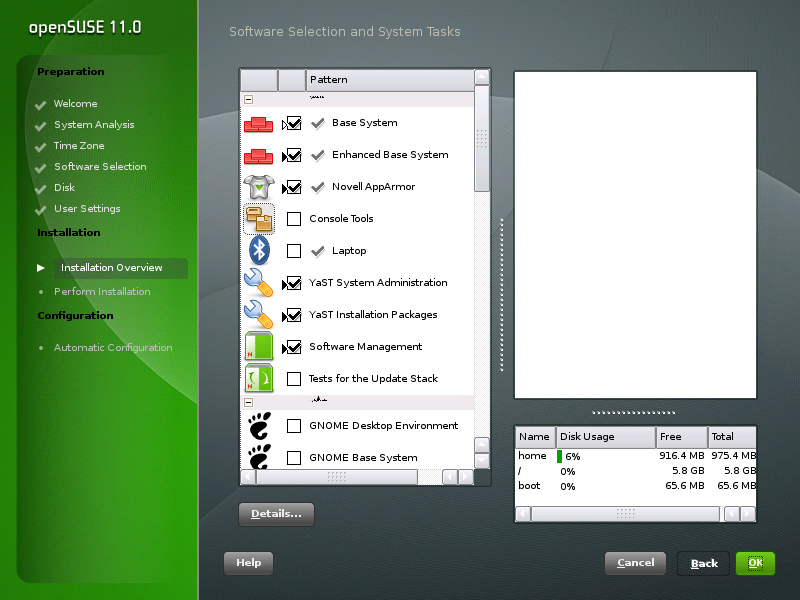
openSUSE contains a number of software patterns for various application purposes. Click to start the pattern selection and modify the installation scope according to your needs. Select your pattern from the list and see the software packages included in the right part of the window. Each pattern contains a number of software packages needed for specific functions (e.g. Multimedia or Office software). For a more detailed selection based on software packages to install, select to switch to the YaST Software Manager.
You can also install additional software packages or remove software packages from your system at any later time with the YaST Software Manager. For more information, refer to Section 3.0, Installing or Removing Software.
Figure 1-11 Software Selection and System Tasks
1.12.4
Here you can change the system and you defined in the first step of the installation. It is also possible to add additional languages. To adjust the system language settings, select . Select a language from the list. The primary language is used as the system language. You can also adapt keyboard layout and time zone to the primary language if the current settings differ. lets you tune language settings for the user root, set UTF-8 support, or further specify the language (e.g. select South African English).
Choose secondary languages to be able to switch to one of these languages at any time without having to install additional packages. For more information, see Section 6.0, Changing Language and Country Settings with YaST.
To change the keyboard layout, select . By default, the layout corresponds to the language chosen for installation. Select the keyboard layout from the list. Use the field at the bottom of the dialog to check if you can enter special characters of that layout correctly. Options to fine-tune various settings are available under . Find more information about changing the keyboard layout in Section 2.3, Setting Up Keyboard and Mouse. When finished, click to return to the installation summary.
1.12.5
Adjust time zone and clock settings here. You can also configure a Network Time Protocol (NTP) client that automatically synchronizes your computer with a time server. This is the same configuration as shown earlier in Section 1.8, Clock and Time Zone.
1.12.6
Change the current settings and change or set the here. This is the same configuration as shown earlier in Section 1.11, Create New User.
1.12.7
openSUSE can boot to different runlevels. Normally, there should be no
need to change anything here, but if necessary set the default runlevel
with this dialog. Refer to Section 8.2.3, Configuring System Services (Runlevel) with YaST,
(↑ Reference ) for
more information about runlevel configuration.
1.12.8
This dialog presents all the hardware information YaST could obtain about your computer. When called, the hardware detection routine is started. Depending on your system, this may take some time. Select any item in the list and click to see detailed information about the selected item. Use to save a detailed list to either the local filesystem or a floppy. Advanced users can also change the PCI ID setup and Kernel Settings by choosing .
1.12.9
Installing from images considerably speeds up the installation. Images contain compressed snapshots of installed systems matching your selection of patterns. Packages not contained in the images deployed will be installed conventionally.
Unless your custom software selection does not match any of the available images, this feature is by default. In case of problems, it for debugging purposes.