1.5 PlateSpin Forge Management VM Configuration
After configuring the appliance and activating the PlateSpin Forge license, you need to configure the VM:
-
Change the Administrator default password and add users to the Administrators group of the PlateSpin Forge Management VM. For information, see Section 1.5.1, Changing the Administrator Password and Adding Users.
-
Configure SMTP settings. For information, see Section 1.5.2, SMTP Configuration.
-
Add recipients for e-mail notification. For information, see Section 1.5.3, E-Mail Configuration.
-
Review built-in protection tiers and (if necessary) create new custom tiers. For detailed information, see “Managing Protection Tiers” in the PlateSpin Forge™ User Guide or in the online help.
1.5.1 Changing the Administrator Password and Adding Users
Use the Web User Interface for Microsoft Windows Server to change the Administrator password and to add users to the Administrator group of the PlateSpin Forge Management VM.
Figure 1-1 Web User Interface for Microsoft Windows Server
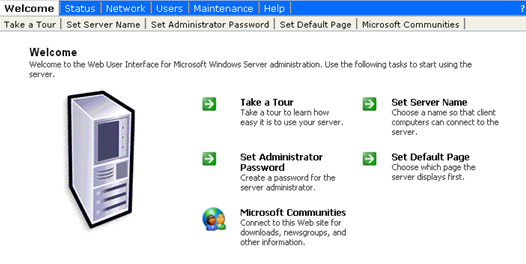
To access the Web User Interface, open a new browser window and navigate to https://ipaddress:8098 where ipaddress is the IP address of the PlateSpin Forge Management VM. There is a link to the Web User Interface under .
Click . Enter the password, which by default is set to password, then enter and confirm the new password. Click . The Web interface confirms the password change. Click to return to the main page.
NOTE:The Web User Interface is only supported for Microsoft Internet Explorer.
To add a user to the Administrators Group for the PlateSpin Forge Management VM:
-
In the PlateSpin Forge Web Interface, click on the toolbar, then click .
-
Click on the right side of the Web page.
-
Specify a and . Confirm the password. All other fields are optional.
-
Click .
To add the new user, or any domain user, to the Administrator Group:
-
In the PlateSpin Forge Web Interface, click
-
Select the Group.
-
Click
-
Click
-
Select the desired User from the list on the right side of the Web page and click .
-
Click
1.5.2 SMTP Configuration
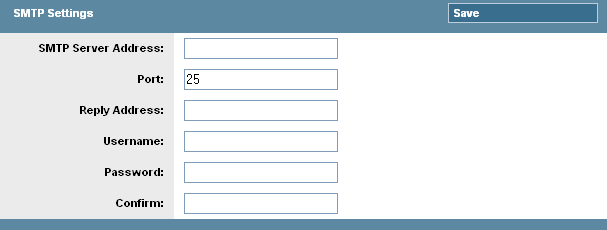
Use the PlateSpin Forge Web Interface to configure SMTP (Simple Mail Transfer Protocol) settings for the server used to deliver e-mail notifications.
Figure 1-2 Simple Mail Transfer Protocol settings
To configure SMTP settings:
-
On the navigation bar in the PlateSpin Forge Web Interface, click > .
-
Specify a SMTP server , if desired (the default is Port 25), and for receiving e-mail event and progress notifications.
-
Type a and , then confirm the password.
-
Click .
1.5.3 E-Mail Configuration
Use the PlateSpin Forge Web Interface to configure e-mail for important notifications. (The Web Interface is available only in Internet Explorer.)
-
On the navigation bar, click . Click .
-
Select to receive e-mail notification of certain Protection Events.
-
Click to add one or more addresses to which to send the notifications.
-
In the field type an e-mail address or multiple addresses (separated by commas). Click .
-
To delete listed addresses, click next to the address to be removed.