6.2 Project Explorer
Projects are displayed in the Project Explorer.
Figure 6-1 Typical Project Explorer Tree
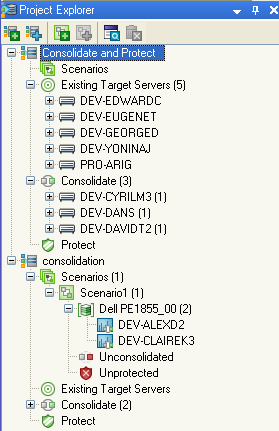
The project, scenario, and consolidated workloads are arranged hierarchically; that is, workloads are listed under a server, servers are listed under a scenario, and scenarios are listed under a project. All selected candidates are listed under workloads inside the project.
Table 6-1 Project Explorer Commands


Alternatively, select Project Explorer commands by right-clicking any server, scenario, or project.
Table 6-2 Project Explorer Icons


6.2.1 Creating Projects
A project can consist of any combination of consolidation candidates, protection candidates, workloads, and scenarios. Consolidation candidates are workloads on the network that you might want to move to virtual machines. Protection candidates are workloads you might want to create standby VM duplicates of for disaster recovery.
You create and compare scenarios in a project. The Project Report consists of scenario comparison results, which help in determining the best consolidation scenario for the environment.
Before you create a project, identify and group consolidation candidates. The identified candidates allow you to create and compare consolidation scenarios in a project.
NOTE:Collecting at least 24 hours of data for each workload before starting the project is recommended.
To create a new project:
-
Click
 and select or click
  in the Project Explorer.
The Project Wizard (Step 1 of 5: Project Name and Type) is displayed.

-
Type a for this project in the text box.
-
Select a :
Server Consolidation: The project produces a recommendation for the best placement of workloads with respect to concurrent execution and CPU and memory heap space requirements.
Workload Protection: The project produces a recommendation for deployment of workloads for disaster recovery. Specify existing virtual servers or use server templates to build a scenario.
Both: The project produces a recommendation for both consolidation and protection. For example, optimally consolidate servers, and provision the remaining headroom for data protection.
A workload cannot be provisioned for both consolidation and protection in the same project.
-
Click .
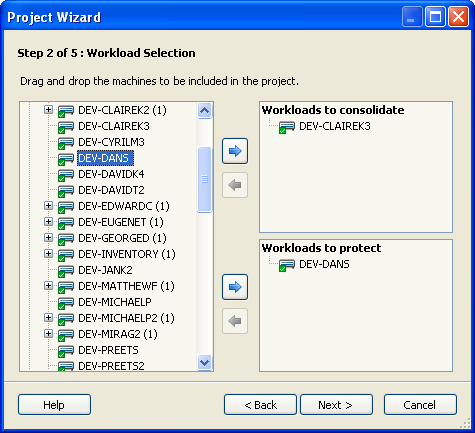
The Step 2 of 5: Workload Selection dialog box is displayed.
-
Identify the workloads to include in the project.
-
Drag workloads from the tree on the left and drop them into the Workloads to Consolidate panel or the Workloads to Protect panel on the right.
Alternatively, select servers and click the arrow pointing to the panel to which you want to add them. If you make a mistake, select the server in the panel on the right that you want to remove and click the arrow pointing back toward the server list. Servers cannot be targeted for consolidation and protection within the same project.
-
Drag and drop Target Servers into either of the two panels on the right.
-
Click .
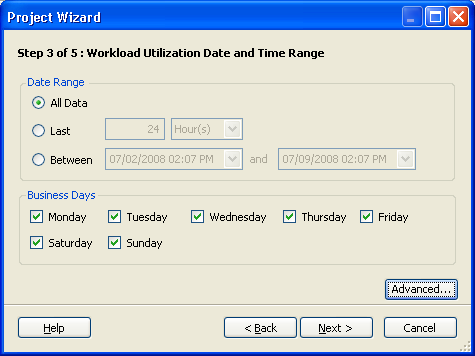
The Step 3 of 5: Workload Utilization Date and Time Range dialog box is displayed.
-
Set the date and time range to summarize the workload data. and are required for calculating the 24H profile of workloads.
-
Optionally, click to manually set workload scaling factors.
The Workload Scaling dialog box is displayed.
-
Use the slide controls to adjust values or type the desired number.
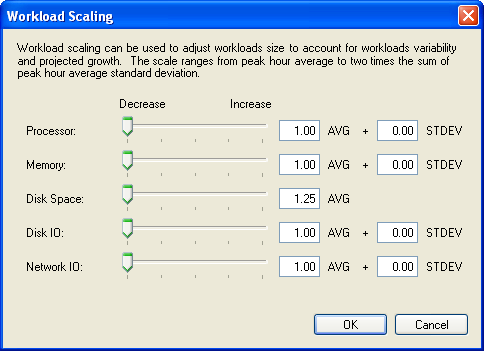
Workloads can be scaled across five dimensions to account for workload variability and projected growth. Server resources allocated to workloads on target servers are based on scaled workloads. By scaling workloads upward, more server resources might be required, potentially resulting in lower consolidation ratios. When scaling pointers are moved, workload scaling factors change.
Workloads cannot be scaled below their peak hourly averages.
-
Click .
-
Click .
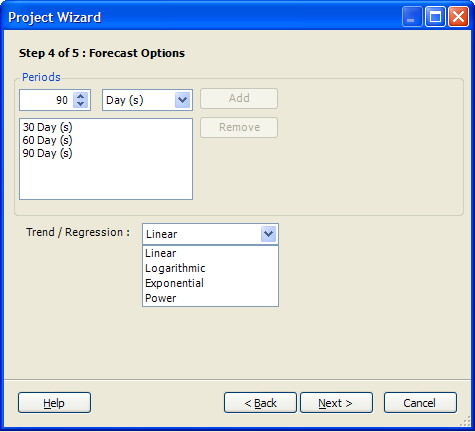
The Step 4 of 5: Forecast Options dialog box is displayed.
Select forecast options and a trend type. Workloads can be forecasted to account for future growth.
The Step 5 of 5: Power and Cooling dialog box is displayed.

-
Click .
-
Enter values for the , or deselect the check box if these values are not to be included.
Energy Cost: Cost of energy per kilowatt hour.
Server Derating Factor: Percentage of total energy consumption by the average server. For example, a server rated at 800 watts uses 400 watts with a server derating factor of 50%.
-
Click .
The new project is displayed in the Project Explorer.
When creating a project, a 24H Profile of workloads is computed. This includes calculating Processor Speed (MHz), Memory (MB), Disk Space Used (GB), Disk IO (MB/s), and Network IO (MB/s) over a 24-hour period for each workload. The 24H Profile comprises 24 values of workloads that correspond to each hour of the day (0 to 23). Each value in the 24H Profile is calculated by taking the peak value from all values observed for that hour.
6.2.2 Server Templates
Server templates are used to define servers for use in consolidation scenarios. You create server templates, each with their own components and utilization thresholds. A common use for server templates is for scale-up or scale-out consolidation scenarios. The created server templates are used as target servers for consolidating workloads.
Creating a New Server Template
-
Click
, then click  on the menu.
The Server Template Manager dialog box is displayed.
-
Click
 .
.
The New Server Template dialog box is displayed.
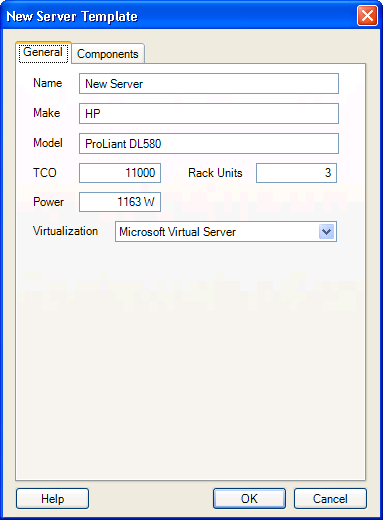
-
Make sure the General page is displayed, then specify the following:
-
Click , then specify the following on the Components page:
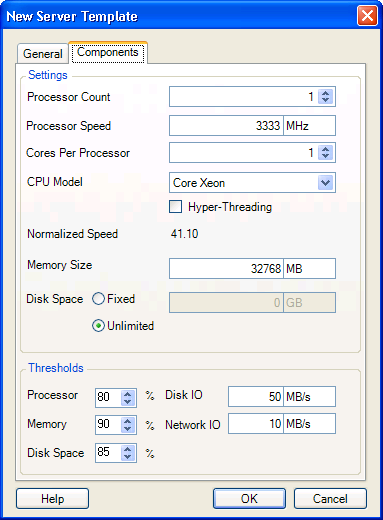
Thresholds specify the level of utilization the Consolidation Planning Module can assume for the server templates. This affects the outcome of consolidation scenarios; lower utilization thresholds result in more servers being required to host the workloads of a scenario.
For example: workloads requiring 180 GB of memory can be consolidated onto a server with 200 GB of memory if the utilization threshold is set at 90%. However, if the memory utilization threshold is set at 50%, only 100 GB of memory can be used, resulting in fewer workloads being consolidated.
Utilization thresholds are initially set to the defaults listed in the table above and can be customized for specific needs.
-
Click .
Editing an Existing Server Template
-
Click
, then click on the menu.
The Server Template Manager dialog box is displayed.
-
Select the server template you want to edit.
-
Click
 .
.
The Edit Server Template dialog box is displayed.
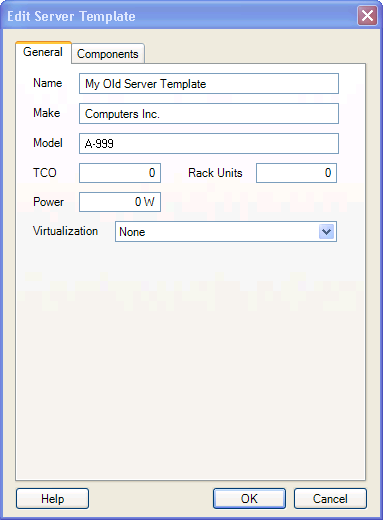
-
On the General page, make any desired modifications using the following as a guide:
-
Click , then make any desired modifications using the following as a guide:
Thresholds specify the level of utilization the Consolidation Planning Module can assume for the server templates. This affects the outcome of consolidation scenarios; lower utilization thresholds result in more servers being required to host the workloads of a scenario.
For example: workloads requiring 180 GB of memory can be consolidated onto a server with 200 GB of memory if the utilization threshold is set at 90%. However, if the memory utilization threshold is set at 50%, only 100 GB of memory can be used, resulting in fewer workloads being consolidated.
Utilization thresholds are initially set to the defaults listed in the table above and can be customized for specific needs.
-
Click .
Copying a Server Template
-
Select the template and click
 .
.
The New Server Template dialog box is displayed with the template information prepopulated.
-
Rename the template and make any other required modifications.
-
Click .
The template is copied and is displayed in the Server Template Manager listing.