Validating Digital Signatures
This section covers the viewpoint of a site administrator who wants to receive signed SAML data from a Trusted Affiliate. At this point, you are configuring properties relating to the receiving half of the SAML relationship.
Assume that you have a SAML trust relationship with another site, and that site is digitally signing incoming SAML assertions to you. You must get a Public Key Certificate from the Trusted Affiliate site in order to validate the signatures it is going to be generating. This means you must:
- Receive a public key certificate from the Trusted Affiliate.
- Import the public key certificate into eDirectory.
- Associate the public key certificate with the appropriate Trusted Affiliate.
- Set the SAML signature security settings on the appropriate Trusted Affiliate.
You can receive public key information in a number of different ways. The most common way is to receive a .der encoded certificate file through e-mail or on disk. After receiving the certificate file, you must import it into eDirectory so that it can be used.
In Novell eDirectory, trusted public key certificates must be placed in a Trusted Roots container. If you do not already have one, you need to create this container. Usually the Trusted Roots container is created under the [ROOT].security container. Do the following to create the container:
-
Right-click the security container.
-
Select New Object > NDSPKI:Trusted Root, as shown in Figure 87:
Figure 87
NDSPKI:Trusted Root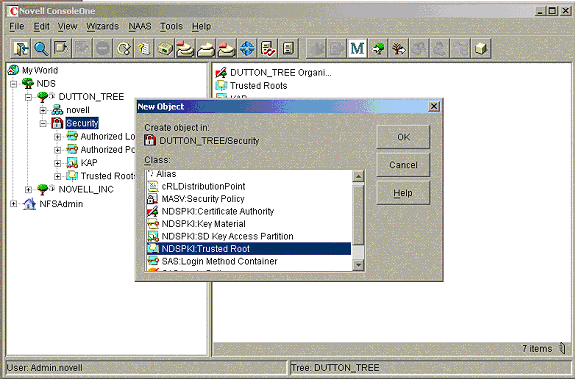
-
Click OK.
-
Add a Trusted Root public key to the newly created Trusted Roots container. Right-click the Trusted Roots container, and select New > Trusted Root.
The Create Trusted Root Wizard launches, as shown in Figure 88:
Figure 88
Create Trusted Root Wizard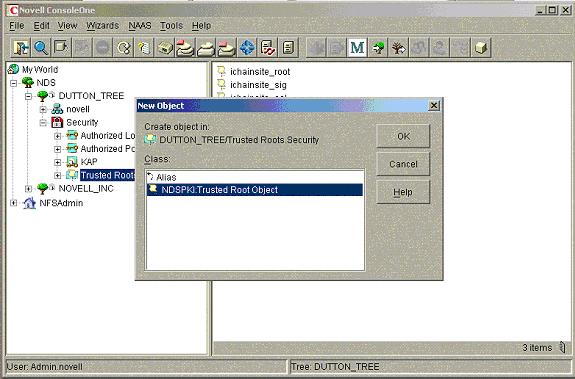
-
Enter the name for the Trusted Root object, then import the file.
A panel similar to the following should be displayed.
Figure 89
Trusted Root Page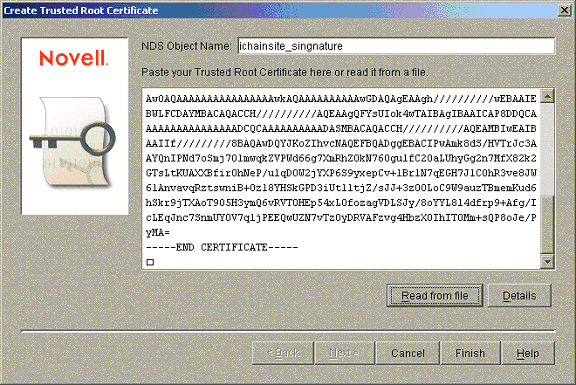
-
Click Finish to complete the import.
You should now have a new object in the Trusted Roots container.
Next, you must associate this object with your Trusted Affiliate entry for the appropriate Trusted Affiliate object.
-
Right-click the Trusted Affiliate object, then select Properties, as shown in Figure 90.
Figure 90
Trusted Affiliate Properties
-
Click the General tab, then click the plus sign (+) located under Trusted Root Information > SAML Signature.
-
Browse to the Trusted Roots container and select the desired Trusted Root object.
Figure 91 shows a Trusted Affiliate with a SAML Signature Public Key Certificate set:
Figure 91
Trusted Affiliate With SAML Signature Public Key Certificate Set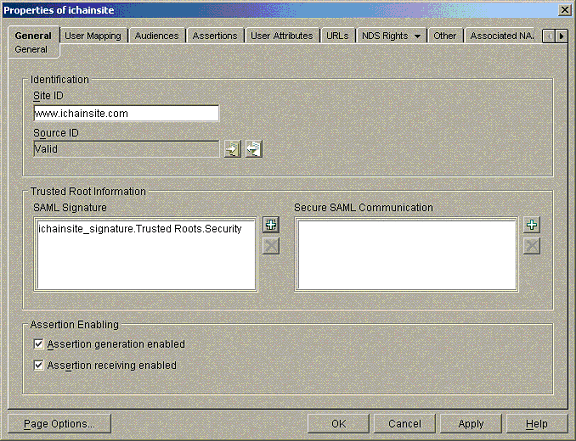
This setting allows the SAML extension server to validate digital signatures generated by this Trusted Affiliate using the specified certificates.
-
Finally, you can require that all SAML data sent from this Trusted Root must be digitally signed. Click the Assertions tab, then select the Require Digitally Signed Messages for the Browser/POST or Require Digitally Signed Messages for the Browser/Artifact check box.
According to the SAML specification, while requiring browser/POST signatures, browser/Artifact signatures are optional, but browser/POST signatures are required. See Figure 92:
Figure 92
Assertions Tab: Signatures
SAML Secure Communication: SSL - Mutual
In the SAML browser/Artifact profile, SAML partner sites directly communicate in order to pass SAML assertions back and forth. This direct server-to-server communication is often referred to as the SAML back-channel. SAML back-channel communication should always go over SSL. For added security, the SAML browser/Artifact profile requires that the SSL layer be mutually authenticated. This means that both the server and the client must mutually authenticate using certificates.
The following are commonly used terms when discussing SSL and Public Key Infrastructure (PKI) in general:
Trusted Root Certificate: Certificates are generally signed by some parent Certificate Authority (CA). The idea is that if you trust a given CA, then you automatically trust the certificates that it signed.
Trusted Certificate: Instead of importing a trusted CA that causes you to trust all of the certificates signed by that CA, you can import an individual public key certificate that you want to trust. This way, you are assured that you will trust that certificate only, as opposed to everything signed by a given CA.
SSL Server Certificate: The certificate used by an SSL server to authenticate the server to incoming requests
SSL Client Certificate: A certificate used to authenticate to servers when generating outbound requests.
SSL Flow of Messages
Figure 93 shows the flow of messages that occur between a Client and Server in setting up an SSL connection:
Figure 93SSL Message Flow
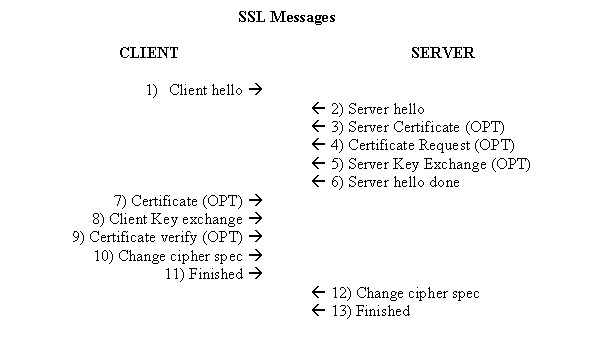
The SSL message flow shows the two critical phases of the SSL negotiation where trust is established between the Server and Client:
- In Step 3, the server presents its SSL Server Certificate. This certificate is used by the Client in Step 9 to determine if the server is trusted or not. These steps authenticate the Server to the Client.
- If client authentication is performed (SSL - Mutual), the server requests a Client certificate (Step 4), and the Client sends its SSL Client Certificate to the Server, which is then responsible for validating it. This step authenticates the Client to the Server.
Certificate Trust in iChain
iChain determines trust using its Trusted Roots container. If the provided SSL Client Certificate exists in its Trusted Roots container, iChain trusts the certificate; or, if the provided SSL Client Certificate was signed by a CA that is in the Trusted Roots container, then iChain trusts the certificate. If neither the client certificate nor its CA is found in iChain's Trusted Roots container, the SSL Client certificate is rejected and the connection closed.
Certificate Trust In the SAML Extension Server
The SAML extension server determines which certificates it trusts based upon the settings in each Trusted Affiliate object. The Trusted Affiliate's General page contains a Trusted Root Information section for the UI. This panel allows the SAML Site administrator to specify which SSL certificates are trusted by the system. When the SAML extension server loads its configuration from the directory, each of the Trusted Affiliate's Secure SAML Communication certificates are read. These certificates are added to the Java Virtual Machine's (JVM) Trust Store. When the SAML extension server generates an outbound SSL request, the received SSL Server Certificate is checked against the certificates stored in the JVM. The certificate is trusted and a connection is made if:
- The SSL Server Certificate exists in the JVM Trust Store.
- The SSL Server Certificate's CA exists in the JVM Trust Store.
The next step in understanding how SAML uses SSL is to look at how the SAML messages are sent between the SAML Extension server and the Trusted Affiliate sites.