Overview of the iChainSite Setup
The following list shows the steps you need to complete in order to set up the www.ichainsite.com SAML demo application with the loopback SAML Trusted Affiliate.
- Configure iChain with the www.ichainsite.com accelerator. See Configuring the iChain Accelerator .
- Configure the ISO with the www.ichainsite.com protected resources and OLAC parameters. See Configuring the iChain Protected Resource and OLAC.
- Deploy the www.ichainsite.com sample application. See Deploying the iChainSite Sample Application.
- Test the www.ichainsite.com sample application.
- Install the SAML extension schema and snap-ins. See Installing the SAML Extension for Novell iChain Software
- Create SAML extension configuration objects in the directory and create the loopback SAML Trusted Affiliate site. See Configuring the SAML Extension in the SAML Extension for Novell iChain guide.
- Install SAML extension server components. See Installing the SAML Extension Software in the SAML Extension for Novell iChain guide.
- Test the SAML extension service.
- Test the www.ichainsite.com loopback SAML Trusted Affiliate site. See Testing the Loopback Affiliate Links.
Configuring the iChain Accelerator
In order to run the sample, you must first create a new accelerator using the iChain GUI. You should name this accelerator www.ichainsite.com. Figure 3 shows a basic www.ichainsite.com accelerator configuration:
Figure 3iChainSite Accelerator Configuration
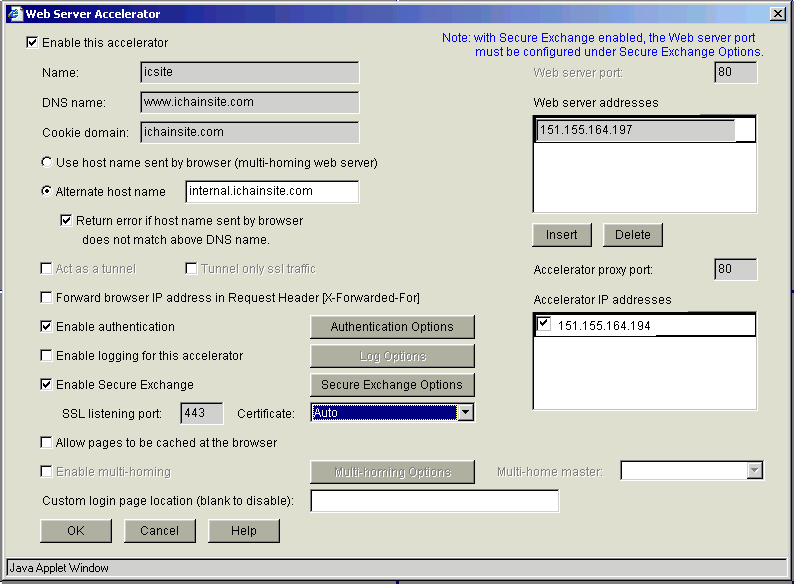
For more information about the Web Server Accelerator page, see Configuring a Typical Accelerator in the Novell iChain Administration guide.
Configuring the iChain Protected Resource and OLAC
Using ConsoleOne, you must define both a protected resource for the iChainSite application and the OLAC parameters to pass to the application. You make these definitions by selecting the iChainServiceObject you are using in the directory, and then selecting the Protected Resources page. Figure 4 shows the protected resource definitions for the iChainSite application:
Figure 4Protected Resource Definitions

Next, you must define OLAC parameters for the ichainsite_portal protected resource. Figure 5 shows all of the OLAC parameters required by the iChainSite demo application.
Figure 5OLAC Parameters
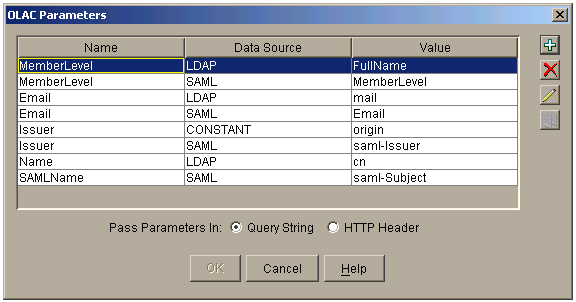
You should make sure that the parameter names (Name) match those in Figure 5 because the iChainSite demo application relies on these values; if they do not match, the application does not work. The LDAP values names (Value) do not need to match as long has you have the appropriate LDAP attribute set on the test user objects. (You can use other LDAP values than fullName for MemberLevel and mail for Email.)
Deploying the iChainSite Sample Application
Because iChainsite uses simple Java* server pages to display its content, you must deploy it into a Java servlet container. If you are running the Apache Tomcat server engine, you can simply take the entire ichainsite directory and place it into the tomcat_home/webapps directory. If you want to deploy the iChain site to the URL extension ic (as used in the previous steps), then you must rename the iChainSite directory to ic. See the SAML Extension for Novell iChain Administration Guide for details on installing and running Tomcat.
You can test by page by going to your browser and entering http://www.ichainsite.com/ic/portal. After authenticating to iChain, you should see a page that looks the one shown in Figure 6:
Figure 6Welcome to iChainSite Portal
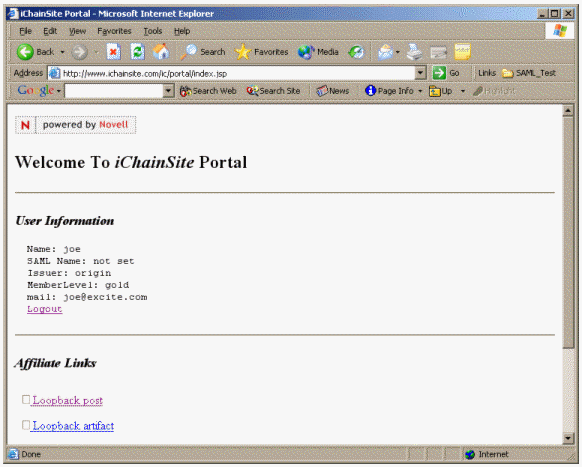
Make sure that the LDAP properties are being passed correctly. In this example, the user is logged in as joe.novell, and has an e-mail address of joe@excite.com and fullName (MemberLevel) of gold. See Testing the Loopback Affiliate Links for information on the Loopback post and Loopback artifact links.
Installing the SAML Extension for Novell iChain Software
Install the SAML extension for Novell iChain components. For detailed instructions on how to install this software, see the SAML Extension for Novell iChain Administration Guide.
The SAML extension installer installs three components:
- SAML extension server
- Snap-ins
- Schema extension
Configuring SAML and ConsoleOne
After you have configured the sample site and installed the SAML components, you are ready to configure the system.
Creating the SAMLExtensionServer
The first object you need to create is the SAMLExtensionServer. This object contains all of the SAML extension server configuration objects.
-
Right-click the container where you want to create the SAMLExtensionServer object.
We recommend that you create this object in the sample container where your iChainServiceObject resides.
-
Click New > SAML extension server.... See Figure 7.
Figure 7
Provider Site Menu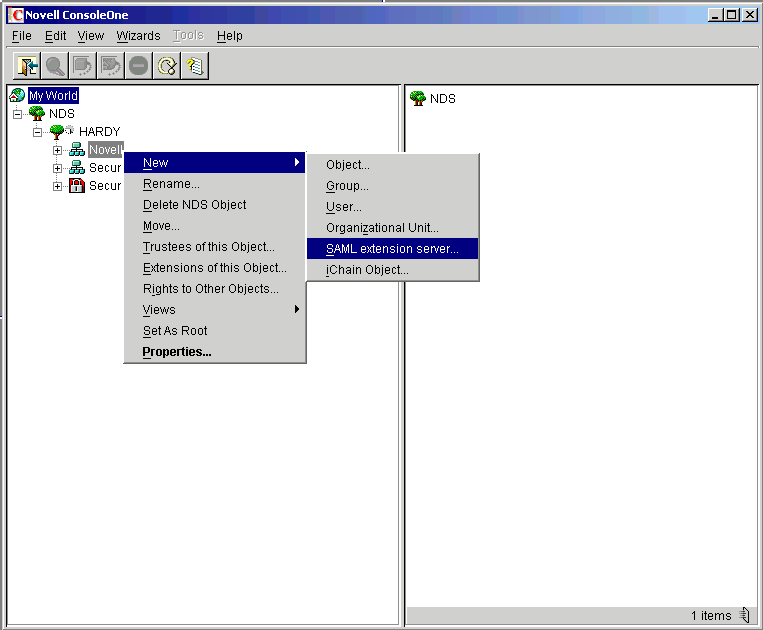
The SAMLExtensionServer object contains configuration information that allows iChain to communicate with the SAML extension server.
-
To set the properties, right-click the SAMLExtensionServer object, then select Properties.
A Properties page is displayed.
Figure 8
Properties of IdentityService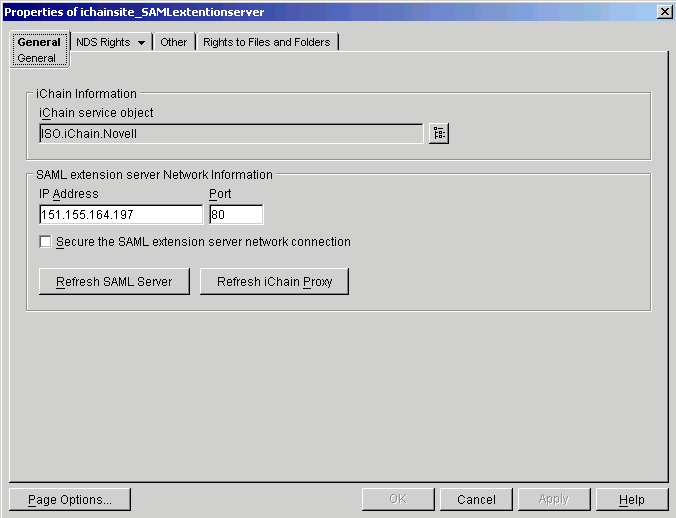
-
Set the following properties:
iChain Service Object: This field is a back-link to the ISO you want to associate this SAMLExtensionServer with.
SAML Extension Server Network Information: These settings tell iChain where the SAML extension server is running on the network. It is generally a good idea to have a machine dedicated to running the SAML extension server. Specify the IP address and port the SAML extension Web server is running on.
Secure the SAML Extension Server Network Connection: This setting allows the use of SSL between the SAML extension server and iChain. See Fine-Tuning the SAML Extension for details on how to set this up.
Creating the ISO ProviderSiteID Link
After creating the SAMLExtensionServer, you must create a link between it and your iChainServiceObject. The iChainServiceObject must contain an attribute that allows iChain to associate the service object with the appropriate Identity Provider Site object. An attribute called identityProviderSiteRef must be created on the iChainServiceObject. Do the following to create the identityProviderSiteRef:
-
Right-click the iChainServiceObject and select Properties.
-
Select Other > Add Attribute.
-
Select the identityProviderSiteRef attribute, then set the value to SAMLExtensionServer.
Figure 9 shows a sample iChainService object with the identityProviderSiteRef attribute set:
Figure 9
iChainService Object with the identityProviderSiteRef Attribute Set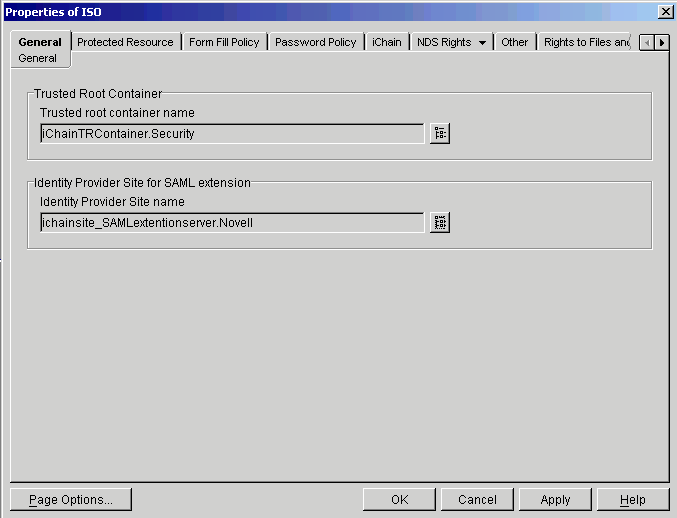
Creating the SAMLSiteConfig Object
-
Right-click the SAMLExtensionServer object.
-
Select New > Site Config. This launches the samlSiteConfig Creation Wizard.
The SAMLSiteConfig object is created as a child object of the SAMLExtensionServer object. Figure 10 shows a new samlSiteConfig object named SAMLConfig:
Figure 10
SAMLConfig Object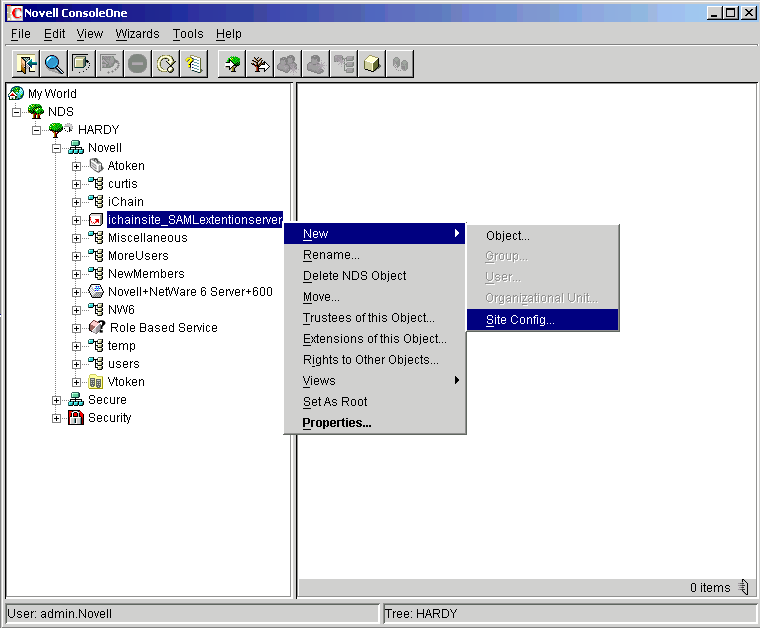
The SAMLSiteConfig object contains the top-level SAML configuration information that is used to identify this site to other SAML sites. The samlSiteConfig Properties page contains the following three main tabs: General, Assertions, and URLs.
General Page
Figure 11 shows the General page's fields, followed by a description of the fields.
Figure 11SAMLSiteConfig Properties: General Page
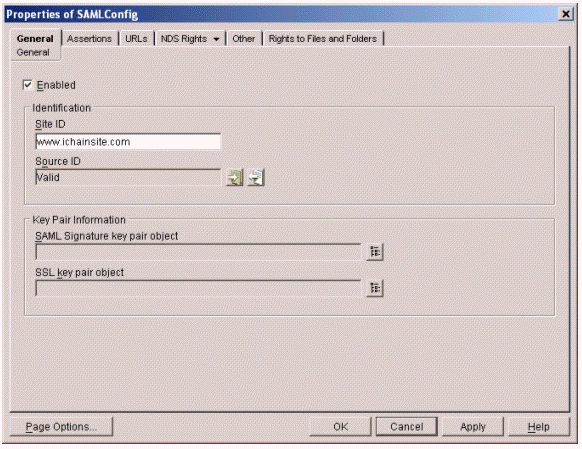
Site ID: A SAML parameter used to identify this SAML site to your partner SAML sites. In Figure 11, the example shows a SAML system being set up for a company using www.ichainsite.com. In this case, the identifier used by partner sites is www.ichainsite.com.
SourceID: A 20-byte value that uniquely identifies the site. This value is used as part of the SAML Browser/Artifact profile. Partner sites use this 20-byte value to determine the origin site of a SAML Artifact. This value can be automatically generated, or you can import a 20-byte hex or base 64 value. Generally, it is sufficient to automatically generate the value. The Valid indicator indicates that a good 20-byte value is set for the configuration.
SAML Signature Key Pair Object: Allows you to specify a Key Material object in the directory to use to create XML signatures on SAML data. To use it, you must export the Key Material object in password-protected PKCS#12 format and copy it to the SAML extension server. The reference to the key is for convenience to help you track which key should be in use on the SAML extension server.
SSL Key Pair Object: Allows you to specify a Key Material object in the directory to use to create outbound SSL connections. To use it, you must export the Key material object in password-protected PKCS#12 format and copy it to the SAML extension server. The reference to the key in the page is for convenience to help you track which key should be in use on the SAML extension server.
Assertions Page
Figure 12 shows the Assertion page's fields, followed by a description of the fields.
Figure 12SAMLSiteConfig Properties: Assertions Page
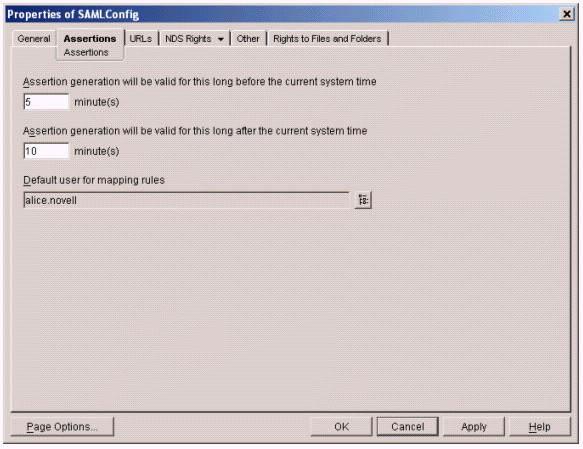
Assertion Generation Will Be Valid for this Long before the Current System Time: SAML assertions contain a conditions element. The SAML conditions element contains two time-stamp values. One of the time stamps is a Not Valid Before time stamp, meaning if the assertion is received before the time specified in the time stamp, it should not be accepted. In some cases, SAML partner systems could have system clocks that are not exactly synchronized. This difference between systems could cause time constraint conditions to fail. Therefore, this value allows you to set the Not Before time condition to be pre-skewed to avoid time synchronization errors. The resulting Not Before time condition is set to the current time minus this value.
Assertion Generation Will Be Balid for this Long after the Current System Time: The SAML conditions element also contains a Not On Or After time stamp. This condition states that an assertion received on or after a specified time must be rejected. SAML assertions that are generated by the system are given a Not On Or After time stamp equal to the current time plus the value of this field.
Default User for Mapping Rules: This is an optional value that indicates a user object to map an incoming SAML user to in the event that all other user mapping rules fail. Each Trusted Affiliate configuration can contain a set of user mapping rules that define how to map incoming SAML users to identities in the local directory. If a given Trusted Affiliate configuration has no rules, or all of the rules evaluate to False, then this value is used to map the user. If this value is left blank and a user cannot be mapped, the user will not be able to access the system and will instead be shown an error page.
URLs Page
Figure 13 shows the URL page's fields, followed by a description of the fields.
Figure 13SAMLSiteConfig Properties: URLs Page
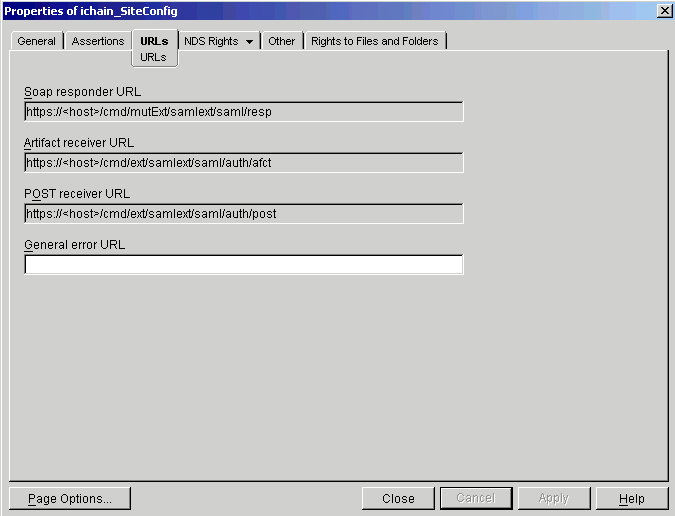
SOAP Responder URL: This value is used for informational purposes only. You use it for setting up affiliations with other SAML-enabled partner sites. It indicates the URL that partner sites should use to access your SAML SOAP responder service. For the SAML extension product, this URL is always https://host/cmd/mutExt/samlext/saml/resp for mutual authentication required connections, or https://host/cmd/ext/samlext/saml/resp if mutual authentication is not required.
Artifact Receiver URL: This value is used for informational purposes only. You use it for setting up affiliations with other SAML-enabled partner sites. It indicates the URL that partner sites should send SAML authentication requests to using the SAML Browser/Artifact profile. For the SAML extension product, this URL always https://host/cmd/ext/samlext/saml/auth/afct.
Post Receiver URL: This value is used for informational purposes only. You use it for setting up affiliations with other SAML-enabled partner sites. It indicates the URL that partner sites should send SAML authentication requests to using the SAML Browser/POST profile. For the SAML extension product, this URL will always be https://host/cmd/ext/samlext/saml/auth/post.
General Error URL: This value is used if an error occurs while the user is performing an operation on the SAML extension server. The user is then redirected to the provided URL, which should show a message that indicates the problem and a link back to the host site or resource.
Creating a SAML Trusted Affiliate
After you have defined your site's SAML configuration, you can create SAML trusted partner sites. Each SAML affiliation is configured in a child object of the samlSiteConfig object in the directory. The object used to contain the SAML partner site configuration is a samlTrustedAffiliate object. You can create a new samlTrustedAffiliate object by right-clicking the SAML Config object that you created in Creating the SAMLSiteConfig Object, then clicking New > Trusted Affiliate.
When you set up the SAML extension service for the first time, we recommend that you create a "loopback" SAML Trusted Affiliate site. The loopback site is a copy of your site (for example, (www.ichainsite.com), and can help you determine whether the SAML extension system is working properly. The following graphics and directions describe how to create a loopback affiliate for your iChain sample site.
General Page
Figure 14 iChainSite Properties: General Page
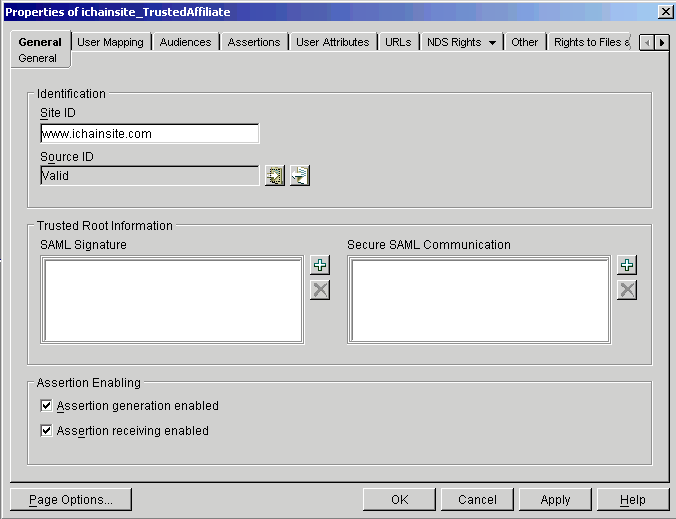
The General page's fields are similar to the samlSiteConfig's General page, but with some key differences, as described:
Site ID: The value used to identify this site to other SAML partners. Because you are creating a loopback affiliate, this value is shown in Figure 14 as www.ichainsite.com.
Source ID: The same value that you generated in the samlSiteConfig Properties. It is important that the value matches the one used in the samlSiteConfig page. If you select the auto-generate option, the values are guaranteed to match.
SAML Signature: Shows links to Trusted Root Certificate objects that the SAML extension service uses to validate signed SAML messages.
Secure SAML Communication: Shows links to Trusted Root Certificate objects that the SAML extension service uses in its SSL trust store when making outbound SSL connections.
Assertion Generation Enabled: Indicates whether assertions should be generated for the SAML affiliate site.
Assertion Receiving Enabled: Indicates whether assertions should be accepted from the SAML affiliate site.
User Mapping Page
Figure 15 iChainSite Properties: User Mapping Page

The User Mapping page allows you to define a set of rules that to be evaluated for each incoming user from this SAML partner. The user mapping rules are evaluated in order and the first successful evaluation is used as the mapping. There are two different types of user mapping rules, along with a password attribute:
Static: A static user mapping rule makes a decision based upon the value of attributes in the SAML Assertion. If the condition of a static user mapping rule evaluates to True, a specified user object is used as the user mapping. This type of rule is ideal for many-to-one user mappings where many users from an affiliate site map to a smaller set of role users at the destination site.
Dynamic: A dynamic user mapping rule performs an LDAP search using values contained in the SAML Assertion. An example of this type of user mapping rule would be a search through the users for a given e-mail address or last name. These types of rules are ideal for one-to-one mappings where there is a unique identity at the designation site for each incoming user from the source site.
User Password Attribute: Many applications fronted by iChain still need a user password in order to function properly. This value allows you to specify a SAML attribute value to use as the user's password when the session is created on iChain. We recommend that you avoid using this feature. It is included only for support of legacy applications that require user passwords for authentication.
User Mapping Rules
As stated in the User Mapping Page section, you can define dynamic and static types of user mapping rules. The following are examples of dynamic and static user mapping rules used in the iChain sample site loopback affiliation.
IMPORTANT: Use the dynamic user mapping rule for setting up the iChain site. The static mapping rule is included only as a reference point.
Dynamic Rules
To set a dynamic user mapping rule:
-
On the User Mapping page, click the plus sign (+) to the right of the User Mapping Rules field.
The Modify a User Mapping Rule dialog box is displayed, as shown in Figure 16:
Figure 16
Modify a User Mapping Rule Dialog Box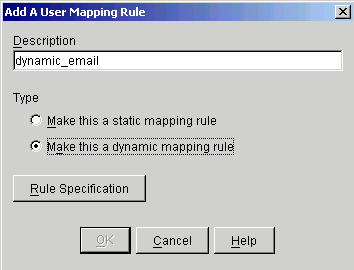
-
In the Description field, specify an identifiable description to associate with this rule.
-
Select Make This a Dynamic Mapping Rule.
or
-
If you want to generate the rule automatically, click OK.
or
If you want to enter the rule manually, click the Rule Specification button.
Clicking Rule Specification displays the Modify Dynamic Mapping Rule dialog box, as shown in Figure 17:
Figure 17
Modify Dynamic Mapping Rule Dialog Box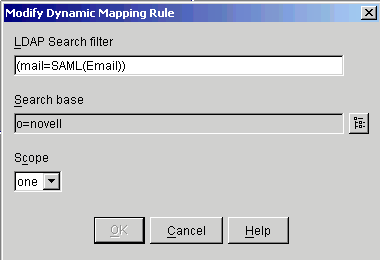
-
Specify the Search filter and Search Base, and select the Scope.
For a dynamic rule, a search is made for a match between the LDAP mail attribute and the SAML Email attribute sent in the assertion. The search base value determines the container in which the search will start. Figure 17 shows that for this example, the search starts in the o=novell container. The Scope value determines if a single level (one) or sub-tree (sub) search is performed. In the example, the search takes place in a single container only.
-
Click OK twice.
-
Static Rules
To set a static mapping rule:
-
On the User Mapping page, click the plus sign (+) to the right of the User Mapping Rules field.
The Modify a User Mapping Rule dialog box is displayed, as shown in Figure 18:
Figure 18
Modify a User Mapping Rule Dialog Box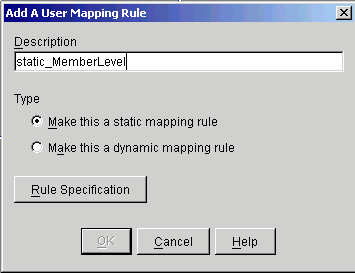
-
On the Description field, specify an identifiable description to associate with this rule.
-
Choose Make this a Static Mapping Rule.
-
If you want to generate the rule automatically, click OK.
or
If you want to enter the rule manually, click the Rule Specification button.
Clicking Rule Specification displays the New Static Mapping Rule dialog box, as shown in Figure 19:
Figure 19
New Static Mapping Rule Dialog Box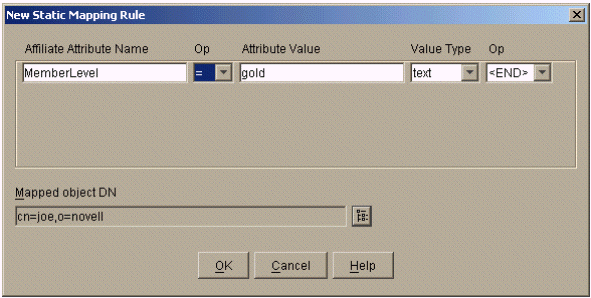
-
Specify the dynamic sample rule with (mail=SAML(Email)). This performs a one-to-one mapping for all users with matching e-mail addresses.
For the sample application to work properly, you must have users in the directory with valid e-mail addresses set.
Audiences Page
Figure 20 iChainSite Properties: Audiences Page
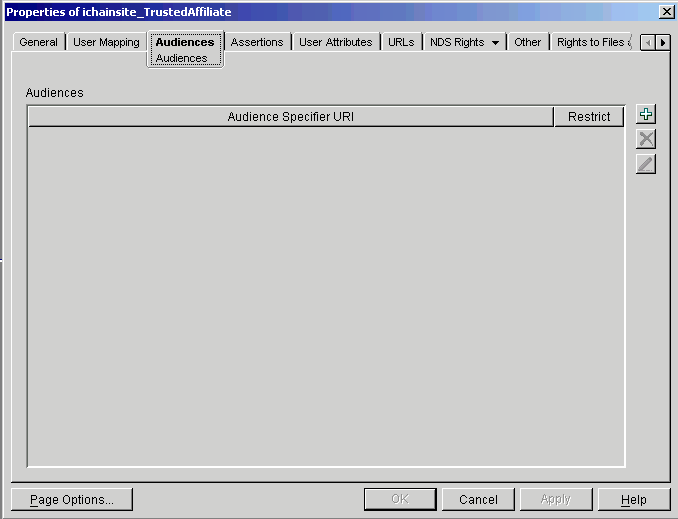
An audience value indicates that a SAML assertion is addressed to one or more specific audiences identified by the text value provided. The value is a URI reference that identifies an intended audience. The URI reference can identify a document that describes the terms and conditions of audience membership. The settings on this page determine what audiences this affiliate accepts in SAML assertions. If the Restricted value is set, a SAML Audience Restriction condition is created for generated assertions containing the specified audience value. It is then the responsibility of the receiving party to determine if it wants to accept SAML assertions with the provided Audience Restriction Condition. When you first set up a SAML partnership, adding audience restriction conditions is probably unnecessary and could add complexity to your system.
Assertions Page
Figure 21 iChainSite Properties: Assertions Page
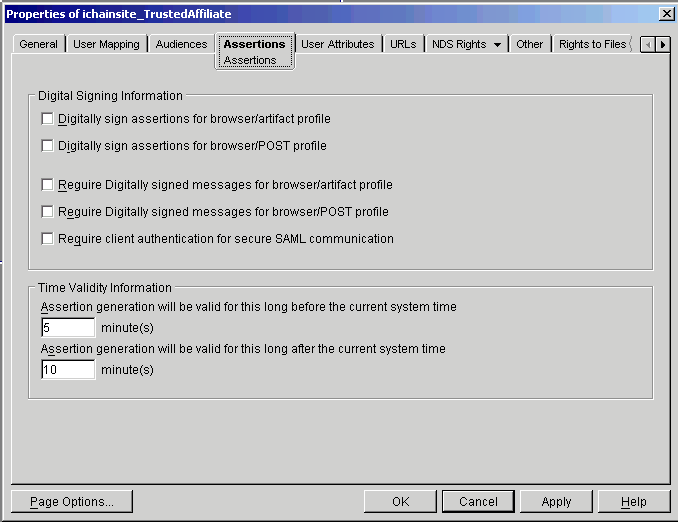
The Assertions page defines the security constraints associated with SAML assertions generated for this partner site and the SAML assertions incoming from this site.
Digitally Sign Assertions for Browser/Artifact Profile: Indicates whether SAML Assertions generated for this partner site in the Browser/Artifact profile should include a digital signature. Generally, this value is set to False because in the Browser/Artifact profile, assertions are obtained over a mutually authenticated TLS connection.
Digitally Sign Assertions for Browser/POST Profile: Indicates whether the SAML response generated for this partner site in the Browser/POST profile should include a digital signature. Generally, this value is set to True. The SAML 1.0 bindings specification requires that Browser/POST traffic be signed; however, in low value transaction cases where security is not a great concern, digital signing can be turned off. For initial setup, we recommend that all digital signing and validation be turned off.
Require Digitally Signed Messages for Browser/Artifact Profile: Indicates whether SAML Assertions received from this partner site in the Browser/Artifact should be required to be signed. Generally, this value is set to False. If this value is True and a SAML Assertion is received from this partner under the Browser/Artifact profile that is not signed, the assertion is rejected.
Require Digitally Signed Messages for Browser/POST Profile: Indicates whether SAML responses received from this partner site in the Browser/POST should be required to be signed. Generally, this value is set to True. If this value is True and a SAML response is received from this partner under the Browser/POST profile that is not signed, the response is rejected.
Time Validity Information: These two settings allow you to override the defaults set in the samlSiteConfig object. Their definitions and use are identical to those described for the samlSiteConfig. See Assertions Page for more information.
User Attributes Page
Figure 22 iChainSite Properties: User Attributes Page
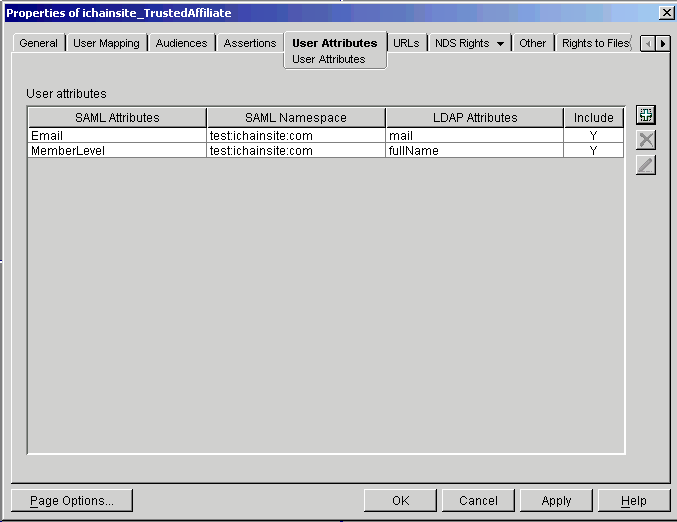
The User Attributes page defines what user attributes are available to this partner site. These attributes can be set so that they are always sent when authentication assertions are generated for this affiliate.
SAML Attributes: The name value that is used to name the attribute in the SAML assertion. Generally, the partner site indicates to the administrator the names of the attribute it requires in order for users to properly access the partner site. As part of the out-of-band negotiation between this site and the partner site, the names of these attributes is determined. For this site, the SAML Attribute name can be any text value the partner site requires.
SAML Namespace: The namespace value that is used to name the attribute in the SAML assertion. Because this is also a value that is requested by the partner site, the SAML Attribute namespace can be any text value the partner site requires.
LDAP Attributes: This is the corresponding LDAP attribute that is used as the value of the SAML Attribute.
ICHAIN_PWD: A special case LDAP value used to indicate that the user's password should be sent as a SAML Attribute to the partner site.
Include (Y) or (N): The Y value indicates that this attribute is included in all generated authentication assertions. The N value indicates that the attribute is only obtained when requested via a SAML Attribute Query. If the partner site requests an attribute that is not in this list, the query is rejected. Thus, you are able to restrict that User attributes you want to expose to the SAML partner sites.
URLs Page
Figure 23 iChainSite Properties: URLs Page
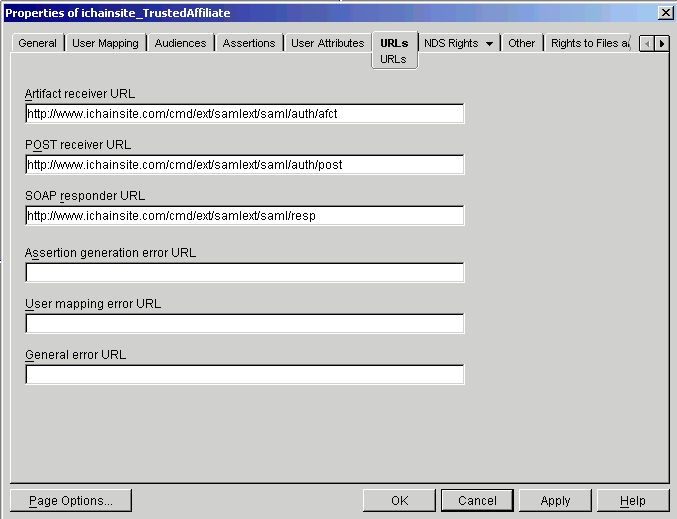
The URLs page is the most important page in the Trusted Affiliate configuration. This page tells the SAML service where to send or re-direct users when a SAML event or error occurs.
Artifact Receiver URL: The user is redirected to this URL when a Browser/Artifact authentication is requested between this site and the partner site.
POST Receiver URL: The user is sent to this URL when a Browser/POST authentication is requested between this site and the partner site.
SOAP Responder URL: The SOAP endpoint that this site will send SAML Artifact requests to when authenticating users from this partner site using the Browser/Artifact profile.
Assertion Generation Error URL: The user is sent to this URL if an error occurs during SAML assertion generation. If there is no value specified in this field, the General error URL or samlSiteConfig Default error URL is used.
User Mapping Error URL: The user if sent to this URL if an error occurs during the SAML user mapping processes. If there is no value specified in this field, the General error URL or samlSiteConfig Default error URL is used.
General Error URL: The user is sent to this URL if an error occurs during assertion validation for SAML data received from this affiliate, or if other error URLs are not set. If this value is not set, the samlSiteConfig Default error URL is used.