

Two options enable users and you to view, edit, add, or delete login information:
Each workstation running SecureLogin has an administration tool. Users use this tool to manage their single sign-on credentials and change SecureLogin settings. Management tasks include adding applications and looking after login details.
This tool can only alter the current user's SecureLogin information. To create corporate scripts that affect multiple users, you must use the Admin Preferences tab in the ConsoleOne snap-in.
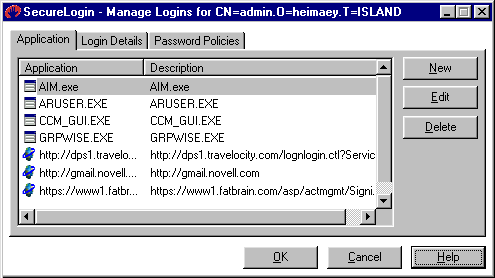
The following figure illustrates the main tabs for the Manage Logins option.
To launch this tool, select Manage Logins from the SecureLogin main screen or right-click the icon on the system tray.
If you make a mistake while adding, editing, or removing details, click Cancel to close the application without saving any changes.
Some applications have prebuilt scripts.
NOTE: Prebuilt application scripts are provided only for English applications. If you deploy SecureLogin in a multi-lingual environment, you might need to modify or create scripts that recognize localized application window titles or text controls.
Using ConsoleOne, you can enable single sign-on and manage logins at the User or Container object level.
Select the object, then click Properties.
Select the Novell SecureLogin tab, then click Manage Logins.
Use the Applications page to list applications that will enable users to easily log in through SecureLogin's single sign-on functionality.
The Application column lists Web, Windows, and terminal applications that you have set up for single sign-on. Icons indicate the application type.
Some applications have prebuilt scripts.
NOTE: Prebuilt application scripts are provided only for English applications. If you deploy SecureLogin in a multi-lingual environment, you might need to modify or create scripts that recognize localized application window titles or text controls.
To add one of these applications to the list:
Click New, then click Select a Prebuilt Application Script.
Select an application, then click OK.
Save the list.
To save a setting and continue working, click Apply. To save a setting and exit, click OK.
Create a login for the application by using the Logins page.
Link the application and login entry by using the Login Details page.
To add applications that don't have prebuilt scripts:
At the Applications page, click New.
Select the New Application option.
Type a name.
Select a type (Startup, Terminal Launcher, Web, Windows), then click OK.
Save the list.
To save a setting and continue working, click Apply. To save a setting and exit, click OK.
Create a login for the application by using the Logins page.
Link the application and login entry by using the Login Details page.
To delete an application from the list, select the application, then click Delete.
Provides information about the application.
When you add an application that has a prebuilt script, the SecureLogin snap-in automatically enters a description for that application. You can edit this description.
When you manually enter an application name, the SecureLogin snap-in automatically sets the description to the name of the executable file or URL that you enter.
To edit a description:
Select the application, then click Edit.
Edit the Description field, then click OK.
The Login Details window displays names (for example, GroupWise®) of applications that can use single sign-on.
A login is a collection of sensitive information, such as passwords. You define a login so that two different applications can share the same login information. For example, gmail.novell.com and grpwise.exe both use the GroupWise login.
To create a login name:
Click New, then enter a descriptive name in the New Login dialog box.
Click OK.
A policy is a set of requirements or rules (for example, the number of characters required for a password). SecureLogin uses policies to enforce security during logins.
To add a password policy:
From the Password Policies tab, click New, type a name, then click OK.
For example, enter GroupWise Policy instead of GroupWise. Describe the application but don't use the name used on the Login Details page.
Add settings.
The settings include password length and case of letters.
Select the policy name, click Edit, enter settings, then click OK.
To set advanced settings, select the policy name, click Edit, then click Advanced. To assign Minimum and Maximum password character lengths, enter a number in the entry field.
For details about settings, refer to the help system.
SecureLogin stores your username and password in the form of a variable and its value. Your username and password are not included in the script. Instead, a variable is used in the script. The value of the variable is your username or password.
Logins consist of key-value pairs. The pair is a variable. You can use any name for the variable.
As the following figure illustrates, the Variable column usually just contains the password and username for a particular application.

However, in some more complicated applications, there may be other variables too.
This example has two variables, Username and Password. The script for this platform has the following line:
type $Username
The variable $Username is written in the script. The value of $Username is p390. When the script runs, SecureLogin looks for the variable $Username in the user's login details. There it finds and reads the value p390. SecureLogin enters the value p390 into the login panel. At run time, the value of the variable $Username (p390) is read. However, in the script we only see the variable $Username.
To enter a variable:
Click New, then name the variable (for example, Password)
Click OK.
After you enter a variable, you can't change that name.
To add or edit a value:
Select the variable, then click edit.
Type a value, then click OK.
For example, enter 1001 for the location of the password field on a login screen.
To display your password for this login, check the Display Passwords check box.
To delete a variable and accompanying value, select the variable, then click Delete.
For more information on variable substitution, see Variables in the SecureLogin Script Commands guide.
Each application has a script. The script tells SecureLogin what to do concerning the application.
For example, a script for a Windows application specifies the executable filename, the controls, and information about dialog boxes.
A script for a Web application specifies the URL and fields to fill in. SecureLogin matches the URL name on the Applications page with the URL on the Web and then runs the script.
For more information, see Administering Scripts . For tips, see Troubleshooting Scripts for Web Sites .
To tighten security, you can control the data (for example, the length of passwords) that users enter for logins.
In ConsoleOne, select a User or Organization object.
Right-click, click Properties, then click Password Policies.
Select a policy, then click Edit.
Enter values.
For details about each setting, refer to the help system.
The Advanced button enables you to set additional requirements.
By default, the Login Details screen displays passwords as xxxxxxxx. You can view the actual password.
Select the application.
Check the Display Passwords check box.