

You and users can customize the operation of SecureLogin by using the following:
The Admin Preferences page enables you to restrict users from accessing the Change Settings option as well as further customize SecureLogin behavior.
The following figure illustrates user settings that you can change by using the SecureLogin user tool:
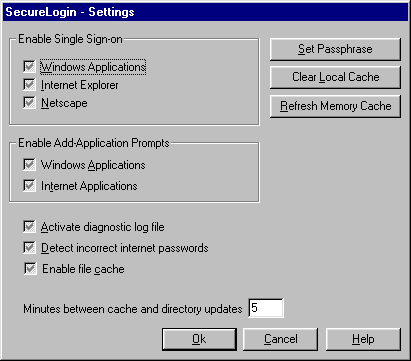
A gray check box doesn't mean that the feature is disabled. Instead, a gray check box indicates that the setting is determined by configuration data on the network or (if configuration data exists) that the setting is at the default value See Understanding Default Settings .
To enable the Windows single sign-on features of SecureLogin, check the Windows Applications check box. To disable Windows single sign-on, uncheck the check box.
Default: On (checked)
To enable Microsoft* Internet Explorer features for SecureLogin, check the Internet Explorer check box. To disable Internet Explorer single sign-on, uncheck the check box.
Default: On (checked)
To enable the Netscape* single sign-on features for SecureLogin, check the Netscape check box. To disable Netscape single sign-on, uncheck the check box.
Default: Enabled (checked)
This Windows Applications setting controls whether the Windows single sign-on component automatically detects Windows login panels. To receive a prompt to run the wizard, check the check box.
Default: On (checked)
The Internet Applications setting controls whether the Web single sign-on component automatically detects Web login panels. To receive a prompt to run the wizard, check the check box.
Default: On (checked)
To log the details of use to the hard drive, you can check the Activate Diagnostic Log File check box. However, because this preference is used for debugging and troubleshooting, do not enable this option unless Technical Services advises you to. Leave the check box unchecked.
Default: Off (unchecked)
To enable SecureLogin to attempt to detect whether you have given it an incorrect Internet password, check the Detect Incorrect Internet Passwords check box. SecureLogin then prompts you to change the password.
Default: Off (unchecked)
Usernames and passwords are normally stored in a directory on the server, but if the server is unavailable, or if you are using a notebook computer, the cache is used. The cache is password protected and encrypted
To enable SecureLogin to use cache files, check the Enable File Caching for Office Use check box.
Default: On (checked)
The Updates rate controls the number of minutes that SecureLogin waits between synchronizing the information between the local cache and eDirectory.
Default: 5 (minutes)
The Set Passphrase option enables you to reset your selected passphrase and password combination.
Click Set Passphrase.
Enter the password to your passphrase, then click OK.
Enter a new passphrase question and answer.
Confirm the answer, then click OK.
To clear the entries held in the local cache, click Clear Local Cache.
To force SecureLogin to immediately synchronize the data between NDS 7 (or later) or eDirectory and the local cache, click Refresh Memory Cache.
You can use the active button to override all the settings and disable all the SecureLogin modules.
Scenario: Writing a New Script. You have started writing a script for an application. Because you need to inspect some control IDs with Window Finder, you do not want the script to run at this time. You disable the Active setting. SecureLogin doesn't run while you fine-tune the script. After troubleshooting, you enable the Active button.
Scenario: Troubleshooting an Existing Script. You have a script already written for an application. You open the application to get more information from it, so that you can put the information in your script. Because the Active setting is enabled, the script for the application runs.
You don't want to wait for the script to run while you look for control IDs. Therefore, you close the application, turn off the Active setting, and open the application. You then get the information that you need, return to your script, enter the information into the script, enable the Active setting, and run the script.
The Active setting can also be useful for the help desk to use in troubleshooting, so that a technician can step through a login manually.
You can use the SecureLogin snap-in to ConsoleOne to change all settings that are available in the SecureLogin user tool except the following:
However, the User Preferences page of the snap-in has one option not found in the user tool: Clear Object Data.
If the SecureLogin eDirectory attribute needs to be refreshed, you can quickly clear the data and let it resync with the cache files.To remove the attribute, click Clear Object Data.
The following figure illustrates this option:
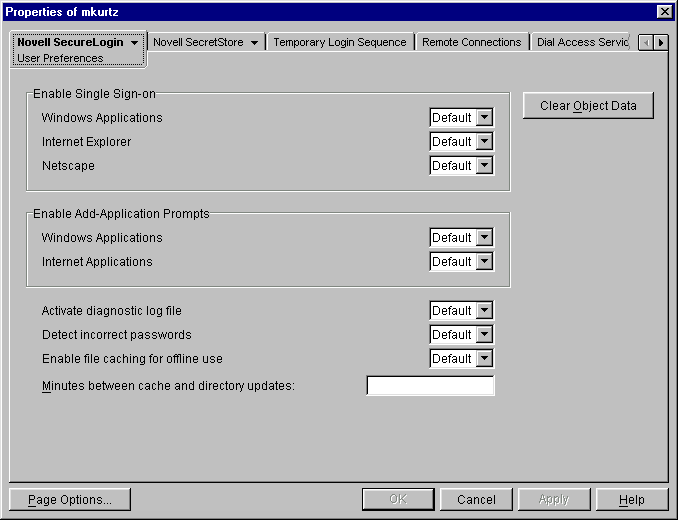
In ConsoleOne, the Novell SecureLogin tab has three options: Manage Logins, User Preferences, and Admin Preferences. For the two Preferences pages, the Default setting might be any of the following:
Whenever you (as administrator) change a setting, that setting becomes the Default setting. Other contexts inherit this setting. Even though you change a setting at a parent context, SecureLogin or ConsoleOne displays Default in subordinate contexts.
Scenario---Changing a Default Setting: At the Digital Airlines Company, you don't want anyone to view their passwords. In ConsoleOne, you select the Organization context, which is digitalairlines. Then you select Properties, click Novell SecureLogin, then click Admin Preferences. From the dropdown list for Prevent Users from Viewing Passwords, you change the setting from Default to Yes.
At the RSDev context, you view the Prevent Users from Viewing Passwords setting, which displays Default. The default setting is actually Yes. You don't have to change Default to Yes (Prevent) because the setting is inherited from the parent context. Users can't view their passwords in the RSDev context.
If you (as administrator) don't change any settings for a context, the Default setting is the value defined by the application.
However, you can change settings on the User object.
Scenario---No Changes: At the Digital Airlines Company, you prefer that all users be able to view their passwords. You do not change any settings in ConsoleOne. At the digitalairlines context, the Default setting reflects the value that SecureLogin provides. Users can view their passwords.
At the RSDev context, you view the Prevent Users from Viewing Passwords setting, which displays Default. The default setting remains as set in SecureLogin. Because no administrator-defined setting exists, no setting is inherited from the parent context. Users can view their passwords.
If you (as administrator) change a setting in ConsoleOne, that changed setting becomes the Default setting for users. Users can't change it. They can view the setting by using the Change Settings option in SecureLogin. However, they can neither view the Admin Preferences settings in ConsoleOne nor change the values that you have set administratively.
If you don't change a setting, the application's setting is the Default setting, unless the user changes it.
If the user changes a setting, that setting is user-defined.
In ConsoleOne, the Default setting on the User Preferences page could mean administrator-defined, product-defined, or user defined. What happens at the user level depends on what the administrator does or does not allow as well as what the product has defined as default values.To determine the value, you must go to the parent context and setting.
Scenario: In ConsoleOne, you select the digitalairlines context > Properties > User Preferences. To control Enable Single Sign-on functionality, you set the following:
| Parameter | Setting |
|---|---|
Windows Application |
Yes |
Internet Explorer |
No |
Netscape |
Default |
Rie is in the RSDev context. You select the User Preferences page for Rie and view settings, which display as follows:
| Parameter | Setting |
|---|---|
Windows Application |
Default |
Internet Explorer |
Default |
Netscape |
Default |
Because you set Windows Application to Yes as administrator and at the Organization context Preferences, the setting is inherited. The Default setting for Rie is actually Yes. Because Internet Explorer is set to No at the Organization level, the Default setting for Rie is actually No. Because no setting was defined for Netscape at the Organization level, the Default setting is whatever value the product has determined.
Rie can change the setting for Netscape.
As administrator, you can use the Admin Preferences option on the snap-in to ConsoleOne to control what users can do with SecureLogin at their workstations. The following figure illustrates this page:
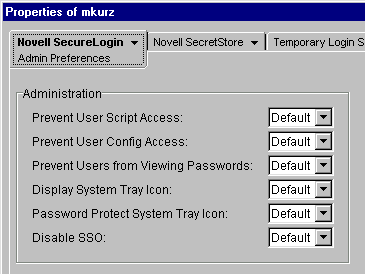
To access this page:
In ConsoleOne, right-click an object (for an example, an OU or User object).
Select Properties.
At the Novell SecureLogin tab, select Admin Preferences.
The SecureLogin user tool has a Script page. This page enables users to view, create, or modify scripts for logging in to applications.
To prevent users from accessing scripts, select Yes at the drop-down menu for Prevent User Script Access. Users are then unable to use the New and Edit buttons on the Applications page.
The Change Settings option enables users to customize the SecureLogin environment at their workstations.
To prevent users from customizing the environment, select Yes at the drop-down menu for Prevent User Config Access.
The SecureLogin user tool enables users to view passwords that they use to log in to applications.
To prevent users from viewing passwords, select Yes at the drop-down menu for Prevent Users from Viewing Passwords.
To view a password:
At the SecureLogin main page, select Manage Logins.
At the Application tab, select an application name, then click Edit.
At the Logins tab, select an entry, then click Edit.
At the Login Details page, check the Display Passwords check box.
During installation, you encountered a Post-Install screen that displayed the following options:

If you checked the Start SecureLogin on Windows Startup check box, SecureLogin places the SecureLogin icon on the system tray whenever you start the computer.
To prevent users from displaying and accessing the system tray icon, select No at the drop-down menu for Display System Tray Icon.
If you turn off the SecureLogin icon on the system tray and then refresh the data, the changes won't take effect until the workstation is restarted.
You can require users to provide their passwords before they can access options on the system tray icon. Select Yes at the drop-down menu for Password Protect System Tray Icon.
By default, SecureLogin reads its information from the current user's context and then searches up the eDirectory tree. You can select where SecureLogin reads its corporate configuration and application information. At the Read Corporate Scripts From dialog box, browse to and select the desired context.
To prevent searching upward from the selected context, Select Yes at the drop-down menu for Stop Walking Here.