Can't Find a Server
After you install SecureLogin, use this section if you get an error stating that a directory can't be found.
-
Verify that the DNS name or IP address of your server is correct.
-
Verify that the server is up and running.
-
Verify that the schema has been extended on that server.
For Novell® eDirectoryTM, see Verifying the eDirectory Schema
For LDAP, see Verifying the LDAP Directory Schema.
For Active Directory, see Verifying the Active Directory Schema.
-
Verify that rights have been granted.
Verifying the eDirectory Schema
For eDirectory, verify that the SecureLogin attributes exist in the extended schema and that rights have been granted. If necessary, add rights.
Verifying SecureLogin Attributes and Rights
When ndsschema.exe extends the NDS® or eDirectory schema, six SecureLogin attributes are added to the directory. You can verify that the attributes exist and that rights have been assigned.
-
In ConsoleOne®, right-click an object (for example, Admin).
-
Click Rights to Other Objects, then click OK.
-
Click Effective Rights.
-
In the Property pane, scroll to Prot:SSO Auth, Prot:SSO Entry, Prot:SSO Entry Checksum, Prot:SSO Profile, Prot:SSO Security Prefs, and Prot:SSO Security Prefs Checksum.
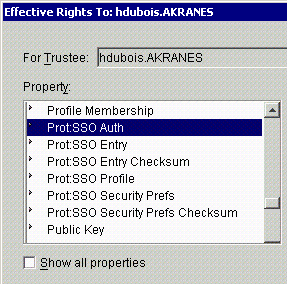
If the attributes don't appear, rerun ndsschema.exe.
Manually Adding Rights
Ndsschema.exe assigns rights to objects in the container that you specify. If you don't specify a container, rights are assigned at the root. If for some reason the rights don't exist, you can manually add them.
-
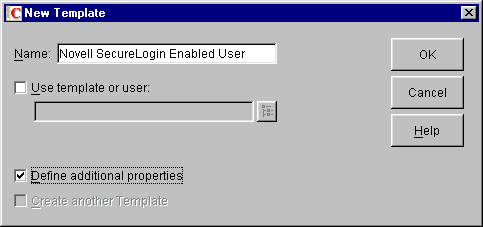
In ConsoleOne, select an O or OU Container object that will contain the Template object.
-
Create a new object of the class Template.
-
At the New Template dialog box, name the template, check the Define Additional Properties check box, then click OK.
-
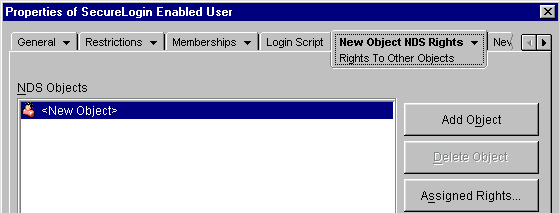
At the properties page for the new Template object, navigate to and select New Object NDS Rights, then select Rights To Other Objects from the drop-down list.

-
Click New Object > Assigned Rights.
-
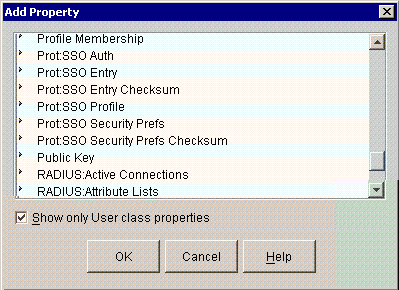
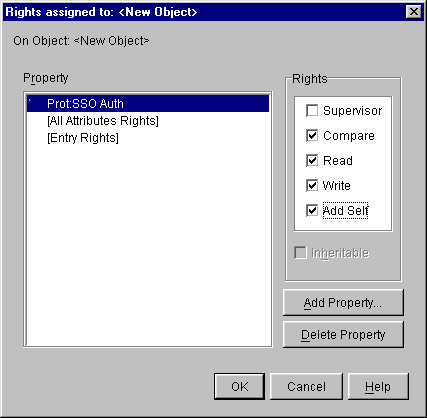
Click Add Property, select the Prot:SSO Auth attribute, then click OK.
-
At the Rights Assigned To dialog box, check the Compare, Read, Write, and Add Self check boxes, then click OK.
-
Configure the Prot:SSO Entry, Prot:SSO Entry Checksum, Prot:SSO Security Prefs, and Prot:SSO Security Prefs Checksum attributes by repeating Steps 5, 6 and 7 for the Prot:SSO Entry attribute.
NOTE: Do not add the Prot:SSO Profile attribute.
-
Exit by clicking OK.
To use the new template:
-
Create a new User object.
-
At the New User property page, enter a name, enter a surname, check the Use Template check box, then click the Browse button.
-
Navigate to and select the Template object that you created, then click OK twice.
-
Type and confirm a password for the new user, then click Set Password.
Verifying the LDAP Directory Schema
To determine whether the LDAP snap-in to ConsoleOne is installed:

Before LDAP client support can be used, eDirectory attribute names must be mapped to LDAP names.
The LDAP v3.0 client option supports servers that have the following:
- Novell eDirectory 8.6.2 or later.
- LDAP support installed and running.
To verify LDAP mappings:
-
Establish a Novell Client connection to the NDS or eDirectory server where you want to run LDAP compatibility mode.
-
From that client connection, launch ConsoleOne.
-
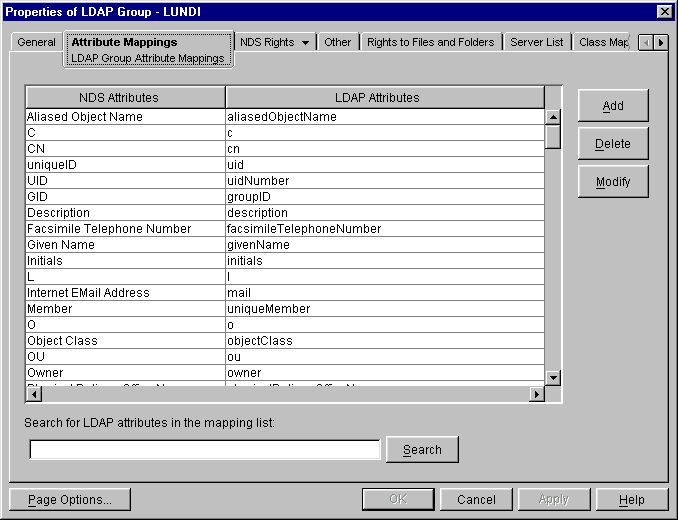
Select the LDAP Group object for your server.
-
Display the Attribute Mappings tab by clicking Properties > Attribute Mappings.
If you can't locate this tab, you must install the LDAP snap-in to ConsoleOne. Download the snap-in from http://download.novell.com. Select ConsoleOne Snap-ins > On NetWare > NDS eDirectory 8.6.2 Snap-in.
-
Click Add.
-
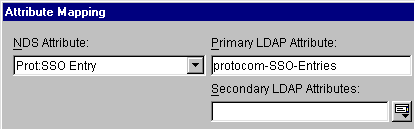
From the NDS Attribute drop-down list, select the Prot:SSO Entry attribute.
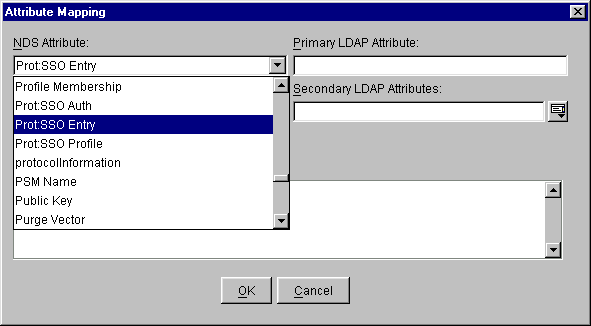
If the Prot:SSO Entry attribute is unavailable, run NDSSchema.exe or LDAPSchema.exe. These files are in the securelogin\tools directory.
-
Map the Prot:SSO Entry attribute to protocom-SSO-Entries, as indicated in the following figure.
-
Similarly, map the other Prot:SSO attributes to corresponding protocom-SSO attributes.
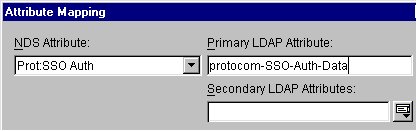
For a list of attributes and corresponding mappings, see Extending the LDAP Directory Schema.
-
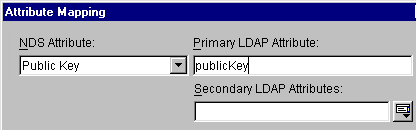
Similarly, map the Public Key attribute to publicKey.
-
Click Apply, then click Close.
-
Refresh the LDAP server.
If you are using ConsoleOne, right-click the LDAP Server object, click Properties, then click Refresh NLDAP Server Now.
If you are using Novell iManager, click LDAP Management, click LDAP Overview, click View LDAP Servers, select the LDAP server, then click Refresh.
Verifying the Active Directory Schema
You might need to verify that the Active Directory schema has been extended.
Adding Administrative Tools for Active Directory
The following procedures assume that you are logged in as an administrator with the required permissions to manage the schema.
Starting the Active Directory Schema Plug-In
You manage Active Directory from a Windows NT or Windows 2000 server. Therefore, you must install SecureLogin on a server.
The Active Directory Schema plug-in is a Microsoft Management Console (MMC) tool. Because schema management is not frequently performed, there is no saved Schema console or Administrative Tool on the Administrative Tools menu. You must manually load the Schema Manager into MMC.
Run the following procedure on the domain controller that contains the schema:
-
Click Start > Run.
-
In the Open box, type MMC.EXE, then click OK.
-
From the Console drop-down list, click Add/Remove Snap-In, then click Add.
-
Click Active Directory Schema, then click Add.
-
Click Active Directory Users and Computers, then click Add.
-
Click Close, then click OK.
-
Save the MMC containing the schema snap-in.
Verifying Attributes in the Active Directory Schema
-
Close and restart MMC.
After extending the schema, you must close and restart MMC before you can verify that the schema has been extended
-
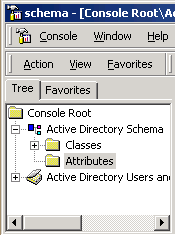
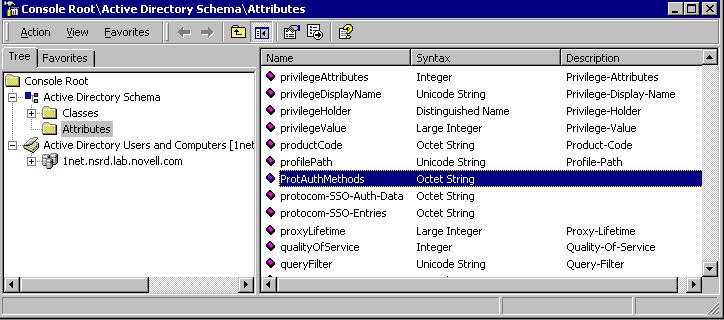
In the MMC tool, navigate to the Attributes folder.
The following figure illustrates the Attributes folder:
-
In the Console1 window, click Console > Add/Remove Snapin (Ctrl+M).
-
Click Add, select Schema Management, click Add, then click OK.
-
At the root of the directory, browse to the attributes and verify that all six Protocom attributes are in the directory.
The following figure illustrates the Attributes folder:
-
Identify the six attributes.
Ensure that protocom-SSO-Auth-Data, protocom-SSO-Entries, protocom-SSO Entries- Checksum, protocom-SSO-Profiles, protocom-SSO-SecurityPrefs, and protocom-SSO-Security-Prefs-Checksum appear in the ADS list of attributes. The following figure illustrates these attributes in the extended schema:
If the attributes don't appear, rerun adsschema.exe.