3.2 Installing SecureLogin: LDAP without eDirectory
The LDAP option installs SecureLogin into LDAP v3.0 directory environments.
You can specify more than one LDAP server for the SecureLogin installation. Although the dialog box in the installation program only allows you to specify one LDAP server, you can specify additional servers by modifying the automate.ini file.
-
Run setup.exe, found in the securelogin\client directory.
-
Select a language, click , and accept the license agreement.
-
Select , then click .
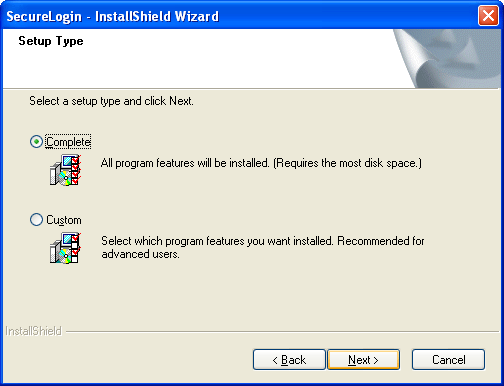
The Complete option uses default values and installs SecureLogin in c:\program files\novell\securelogin. For options available through the Custom option, see Section 3.2.1, Using the Custom Option for LDAP without eDirectory.
-
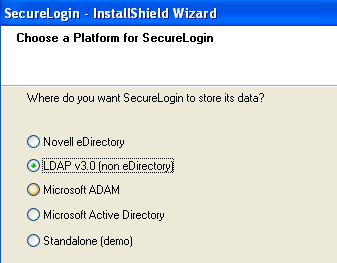
Select LDAP v30 as the platform where SecureLogin stores its data, then click .
-
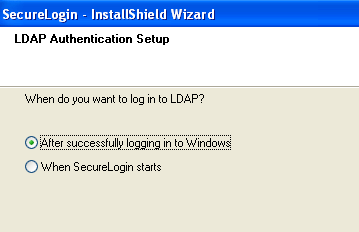
Select when to log in to LDAP, then click .
The After Successfully Logging in to Windows option is called the credential manager mode.
To configure a workstation to use the LDAP GINA as the primary authentication:
-
If the Novell Client is installed on the workstation, remove it.
-
During the SecureLogin installation, select the option and the option.
-
-
At the Ready to Install SecureLogin dialog box, click .
-
Click , click , then restart the computer by clicking .
-
After the computer restarts, log in to LDAP before SecureLogin starts, then provide necessary information.
The first time that you log in to LDAP, you need to provide the server’s IP address and the port number.
New users must also provide a passphrase question and answer.
3.2.1 Using the Custom Option for LDAP without eDirectory
The Custom option provides the same defaults as does the Complete option, but enables you to do the following:
-
Specify a folder where SecureLogin will be installed.
-
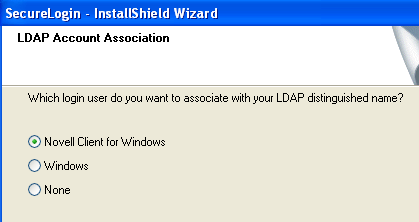
Specify whether to associate your Windows username with your LDAP distinguished name, if LDAP is installed in the Credential Manager Mode.
-
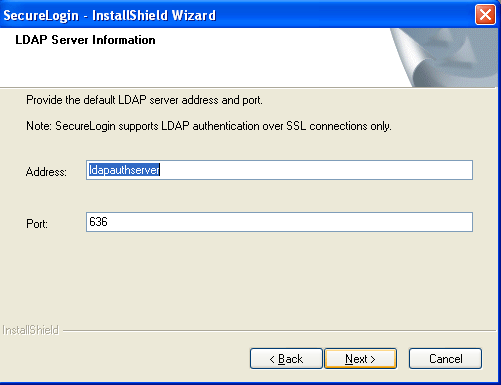
Specify an LDAP server address and port.
Providing Information for Users: As an internet standard, LDAP does not require more than a TCP/IP protocol installation on a client workstation. When using the LDAP connectivity option, the user must provide LDAP server information during the first login. For subsequent logins, this information is automatically saved and entered into the login dialog box.
You must provide users with the following:
-
The registered DNS name or IP address
-
The TCP port for Secure LDAP
By default, this is port 636. When entered, it is saved in the workstation's registry for subsequent logins.
NOTE:By selecting the option, the administrator or the user can provide this information during installation.
-
-
The name (ldapauthserver) that appears in the Address field is a placeholder name. Specify a server name or IP address.
-
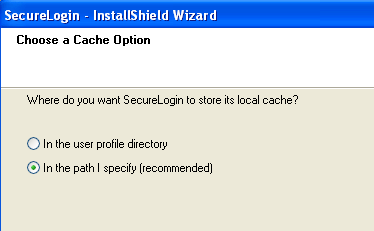
Specify a path for SecureLogin’s local cache.
-
The user profile directory is the default path.
User profiles for Windows 2000 and Windows XP are located in Documents and Settings\Username.
-
Select SecureLogin components.
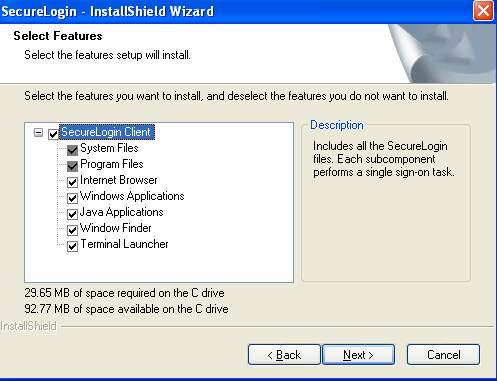
The Description panel provides information about a component that you select. Click .
-
Select options for starting SecureLogin.
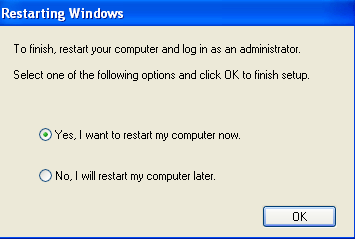
If you say No, make sure to reboot your computer before you start SecureLogin. If you select Yes, your computer will be restarted.