5.13 Billing
5.13.2 Invoices

The Invoices sub-menu option is available within the Finance tab when the option has been enabled by the system administrator. Invoices allows support organizations to charge Customers for support services provided, and manage Items purchased with Service Contracts.
(For more information about enabling Billing, see: Setup>Billing within the Administrator Guide.)
An Invoice can be created when an Item and Service Contract is ordered by a Customer. Alternatively, Invoices can be created for Service Contracts alone, as the Item may already exist in the system.
Invoices can be generated by the system through the following screens:
-
Within the Invoices section
-
When an Incident is created against an out-of-contract Item
-
When an Item, Customer or Organizational Unit is created, or edited to assign a new SLA.
The following sections are covered within Invoices:
-
Invoice creation - creating an invoice for a Service Contract or an Item with a Service Contract
-
Invoice summary screen - Summary tabs, emailing and editing an Invoice, and information about an Invoice Status
-
Invoice payment and delivery - processing an Invoice when payment is required.
5.13.3 Creating Invoices
Invoices can be created for Items and associated service Contracts, and for Items or Service Contracts only.
Creating an Invoice to purchase an Item and Service Contract
To create an Invoice:
-
Select Finance>Invoices
-
Click New
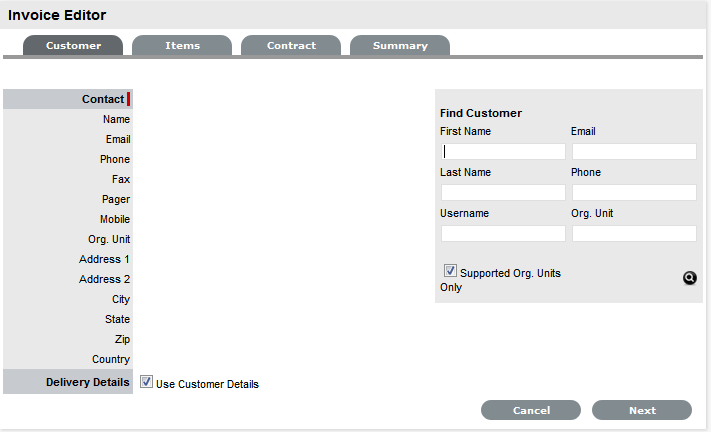
The Customer tab appears.
-
To assign a Customer to the Invoice:
-
Search for a Customer who already exists in the system
Enter any known information such as their First Name, Last Name, Email Address, Org. Unit or Username in the Find Customer fields. To view a list of all Customers in the database, leave all the fields blank.
-
Click

-
Click on a Customer's name to assign them to the Invoice
The Delivery Details are automatically extracted from the Customer Details. If they are not the same, uncheck by clicking the tick in the Use Customer Details box and enter the correct details.
-
Select Next to continue.
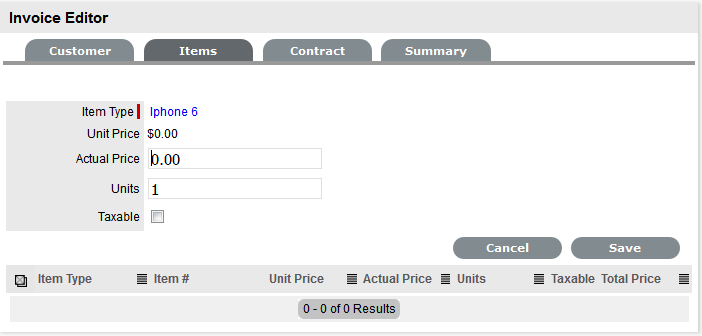
The system moves to the Items tab.
-
-
To add an Item Type for an Item Order:
-
Select
 if the Invoice is to purchase a new Item
Otherwise, click Next to purchase a Service Contract.
-
Search for the Item Type to be associated with the Invoice
Leave the search field blank and click the Search button to display a list of Item Types that can be assigned to the Invoice
-
Select the relevant Item Type link to add it to the Invoice
-
Enter the Actual Price information, if relevant and the number of Units to be ordered
-
Mark the order as Taxable if required
The tax is not included in the Actual Price but will be calculated within the Invoice Summary tab.
-
Click Save to add
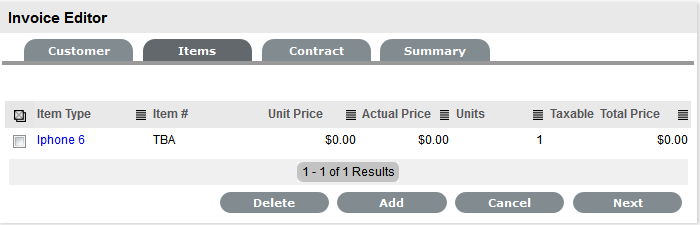
The Item Type details are applied to the Invoice
-
To add more Item Types, select
and repeat the above process.
Alternatively, click Next to move to the Contract tab, if required.
-
-
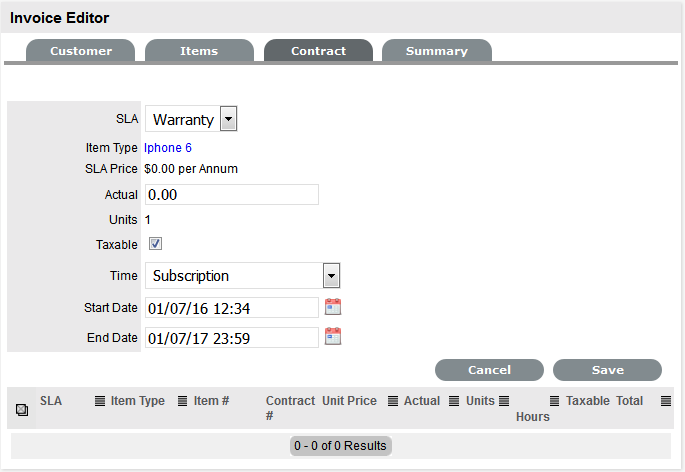
To add a Service Contract for a newly ordered Item Type:
-
Select
to add a Service Contract to the Invoice
Or, click Next to go to the Invoice summary.
-
Select the appropriate SLA from the drop-down options
-
Select the Item Type related to the Service Contract
To search for an Item Type enter any known details in the Find Item Type search field.
-
Click the Item Type link to assign it to the Invoice
-
Amend the Actual Price, if relevant
-
Check the Contract as taxable, if relevant
-
Select the Time period covered by the Contract:
Subscription - a contract that covers a specified period of time
Time Limited Subscription - a contract that covers either a specified period of time or number of support hours, whichever limit is reached first
Support Hours - a contract that defines the number of support hours covered
Support Hours by Month - a contract that covers a total number of support hours purchased for a defined timeframe and allocated on a per month basis.
-
Click Save.
-
To add another contract to the Invoice, click
and repeat the above process.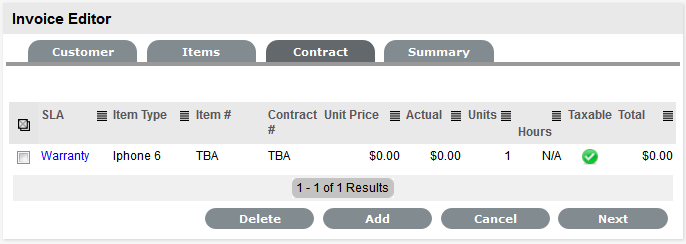
-
-
Click Next to move onto the Summary page
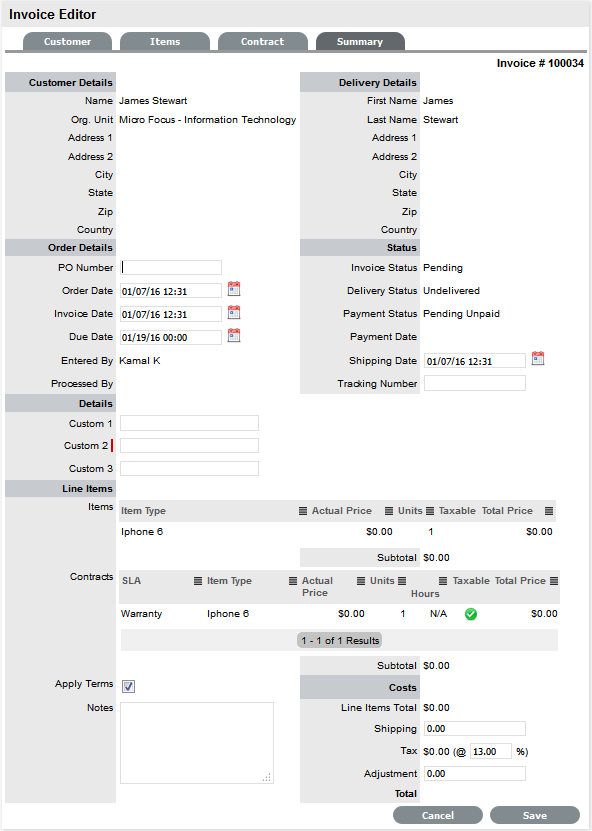
-
Enter a PO Number and make any other adjustments, if relevant
-
Click Save
-
Select
 to send the Invoice to the Customer, if required
-
Click Done.
Creating an Invoice to Purchase a Service Contract
To create a Service Contract Invoice:
-
Select Finance>Invoices
-
Click New
The Customer tab appears.
-
To assign a Customer to the Invoice:
-
To search for a Customer who already exists in the system
Enter any known information such as their First Name, Last Name, Email Address, Org. Unit or Username in the Find Customer fields. To view a list of all Customers in the database, leave all the fields blank.
-
Click
-
Click on a Customer's name to assign them to the Invoice
The Delivery Details are automatically extracted from the Customer Details. If they are not the same, uncheck by clicking the tick in the Use Customer Details box and enter the correct details.
-
Select Next
The system moves to the Items tab and displays the following message

-
Click Next again
The system moves to the Contract tab.

-
-
To create a Service Contract:
-
Select
to create the Service Contract
-
Select the appropriate SLA from the drop-down options

-
Select the Contract Type
-
Contract Type
Description
Item Contract
To purchase a contract for an Item. Search and select an Item using the Find Item search.
Customer Contract
To purchase a contract for a Customer. Search and select a Customer using the Find Customer search.
Org Unit Contract
To purchase a contract for an Organizational Unit. Search and select an Org Unit using the Find Org Unit search.
-
Amend the Actual Price, if relevant
-
Check the Contract as taxable, if relevant
-
Select the Time period covered by the Contract:
If Subscription is selected, the Start and End Dates are automatically completed by the system.
If Time Limited Subscription is selected, the Support Hours field is displayed and the number of support hours purchased by the Customer should be entered. Also, the Start Date and End Date fields should be completed manually, entering the length of time for the subscription period.
If Support Hours is selected, the number of support hours purchased by the Customers should be entered.
If Support Hours by Month is selected, a contract that covers a total number of support hours purchased for a defined timeframe and allocated on a per month basis.
(If a Contract is forward dated with a Start Date set in the future, the Pending Contract status is assigned. See Pending Contracts.)
-
Click Save
-
-
To add another contract to the Invoice, click
and repeat the above process.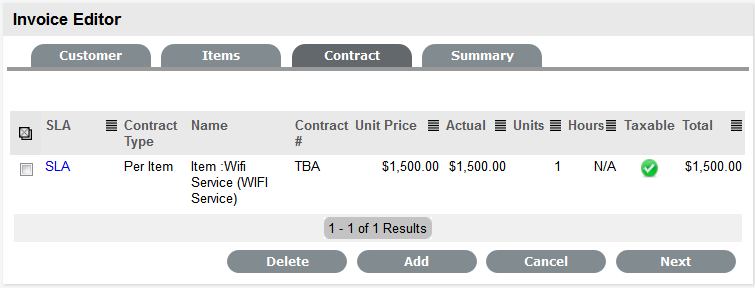
-
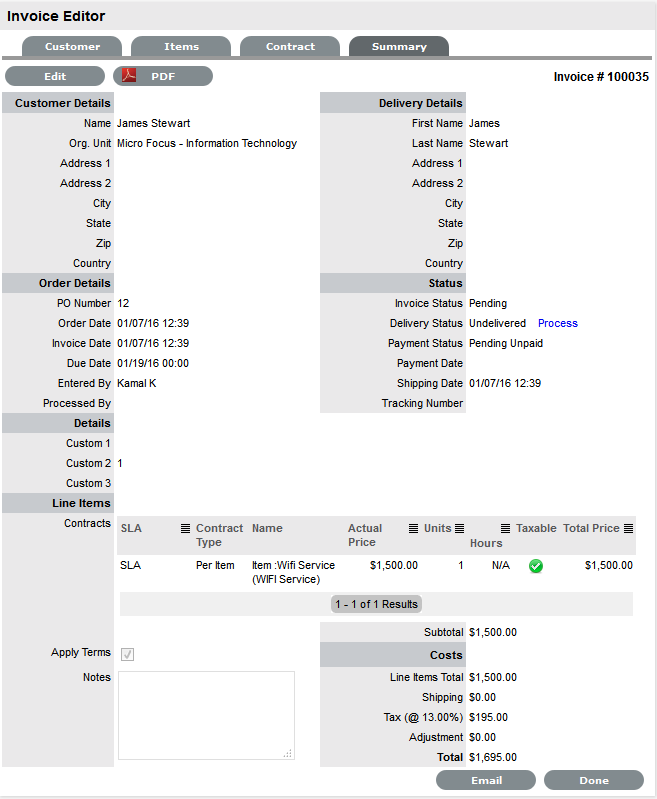
Click Next to move onto the Summary page
-
Make any adjustments, as required
-
Click Save
-
Select
to send the Invoice to the Customer, if required
-
Click Done.
5.13.4 Invoice Summary
The Invoice Summary tab includes the invoiced Customer, delivery and order details. It allows Users to email the Invoice to relevant parties and displays the status of the Invoice. The summary screen also allows Finance Users to process an Invoice when payment is received.
The following fields are included with the Invoice Summary tab:
|
Fields |
Description |
|---|---|
|
PO Number |
Auto-generated or manually entered order identification number. |
|
Order Date |
Auto-generated or manually adjusted order date. |
|
Invoice Date |
Auto-generated or manually adjusted date for the invoice creation. |
|
Due Date |
The date the invoice is due. Auto-generated based on the Default Invoice Due value defined by the Administrator. |
|
Entered By |
The User who created the invoice. |
|
Processed By |
The User who processed the invoice. |
|
Invoice Status |
Displays what stage of the order process the invoice is in. |
|
Delivery Status |
Details the status of delivery for items on the invoice |
|
Payment Status |
Details if the invoice has been paid |
|
Payment Date |
Date the invoice was processed for payment. |
|
Shipping Date |
Manually entered date of shipping. |
|
Tracking Number |
Reference number manually entered to track the order. |
|
Apply Terms |
For the system terms and conditions to be included in the PDF Invoice and the Invoice emailed to the Customer, tick the Apply Terms option. |
|
Notes |
Enter any additional Invoice information within the Notes field. |
|
Shipping, Discounts and Taxes |
Before saving an Invoice, any shipping costs to be included in the grand Invoice total can be entered in the Shipping field. |
|
Adjustment |
The Adjustment field records Customer discounts and will be subtracted from the final order total. |
NOTE:A flat tax percentage can be added to taxable line Items included on the Invoice. This is a global property that is configured by the system Administrator, in Setup>Billing>Tax Rate, but can be edited if required.
Emailing an Invoice
Once an invoice is created, selecting the Email button will send a copy of the Invoice to:
-
The Customer who placed the order
-
The system Finance User
-
The User who recorded the Invoice
-
The Customer who will take delivery, if different to the person who placed the order.
If the system Administrator has enabled the Email Invoice functionality in the application Setup, the Invoice will be emailed automatically to the relevant parties when it is created.
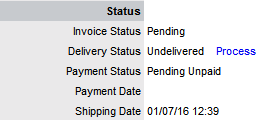
Invoice Status
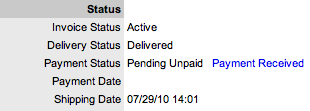
When an Invoice is first logged in the system it has a status of Pending. A pending Invoice can be edited. However, when an Invoice has been successfully delivered or processed, the Invoice Status moves to Active and it is no longer editable.
An Invoice changes to a status of Cancelled when one of the following events occurs:
-
Another Invoice is created to supersede the original Invoice; or
-
The Invoice was created for a specific Incident and that Incident was deleted/cancelled either manually or due to the Incident Cancel Time, set by the system Administrator, being exceeded. See Setup>Billing within the Administrator Guide.
Editing an Invoice
To amend Invoice details or to include additional Line Items, edit or enter the information prior to selecting the Process hyperlink. This link is not available when the Invoice is in Edit mode, as all Invoice information must be locked down to ensure the application has control of the details of the Items and their delivery.
5.13.5 Invoice Payment & Delivery
Relative to the workings of your support organization, Item and/or Support Contract Invoices may or may not need to be paid before an Item can be delivered to your Customer or Support Contract used by your Customer.
To update the Shipping Date, open the Invoice in Edit mode when the Delivery Status is Undelivered and enter the relevant date within the Shipping Date field.
Processing an Invoice when Payment is Required
For organizations where the option of Payment Required is enabled by the Administrator, a User with Finance access is the only User who can update the Payment Status of an Invoice. To update the Payment Status, the Finance User selects the Payment Received hyperlink of an Invoice to change the status to Paid. Once payment has been made, any other User, such as a Supervisor, can process the Invoice.

Processing an Invoice when Payment is not Required
If the Payment Required option has not been enabled by the system Administrator, a Line Item can be activated in the support system by selecting the Delivery Status Process hyperlink. This means that Customer payment does not need to be received by the organization before the Customer Item is delivered or a support contract is activated in the system.
When the Process hyperlink is clicked, the Invoice Status is updated to Active, and the Delivery Status changes to Delivered. (If the invoice is related to a support contract, the request status is moved from Pending - No Contract to the Workflow default open State, such as Pending.)
5.13.6 Service Level Agreements (SLAs)

Service Level Agreements (SLAs) are used by organizations to manage the levels of service expected of the IT and to ensure optimal maintenance of critical business systems and services. SLAs are documents that are negotiated between the Service Provider and Customer departments, to identify expectations and clarify responsibilities.
This tab is used to create and modify Service Level Agreements that provide request management capabilities.
SLAs include the following elements:
-
Name
-
Service Level Manager
-
Priority Targets
-
Automated Alert Notifications
-
Pricing (if enabled in Admin>Setup>Billing)
-
Blackout Periods
-
Workflows.
Details
Creating a Service Level Agreement
To create a new Service Level Agreement:
-
Select Service >SLAs
-
Click New
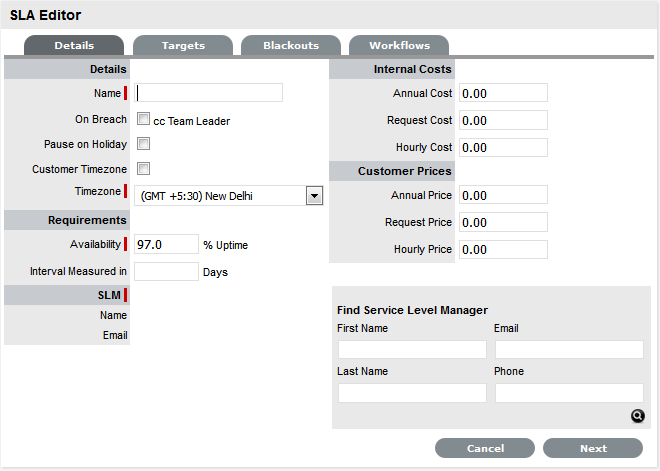
The screen defaults to the Details tab of the SLA Editor screen.
-
Complete the fields, including any custom fields, as required:
-
SLA Editor
Details
Name*
The name to identify the SLA.
Review Date
Details are completed based on the Admin default settings but can be edited by the User. An Alert is sent based on the default days set in the Review SLA Alert field in Admin>Setup>Privileges>Requests.
On Breach
Notification can be set to Carbon Copy (CC) an email to the Team Leader when the Warning or Escalation alert is sent to the Technician assigned to the request. It should be noted that the Service Level Manager is also notified when an SLA is breached.
Pause on Holiday
**This option is only displayed if the Observe Public Holidays option has been enabled within the Administrator>Setup>Privileges>User tab.
Enable this option, if the SLA is to be adjusted on designated Public Holidays. The Public Holidays are defined within the Administrator>Setup>Public Holidays screen and associated with requests via the assigned Technician and their associated Country.
Customer Timezone
When enabled, SLA times displayed within the Technician request view uses the Customer timezone.
Timezone
This is visible when Customer Timezone is not set and all SLA dates are calculated based on the Timezone set within this field. This is especially applicable for User Work Hours, Blackouts, which also impacts the SLA Reports.
Requirements
Availability*
Used to state the time an Item under the SLA is required to be online. The default value is set to 97%.
Interval Measured in
Defines the number of days over which the Availability requirement is calculated.
Priority
Process Name
The field is displayed when Workflows have been assigned to the SLA.
If multiple Workflows have been assigned for each Process, this field allows the User to assign a default Workflow for the SLA. When a request is created using the SLA, the default Workflow is assigned to the request.
SLM (Service Level Manager)
Name
Email
Use the Find Service Level Manager search option, to enter the contact details of the Manager who will monitor the performance of the SLA.
This is also the User who is assigned responsibility for managing the performance of external support providers when a request moves into a Workflow State that is supported by an Underpinning Contract .
Internal Cost ^
Annual Cost ^
The SLA cost is calculated on the basis of what is costs the service organization to provide the service agreement, as applied on a yearly basis per User. The figure is associated with Items and used to calculate the cost of supplying a Service. This figure can be used as the basis for setting the Annual Price.
The figure entered should be on a Annual Cost per User basis.
Request Cost ^
Indicates the cost applied on a Per Request basis. This figure can be used as a reference for setting the Incident Price.
Hourly Cost ^
Indicates the cost applied on an Hourly basis. This figure can be used as a reference for setting the Hourly Price.
Customer Pricing ^
Annual Price ^
This is the charge applied to the SLA on a yearly basis and paid by the customer consuming the Service associated with the SLA. (It should be greater than the SLA Cost, as it would include the cost of servicing the SLA plus a profit margin, if relevant.) The figure is associated with Items and used to calculate the price paid by the customer for consuming a Service.
The figure entered should be on a Annual Price per User basis.
Request Price ^
Indicates the price paid by the customer when the SLA is applied on a Per Request basis.
Hourly Price ^
Indicates the price paid by the customer when the SLA is applied on an Hourly basis.
* Denotes a mandatory field
^ Only applicable when SLA Prices are enabled in Setup>Billing
Targets
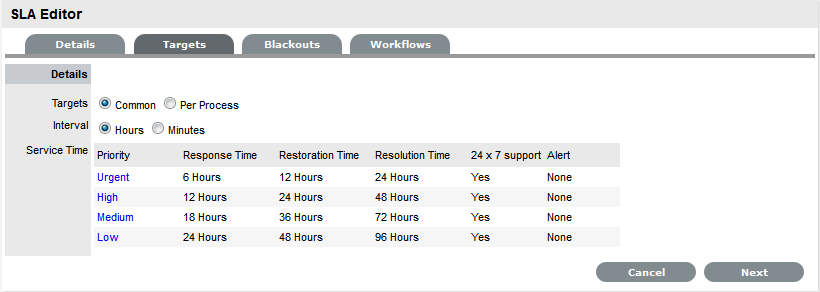
The Targets tab is used to configure the SLA's priority Response, Restoration and Resolution Times.
To modify a Priority:
-
Select Service > SLAs
-
Select an SLA
-
Select the Targets tab to display the following fields:
-
SLA Editor
Targets
Targets
Common: Select Common if the SLA is to apply across Incidents, Requests, Problems and Change Management.
Per Process: If the SLA is specific to a Process, select Per Process and choose a Process displayed in the drop-down list.
Interval
Define if the time is to be calculated in Hours or Minutes.
Service Time
Priority
Urgent, High, Medium and Low.
Milestones
Initial Response
The maximum time the Customer would wait from the point of request creation before receiving a Note update for a Technician. The Response trigger is stopped when a Note has been added to the request by the assigned Technician and an email is sent to the Customer. If the Response Time is reached, without a Note being added, the request will be escalated.
Restoration Time
The maximum time the Customer would wait from the time the request was created until a workaround or temporary fix has been implemented. The Restoration trigger stops by assigning the request a Workflow State that has to the SLA Restoration option set to Yes. By default, this Workflow State is Open - Restored.
Resolution Time
The taken time from the point of request creation until it the request is moved to a Workflow State with the SLA Resolution option set to Yes. Any of the default Workflow Exit States stop the Resolution Timer.
Notify Override
If the system is to override the default notification method set for a request when the Priority being edited is assigned to a request, check this option.
Notification Type
Set Email or SMS as the type of notification when the override action is applied to a Priority.
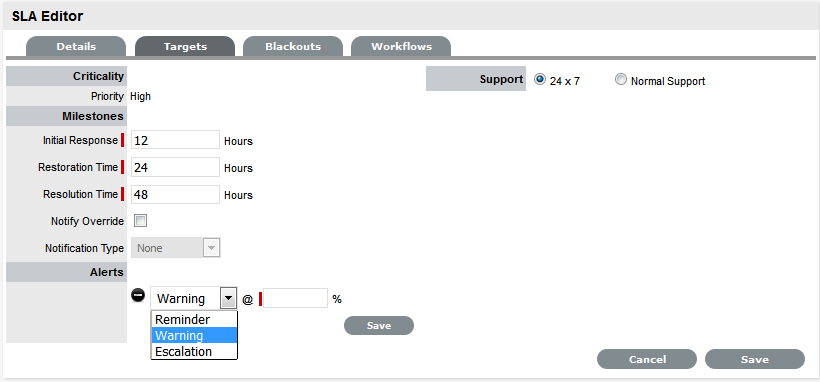
Alerts
Reminder
Sends a reminder email to the Technician when the defined percentage of time elapses for a Response, Restoration or Resolution target that has not been met on a request. Can be set up to 200% of the SLA. Note, Alert intervals are not cumulative.
Warning
Sends a warning email to the Technician when the defined percentage of time elapses for a Response, Restoration or Resolution target that has not been met on a request. Can be set up to 200% of the SLA.
Escalation
Escalates the request to a higher escalation layer when the defined percentage of time elapses for a Response, Restoration or Resolution target that has not been met on a request. Can be set up to 200% of the SLA. It should be noted that the Service Level Manager is also notified when an SLA is breached.
Support
24 x 7
Do not amend if the SLA is to apply 24 hours a day, 7 days a week.
Normal Support
Select if service hours are to be defined for the SLA. When checked, define the service hours by either selecting a template (Templates are configured by the Administrator in the Setup>Localization>Hours tab) or manually define the days and time by making selections within the drop-down lists.
-
Click Edit, if not already in Edit mode
-
Define if the SLA applies across all Processes or to a specific Process
-
Define if the SLA is to be calculated in minutes or hours
-
Select the Priority link to customize Milestones, Alerts and Support hours
-
Modify the Milestone intervals for the Response Time, Restoration Time and Resolution Time, as required
NOTE:The time will be set in minutes or hours, as defined for the SLA.
Milestone intervals are not cumulative
For example, for the default Warranty SLA, the Priority of Urgent has the default Milestone times of 6, 12 and 24 hours. This means a User has 6 hours to send a response to a Customer before the Response time is breached, 12 hours from the point of request creation to meet the Restoration time, and 24 hours from the point of request creation to meet the Resolution time. It should be noted that requests may be moved to non-SLA timed States during these Milestone periods, so the 12 or 24 hours may not be consecutive hours.
-
Check the Notify Override option, if relevant
Set the type of notification, email or SMS, that is to be used to contact the User assigned to the request with this Priority.
-
Create one or multiple Reminder, Warning or Escalation Alerts, if relevant
NOTE:Enter the percentage of time to elapse for an Alert to be triggered for a Milestone. Selecting Warning as the Alert will cause a warning e-mail to be sent to the request's Technician when the specified percentage of a milestone has been reached.
Selecting Escalation will trigger a request escalation to the next support layer of the Team. The escalation system will also fire if the SLA threshold is breached.
It is recommended that reminders be sent at 50% of elapsed time and escalations at 75-80%
These figures are advisory only. The internal processes of your organization will dictate the appropriate values. The Reminder percentage must be less than the Warning or Escalation percentages.
Alerts can be set to 200% of the SLA time, which ensures notifications can be still be received against breached requests
If Alerts are not customized, the application will automatically escalate the request when the Priority milestone is breached
-
Click Save
-
Modify other Priorities as necessary.
Configuring Support Hours
After the Priority times and Alerts of an SLA have been configured, Support Hours can be defined. These can be set to 24 hours by 7 days a week (24 X 7), or manually adjusted to reflect the support operation open hours.
Under 24 X 7 mode, if the SLA's urgent Initial Response field is set to six hours, and an urgent request that uses the SLA is created at midnight in the assigned Technician's time zone, those six hours will expire by 6:00 AM. This is the option to use if a support operation is staffed 24 hours a day.
If a support operation is not open 24 hours a day, the request timers are not required to run when Technicians are not available. For instance, if the support hours are 9:00 AM to 5:00 PM and the SLA hours reflect this, the SLA timers of the urgent request created at midnight would not start ticking until 9:00 AM the following business day and would expire at 3:00 PM.
To define the SLA support hours:
-
Select Service > SLAs
-
Select an SLA
-
Click the Priority link
This will display the Details tab with Support Hours options of 24x7 and Normal
-
The default setting is 24 X 7, to amend the support hours select the Normal Support option
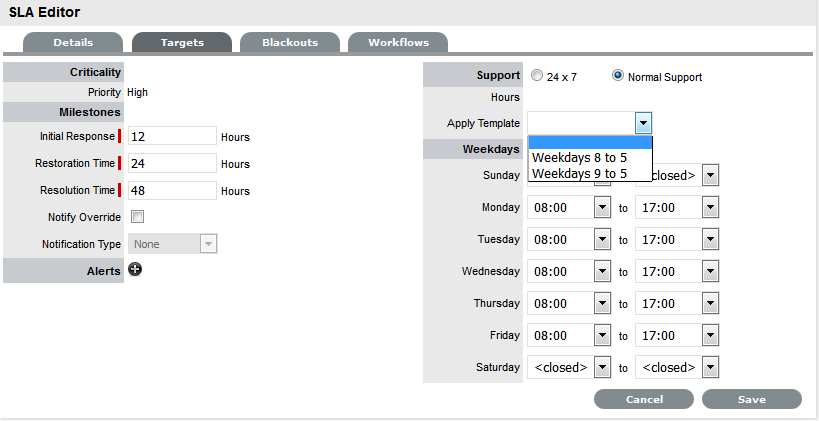
-
Select a template from the Apply Template drop-down options or customize Weekdays manually.
Note that the SLA timers become inactive when the support desk is closed.
-
Click Save.
Blackouts
Blackouts are used as part of Change and Configuration Management to advise Users about the appropriate periods of time that an Item associated with an SLA should be scheduled to be taken off-line if an Outage is needed. Within the system, when an Outage is being scheduled (Item>Details>Outages) the Blackout period is displayed, informing the User of the best time to schedule a Planned Outage.
A Blackout Period is based on an agreement between the Customer and the Service Desk regarding set times that the Customer has no service expectations. This can also be the preferred time for Item upgrades and maintenance as they will not affect service availability.
A Blackout Period is specified within an SLA. During this time the SLA is viewed as inactive and its measuring time is stopped. OLAs that underpin a Workflow State that apply an SLA with a Blackout Period, also adopt the Blackout Period.
Specifying an SLA Blackout
To specify an SLA Blackout:
-
Select Service >SLAs
-
Click an SLA hyperlink
-
Click Edit
-
Move to the Blackouts tab
-
Tick the Windows option
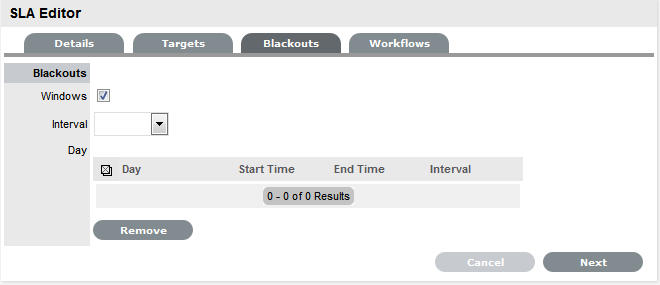
-
Set the Interval of weekly or monthly
-
Apply a Template or define the day and time period for the approved Blackout manually, then click

-
Define the preferred Timezone
This is required information to save the Blackout information.
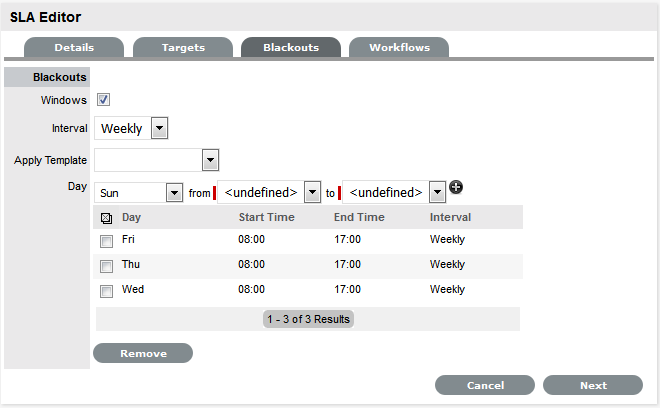
-
Click Save.
See: Item Planned Outages using Blackout Periods
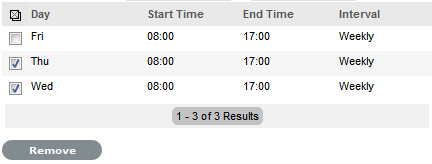
To remove time-frames from the Blackout Period:
-
Select Service >SLAs
-
Click an SLA hyperlink
-
Click Edit
-
Move to the Blackouts tab
-
Check the box next to the Day to be deleted from the Blackout
-
Click Remove.
Workflows
Workflows are associated with an SLA through the Workflows tab of the SLA Editor screen or within the Workflow itself. All SLAs assigned to the SLA are listed within this tab and Workflows can be added or removed within this tab, as required.
Assigning a Workflow
To assign a Workflow:
-
Select Service>SLAs
-
Click the relevant SLA link
-
Move to the Workflows tab
-
Click Edit
-
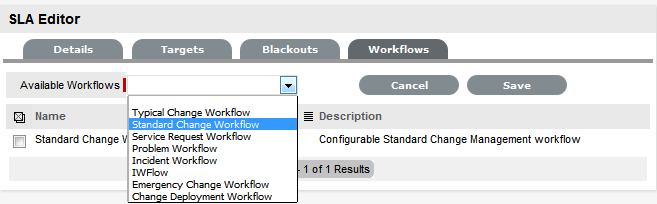
Select Add
The Available Workflow drop-down list will be displayed.
-
Select a Workflow
-
Click Save.
To remove a Workflow assignment, use the checkbox next to the relevant Workflow and click the Remove button.
Default Warranty SLA
The system includes a default SLA that does not include costs, called Warranty. The Warranty SLA can be used or edited as required.
Integration with Request Creation and the Billing System
The prices specified in the SLA provide the basis for fees charged for support on both a Per Request basis and on a subscription basis. The hourly rate is included for reporting purposes. Rather than an Item using an SLA, Items can be covered by maintenance contracts. A contract can cover a particular request, or exist as a subscription.
Maintenance Contracts form part of the request creation process. Requests can be entered into the system without a valid contract, but are flagged as unpaid, and are unable to be worked on until the invoice is processed. There is also a control (configured in the Billing Preferences) for the length of time an unpaid request can exist in the system.
See: Assigning an SLA to a Customer
See: Assigning an SLA to an Organizational Unit when Contracts are Disabled
Assigning a Default Workflow to an SLA
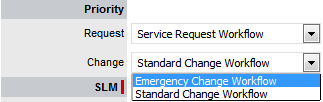
If more than one process Workflow is assigned to an SLA, it is required to select a default Workflow. This default Workflow will be the Workflow assigned to a request when the SLA assigned supports more than one Workflow.
To assign a Default Workflow:
-
Select an SLA from the Service > SLA tab
-
Click Edit
Note that the system automatically assigns a default Workflow to an SLA, as Workflows are being assigned.
-
Within the Priority Field, use the drop-down lists to update the relevant Incident, Problem, Change and Service Request default Workflows
-
Click Save to apply the change.
5.13.7 Outages
An Outage is when an Item Status is unavailable due to expected or unexpected events. For example, the Item may be out for repair or faulty. To move an Item into an unavailable State, and therefore list it as inactive, the Item Status selected for the Active State option within the Item Category Lifecycle must be set to No, and the Offline State option set to Yes.
Planned Outages
Planned Outages are used to manage Items' proposed unavailability. This is useful for informing Customers and Users about planned changes to infrastructure that may cause an Item to be taken offline or out of service.
If an Item has an SLA with a specified Blackout Period, ideally Outages should be planned to fall within this time. The Blackout Period is an agreement between the Customer and the service provider regarding a period of time when the Customer has no service expectations. This can also be the preferred time for Item upgrades and maintenance without affecting service availability. To access the Blackout Period details for an SLA associated with an Item, create the Planned Outage within the Outages tab of the Item Information screen.
Creating a Planned Outage
To create an Outage:
-
Select Configuration > Outages
-
Click New
-
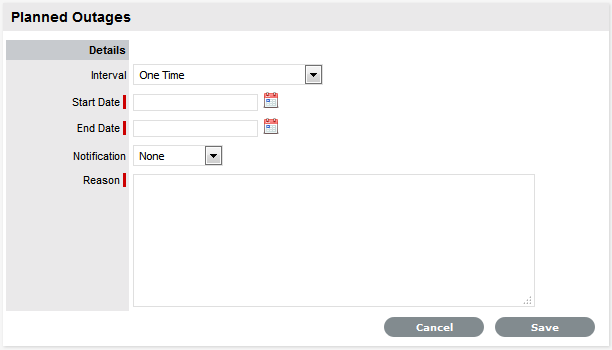
Planned Outages
Details
Description
Interval
Select One Time if the Outage is a one off, or set regular outages based on a weekly or monthly basis.
Start Date
Select the Start Date within the calendar, and modify the Time accordingly inside the calendar pop-up.
End Date
Select the End Date within the calendar, and modify the Time accordingly inside the calendar pop-up.
Notification
Select Email or SMS Notification about the Outage is to be sent to the Primary Contact of the Org. Unit, or All Customers/Owners associated with the Item.
Reminder
This option is displayed when a Notification is set for the Outage.
If a Reminder notification is to be applied to the Outage, check the box and define the period of time prior to the Planned Outage period that the reminder is to be issued.
Reason
Enter a description that details why a Planned Outage is being scheduled.
-
Define the Interval for the Outage
The options of One Time, Weekly and Monthly are available.
-
Set the Outage Start and End dates
-
Set the Notification method and recipients
These are applied when the Outage is saved.
-
Tick the Reminder Email field
If a reminder is to be emailed to defined recipients prior to the Outage time. Define the length of time before the Outage occurs that the reminder is to be sent.

-
Enter the Reason for the Outage
-
Click Save
The add Items option is displayed.

-
Click
The Find Item/Item Type field is displayed.
-
Enter the known Item Number or Type and click
-
Click the Item Number hyperlink to add the Item to the Outage
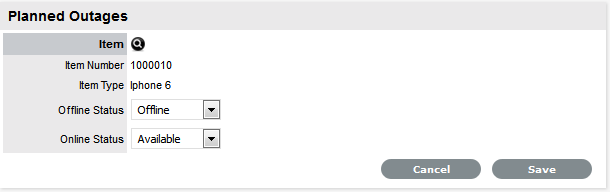
-
Define the Offline Status and Online Status for the Item
These are the States the Item will be automatically assigned in the CMDB when the Planned Outage commences and ends.
-
Click Save
Repeat Steps 9 to 12 to add more than one Item to the Outage. Click
 to remove Item details from the Outage.
-
Click Save and Done.
The Outage details are visible in the Planned Outage page, if the Criticality of the Item is equal to or greater than the Minimum Criticality set by the Administrator within the Setup>Privileges>System tab.
Viewing Outages
Planned Outages can be viewed from the Login Page and the Customer Portal, if the Administrator has toggled the Setup>Privileges>System Outages Page option to Yes. This enables the Planned and Unplanned Outage links in the Customer Portal and Login Page.
Customer Portal View
In the Customer Portal the Planned Outages information is accessible in the side bar menu of the Items and Services tab.
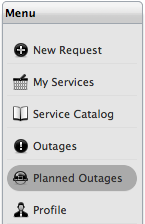

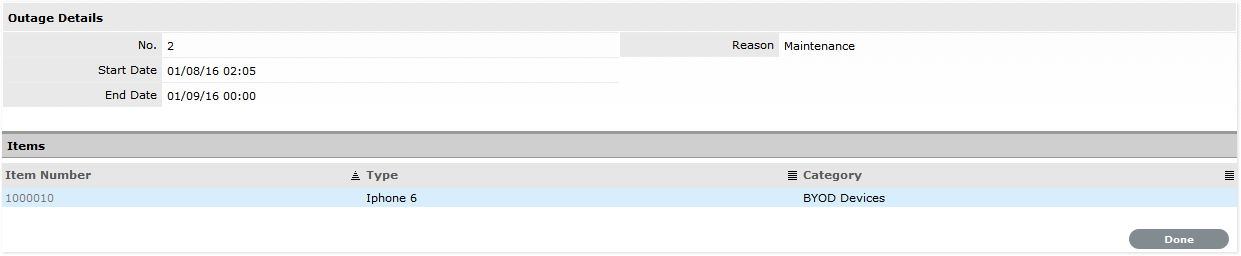
To view the Outage details, click the Outage No. link. To close the window, click Done.
Login Page View
Planned Outage information can also be accessed from the Login page, Click the View Outages link to display a complete list of current outages. Select the View Planned Outages link to access planned downtime details.


Planned Outage Page Options
-
Search for Outages based on the Item Type
This functionality is enabled by the Administrator in Setup>Privileges>System Search Outages.
-
Within the Outage Details window, click on the Item Number link to show the Item Relationship Map
To enable this feature, the Show Affected Relationships option must be activated by the Administrator in Setup>Privileges>System Outages.
-
To return to the Planned Outage list, click the Done.
5.13.8 Purchase Orders
Purchase Orders can simplify the tracking of where and when new Items are purchased or leased. This feature is not meant to replace an organization's original PO system, it is designed to easily link a specific PO number (and its associated vendor and date information) with an Item.
Enabling Purchase Orders
To enable Purchase Orders:
-
Select Setup>Billing
-
Set the option Enable Purchase Orders to Yes
-
Set the default tax rate
The percentage amount entered here is applied by default to all POs.
-
Enter the Company Details to be used on the PO
-
In Global Settings, select the preferred currency
-
Click Save.
NOTE:A logo can be applied to system generated POs by adding the graphic within the Setup>Customize tab. (This option is only displayed when the Purchase Orders functionality is enabled within the Setup>Billing tab.)
The Purchase Order sub-menu option is made available within the Finance tab for Finance, Supervisor and Technician Users, when enabled.
5.13.9 Contracts
A Contract is made up of a Service Level Agreement (SLA) and a Service Delivery Period (start and end time). They can be used to manage an entitlement to service from a start date, through to an end date.
Contracts and Invoices are used together when the Service Desk needs to charge its Customers for any support provided. Billing within the system is on a per Contract basis, and is enabled automatically when Invoices are activated.
Contracts can be created for different elements to suit organizational needs. Contracts can cover the individual elements:
-
Items
-
Customers
-
Organizational Units
-
Requests.
Pending Contracts are contracts that have a start date set in the future. They automatically become active on the contract start date or can be enabled manually.
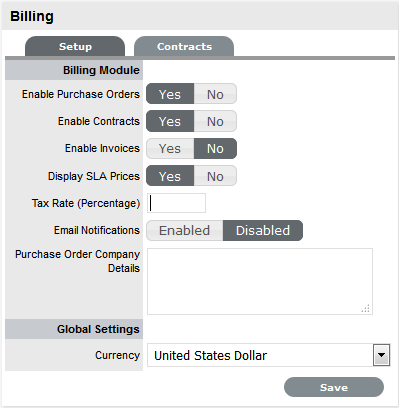
Enabling Contracts
To enable a Contract:
-
Select Setup>Billing
-
Click Yes to enable Contracts
A Contracts tab will be visible.
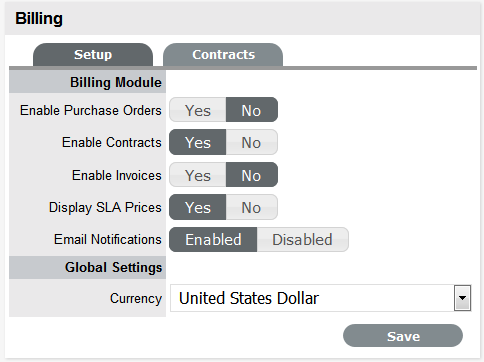
-
Define the Email Notifications option for Finance Users
When enabled, automated emails are sent to Finance Users regarding matters relating to POs, Invoices and/or Contracts.
-
Set the Currency for all financial transactions managed by the system
-
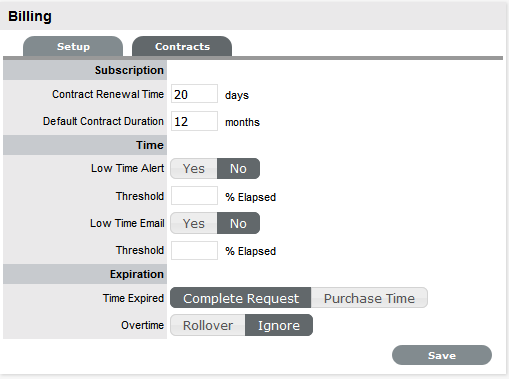
Move to the Contracts tab to define parameters for Contracts
-
Options
Description
Subscription
Contract Renewal Time
The system can automatically send a Contract Renewal Invoice before a contract expires. Enter the number of days prior to the contract expiration date for the system to send the renewal invoice.
For Contracts not to be automatically created, leave this field blank.
(The information for the invoice can be configured in the InvoiceSummary link within the Setup>Email>Templates>Email Summary Templates filter screen. This template is sent with the InvoicePrefix email that can be edited in Setup>Email>Templates>Full Email Templates list. )
Default Contract Duration
The system sets the default contract renewal period to 12 months, adjust or delete the entry as required.
Time
Low Time Alert
The system can automatically create an alert within the Customer Portal for customers that have Time-based contracts (i.e., purchased a quantity of support hours.) The Alert can be sent based on the percentage of hours that have been used.
Low Time Email
The system can automatically send an email to a Customer that is getting close to using all their support hours in their Time-based contracts. The Email can be sent based on the percentage of hours that have been used.
The Email content is set in the ContractTimeLow option of Setup>Email>Templates.
Expiration
Time Expired
When a Customer's contract is expired when a User is working on a request, this option specifies if the User can Complete the request although the Contract has expired and if the system will lock out the User until the Customer has purchased additional time.
When Complete Request is selected, the following options are displayed:
-
Rollover - means the time used to resolve the issue will be subtracted from the Customer's renewed contract.
-
Ignore - means the time used to resolve the issue, although the Customer contract has expired, is not allocated to a future contract.
(The subject line and content for the automated emails sent on contract expiration is configured in the ContractTimeElapsed and ContractTimeElapsed of Setup>Email>Templates.)
-
-
Enter the Contract Renewal Time, if required
For contracts not to be automatically created, leave this field blank.
-
Set Notifications and Thresholds
-
Set Time Expired option

-
Click Save.
5.13.10 Invoices
Invoices are used for the billing of Contracts and can also be used for Purchase Orders. When Invoices are enabled, Contracts are enabled automatically. Invoices can be used to maintain the purchasing of Items as well as Contracts for these and existing Items.
Enabling Contracts and Invoices
When an Invoice is created, a Contract is automatically generated.
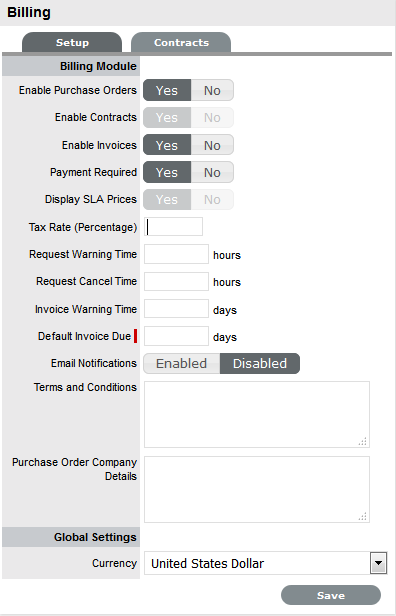
To enable Invoices:
-
Select Setup>Billing
-
Click Yes to enable Invoices
When an Invoice is enabled, the following options become available.
-
Options
Description
Contracts
Contracts are enabled automatically when Invoices are activated.
Payment Required
Setting Payment Required to Yes will require line items on invoices to be paid before they become active in the system. Any incidents logged against an unpaid Contract or Item cannot be worked on until payment is received.
NOTE:Note: Invoice payments can only be processed by a Finance User.
Tax Rate (Percentage)
The rate used to calculate tax on an invoice subtotal.
Request Warning Time
Where a Contract has not been paid and requests have been raised, a reminder email can be sent stating that payment is due. Use this field to specify the length of time in hours from the opening of the incident before sending a reminder email.
Request Cancel Time
Specifies a waiting time for requests with a Status of Pending-Unpaid before they are cancelled.
Invoice Warning Time
Enter the number of days prior to the due date to send the Customer a reminder email regarding non-payment of an invoice.
Contract Renewal Time
The system can automatically send a Contract Renewal Invoice before the end of a contract. Enter the number of days prior to the contract expiry to send the renewal invoice.
Default Invoice Due*
Enter the number of days to calculate an invoice due date.
Email Notifications
Enables the system to update Finance Users, via automated emails, regarding matters relating to POs, Invoices and/or Contracts.
Terms and Conditions
Free text entered in this field is included in the invoice emailed to the Customer.
Purchase Order Company Details
This option is displayed if the Purchase Orders option is also enabled.
Enter the Company details to be displayed on Purchase Orders.
Currency
Select the currency for all financial transactions within the system.
*Denotes mandatory field.
-
Enable the Payment Required and Email Notification options, if necessary
-
Complete all the necessary fields
-
Select preferred currency
-
Click Save.