2.3 Home

When a User logs into the application, the system defaults to the Home tab. This allows the User to instantly access requests that have been allocated to them and their Teams, which are currently active. Alternatively to default to the Dashboard, a User can update the Default Home option in their My Account screen.
As a Supervisor, Alerts and Quick Call templates can be created for system-wide use within the Home tab. Personal Account information can be accessed and modified in the My Account screen. Service metrics can be displayed graphically within the fully configurable Dashboard tab.
The Home tab gives access to the following tabs:
-
My Tasks - Provides the User with a list of their active requests and their Team's active request. Queued requests, if enabled, are also available in the Home tab.
-
Dashboard - The Dashboard can be configured to provide the User with the real time service desk data
-
Alerts - Allows the User to view, create or edit alerts
-
Chat- Allows the User to view and accept Customer's chat requests (when enabled in the system Setup)
-
Calendar - Displays an event calendar for User's requests and due dates, along with Resource and Outages calendars
-
My Account - Allows the User to edit their personal information including email preferences, password resets, if enabled, and set their time zone
-
Quick Calls - Allows the User to create Quick Call templates, for all Users of the application
-
Group Templates - Allows the User to define Group Templates used when creating Request, Incident and Change groups
-
Feedback - Allows the User to access published Surveys that are ready for completion.
2.3.1 My Tasks
My Tasks displays current active requests allocated to the logged in User. They can also view a list of active or all tasks assigned to the Team(s) the User is associated with, by selecting the relevant My Teams Tasks Filter. If the Queue option is enabled for the User's Teams, My Teams Queued Tasks is also accessible in the Filter drop down list.
The List View can also be customized by clicking  .
.
From this screen requests can be:
-
Created
-
Searched
-
Grouped
-
Exported to PDF or Excel
-
Subscribed to for updates via RSS feeds.
If the User is a member of a Service Request, Change, Deployment, Problem or Incident Team, the list will contain all active requests assigned to them for each Process.
To view a request details, select the Reference # hyperlink.

Creating a new request
To create a new request:
-
Select Home>My Tasks
The Tasks screen appears.
-
Click New
The Request Information screen appears.
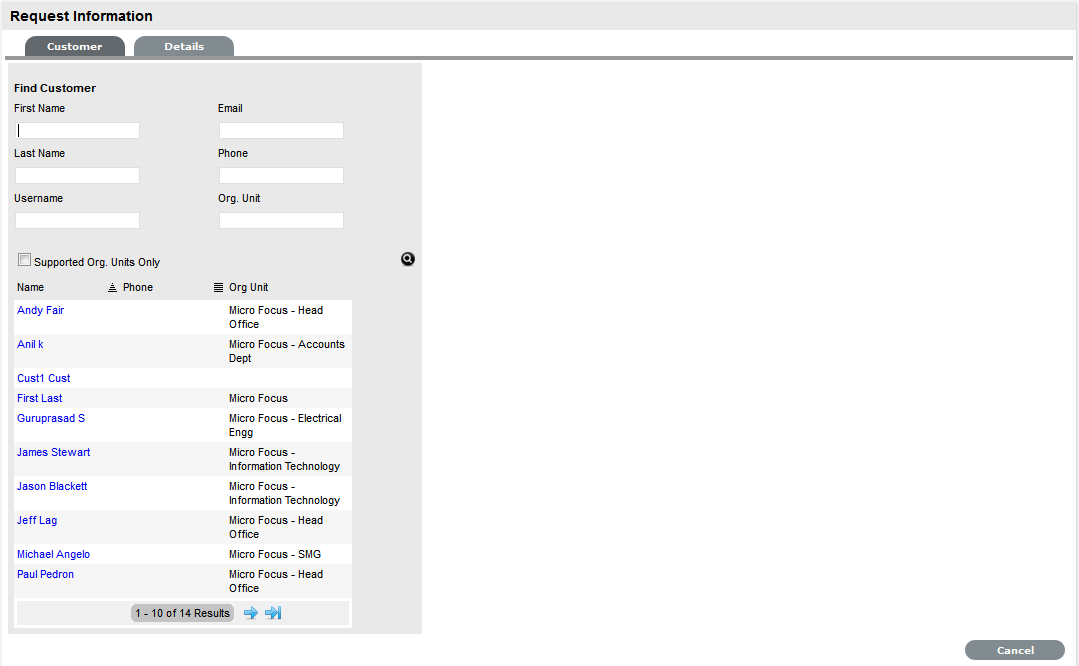
-
Search and select a Customer
See: Searching for Customers or Creating a New Customer.
-
Search and select an Item
See: Searching for an Item.
-
Select the Service Type, Classification and enter in the task Description
Selecting the Service Type defines the task as an Incident, Problem, Change or Service Request.
-
Click Save.
NOTE:Refer to the specific Process section of the User Guide, for more detailed information about working with the newly created task.
Request Search Tips:
Search results displayed within the Home tab include requests associated with the logged in User or their associated Teams. To access a search results list across all Users in the system, perform the search within the relevant Process tab.
-
The request search option has a default Status to search only Active Requests. To ensure search success, select the relevant Incident Status, if unsure, select All
-
To search across multiple Processes, leave the Type field blank
-
To search for multiple requests numbers at once, insert a comma separator between ID numbers
-
To search based on a request Status, select the request Workflow option from the Workflow drop-down list. Once selected, a list of States is displayed
-
To search by Classification, select an Item Category from the Category drop-down list. After the Category is chosen, a list of Classifications is displayed
-
To search based on the content of a request Description, select the Full Text option within the Search and enter a relevant term (See: Full text searches.)
-
To search using an Item's Custom field information, select the Item Category to display any Custom Fields enabled for that Item.
NOTE:For information regarding request assignment, reviewing a request, adding notes or updating the status, refer to Working on a Request.
2.3.2 Searching for an Item
To search for Items in the CMDB use the Search button on the Configuration>Items screen.
To search for an Item:
-
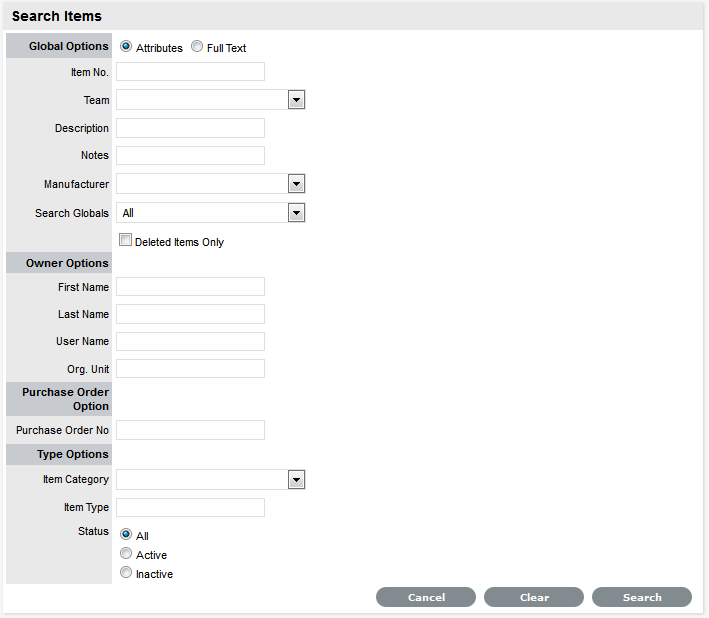
Click

A search page is displayed with the options to search across the Team, Item Status, Manufacturers, Global Items, Item Ownership, Item Categories and Types. There is also the option for the search results to return deleted Item information.
-
Define any Item Attributes
To complete a Full Text search select that option and then enter relevant text in the Term field. (See: Full text searches.)
-
Click
A list of Items will be displayed.
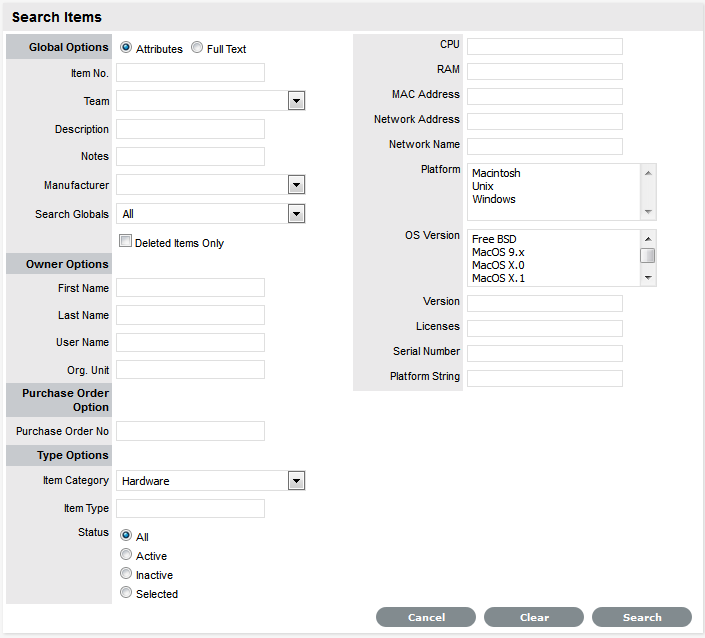
For an advanced search on specific Item details, it is necessary to enter the Item Category. When this is selected the Item search page will expand:
Tips on searching for an Item:
-
Select the Deleted Items Only option to return a list of all Items that have been deleted in the system. To re-enable these deleted Items, once the search is executed, select the Item ID# followed by

-
To search on an Item's Status, first select the Item Category
-
To search on attribute fields of an Item, first select the Item Category
-
To return a list of Items that are allocated to Customers or Org Units, select the Assigned Only option from the Search Globals drop-down list.
Full Text Search Options
A variety of search options, including the ability to search using terms or phrases, can be used to find information in the Knowledge Base or using any full text search fields included in system search screens. Search options include:
-
A single character wildcard search using the ? symbol
-
A multiple character wildcard search using the * symbol
-
A fuzzy search using the tilde, ~, symbol at the end of a single word. For example, to find words similar to roam, enter roam~ and this will return terms like foam and roams.
When searching using a phrase, the group of words need to be entered in the Text field within double quotation marks, for example, "user account access". Complex searches can be conducted using a combination of phrases or terms with boolean operators and all search results are relative to the Team assignment of the User or Item ownership for a Customer.
The boolean operators (i.e., AND, NOT, OR, +) must be entered as uppercase letters. For example:
-
"user" OR "account" returns results related to either word
-
"user" AND "account" returns results with both words
-
"user" NOT "account" returns results including "user" but not "account"
-
+user account returns results that must contain "user" and may contain "account"
-
"user" -"account" returns results that contain "user" but not "account". (Same results as using NOT.)
To further control the boolean logic, more complex searches can be conducted. For example, to search for either "user" or "account" and "access", the search words would be entered as: (user OR account) AND access. This will return results where "access" must be included, while either term of "user" or "account" is found.
Fuzzy logic searches using the '~' (tilde) can be performed on a single word term with the '~' at the end of the word. A value between 0 to 1 can also be applied to the search, where the value closer to 1 ensures terms with higher similarity are matched. If a value is not defined, the default of 0.5 is applied to the search. For example, roam~ should return results with similar spelling, like foam and roams. The search term of roam~0.8 might return words like roams, roamed.
Wildcards can be used to replace single character '?' and multiple characters '*' in search terms. For example, te?t, test* or te*t. Wildcards can not be used as the first character of a search.
Proximity searches can be used to find words in a phrase within a specific distance away from the entered search term. To conduct a proximity search use "~" at the end of the phrase. For example, "user account"~10 will search for results where the word user and account are within 10 words of each other.
Escape character searches are also supported in the system and include: + - & || ! ( ) { } [ ] ^ " ~ * ? : \
An example of using escape characters when searching for (1+1):2, requires the search syntax of \(1\+1\)\:2 to be entered. It should be noted that the '\' must be entered before the escape characters.
Field Searches
Within the system full text searches can be conducted on specific fields, these include:
|
Search Screen |
Fields |
|---|---|
|
Request |
Subject, description, notes, attachments and solution. |
|
Item |
Number, itemtype, category, attachments and notes. |
|
Knowledge Base |
Title, summary, body, attachments, itemtype, classification, and custom1-5. |
|
Forum |
Title, content and author (last name). |
To search on a specific field, within the Term or All Text field enter the name of the field to be searched on followed by a colon and the term or text. For example, if searching for a specific Title, the Term or All Text search field would be completed as follows for the various search types:
-
single word search - title:canceled
-
phrase search - title:"canceled ticket"
-
multiple word search - title:canceled OR title:ticket.
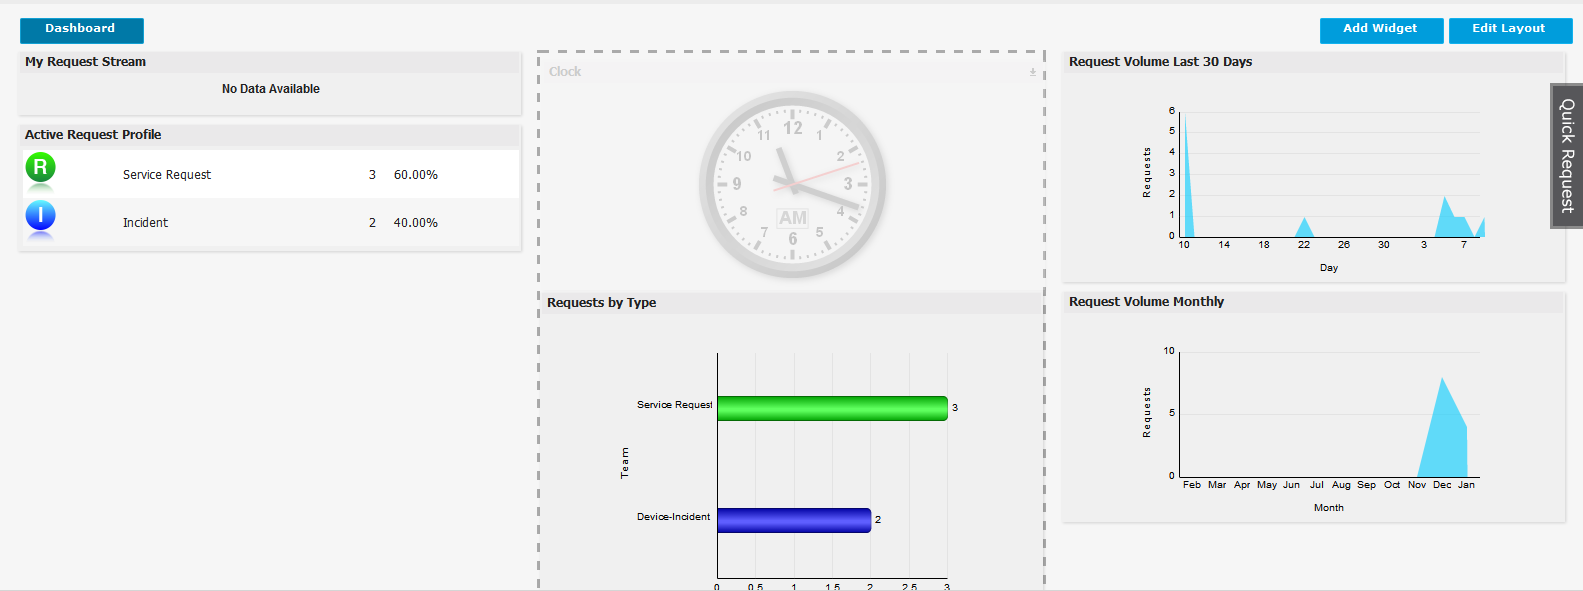
2.3.3 Dashboard
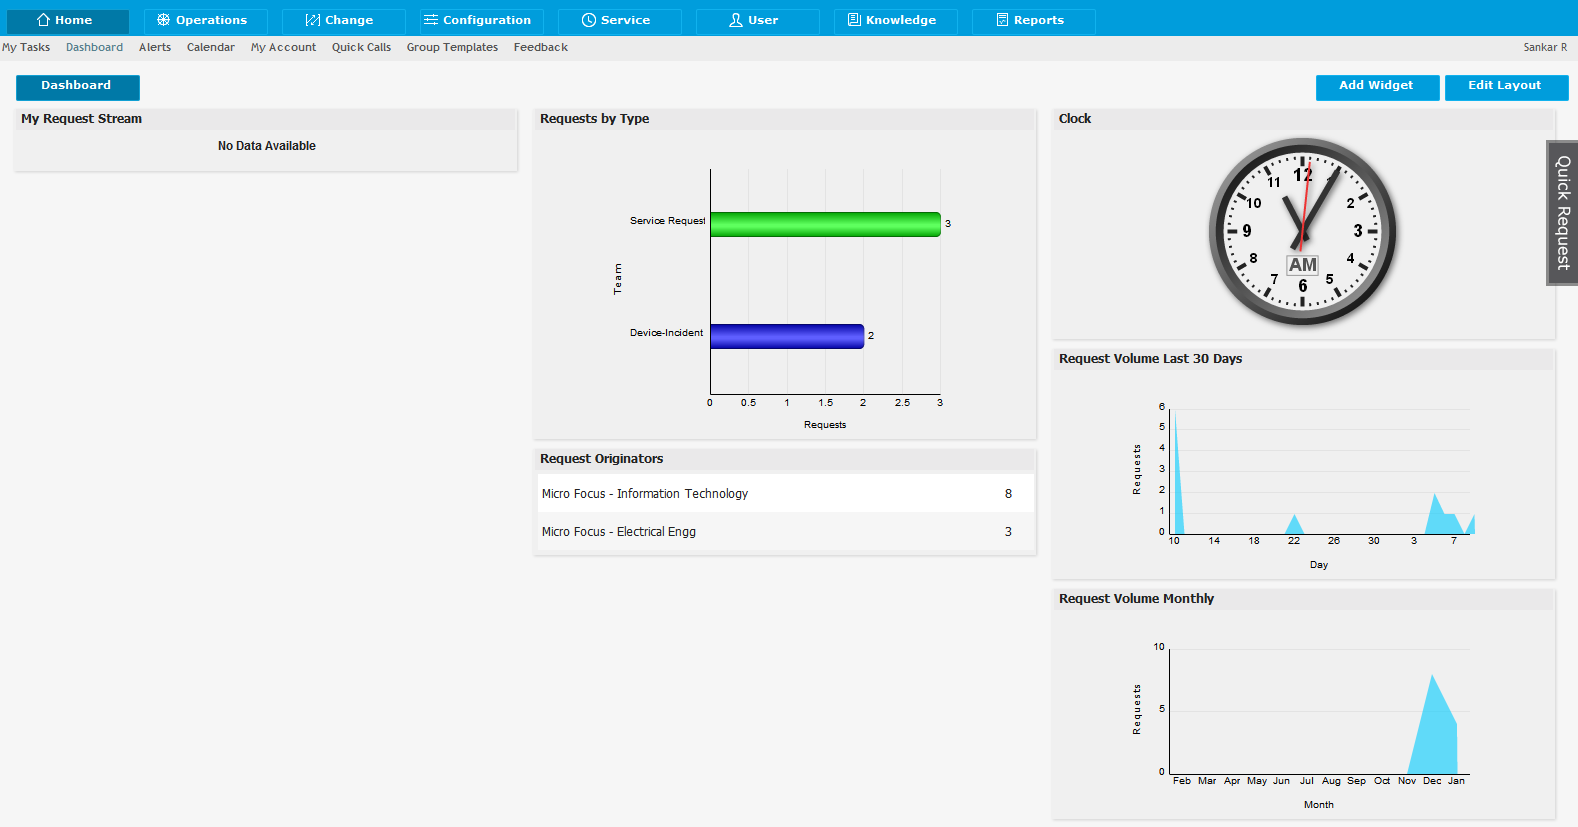
The Dashboard can be customized to display automatically updating request lists, system reports and information using widgets. The Request Stream widget provides Users with a list of requests that automatically updates without requiring a screen refresh, as is required in the My Tasks tab.
Dashboard as default Home Tab
Users can set the Dashboard as their default landing page upon logging into the system, by adjusting the Default Home option within the My Account screen.

Customizing the Dashboard
Information displayed on the Dashboard can be adjusted according to the Layout defined and the widgets selected.
To customize the Dashboard Layout, within the Home tab:
-
Select the Dashboard tab
The Add Widget and Edit Layout buttons are visible on the right side of the screen.
-
Click

The Edit Layout window is displayed.
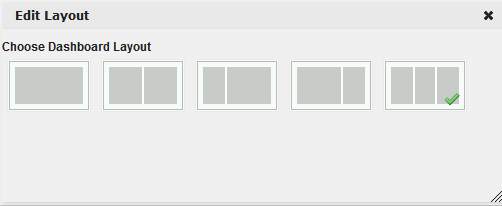
-
Click the image for the required Layout option
The screen will default to the selected option. To move any existing widgets to another location on the screen, click on the widget heading and drag to the preferred location.
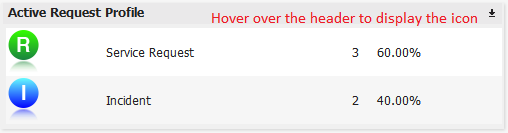
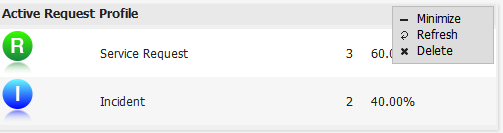
Widget Menu Options
To access the Minimize, View Data, Refresh and Delete widget menu options, scroll over the widget header.
|
Menu Option |
Description |
|---|---|
|
Minimize/Maximize |
Select Minimize to reduce the view of the widget to the Widget Header. When minimized, the Maximize option becomes available. Click Maximize to display the widget in full. |
|
View Data |
Available within the Request Stream widget menu option. Select to view the request details that make up the widget content. |
|
Refresh |
Select to manually refresh the data displayed. |
|
Delete |
Click to remove the widget from the dashboard. A warning message will be displayed, select OK to continue with the deletion process. |
To add widgets to the Dashboard, within the Home tab:
-
Select the Dashboard option
The Add Widget and Edit Layout buttons are visible on the right side of the screen.
-
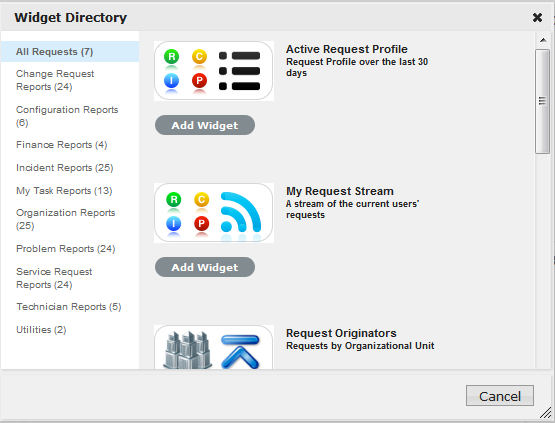
Click

The Widget Directory is displayed with the categories across request types, Configuration Management, Finance and Utilities.
-
Select a widget category
The list of available widgets is refreshed based on the category selected.
-
Click the Add Widget button for the widget to be included on the Dashboard
The widget is applied to the Dashboard and the Directory screen is closed automatically.
-
To move the widgets to another location on the screen, click the widget heading to engage the drag icon and move the widget to the preferred place on the dashboard.
2.3.4 Alerts
Alerts are an internal mechanism used by Administrators, Supervisors and Technicians to notify Users and Customers about important issues relevant to them or their environment.
NOTE:It should be noted that Technicians can only create Alerts if enabled by the Administrator in Setup>Privileges>Users.
Alerts generated within the Home tab or within a request can act as reminders or notifications for personal use, for a specific User, or for Users of a particular Role. Alerts can be scheduled to be published and dismissed. Automatically generated Alerts result from SLA warnings and breaches.
System generated Alerts are created for Administrator Users when ADS/LDAP sync and AMIE Item import tasks are completed.
Viewing Alerts
When an Alert is received, the Alert icon flashes in the top right corner, next to the login name:

To view a received Alert:
-
Click on the icon
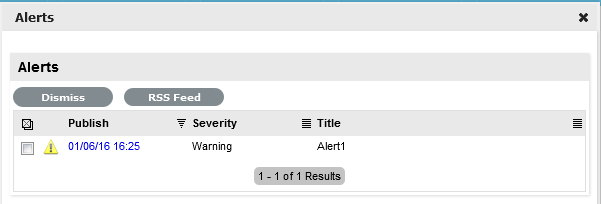
The Alert screen opens with all current Alerts. The icon in the first column indicates whether the Alert is Information, a Warning or Urgent.
-
Click on the date in the Publish column to view the details of the Alert
The default window displayed will include a Click Here link to access related information such as Incident or Solution details.
-
Click Done to close and keep the Alert, or Dismiss to delete it from the pop-up window and disable the flashing icon
-
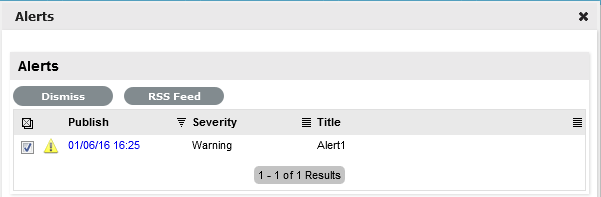
To dismiss one or multiple Alerts within the Alerts list, check the boxes next to the relevant Alerts and then select the Dismiss option
-
To subscribe to RSS feeds for Alert updates, select the RSS button.
Creating Alerts
To create an Alert:
-
Select Home>Alerts
-
Select New
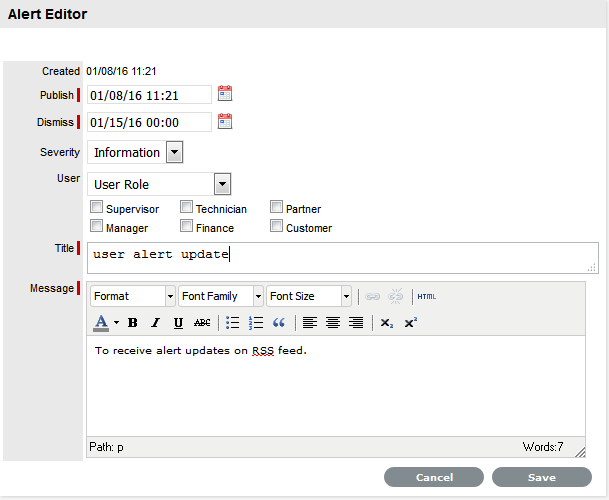
The Alerts editor appears.
-
Enter a Publish and Dismiss date
Alert Details
Description
Created
The current date and time.
Publish
The date the Alert is published. Use the calendar icon to the right of the field, to select a Publish date.
Set to a date in the future, or use the default to publish the Alert immediately.
Dismiss
The date the Alert ceases to be available. Use the calendar icon to the right of the field, to select a Publish date. On this date, the Alert will disappear from a User's Alert list.
Severity
The type of Alert to be published. The choices are:
-
Information – for general Alerts
-
Warning – to warn Users of potential issues
-
Urgent – to publish an urgent actionable message.
The icon appearing with the message will depend on the type of Alert.
User
The User type to receive the Alert, which include:
-
Specific Customer or User - In the Find User or Customer list, click search to select the recipient from the drop-down list.
-
User Role - An Alert sent to a User Role will go to all Users with that Role.
-
Personal Alert - A personal Alert appears on the User's own screen at the Publish date.
-
Organizational Units - In the Find Org. Unit field, search and select the recipients.
-
Public - A Public Alert appears when the Public Alert link is selected on the Login Page.
Title
Enter the title of the Alert.
Message
Enter the main content of the Alert.
-
-
Select the Severity for the Alert message
-
Select the User
Options include selecting User Roles, a specific User or personal.
-
Enter a Title for the Alert
-
Enter the Message content for the Alert
-
Click Save
Alerts with current Publish dates will be sent immediately.
-
Click Done.
Deleting Alerts
Alerts can be deleted within the List View by selecting one or more Alert checkboxes and clicking the Delete button. Alternatively, they can be deleted individually within the Alert Editor information screen by selecting the Delete button.
SLA Breach Alerts
Alerts are also used by the system to inform Users about SLA breaches. The Alert will be addressed to the User and assigned to the request that has failed to reach an SLA target. The breach will contain information such as the affected Request ID, and how the SLA has been breached.
Administrator Alerts
The system will generate an Alert for the system Administrator when the system has been synchronized with directory servers or an external asset management tool. Active system Alerts can be viewed by the Administrator in My Accounts>Alerts.
2.3.5 Chat
Chat allows Customers and Technician Users to interact in real-time, regarding Customer requests. When the system Chat facility has been activated for the application, and if a User has enabled their availability for chat sessions, Customers with an active request can initiate a chat with the User assigned to the Customer’s request. Or, if the Privilege is selected within the application Setup, the Customer can chat with any Technician within the Team assigned to their request.
The Administrator can enable the system Chat facility for the application within Setup>Privileges>System.
Enable User Availability
If the Chat feature is active for the application, a User must set their availability to Available for Chat, in order for a Customer to access the functionality within the Customer Portal. A Customer can only initiate a chat with the User, if the User is logged into the application and the Available for Chat option is active.
If the User is Available For Chat and the Customer logs onto the Customer Portal to access a request update, the Customer is able to initiate a chat session with the User from within the Chat menu.
To activate the User availability:
-
Select the Home tab
-
Move to the My Account Option
-
Select Edit
-
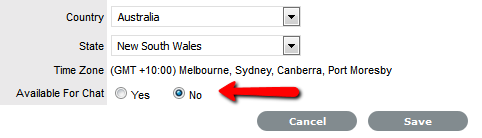
Select Yes within the Available For Chat option
When the option is set to No, Customers will not be able to initiate a chat with them, from the Customer Portal.
-
Click Save.
With the availability option enabled, Customers can initiate chat sessions with the User from the Customer Portal.
Accept a Customer Chat
When a Customer has initiated a chat, their chat request is placed within a User's chat queue. ![]() is displayed next to the logged in User Name (on the right hand side of the sub-menu bar) to alert the User that a Customer has requested a chat session.
is displayed next to the logged in User Name (on the right hand side of the sub-menu bar) to alert the User that a Customer has requested a chat session.
For Users to accept a chat session initiated by a Customer:
-
Click the icon
Or, go to Home > Chat to view the chat queue

-
At the chat queue, select a chat request by clicking the Accept icon
The chat window opens.
-
The User/Customer chat can commence.
Email Chat Button
A copy of the chat transcript can be emailed to the Customer by selecting the Email button within the chat window.

End Chat Button
To end a chat session, close the chat window. When the window is closed a message is displayed to notify the User that the chat transcript was saved as a request Note.
Request Note
A chat session request Note is created when a chat commences. The Note is continually updated as messages are posted by chat members. When the chat ends, a chat transcript is accessible to Users and the Customer within the Notes tab of the request.
NOTE:It is advised that a chat sessionnot be refreshed, as refreshing a chat window will effectively close the chat.
2.3.6 Calendar
The Calendar provides Users with information regarding request due dates, planned outages, scheduled vacations and requests. Within the Calendar screen Users of Google Calendar, Microsoft Outlook, Apple iCal or any calendar application that supports the iCalendar format can subscribe to the system's calendar and updates to their schedule are automatically applied to their personal calendar application. The system provides separate Feeds for outages, requests, holidays, vacations and scheduled requests.
Subscribe to Calendars
To subscribe to a calendar feed, select the required calendar in the Legend view and the calendaring tool will display a message wanting confirmation of the subscription. Alternatively, use the calendar application's Subscribe menu option and complete the URL details for the required feed.
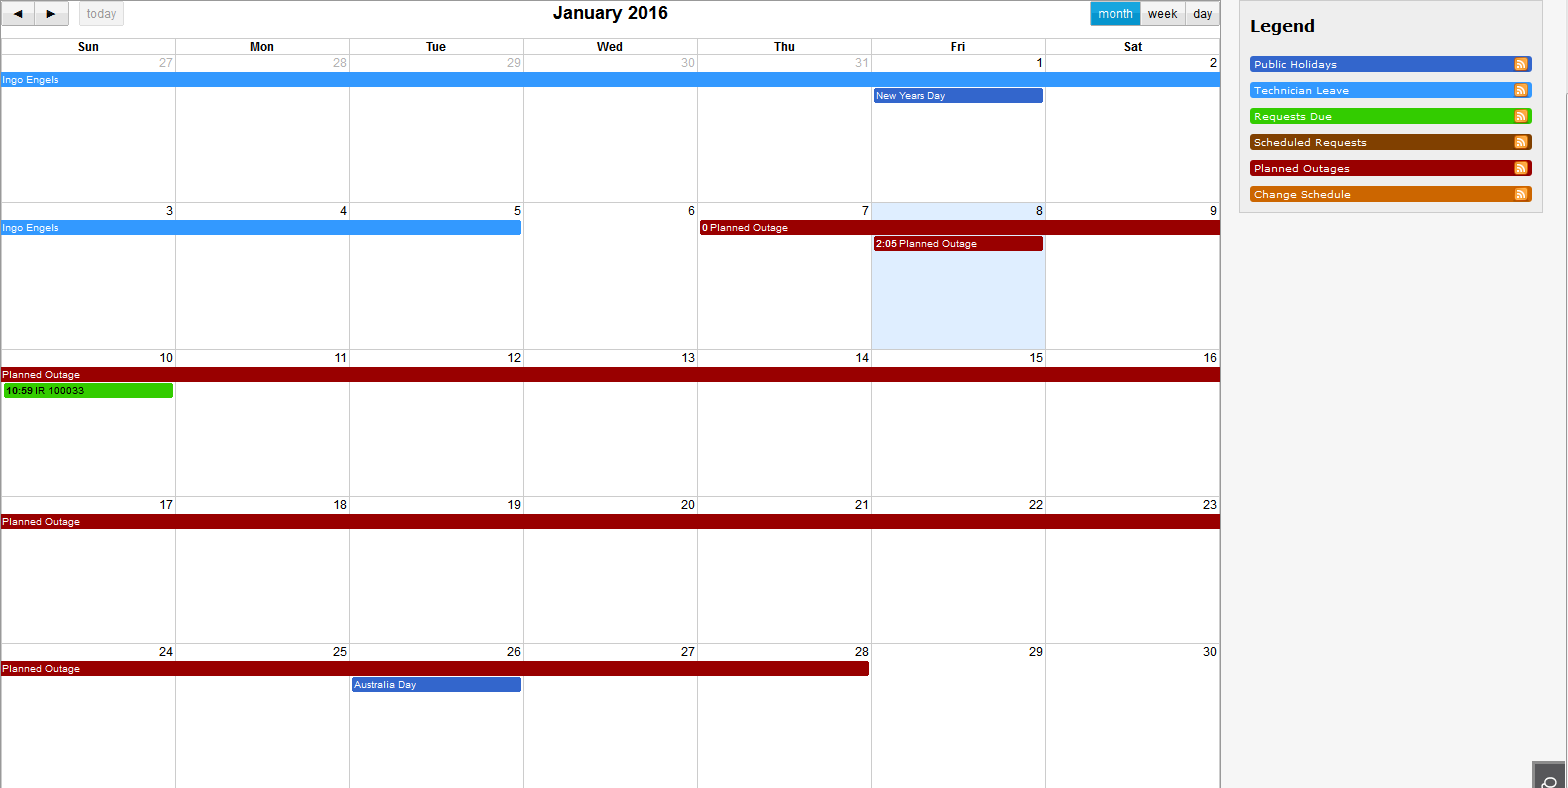
To filter the dates displayed in the calendar view, use the month, week and day tab. To view request details, click on the relevant Request ID hyperlink.
2.3.7 My Account
The My Account tab allows the User to:
-
Edit personal information and notification preferences
-
Reset their Username and password
-
Set Password questions, if enabled in the system
-
Select the Default Portal and Home tab landing page
-
Set a Time Zone and Date Format.
NOTE:Fields imported through an LDAP or Active Directory server cannot be changed.
Editing Account Information
To edit account information:
-
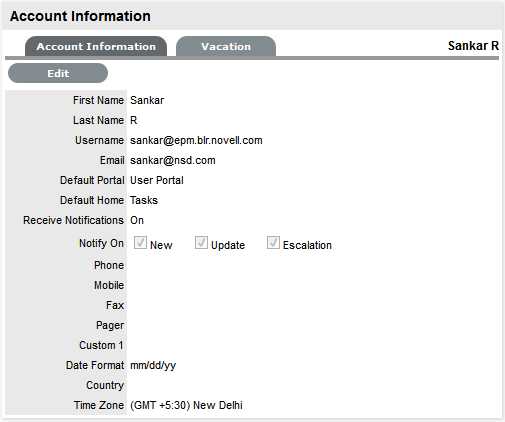
Select Home>My Account
The Account Information screen appears.
-
Click Edit
-
Make the required changes
Account Information
First Name
First name of the Account User. If account information is imported via LDAP or Active Directory, First Name will not be editable.
Last Name
Last name of the Account User. If account information is imported via LDAP or Active Directory, Last Name will not be editable.
Username
Username name of the Account User.
Password
Password reset.
Confirm Password
Re-enter the password to confirm correct entry of the selected password.
Password Question One/Two
Select questions that are to be asked when the Lost Password link is selected in the Login Page and the challenge questions are required to verify Users details before re-sending the system password.
(These fields are displayed when Password Questions option has been enabled in Setup>Privileges>System.)
Answer One/Two
Enter the answers to the questions.
Default Portal
Where a User has more than one Role, the Default Role will be the Role used at login.
Default Home
The User can define the tasks Home tab or the Dashboard tab as the default landing page when they log into the system.
Preferred Communication
Select Email or SMS as the preferred method of receiving updates from the system.
This field is visible if the User also has a Customer Role in the system and the Customer Defined Contact option is enabled in Setup>Privileges>CustomerTab. It only applies, when the Team has the Customer Notification option set to Customer Defined.
Email
Email address for the Account User.
Receive Notification
When set to No the User will not receive system-generated emails when requests are created or updated. Irrespective of the setting in this field when a request is escalated to a User, an email notification will be sent.
Phone, Mobile, Pager
Telephone, mobile and pager details. If these fields are imported via LDAP or Active Directory they will not be editable.
Date Format
Preferred date format.
Country
When Country details are entered, if the Country has States, a States list will be displayed. (If the option is not available is the displayed list, additional options can be configured by the Administrator in Setup>Localization> Regions.)
Time Zone
User's Time zone
Available for Chat
Using this option Users can select whether they are available for a Chat request, when the Chat facility is enabled.
-
Click Save.
Receiving Email
If a User does not wish to receive email notifications when they are assigned a new request, or when changes are made to a request (i.e., a new request Note has been logged by the Customer) set the Receive Email option to No.
It should be noted that regardless of what is selected for the Receive Email option, if a request is escalated to the User, a notification email is forwarded to them by the system.
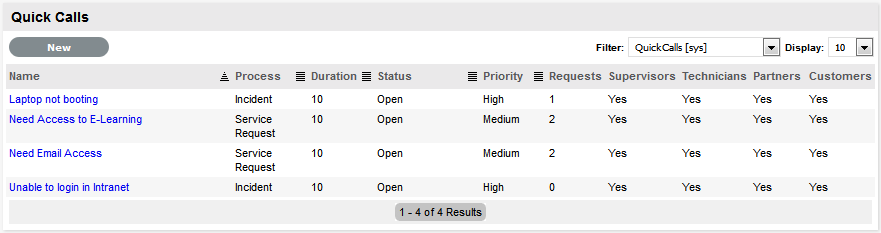
2.3.8 Quick Calls
A Quick Call is a commonly created request that uses a template. Creating a template saves time and effort because the details of commonly created requests can be customized as part of a template that is automatically applied when the request is logged with the system.
If Quick Calls have been enabled by the Administrator in Setup>Privileges>Requests, the Quick Calls sub-menu option is available within the Home tab of the Supervisor screen.
Supervisors create the Quick Calls or Templates for frequently received requests that are used by other Users during the request creation process. Access privileges for Quick Call templates can be set for Supervisors', Technicians', Partners' and Customers' use.
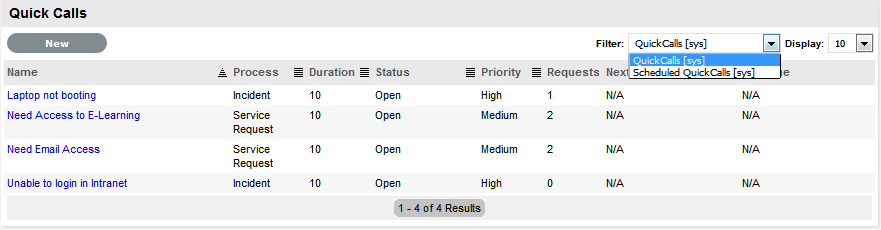
Scheduled Quick Calls
Regularly logged requests can use the Quick Call functionality to automatically create requests in the system when the Supervisor pre-sets the content of the request and customizes a timetable. The system can automatically apply Quick Call templates to create requests on a Daily, Weekly, Monthly, Bimonthly, Quarterly, Bi-Annually, Annually, Bi-Weekly, set Day of Week or on a One Time basis.
To access the list of Scheduled Quick Call Templates for use in the system, use the Filter option within the Quick Call sub-menu.
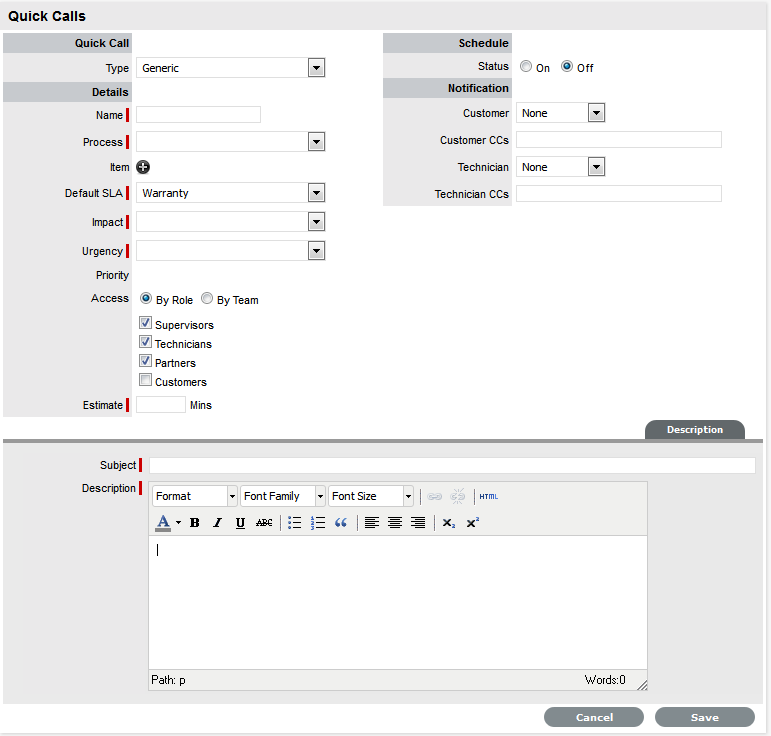
Creating Quick Call Templates
To create a Quick Call Template:
-
Select Home>Quick Calls
-
Click New
The Quick Call editor appears.
-
Enter template information
Options
Description
Details
Name*
Enter a name for the template. This will appear in the drop-down list of templates available when creating a request.
Process*
Select the Process in which the template will be used (Incident/Problem/Change/Service Request).
Item
If relevant, select an Item to assign to a Quick Call. This option is not visible when Contracts are enabled.
NOTE:If no Item or the Unknown Item is assigned to the template, the Quick Call will be made available in the Request Type drop-down list of the Details tab, after an Item has been assigned to the request.
Classification*
If an Item has been assigned to a Quick Call, the Classification option is displayed. Select the relevant Classification for the Quick Call template.
Default SLA*
Select a default SLA to be assigned to the request. This is applied if the Item, Customer, or Organizational unit does not have a valid maintenance contract. The Default SLA selected determines the Workflow options displayed at Default Workflow.
Default Workflow*
The Workflow list is populated based on the default SLA selected. Select the default Workflow to assign to the request. If the required Workflow is not displayed, move to the Service tab and select Workflows to assign the selected Default SLA to that Workflow. See: Workflows.
**For Change Request Quick Calls, the ability to assign any stage of the Workflow to the Template, allows the RFCs created in the system using the Template to be pre-approved.
Default Status*
Use the drop-down menu to select the Status for the template. This list will be based on the default Workflow selected for the Quick Call.
For example, if a template is created for a Password Reset it may be effective to set the status to Closed-Resolved as the request can be solved in one step.
NOTE:Select an Exit Point State to access the Solution Tab within the Quick Call Template screen.
For Change Request Quick Call Templates, it is possible to set a State that allows the RFC to be pre-approved when created in the system.
Team*
Select the Team to manage the request. The Teams list will be populated according to the Teams who support the Workflow assigned to the Quick Call.
Technician
Select the Technician responsible for the request. The Technician list is based on the Team selected. If System Assigned is selected, the system's logic uses skill set/classification, Org Unit and workload to select the technician for the request.
Impact*
The proposed impact the request has to a Customer or Organizational Unit.
(This option is only visible if the Admin>Setup>Privileges>Request>Incident Priority is set to "Derived".)
Urgency*
The proposed urgency to have the request resolved for the Customer or Organizational Unit.
(This option is only visible if the Admin>Setup>Privileges>Request>Incident Priority is set to "Derived".)
Priority
If this field is editiable, select the Priority that reflects the degree of impact and urgency of the issue. Alternatively, if the Admin>Setup>Privileges>Request>Incident Priority is set to "Derived" the Priority will be automatically calculated based on Impact and Urgency selected in the above two fields.
Access*
The template access can be restricted based on User Role or Team Membership. If By Role is selected, indicate the Users types who can see and use the template in the application (Supervisors, Technicians and Partners). To enable Customers to use the Quick Call template within the Customer Portal, also tick the Customer option.
If the Quick Call is to only to be accessible Users within a specific Team, select the By Team option to remove the Roles list options and assign the Team from the list displayed. (A Process must be assigned to the template for list of Teams to become visible.)
Estimate*
Is an estimation of the time accrued for the request at the point of creation. This is useful for scheduled requests created in Workflow Exit State, as it records the amount of time taken to complete the automatically generated task.
Description*
A description of the request.
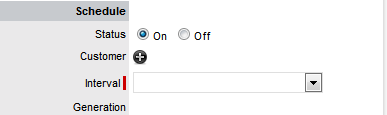
Schedule
Status
Indicates if the template is a Scheduled Quick Call and if it is to be automatically generated at the times specified in the Interval field.
Customer
Allows the template to be automatically associated with a Customer upon creation.
Interval
Nominates the time interval that the Quick Call is to be created. Select from the options of Daily, Weekly, Monthly, Bi-Monthly, Quarterly, Bi-Annually, Annually,Bi-Weekly, specific day of the week or on a one-off basis.
Generation
Based on the Interval selected, define the month/day/ time to generate the Quick Call.
Notification
Customer
If relevant, set the type of Notification and define if updates are to be sent just to the Customer related to the request, or if all Owners of the Item are to be also updated.
Customer CCs
If relevant, enter the email details of any other Customers who must be notified regarding activity related to the request.
Technician
If relevant, set the type of Notification, and select if the Technician, Layer or Team is to be notified about the request activity when it is logged in the system.
Technician CCs
If relevant, enter the email details of any other Users who must be notified regarding activity related to the request.
* Indicates mandatory fields
-
Click Save.
NOTE:When using a Quick Call template with Billing enabled, the Items available in the Add Item list will be limited to those that belong to the selected Customer and have a valid maintenance contract in place.
Applying Time Estimates to Workflow States
Workflow State time estimations can be defined for a Quick Call template, within the Impact tab. This allows each Status to be assigned with an estimated time frame for a request to remain in that state. This facility is especially relevant for requests created for Change Management and indicating the length of time to complete each stage of a change.

Assigning a Solution Article to a Quick Call
A Solution Article can be assigned to a Quick Call if the template has been allocated an Exit Point status. Once an Exit Point has been assigned, a Solution tab will become visible. Within this tab, the User can search for a Solution Article and assign it to the Quick Call. When the Quick Call is applied to an Incident or Service Request, the Solution is automatically attached.

2.3.9 Group Templates
Project or Group Templates are created by Supervisors as a means to group related Quick Call templates. For example, a Group Template could be created for when a new employee begins work at an organization. The new employee will need a new PC, an email account, a Username and password etc. Rather than creating a separate request for each task, a Group Template could be created including all the Quick Call requests.
Group Templates are available to any User within the system.
Creating a Group Template
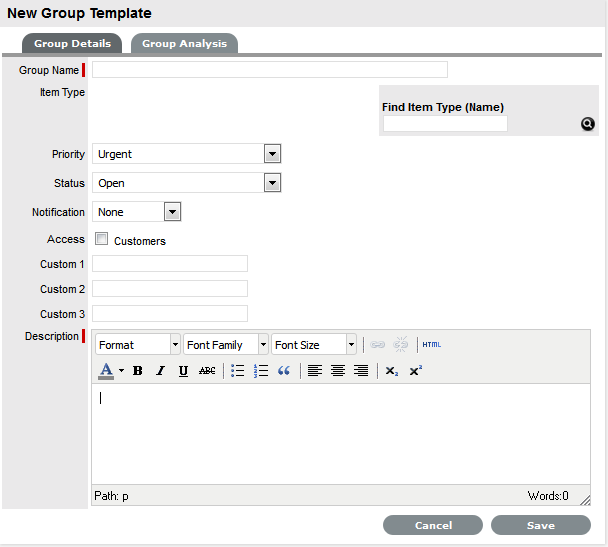
To create a new Group Template:
-
Select Home>Group Templates
-
Click New
The Group Template editor appears.
-
Enter the Group Name
-
Search and select an Item Type the group will be based on, if required
-
Select the Priority for the template
-
Select a default Status (Open or Closed- Resolved) and Notification method
-
Tick the Customers Access option, if Customers are to be enabled to use the Group Template in the Customer Portal.
If this option is selected, the On Save and In Sequence options are displayed, which defines how the individual tasks will be created when the Template is saved by the Customer.
If the In Sequence option is used, the first task within the Group Template is created when the template is selected and saved by the Customer. When the first task is Closed, the next task within the template is automatically created and so goes the auto-creation process until all tasks within the template have been created and closed in sequence.
When the On Save option is selected, all tasks included in the Template are created in the system when the Customer saves the Group Template in the Customer Portal.
-
Enter a Description
-
Click Save
The Group Analysis tab is displayed. The User is required to create Task templates or Quick Calls for the Group Template
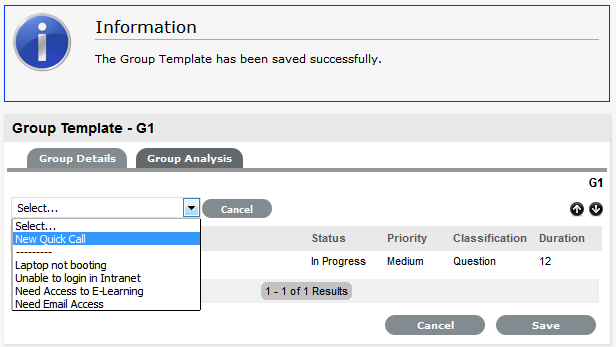
-
Assign a pre-existing Quick Call by selecting options displayed beneath the dashed line and selecting the Add button
-
Create new templates by selecting New Quick Call in the drop down list.
The Quick Call editor is displayed.
-
Enter Quick Call details and Save
For more information about configuring Quick Call templates, see: Quick Calls.
NOTE:If the system requires an Item to be assigned to a Quick Call template, assign the Unknown Item and the new Item details can be further refined when the Task becomes active in the system.
-
Continue to create additional Task templates, as required
-
When all relevant Quick Call templates have been created for the Group Template, click Done.
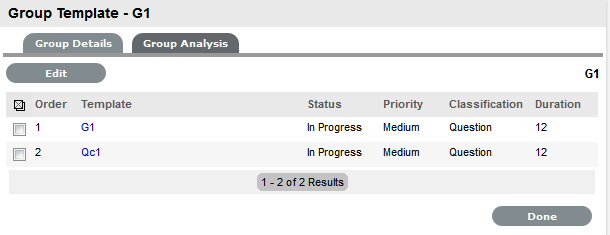
NOTE:To change the order of requests in the Tasks list, select the checkbox beside the Order ID and use the

 buttons.
Applying Group Templates
See: Incident Groups or Change Groups for more information on applying a Group Template.
2.3.10 Feedback
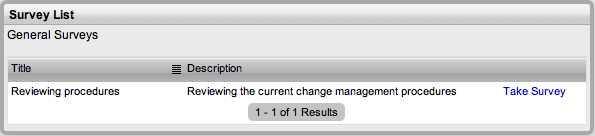
Within the Feedback tab, Users can complete published surveys in order to provide useful feedback relating to service and support activities. This information is then collated and available within the Knowledge Base tab.
Completing a Survey
When a Survey is published, it can be completed by Users and Customers. To complete a Survey as a Supervisor or Technician User:
-
Select Home > Feedback
-
Select the Take Survey hyperlink
-
Complete the Survey
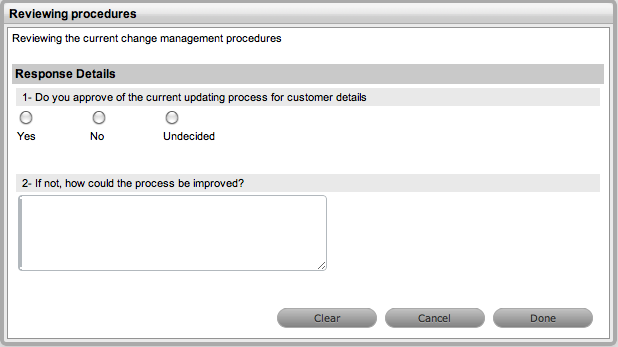
-
Click Done.