1.13 Contract Assignment
Contracts can be assigned to an Item, Customer, Organizational Unit or on a per Incident basis. The following content regarding creating a Contract, assumes that within the system Setup, the Billing>Contracts option is enabled.
When a request is created, the system will check if the Customer has a valid contract. If the Customer is not under contract, the system will check if the Org. Unit is covered, and if not, it will assess the Item contract status. If no contract is in place, the request will be assigned a "Pending - No Contract" Status and locked down until a Contract is created. See: Create a Contract.
An Item, Customer and Organizational Unit can only have one active contract in place at a time but multiple contracts can be queued by assigning a Start Date that falls after an existing Contract's end date. Queued Contracts are visible within the Item, Customer or Org Unit's Contract tab identified by the contract number generated at the point of creation, if Invoicing is not enabled in the system. If Invoicing is enabled in the system and an SLA cost is associated with the contract, a contract number is generated when the invoice payment is processed by a Finance User.
1.13.1 Customer Contracts
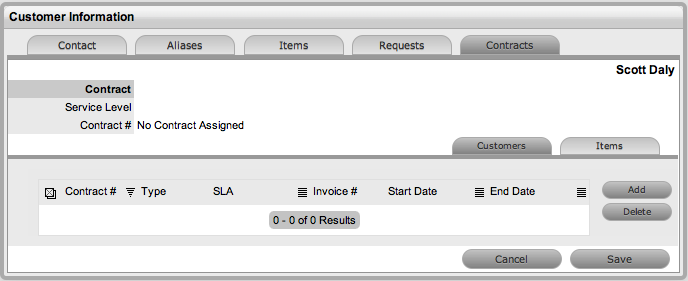
Customer contract history is stored within the Contracts tab of the Customer Information screen. All contracts, valid and expired, are listed within the Customer and Items tab of the Contracts screen.
To create a new contract for a Customer:
-
Select User>Customers
-
Select the Customer Name
-
Move to the Contracts tab
-
Click Edit
The Add and Delete buttons become available with the Contracts>Customer tab.
-
Click Add
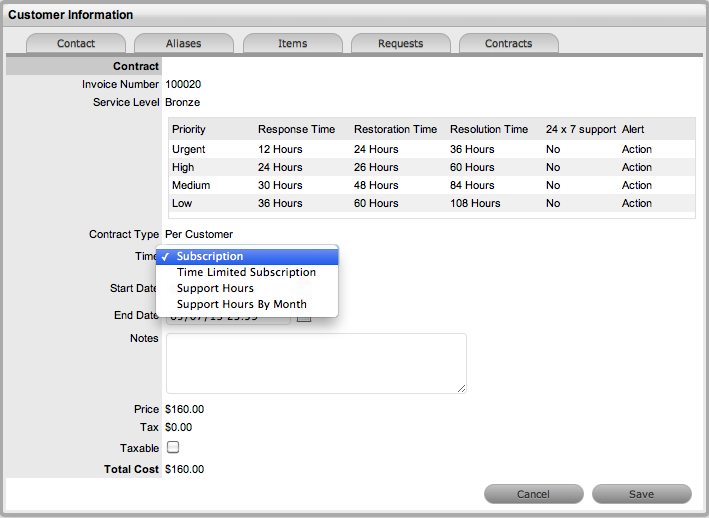
(If Invoices are enabled in the system, an Invoice number will be automatically generated and assigned to the Contract).
-
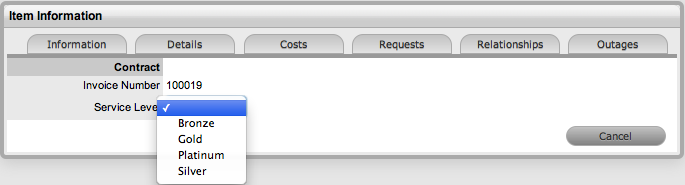
Select a Service Level from the list
When selected, the screen expands to display start and end date fields.
-
Define the Contract Time period
For the Per Customer Contract Type the Time Period for the Contract can be defined as one of the following:
Subscription if selected, the Start and End Dates are automatically set to year from the date of creation, but can be edited if required.
Time Limited Subscription if selected, the Support Hours field is displayed and the number of support hours purchased by the Customer should be entered. Also, the Start Date and End Date fields should be completed manually by entering the length of time for the subscription period, or the system will default to entering a year from the date of creation.
Support Hours if selected, the number of support hours purchased by the Customers should be entered.
Support Hours by Month if selected, set the number of hours purchased per month and define which day of the month contract is to rollover to start the new month. The Total Support Hours will automatically be calculated based on the Start and End Dates set for the Contract.
(If a Contract is forward dated with a Start Date set in the future, the Pending Contract status is assigned. See Pending Contracts.)
-
Add any relevant Invoice Notes
-
Check the Taxable box, if the Contract is to be taxed
-
Click Save
If invoices are enabled and a cost is associated with the SLA, a Warning message is displayed prompting that the invoice needs to be processed by a Finance User before the contract will become available in the system. The invoice can be processed in the Finance >Invoices tab.

-
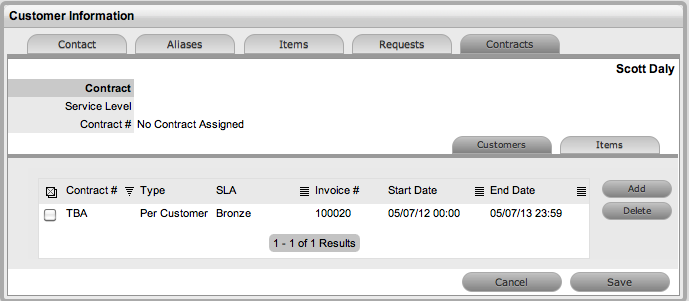
Click Next to continue
The system reverts to the Contracts summary screen
-
Click Save. Click Done.
-
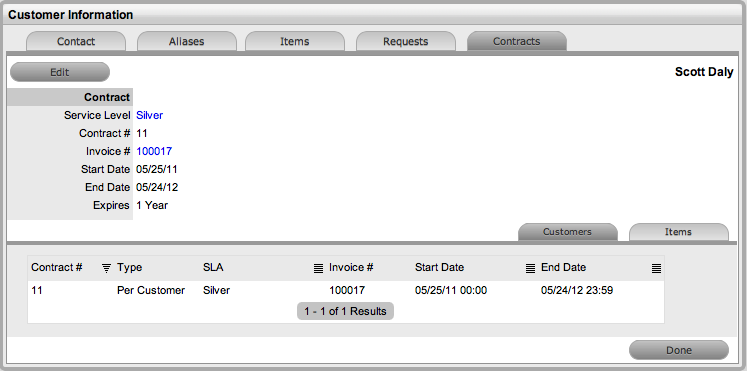
NOTE:If Invoices are enabled, a new invoice is automatically saved within the Finance>Invoices screen for the newly created Contract. If payment is required, a Pending Invoice Number is displayed and once processed, the Contract details will be included in the Customer Information>Contracts>Customer tab.
The Items tab within the Customer>Contracts screen is used to list all the Items with a Contract that are owned by a Customer.
To delete a current Contract, as a Supervisor User, select  next to the Contract Number. Alternatively, to delete a current or queued Contract, within the Contract>Customers tab check the field next to the relevant Contract # and select the Delete button.
1.13.2 Organizational Units Contracts
Organizational Units’ Contract history is stored within the Contracts tab of the Org. Unit Information screen. All Contracts, valid and expired, are listed within the Org. Unit, Customer and Items tab of the Contracts tab.
NOTE:To assign a Contract to an Org Unit, a Primary Contact must be nominated for the Org Unit or the system will prompt the User to assign a Primary Contact during the Contract assignment process. This means, prior to creating the Contract assign at least one Customer to the Org Unit and then designate a Customer as the Primary Contact.
To create a new Contract for an Organizational Unit:
-
Select User> Organizational Units
-
Select the Organizational Unit's Name
-
Move to the Contracts tab

-
Click Edit
The Add and Delete buttons become available with the Contracts>Org Unit tab.
-
Click Add
If a Primary Contact has not been assigned to the Org Unit a system prompt will notify the User to create a Primary Contact. See: Primary Contact.
-
Select a Service Level from the list
When selected, the screen expands to display start and end date fields.
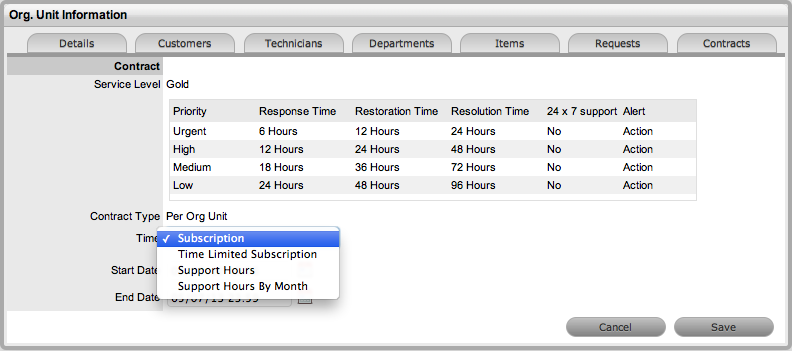
-
For the Per Org Unit Contract Type the Time Period for the Contract can be defined as one of the following:
Subscription if selected, the Start and End Dates are automatically set to year from the date of creation, but can be edited if required.
Time Limited Subscription if selected, the Support Hours field is displayed and the number of support hours purchased by the Customer should be entered. Also, the Start Date and End Date fields should be completed manually by entering the length of time for the subscription period, or the system will default to entering a year from the date of creation.
Support Hours if selected, the number of support hours purchased by the Customers should be entered.
Support Hours by Month if selected, set the number of hours purchased per month and define which day of the month contract is to rollover to start the new month. The Total Support Hours will automatically be calculated based on the Start and End Dates set for the Contract.
(If a Contract is forward dated with a Start Date set in the future, the Pending Contract status is assigned. See Pending Contracts.)
-
Click Save
-
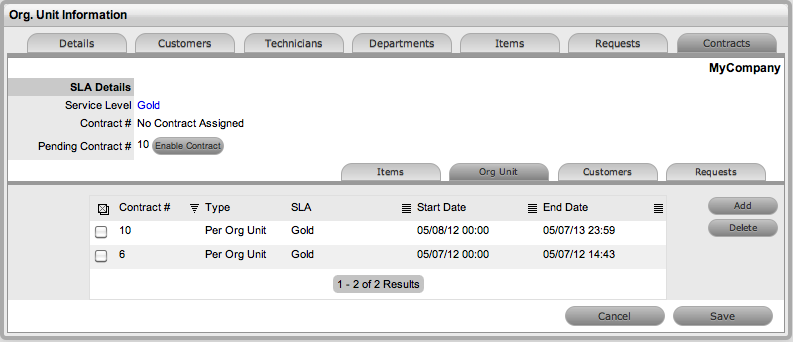
Click Next to continue
The system reverts to the Contracts summary screen, if the contract is forward dated and another contract is not already active, the Enable Contract option button will be available. Select this button if the contract is to commence prior to the set Start Date. Alternatively, other contracts can be queued for the Org Unit by selecting the Add button.
-
Click Save
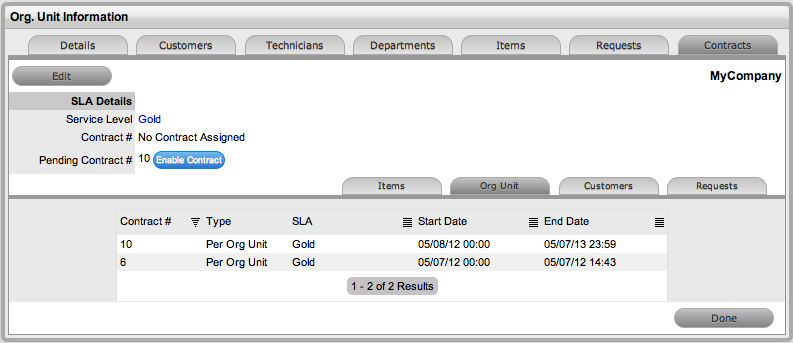
To process the contract before the set Start Date select the Enable button.
-
Click Done.
A success message is displayed.

-
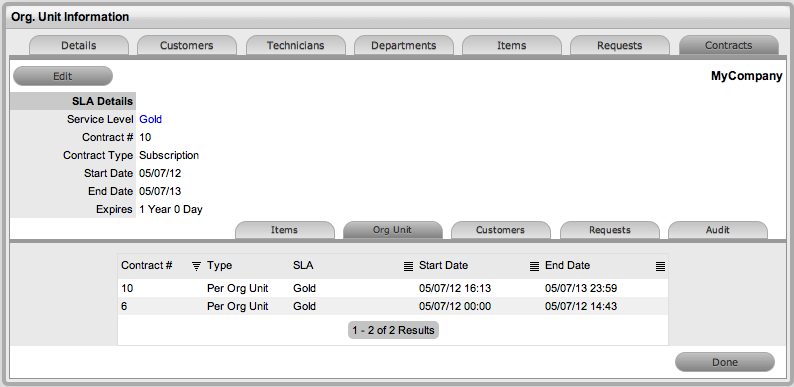
NOTE:If Invoices are enabled, a new invoice is automatically saved within the Finance>Invoices screen for the newly created Contract. If payment is required, a Pending Invoice Number is displayed and once processed, the Contract will be listed in the Org.Unit Information>Contracts>Org.Unit tab.
To delete a current Contract, as a Supervisor User, select next to the Contract Number. Alternatively, to delete a current or queued Contract, within the Contract>Org Unit tab check the field next to the relevant Contract # and select the Delete button.
The Items and Customers tab within the Org Unit>Contracts screen is used to list all the Items and Customers with a Contract that belong to the selected Org Unit.
1.13.3 Item Contracts
-
Select the Item Number within the Configuration>Item screen
-
Move to the Costs tab
The Contracts tab is visible in the bottom right corner of the screen
-
Click Edit
The Add and Delete buttons are made available within the Contracts tab

-
Click Add
(If Invoices are enabled in the system, an Invoice number will be automatically generated and assigned to the Contract).
-
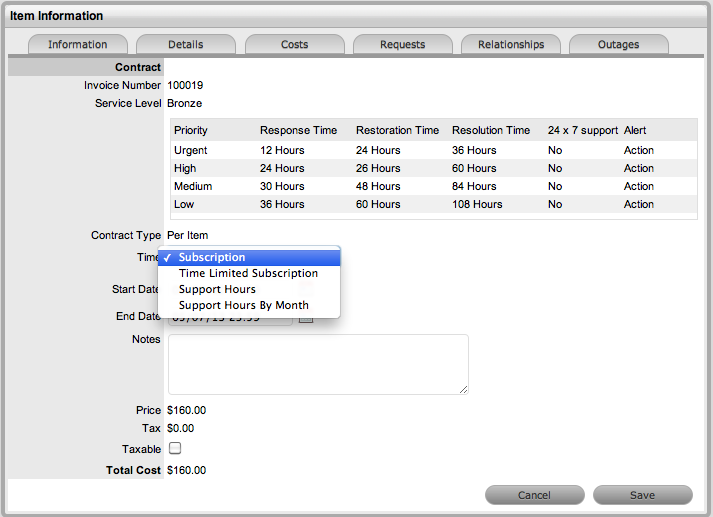
Select an SLA from the drop-down option
The screen will display the SLA details and the Contract Type locked to Per Item.
-
Assign the Time period to be covered by the Contract:
If Subscription is selected, the Start and End Dates are automatically completed by the system, but can be edited if required.
If Time Limited Subscription is selected, the Support Hours field is displayed and the number of support hours purchased by the Customer should be entered. Also, the Start Date and End Date fields should be completed manually, entering the length of time for the subscription period.
If Support Hours is selected, the number of support hours purchased by the Customers should be entered.
If Support Hours by Month is selected, set the number of hours purchased per month and define which day of the month contract is to rollover to start the new month. The Total Support Hours will automatically be calculated based on the Start and End Dates set for the Contract.
(If a Contract is forward dated with a Start Date set in the future, the Pending Contract status is assigned. See Pending Contracts.)
-
Add any relevant Invoice Notes
-
Check the Taxable box, if the Contract is to be taxed
-
Click Save.
If Invoices are enabled in the system, an Invoice number will be automatically generated for the Contract and made available within Finance>Invoices. Payment will need to be processed by a Finance User before the Contract can be enabled in the system. If invoice payment is required before the contract can be enabled in the system the following Warning message is displayed:

-
Click Next
The Contracts information is only populated after the Invoice has been processed. To process the invoice, as a Finance User move to the Finance>Invoices tab. Once the relevant invoice payment has been processed the Contract details will be visible in the Costs >Contracts tab.
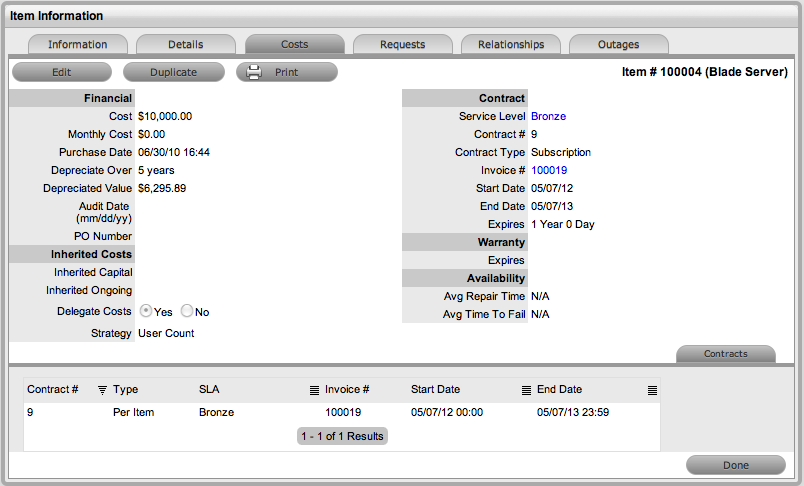
The Costs tab provides a summary of the current Contract details. The Contracts tab within the Costs screen, lists all contracts that have been assigned to this Item.
To delete a current Contract, as a Supervisor User, select next to the Contract Number. Alternatively, to delete a current or queued Contract, within the Costs>Contract tab check the field next to the relevant Contract # and select the Delete button.
1.13.4 Per Request Contracts
When a request is created without a valid contract, the system automatically assigns the request a status of Pending - No Contract. The User can associate a contract to either the Item or request within the Contract tab of the request Information screen. A Request Contract is only valid for the life of the request. See: Create a Contract.
1.13.5 Contracts with Invoices Enabled
When the Invoices option is enabled within the application's setup and a Contract is being created, the system automatically generates a Contract Invoice. For the contract to become active in the system, a Finance User must process the invoice. If no cost is assigned to the Service Level (i.e., Warranty), the invoice is automatically processed and the contract is active in the system.
1.13.6 Canceling Contracts
If a Contract is no longer valid, it can be cancelled at any time during the contract period. A Supervisor can cancel the Contract within the Customer, Org, Unit or Item Contracts screen, by selecting next to the Contract Number. Contracts that are canceled using this option will record the Reason for cancellation as the Supervisor User name who triggered the cancel action.
A User with the Finance Role can delete a Contract within the list view of the Service>Contracts tab.
To cancel a Contract, as a User with the Finance Role:
-
Go to Service > Contracts
-
Select a Contract ID to be canceled
The Contract Information screen will appear.
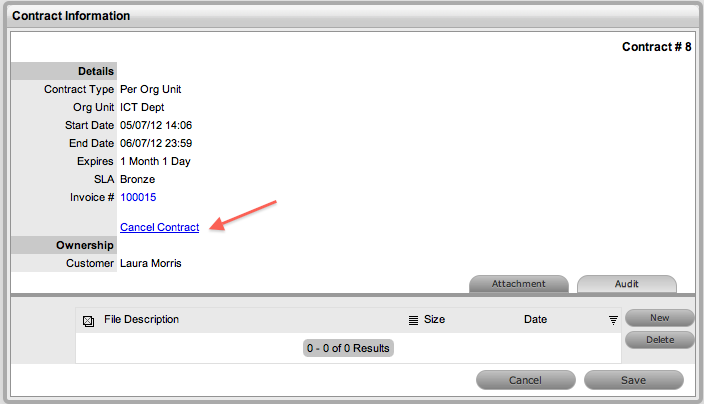
-
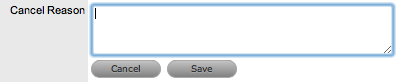
Click the Cancel Contract hyperlink
A Cancel Reason text box is displayed.
-
Enter an explanation for canceling the Contract
-
Click Save
The Cancel Reason is assigned to the Contract and the Contract Expiry date will be marked Expired.
-
Click Done.
NOTE:When a Customer Contract is cancelled and the Customer's associated Org Unit has an active contract in place, the Org Unit Contract details will be displayed within the Contracts>Service Level field of the Customer Information screen.