5.5 Creating a User Home Folder Policy
Prior to creating the user policy, you must determine if the policy should pertain to the members of the domain, organizational unit, or a group.
-
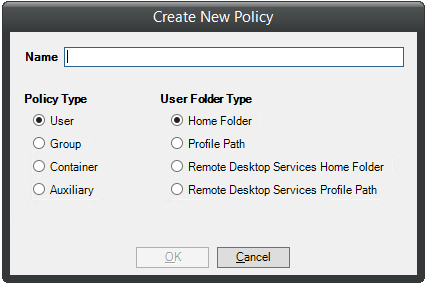
Launch NSMAdmin.
-
In the menu, click .
-
In the menu, select
The following screen appears:
-
Specify a descriptive name in the field and leave the and options selected.
The Policy Options page appears.
-
Continue with Section 5.5.1, Setting Policy Options.
5.5.2 Setting Associations
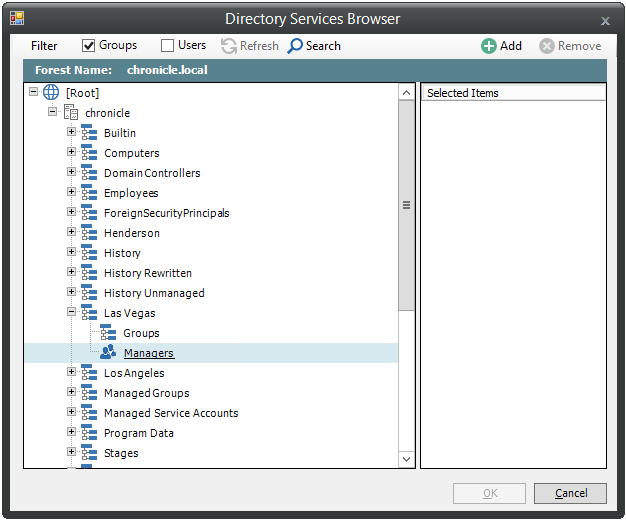
The Associations page is where you assign the policy you are creating to a domain, organizational unit, Group object, or—if you are creating a Blocking policy—a User, Group, or Container object.
-
In the left pane, click .
-
Click to bring up the Object Browser.
-
If you plan to assign the policy to a User object, select the check box in the Filter region of the Object Browser.
-
Browse through the directory structure and select the domain, organizational unit, Group object, or User object you want to associate the policy to.
The Domain Users group cannot be a target for a policy association.
-
Drag the object to the Selected Items pane, then click .
The Object Browser is closed and the object is displayed in fully qualified name format in the right pane of the window. For example, CN=Managers,OU=Las Vegas Groups,DC=NVB,DC=local.
-
Click to close the Object Browser.
-
Click to save your settings.
-
Proceed with Section 5.5.3, Provisioning Options.
5.5.3 Provisioning Options
The Provisioning Options page is where you indicate home folder rights, the network drive letter for the home folder, the location of a template for provisioning folder structure and content in a home folder when it is created, and more.
-
In the left pane, click .
The following page appears:
-
In the Folder Properties region, specify the following settings:
Default Rights: By default, Novell Storage Manager grants the user all file rights to the home folder except for Full Control. Granting Full Control is not recommended because it provides administrator rights to the home folder, and enables the user to rename and delete the folder.
Policy Defined Default Attributes: Select this check box to enable the , , and check boxes, which provide the user the ability to set these attributes for the home folder. For example, if you wanted home folders to be hidden from view, you could enable the Hidden attribute by selecting the check box.
By default, Novell Storage Manager assigns the user for whom a home folder is created as the home folder owner. Because this essentially provides the owner administrative rights to the home folder, you might want to provide ownership to the network administrator instead. To override the ownership and indicate a new owner, click the check box, then browse to and select the User object you want to establish as the owner.
The home folder user still has all rights—with the exception of administrative rights—to the home folder.
-
(Optional) To have subfolders and documents provisioned in the home folder when it is created, use an existing file path as a template.
For example, if you wanted each home folder to have an HR subfolder with some HR documents inside, click to locate and select the HR folder in the file system.
Everything beneath the selected folder is copied into the user’s home folder.
-
In the Home Folder Options region, indicate the network drive letter that users associated with this policy will use to access their home folders.
-
Click to save your settings.
-
Proceed with Section 5.5.4, Setting Target Paths.
5.5.4 Setting Target Paths
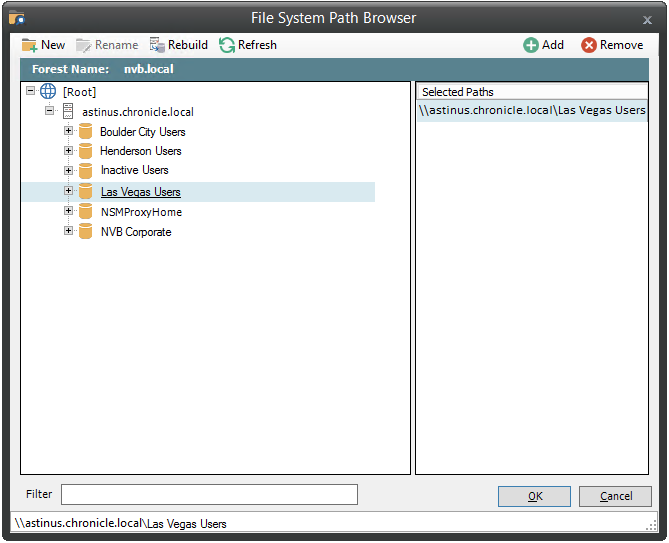
The Target Paths page is where you set the paths to the shares where user home folders will be hosted.
-
In the left pane, click .
-
In the Target Placement region, fill in the following fields:
Distribution: If you create more than one target path for a policy, you can indicate any of the following options:
-
Distributes storage randomly among the number of target paths.
-
Distributes the creation of user home folders according to shares with the largest amount of absolute free space. For example, if you have two target paths listed, target path 1 has 15 GB of free space, and target path 2 has 10 GB, the home folders are created using target path 1.
-
Distributes the creation of user home folders to volumes with the largest percentage of free space. For example, if you have two target paths listed, target path 1 is to a 10 TB share that has 30 percent free space and target path 2 is to a 500 GB share with 40 percent free space, the home folders are created using target path 2, even though target path 1 has more absolute available disk space. You should be cautious when using this option with target paths to shares of different sizes.
Leveling Algorithm: Use this option to structure the home folders so that they are categorized by the first or last letter of a username through a subordinate folder. For example, if you choose , and the field is set to 1, a user named BSMITH has a home folder located in a path such as \\SERVER1\HOME\B\BSMITH.
If you choose , and the field is set to 1, the same user has a home folder located in a path such as \\SERVER1\HOME\H\BSMITH.
The means the last character of the attribute Novell Storage Manager uses to create storage. Once again, Novell Storage Manager uses the SAM, not the character of the last name.
The field allows you to enter up to 4 characters. This makes it so that you can organize home folders by year. For example, if your setting is , and the setting is 4, a user named BMITH2014 has a home folder located in a path such as \\SERVER\HOME\2014\BSMITH2014.
Maximum Unreachable Paths: If you have a substantial number of target paths listed on this page, this field lets you indicate the number of target paths Novell Storage Manager accesses to attempt to create a home folder before it suspends the attempt.
-
-
For each target path that you want to establish, click to access the Path Browser.
-
Browse to the location of the target path you want and click to add the target path to the Selected Paths pane.
-
Click to save your settings.
-
Proceed to Section 5.5.5, Setting Quota Options.
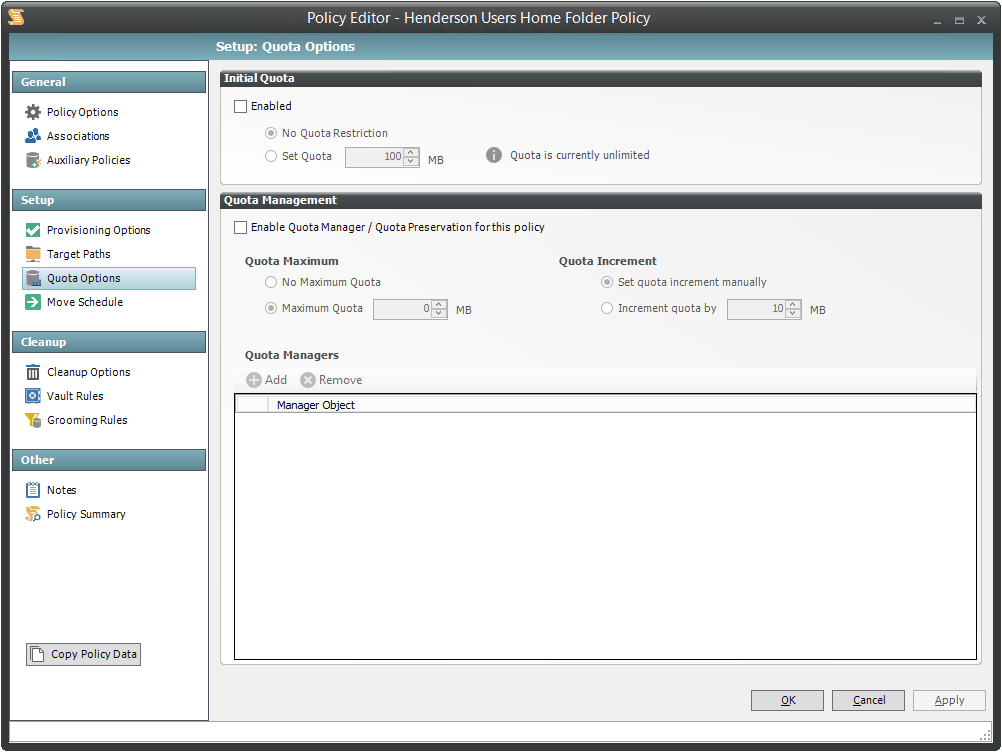
5.5.5 Setting Quota Options
This page lets you establish user storage quotas. Until quota management is established, users have unlimited storage disk space for their home folders.
NOTE:Quota management on NAS devices needs to be managed by the NAS vendor software.
This page is also where you establish quota management settings for quota managers. A quota manager is a specified user or group—for example, a help desk administrator or technical support rep—who is granted the ability to increase a user’s quota, without having rights to the file system. Quota management actions are performed through Quota Manager, which is a separate Web browser-based management interface. For more information on Quota Manager, see Section 8.0, Using Quota Manager.
-
In the left pane, click .
The following page appears:
-
Select the check box to enable an initial storage quota for users to whom this policy will apply.
Leaving this check box deselected gives users unlimited user home folder storage.
-
In the field, specify the initial storage quota for the user home folders.
-
Set up quota managers and enable the Quota Manager Web interface for this policy by filling in the following fields:
Enable Quota Manager / Quota Preservation for this policy: Select this check box to enable the Quota Management region of the page and to enable quota preservation.
Quota preservation preserves the home folder quota settings for users that are moved. For example, if a user is moved from the Sales organizational unit to the Marketing organizational unit, if the user’s quota allocation for the policy that applies to Sales were higher than the quota allocation for the policy that applies to Marketing, the quota allocations from the policy associated with the Sales policy are preserved for the user.
Quota Maximum: Indicate whether the user home folders associated with this policy will have a maximum quota setting. If so, indicate the maximum quota.
Quota Increment: Indicate whether quota managers will set the quota manually or in set increments. If you use manual increments, the quota manager can increase the quota in any increment until it meets the maximum quota setting. If you establish set increments, the quota manager can only increase the quota by the increment setting.
Quota Managers: Click and use the Object Browser to browse to and select a user or group you want to serve as a quota manager by dragging the User or Group object over to the right pane. Repeat this for each user or group you want to establish as a quota manager.
If you do not specify a user or group as a quota manager, only members of the NSMAdmins group will be able to use the Quota Manager Web interface.
-
Click to save your settings.
-
Proceed with Section 5.5.6, Setting the Move Schedule.
5.5.8 Setting Vault Rules
When a User object is removed from Active Directory, you can have Novell Storage Manager vault the contents of the user’s home folder from a primary storage device to a less expensive secondary storage device. Novell Storage Manager lets you specify what to vault or delete through vault rules. For example, before vaulting a user’s home folder, you might want to remove all .tmp files. Or, you might want to vault only the user’s My Documents folder and nothing else in the home folder. You accomplish all of this through settings in the Vault Rules Editor.
-
In the left pane, click .
The field displays the vault path that you established when you set up cleanup rules.
-
Click to bring up the Vault Rules Editor.

-
In the field, specify a description of the vault rule.
For example, “Files to delete before vaulting,” or “Files to vault.”
-
Fill in the following fields:
Action: Select whether this vault rule will delete or vault files.
If you select , only the files or folders that you list in the text box are vaulted and the remainder of the home folder contents is deleted. Conversely, if you select , only the files or folder that you list in the text box is deleted and the remainder is vaulted.
Files: If the vault rule you are creating will vault or delete content at the file level, leave the option selected.
Folders: If the vault rule you are creating will vault or delete content at the folder level, select the option.
Selecting disables the filter settings in the lower portion of the Vault Rules Editor.
Masks: List the files or folders you want to be vaulted or deleted, according to what is indicated in the drop-down menu.
File or folder names can contain an asterisk.
-
(Conditional) If the vault rule you are creating is specific to files, complete the applicable filter settings.
Leaving the setting as , vaults or deletes all file types listed in the text box according to what is indicated in the drop-down menu. Choosing any of the other options from the drop-down menu lets you indicate files to delete or vault according to size, when created, when last modified, and when last accessed.
-
Click to save the vault rule.
-
If necessary, create any needed additional vault rules by repeating the procedures above.
-
Proceed with Section 5.5.9, Setting Grooming Rules.