2.1 Configuring Your Preferences
Your preferences define the behavior for many available features. The following preference tabs are covered in this section:
2.1.1 Setting Your Preferences:
-
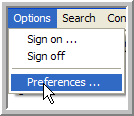
Select the menu item.
-
Select the tab for the preferences you want to edit:

-
: Edit your and options.
-
: Select the information (columns) you want to display for your contacts and the order that the columns appear.
-
: Format the default text that appears in your Application and Chat windows.
-
: Set data share preferences for your meetings.
-
: Set computer phone preferences for your meetings.
-
: Set your language preference.
-
-
To save your settings and close the window, click .
or
To close the window without saving, click .
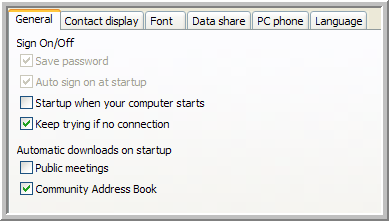
2.1.2 General Preferences
Figure 2-1 General Preferences Tab
-
Sign On/Off options:
-
: Select this option to save your password unless your policy setting prohibits this (to verify, check with your administrator).
-
: Select this option to automatically sign on when Conferencing starts. You need to select the option before you select this option.
-
: Select this option if you want Conferencing to automatically launch when your computer starts.
-
: Select this option to have Conferencing automatically connect/reconnect to the server when it detects an error in the network.
-
-
Automatic Downloads on Startup options:
-
: Select this option to automatically download information on any public meetings when you start Conferencing.
-
: Select this option to automatically download the Community Address Book information when you start Conferencing.
-
2.1.3 Contact Display Preferences
Use the tab to configure the information (columns) that display for your contacts.
NOTE: This affects the Manage Contacts and Buddies and Select Contacts windows.
Figure 2-2 Contact Display Preferences Tab
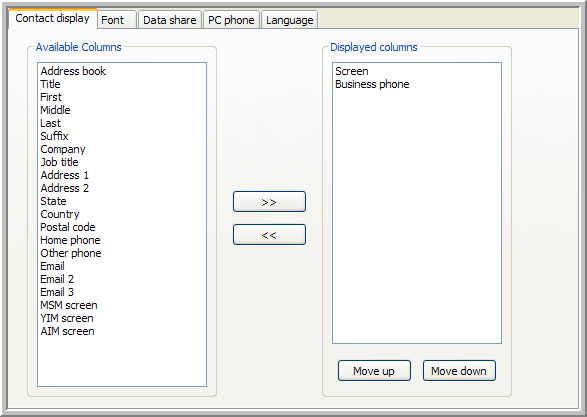
To display a column:
-
Select the column you want to display for your contacts in the list on the left (you can select more than one at a time).
-
Click thebutton to move the columns into the list on the right.
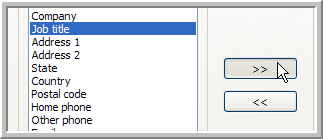
The more columns you select, the longer it take to populate the contact list when you start your client. Therefore, it is best to select only those columns you refer to regularly.
To select the order that the columns appear for your contacts:
-
Select a column in the list on the right.
-
Use the and arrows to change the columns display order (top position appearing first).
-
Repeat the previous steps to position all the columns in the correct display order.
2.1.4 Font Preferences
To set the application font:
-
Click .
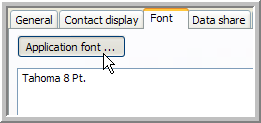
-
Select the , , , and you want to use.
-
Click .
The text pane below the button displays a sample of the application text.
The text pane below the chat font tools displays a sample of the chat text.

To set the Chat default font, use the following chat font tools:
-
 Set Foreground Color
-
 Set Background Color
-
 Decrease Font Size
-
 Set to Normal Font Size
-
 Increase font Size
-
 Set to Bold
-
 Set to Italics
-
 Set to Underline
2.1.5 Data Share Preferences
Figure 2-3 Data Share Preferences Tab
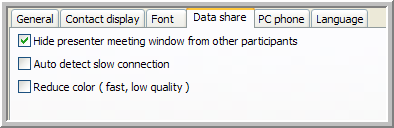
-
: Select this option to hide the Meeting window when sharing in full-screen mode.
This setting only takes effect if it is set prior to initiating a share session. Leave this setting off to share transparent windows. This setting has no effect for presenters running with Windows 98 (participants still see the Meeting window).
-
: Select this option to detect poor connections and reduce the data that Conferencing sends to the participants (the shared data does not look as sharp).
A fast connection that comes up and down a lot, might be treated as a slow connection, so only use this setting if you anticipate participants with slow connections.
-
: Select this option to load shared graphics faster, but at a lower quality.
2.1.6 PC Phone Preferences
Figure 2-4 PC Phone Preferences Tab
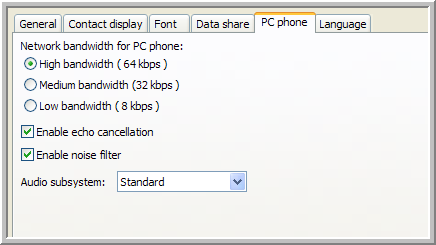
-
: Select one of these options to set the bandwidth for your computer phone.
-
: Select this option to enable echo cancellation (recommended).
A fast connection that comes up and down a lot, might be treated as a slow connection, so only use this setting if you anticipate participants with slow or intermittent connections.
-
: Select this option to enable noise filter (recommended).
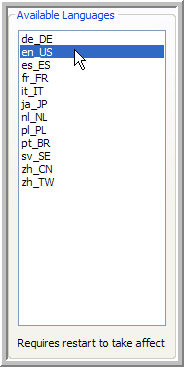
2.1.7 Language Preferences
Select the five-letter code that corresponds to your language.
Figure 2-5 Language Preferences Tab