2.2 Installing a Standalone Lucene Index Server
This section covers how to install the Lucene Index Server as a standalone server.
NOTE:You need to install JDK (Sun JDK 1.5.0_011 or higher) before installing the Lucene Index Server. Linux systems need to have a minimum open file limit of 4096.
2.2.1 Installing Lucene for a New Teaming Site
To install a Standalone Lucene Index Server for a new Novell Teaming application:
-
Copy the Lucene installer to the system on which you want to install the standalone Lucene Index Server.
The Lucene installers are in the Novell Teaming kit you unzipped:
-
lucene-installer.exe
-
lucene-installer.linux
-
-
Run the Lucene installer.
-
In the window, select the procedure you want to perform, then click :
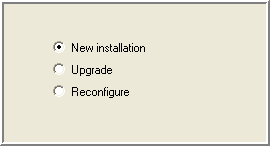
New installation: Use this option to perform an initial installation of the Standalone Lucene Index Server.
Upgrade: Use this option to perform an upgrade of an existing Standalone Lucene Index Server.
Reconfigure: Use this option to reconfigure an existing Standalone Lucene Index Server.
-
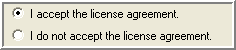
Read the license agreement, select theoption to indicate your acceptance of the agreement, then click .
-
(Windows only) In the window, if you need to change the default for the luceneserver directory, click and select the new location, then click .

-
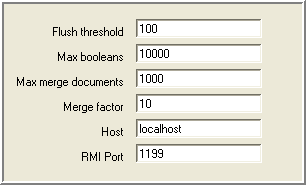
In the window, edit the fields to configure the Lucene index, then click .
If the default port cannot be used, specify the and edit the value.
You can run the Lucene as a server from the same system as Novell Teaming or from a remote system. You need to install the Standalone Lucene Index Server before running Novell Teaming. See Installing a Standalone Lucene Index Server.
-
In the window, click to begin the installation, or use to review the current configuration of the installer.
2.2.2 Installing Lucene for an Existing Teaming Site
-
Shut down Novell Teaming on the Novell Teaming server (see Stopping Novell Teaming).
-
Run the Lucene installer (see Section 2.2.2, Installing Lucene for an Existing Teaming Site).
-
On the standalone server, look at the lucene-server.properties file and find the setting for index.root.dir.
You can edit this setting to change the location of the root directory.
-
Create a liferay.com subdirectory in the index.root.dir directory.
-
On the Novell Teaming server, look at the ssf.properties file and find the data.root.dir setting.
-
Copy all the files from the data.root.dir/lucene/liferay.com directory on the Novell Teaming server to the index.root.dir/liferay.com directory you just created on the standalone machine.
IMPORTANT:If you are using FTP, make sure to copy in binary mode.
-
For UNIX systems, make sure permissions are set so that the Novell Teaming user has full access to these files and the liferay.com directory.
-
Start the server at the end of the installation if it is not already started:
-
Change directories to lucene-server-installation-dir
-
Run the rmiregistry-startup script in the bin directory
-
Run the indexserver-startup script in the bin directory
-
-
Restart Novell Teaming (see Starting and Stopping Novell Teaming).