2.3 Creating a Team Workspace
By default, anyone can create a team workspace (your site administrator will inform you, if the defaults are altered for your organization’s installation). Create a team workspace when a collection of workspaces and folders would facilitate your team’s mission.
This section includes the following subsections:
2.3.1 Create the Workspace
To create a team workspace:
-
On the portal page, in the workspace tree, click :
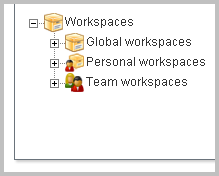
By default, all team workspaces are contained within . Your site administrator might instruct you to go to a different workspace to create your team workspace. If so, the remaining steps in the process are the same.
-
Click the button, located just under the workspace tree toward the top of the page:
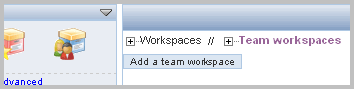
Novell Teaming displays a form used to create your team workspace.
-
Provide a title for your team workspace.
-
In the section, use the type-to-find feature (typing a few letters as Novell Teaming supplies a list of links that match what you have typed so far) to specify your teammates.
-
In the section, select the check box next to the folders you want your team workspace to contain. (You can also add sub-workspaces and more folders later.)
-
(Optional) In the section of the form, click the checkbox and provide a message in the box. Novell Teaming automatically sends the announcement text in an e-mail message to your teammates after you submit this form.
-
Click .
Tips for Team Workspaces
-
As the owner of this workspace, you are primarily responsible for workspace administration. Examples of those tasks include creating other containers for information (sub-workspaces and folders), adjusting access control (which determines who can do what in the workspace), and providing some initial content to assist team members with getting started.
-
Do not provide a large volume of content. For the workspace to match the needs and style of your team, your teammates’ active participation should contribute content and guide administrative decisions.
2.3.2 Viewing Team Members
By default, Novell Teaming includes a team-membership accessory on your workspace page, which shows you your teammates. are sections at the top of workspaces and folders that provide summary information for you. In this case, the accessory shows you a list of team members for the new team workspace. If you want to close an accessory to provide more room for viewing other contents of the workspace or folder, click the (down-arrow) icon toward the upper right corner of the accessory panel:
Figure 2-9 Collapsing the Team Members Accessory Panel
If this accessory is not present, do the following to view the team membership:
-
View your team workspace.
-
Click > .
2.3.3 Communicating with Teammates
In addition to having a workspace to contain more items, team workspaces allow for faster communication among teammates. To use team communication tools:
-
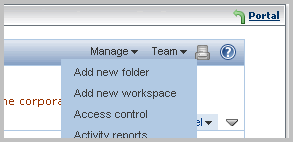
Click the menu on the management menu bar.
-
Click either or .
Teammates participate in meetings by using their Novell Conferencing clients.
2.3.4 Allowing Visitors to Your Team Workspace
By default, only team members can view and participate in the workspaces and folders contained in the team workspace. There might be times when you want to allow other people to visit your team workspace (which, by default, means that they can read entries and comment on them, but they cannot create entries).
To allow visitors to your team workspace:
-
Sign in as the owner of the team workspace.
-
Navigate to your team-workspace page.
-
Click :
Novell Teaming displays the form for the team workspace.
-
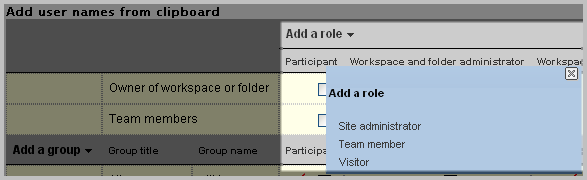
In the section, if it is not set to already, click the radio button, and click :

-
Click > :
-
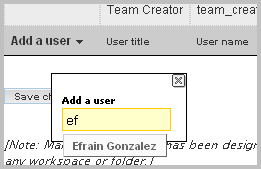
Toward the bottom-left portion of the form, click , and use the type-to-find feature to select a name:
-
In that new user’s row, select the check box in the column:

-
Repeat Step 6 and Step 7 until you have added all your visitors.
-
Click .
-
Click .
The people for whom you selected the role have the right to view your team workspace and to add comments to existing entries. They cannot create new entries.