1.5 Notes about Specific Messages
The use of some messages is less intuitive than for other messages. This section provides additional information for those messages and includes the following subsections:
1.5.1 Adding Folders and the Binder Configuration Identifier
When adding a folder (addFolder), you need to specify a binder configuration identifier, which identifies the template used to configure a folder of a particular type. For example, the blog-folder template specifies settings used to configure a new blog folder.
To review the blog-folder template:
-
Click in the administration portlet.
-
In the “Currently defined templates” section, click .
-
Click > .
Novell Teaming displays a page, the top of which appears as follows:
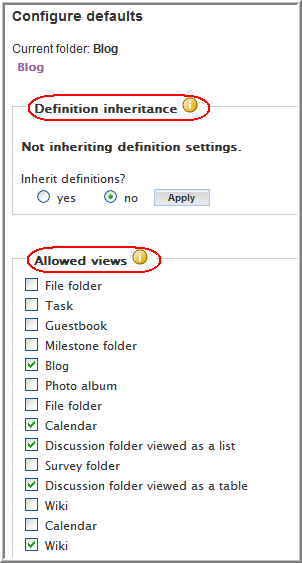
Here is the complete list of the configuration settings available in the template:
-
Definition inheritance
-
Allowed views
-
Default view
-
Default entry types
-
Workflow associations
-
Allowed workflows
-
At the time of this writing, Novell Teaming does not provide a message that you can use to retrieve the binder configuration identifier for a particular type of folder. Instead, to obtain the binder configuration identifier for the folder you want to create, do the following in the UI:
-
View any workspace or folder.
-
Click > .
-
While viewing the page, use your browser to view the HTML source code for the page.
-
Search for the type of folder you want to create (for example, discussion, blog, calendar, and so on).
-
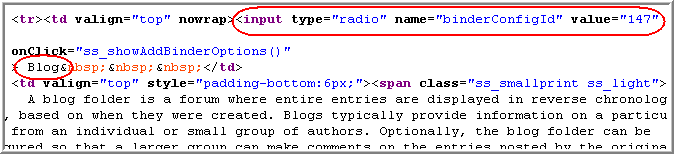
In the input HTML tag that creates the radio button for that type of folder, note the name=”binderConfigId” and value=”nnn” pair of tag elements.
The number specified by the value element is the binder configuration identifier of the folder you want to create.
Here is an example of the binder configuration information for a blog folder, as found in the HTML source for the page:
Figure 1-1 The Binder Configuration Identifier in Source Code
1.5.2 Adding Items and the Definition Identifier
When creating entries (addFolderEntry), Novell Teaming requires a definition identifier, which maps to the definition for the type of entry you want to create. You work with definitions when using the designers in the administration portlet.
The easiest way to work with definition identifiers is to specify null for this value. When you specify null, Novell Teaming automatically applies the definition identifier for the default entry type of the folder in which you are creating a new entry. For example, you want to create an entry in a blog folder. If you pass null as the definition identifier, Novell Teaming automatically applies the definition identifier for a blog entry, which is the default entry for a blog folder.
As another option, you can use the getDefinitionListAsXML message to get information about all definitions. Then, you can parse the XML string for the definition identifier for the type of entry you want to create.
In the XML string, this is part of a definition for a standard Novell Teaming item:
<definition name="_appItemType" id="402883b9114739b301114754e8120008"...>
To obtain the _appItemType for the item you want to create and to obtain its corresponding definition identifier:
-
Sign in to Novell Teaming as a site administrator.
-
In the administration portlet, click the plus sign () next to .
-
Click the category of the item you want to create using the Web services (for example, click if you want your Web service call to create an entry).
-
Click the plus sign (+) next to .
-
Locate the title of the item you want to create (for example, ), and note the identifier in parentheses next to the title (for example, ).
-
In the XML returned by getDefinitionListAsXML, parse the string until you find the type of item you want to create (for example, name="_blogEntry").
-
Continue parsing that same element until you locate the id attribute.
Retrieve the definition identifier (for example, id="402883b9114739b301114754e8120008").
1.5.3 Tips for All Messages that Add and Modify Entries
When you add (addFolderEntry) or modify an entry (modifyFolderEntry), you must pass a string of XML containing elements for the entry you want to create or modify. Because Novell Teaming XML does not adhere to a schema, you need to review a copy of a complete entry to understand the structure of the XML string that you need to specify as a parameter to these messages.
To review the structure of XML required to add or modify an entry, do the following:
-
In the Novell Teaming UI, create an entry of the type you want your Web services client to be able to create or modify, and specify a value for every element on the creation form.
-
Mouse over the title of the created entry and note the entry identifier in URL displayed in your browser, as shown in the following graphic:
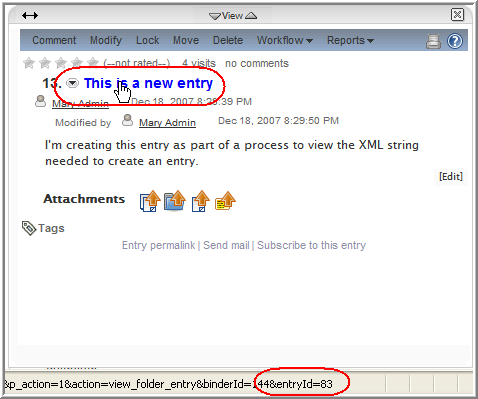
The entry identifier in the previous graphic is 120.
-
Either use the printFolderEntry command for wsclient.bat or use the getFolderEntryAsXML message to view the XML contents of the entry you just created in the UI.
-
Use the XML information you retrieved as a template for the string you need to pass to create a new entry or to modify one.
1.5.4 Attaching Files
In Novell Teaming, attachments are files that are associated with an entry. An entry can have more than one attached file.
Using Web services, an attachment is a file exchanged in conjunction with a message being passed between the client and server. Novell Teaming recognizes only the first file attachment to a message being sent to the server and ignores all other attachments.
To attach more than one file to an entry in Novell Teaming, you must use the uploadFolderFile message multiple times (uploadFolderFile). So, to attach 17 files to an Novell Teaming entry, you must use uploadFolderFile 17 times. Your client source code establishes where in the file system it finds or places files used as attachments to messages.
The uploadFolderFile message requires that you pass a data item name. This identifier maps to the value specified in the name attribute of the input HTML tag used to upload the file; this value is also used in a hidden HTML tag that communicates values between the HTML form and the Novell Teaming database.
To upload a file into the standard form element used to contain attachments, specify ss_attachFile as the data item name. If you are uploading files into a custom form element, follow the instructions in the previous section for viewing the XML of a folder entry (Section 1.5.3, Tips for All Messages that Add and Modify Entries), obtain the name of the custom form element containing attached files, and specify it when adding more attachments.
1.5.5 Fetching Attachments
When you use getFolderEntryAsXML to obtain information about an entry (getFolderEntryAsXML), you use a boolean parameter to indicate if you want the entry’s attachments. If you specify that you do want the attachments, your client establishes where on its system it wishes to place the attached files.
1.5.6 Adding Calendar Entries
When you pass the uploadCalendarEntries message to the server (uploadCalendarEntries), the Web services framework uses both an XML formatted string of iCal data passed as the second parameter to the message (<doc><entry>iCal data</entry></doc>), and an iCal file that might or might not be passed as an attachment to the message. Although you can split the source data across both the parameter and the attachment, clients generally use one or the other to specify entry data. So, if you want the iCal file attachment to be the source of data for calendar entries, then pass an empty XML document as the second parameter to uploadCalendarEntries (<doc></doc>).
NOTE:The uploadCalendar command in the wsclient.bat batch file accepts two required parameters and an optional third parameter. The second parameter is a file containing XML that specifies iCal data. The third, optional parameter is an iCal formatted file. Both files must be located in the same directory as wsclient.bat. Again, if you want the iCal file to be the only source of data for newly created entries, place an empty XML document in the file specified as the second command parameter.
1.5.7 Binder Pages and getWorkspaceTreeAsXML
When you use getWorkspaceTreeAsXML to obtain information about the hierarchical workspace tree (getWorkspaceTreeAsXML), Novell Teaming returns XML formatted information about nodes in the tree, within the levels of the hierarchy you specify. Each node in the tree is a binder, which is typically a place (a workspace or folder). Sometimes, the XML element returned for a node is called a page.
The following graphic shows the workspace tree, which is expanded to show five levels of the workspace hierarchy:
Figure 1-2 Workspace-Hierarchy Levels as Seen in the UI
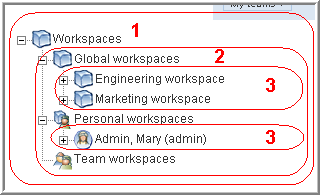
Each of the depicted workspaces and folders are nodes in the workspace tree. The workspace is the only binder at level 1. Level 2 binders include , , and . The only depicted binder at level 3 is the binder. Level 4 binders include folders and the workspace. And the binder is located at level 5. If a binder has a plus sign next to it (for example, both the and binders are preceded by plus signs), then it means that there are hierarchy levels of binders that are not yet being displayed in the UI.
If you use getWorkspaceTreeAsXML to fetch one level of the tree starting at the node, Novell Teaming returns information about , , and .
As mentioned, some nodes in the tree are pages, which are shown here:
Figure 1-3 Pages as they Appear in the UI
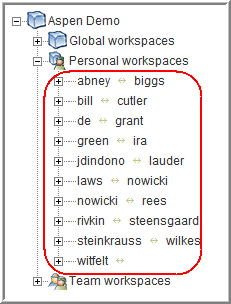
The /ssf/web/docroot/WEB-INF/classes/config/ssf.properties file contains a property called wsTree.maxBucketSize, which, by default, is set to 25. This means that the maximum number of subworkspaces or subfolders allowed is 25. If a folder or workspace has more subplaces, Novell Teaming creates virtual buckets called pages. Each line in the previous graphic ( and ) corresponds to a page. The workspace has two pages.
When you use getWorkspaceTreeAsXML to retrieve information about nodes in the workspace tree, it can return more than one hierarchical level as you specified, unless it encounters a page. To expand the tree beyond a page, you must call getWorkspaceTreeAsXML again, pass the binder identifier of the page, and pass the number of levels beyond the page you wish to retrieve.
Consider the following:
Figure 1-4 A Page Containing Sub-Workspaces
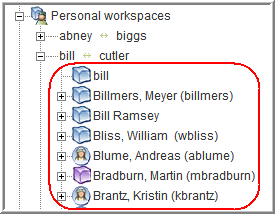
The page contains workspaces. The workspaces listed (, , , and so on) are one level beyond the page.
When you receive page information as a node in the workspace tree, you receive page and tuple attributes. For example, page=”1” and tuple=”jane_adams//rhonda_hernandez”. To obtain information about the contents of this page, you need to specify the identifier of the page’s parent, the number of hierarchy levels you want expanded, and a concatenation of the page number and tuple values, as shown in this example:
getWorkspaceTreeAsXML 24 3 "1//jane_adams//rhonda_hernandez"
This code begins at binder number 24, accesses page number 1, and returns 3 hierarchical levels of data for all users between Jane Adams and Rhonda Hernandez.
Given the structure of the Novell Teaming pages and how Web services returns tree data, it is easiest to retrieve page data in this way. However, if you choose, you can actually retrieve paged tree data regardless of page number. To do this, specify any page number (Novell Teaming actually ignores it), and specify a tuple in the correct order in which it appears in the tree, even if the set of users crosses pages. Novell Teaming returns hierarchical information for all users in between the tuple values. However, if the number of returned nodes exceeds the value specified in the wsTree.maxBucketSize property (by default, 25 users), Novell Teaming pages the data.
Finally, if you want to see all tree information without any page specifications, specify -1 as the value of the hierarchy levels you want returned.