9.3 Designing a Custom Folder Entry Form
The steps in this section describe how to customize (design) a folder entry form after it has already been created. For information on how to create a custom folder entry form, see Section 9.2, Creating a Custom Folder Entry Form.
You can design an entry immediately after you create it, or you can modify the design of an existing entry. For information on how to modify an existing entry form, see Section 9.4, Modifying an Existing Entry Form.
Teaming enables you to design the entry form, the entry view, or the summarized entry view.
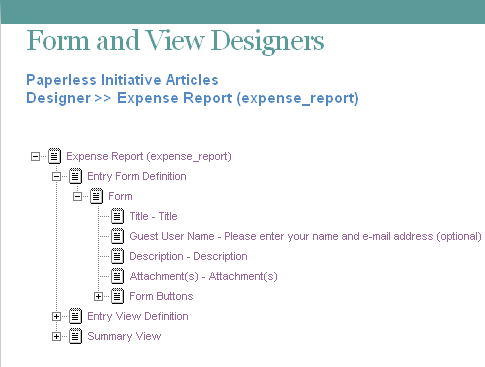
9.3.1 Designing the Entry Form
The entry form is what users see when they are creating a new entry. This form needs to contain all of the fields necessary for users to create this type of entry. For example, an Expense Report form needs to contain the expense code, the purpose for the expense, the cost of the expense, and so forth.
After you add elements and layout options to the entry form, you must then add all of the elements and layout options to the entry view in order for them to be displayed when users view the entry. For information on how to add features to the workspace view, see Designing the Workspace View.
Teaming provides you with all of the tools necessary to create an entry form for any type of entry.
-
Under the custom entry form that you created, expand , then expand .
Adding Additional Elements to a Form
-
Click .
-
In the Form window, on the right side of the page, click .
-
In the section, click the element that you want to add.
For information on the types of elements that you can add, see Section 9.5.1, Entry Form Elements.
-
Specify the appropriate information.
-
Click .
Modifying Elements in a Form
-
Expand , then click the element that you want to modify.
-
In the window on the right side of the page, click .
-
Make the desired modifications, such as changing the caption or data name, then click .
Based on the modifications that you make to a form element, you might need to make the same modifications to the corresponding view element.
Adding Additional Layout Options to a Form
-
Click .
-
In the Form window, on the right side of the page, click .
-
In the section, click the layout option that you want to add.
For information on the types of layout options that you can add, see Section 9.6, Understanding Layout Options.
-
Specify the appropriate information.
-
Click .
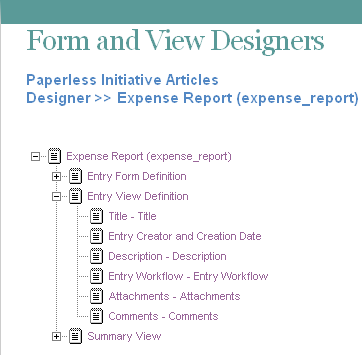
9.3.2 Designing the Entry View
The entry view is how the information from your entry form is displayed to users who view your entry. Every form must have a corresponding view. This view needs to contain all of the fields necessary for users to get the information they need when viewing the entry; it is made up of elements from the form.
Before you can add elements and layout options to the entry view, you must first add those same elements and layout options to the entry form in order for them to be displayed in your entry. For information on how to add features to the entry form, see Designing the Entry Form.
Teaming provides you with all of the tools necessary to create an entry view for any type of entry.
-
Under the custom entry form that you created, expand .
Adding Additional Elements to an Entry View Definition
-
Click .
-
In the Entry View Definition window, on the right side of the page, click .
-
In the section click the element that you want to add.
For information on the types of elements that you can add, see Section 9.5.2, Entry View Elements.
-
Specify the appropriate information.
-
Click .
Adding Additional Layout Options to an Entry View Definition
-
Click .
-
In the Entry View Definition window, on the right side of the page, click .
-
In the section, click the layout option that you want to add.
For information on the types of layout options that you can add, see Section 9.6, Understanding Layout Options.
-
Specify the appropriate information.
-
Click .
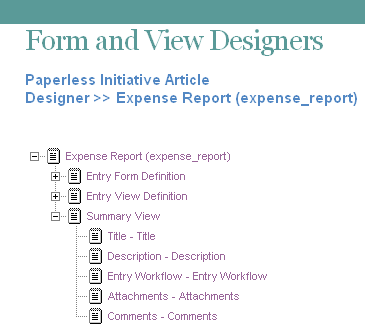
9.3.3 Designing the Summary View
The summary view is used to display entries in a folder before the entries are opened.
Teaming provides you with all of the tools necessary to create a summary view for any type of entry.
-
Under the custom entry form that you created, expand .
Adding Additional Elements to a Summary View
-
Click .
-
In the Summary View window, on the right side of the page, click .
-
In the section click the element that you want to add.
For information on the types of elements that you can add, see Section 9.5.2, Entry View Elements.
-
Specify the appropriate information.
-
Click .
Adding Additional Layout Options to a Summary View
-
Click .
-
In the Summary View window, on the right side of the page, click .
-
In the section, click the layout option that you want to add.
For information on the types of layout options that you can add, see Section 9.6, Understanding Layout Options.
-
Specify the appropriate information.
-
Click .