7.1 Creating a New Custom Workspace View
To create a new custom workspace, you use the Form and View Designer to create a view, then you create a form with the elements and layout options that you want to display in the view. After the form is in place, you add the same elements and layout options to the view, then you can add optional view elements to create the final view.
You must have both a form and a view in order to display all the elements that you want in a workspace. The form and the view must have a common set of elements and layout options, but the view can have some additional elements that are not in the form.
7.1.1 Creating the View
-
Navigate to the workspace where you want to create the new view.
-
Click > in the Action toolbar.
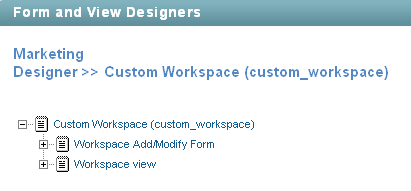
The Form and View Designers page is launched.
-
Click > .
The Add a New Definition form is displayed.
-
Specify the following information in the Add a New Definition section:
Caption: Specify the name of the workspace view that you want to appear in the Novell Vibe interface. (For example, “Custom Workspace.”)
Name: Specify the internal name of the workspace view. This name is not visible to regular Vibe users. (For example, “custom_workspace.”)
Family: Select the workspace type that this view is most closely associated with.
Workspace Icons: Select the icon that you want to represent the workspace. The icon that you select is displayed with the name of the workspace in the Navigation panel.
-
Click .
-
Continue with Section 7.1.2, Adding Elements to the Workspace Add/Modify Form.
7.1.2 Adding Elements to the Workspace Add/Modify Form
The workspace add/modify form is the form you see when you are creating or modifying the content of your workspace home page. This form needs to contain the elements and layout options that you want to display in your workspace home page. For example, you might want to display multiple remote applications and a two-column table.
After you add elements and layout options to the workspace form, you must then add those same elements and layout options to the workspace view in order for the elements and options to be displayed in your workspace. For information on how to add features to the workspace view, see Section 7.1.3, Adding Elements to the Workspace View.
-
Under the custom workspace form that you created, expand .
If you are modifying an existing form, all of the elements and layout options that are currently applied to your form are displayed.
or
If you are creating a new form, only the default options are displayed.

-
Add and modify the desired elements and layout options, as described in the following sections:
Based on the modifications that you make to a form element or option, you might need to make the same modifications to the corresponding view element or option.
Adding Elements to a Form
-
Click .
-
In the Workspace Add/Modify Form window on the right side of the page, click .
-
In the section, click the element that you want to add.
For information on the types of elements that you can add, see Section 7.5.1, Workspace Form Elements.
-
Specify the appropriate information.
-
Click .
Modifying Elements in a Form
If you are modifying an existing form, you can modify existing elements.
-
Expand , then click the element that you want to modify.
-
In the window on the right side of the page, click .
-
Make the desired modifications, such as changing the caption or data name, then click .
Deleting Elements in a Form
If you are modifying an existing form, you can delete existing elements.
-
Expand , then click the element that you want to delete.
-
In the window on the right side of the page, click .
-
Click .
Adding Layout Options to a Form
-
Click .
-
In the Workspace Add/Modify Form window on the right side of the page, click .
-
In the section, click the layout option that you want to add.
For information on the types of layout options that you can add, see Section 7.6, Understanding Layout Options.
-
Specify the appropriate information.
-
Click .
7.1.3 Adding Elements to the Workspace View
The workspace view is how the information from your workspace add/modify form is displayed to users who view your workspace. Every form must have a corresponding view. This view needs to contain all of the elements and layout options that you want to display in your workspace home page; it is made up of elements from the form.
Vibe provides you with all of the tools necessary to create a workspace view that suits any of the purposes that you want to accomplish with your workspace.
Before you can add elements and layout options to the workspace view, you must first add the elements and layout options to the workspace form in order for them to be displayed in your workspace. (For information on how to add features to the workspace form, see Section 7.1.2, Adding Elements to the Workspace Add/Modify Form.)
To add elements to the views:
-
Under the custom entry form that you created, expand .
If you are modifying an existing view, all of the elements and layout options that are currently applied to your view are displayed.
or
If you are creating a new view, only the default options are displayed.

-
Add the desired elements and layout options, as described in the following sections:
Adding Elements to a View
-
Click .
-
In the Workspace View window on the right side of the page, click .
-
In the section, click the element that you want to add.
When you add elements to a view, you add elements that have already been added to the form; any form element that you create can be added as a view element.
For information on the types of elements that you can add that are specific to views, see Section 7.5.2, Workspace View Elements.
-
Specify the appropriate information.
-
Click .
Modifying Elements in a View
If you are modifying an existing view, you can modify existing elements.
-
Expand , then click the element that you want to modify.
-
In the window on the right side of the page, click .
-
Make the desired modifications, such as changing the caption or data name, then click .
Deleting Elements in a View
If you are modifying an existing view, you can delete existing elements.
-
Expand , then click the element that you want to delete.
-
In the window on the right side of the page, click .
-
Click .
Adding Layout Options to a View
-
Click .
-
In the Workspace view window on the right side of the page, click .
-
In the section, click the layout option that you want to add.
For information on the types of layout options that you can add, see Section 7.6, Understanding Layout Options.
-
Specify the appropriate information.
-
Click .