4.2 Managing Access Control for Users and Groups
When you have appropriate rights, you can control which users have access to workspaces, folders, and entries. Furthermore, you can regulate what actions they are allowed to perform. For example, you can allow a specific team to view a workspace, but only allow certain members of that team to create entries in the workspace.
You can control access to workspaces, folders, and entries.
4.2.1 Controlling Access to Workspaces and Folders
Accessing the Configure Access Control Page
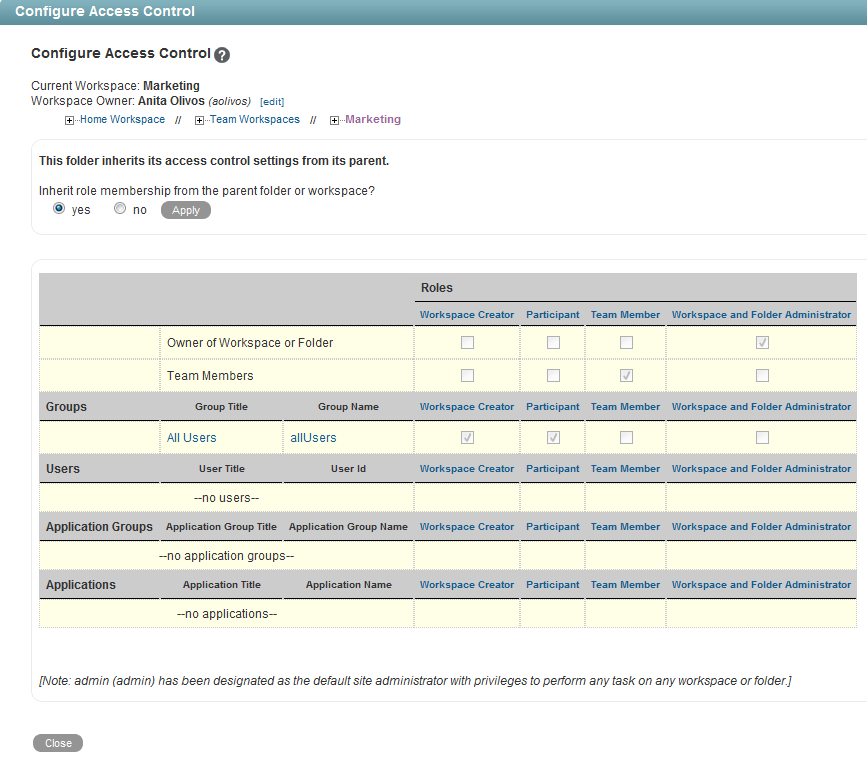
Novell Vibe provides a table on the Configure Access Control page that enables you to make all of your needed access control modifications. You must use this table to perform any access control modifications in Vibe.
-
Navigate to the workspace or folder where you want to modify user access rights.
-
Click > in the Action toolbar if you want to change the access control settings for a workspace.
or
Click > in the Action toolbar if you want to change the access control settings for a folder.
The Configure Access Control page is displayed.
Activating the Table
Before you can make modifications to the table on the Configure Access Control page, you need to ensure that the folder or workspace does not inherit its access control settings from its parent folder or workspace:
-
In the Folder Inheritance section, select , then click .

You can now make modifications to the table.

Adding Roles to the Access Control Table
-
Click the link at the top of the table.
-
From the drop-down list, select the role that you want to add.
Vibe adds a new column to the table for the new role.
-
Assign the appropriate user or group to this role by selecting the check box in the user’s or group’s row, as described in Assigning Roles to Users and Groups.
For information on how to add a new user to the access control table, see Adding Users to the Access Control Table.
For information on how to add a new group to the access control table, see Adding Groups to the Access Control Table.
-
Click .
Adding Users to the Access Control Table
You can individually add users to the Access Control table, or you can add them by using the Vibe clipboard.
Adding Individual Users
-
Click the link in the left column of the table.
-
In the field, begin typing the name of the user that you want to add, then select that user from the provided list.
Vibe adds a new row to the table for the new user.
-
Assign the user to the appropriate role by selecting the check box in the column of the user’s row, as described in Assigning Roles to Users and Groups.
-
Click .
Adding Users from the Clipboard
-
In the upper left corner of the Access Control table, click .
All of the users who are currently on your clipboard are added to the Access Control table.
For more information on how to use the Vibe clipboard, see
Using the Vibe Clipboard
in the Novell Vibe 3.3 User Guide. -
Assign the users to the appropriate role by selecting the check box in the column of each user’s row, as described in Assigning Roles to Users and Groups.
-
Click .
Adding Groups to the Access Control Table
-
Click the link in the left column of the table.
-
In the field, begin typing the name of the group that you want to add, then select that group from the provided list.
Vibe adds a new row to the table for the new group.
-
Assign the group to the appropriate role by selecting the check box in the column of the group’s row, as described in Assigning Roles to Users and Groups.
-
Click .
Assigning Roles to Users and Groups
A role is a set of privileges. When you assign a user or group to a role, that user or group automatically has all the rights associated with that role.
-
Ensure that the user or group and the role that you want to associate with the user or group are visible in the Access Control table.
For information on how to add a role or a user or group to the table, see Adding Roles to the Access Control Table, Adding Users to the Access Control Table, and Adding Groups to the Access Control Table.
-
In the row of the user or group, select the check box that is located in the role column that you want to assign to the user or group.
-
Click .
If you want to unassign a role:
-
Deselect the appropriate check box, then click .
Using the Configure Access Control Page to Adjust Access Controls
Vibe enables you to adjust the access control settings of any workspace or folder, directly from the Configure Access Control page.
-
In the workspace tree at the top of the Configure Access Control page, navigate to the place where you want to adjust the access controls.
-
Click the linked title of the place where you want to adjust the access controls.
Vibe displays the Configure Access Control page for the page that you specified.
Creating Access Controls for Remote Applications
Because not all remote applications can be completely trusted, it is often a good idea to limit the privileges of the remote application.
For information on how to do this by using access controls, see Section 12.4, Managing Access Controls for Remote Applications.
4.2.2 Controlling Access to Entries
Vibe enables you to set access controls for an entry that differ from the access controls of the parent folder. You might want to do this if you have granted a group of users access to a folder, but only want a subset of that group to have access to see certain entries within the folder. Or, you might want to set access controls on a particular entry to make that entry visible to users who don’t have access to the folder where the entry resides, as described in Exposing a Vibe Entry to a Wider Audience Than the Folder Access Controls Allow.
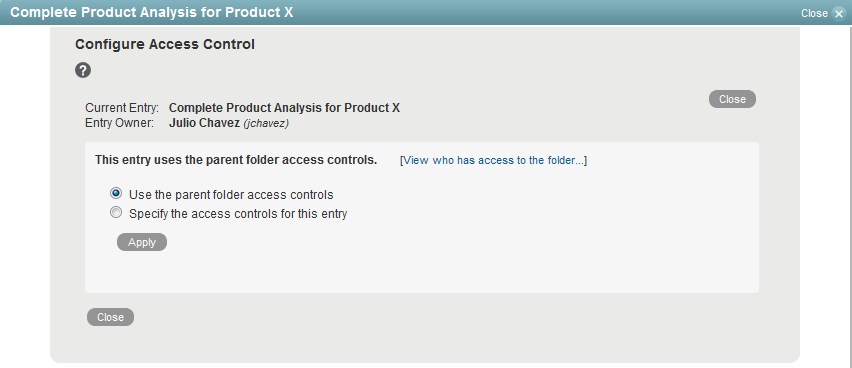
Before you can modify access controls for an entry, you need to ensure that the entry does not inherit its access control settings from the parent folder:
To set access controls on an entry:
-
Navigate to the entry where you want to modify user access rights.
-
Click > in the Entry toolbar.
The Configure Access Control page is displayed.
-
To set access controls that differ from the access controls of the parent folder, select , then click .
-
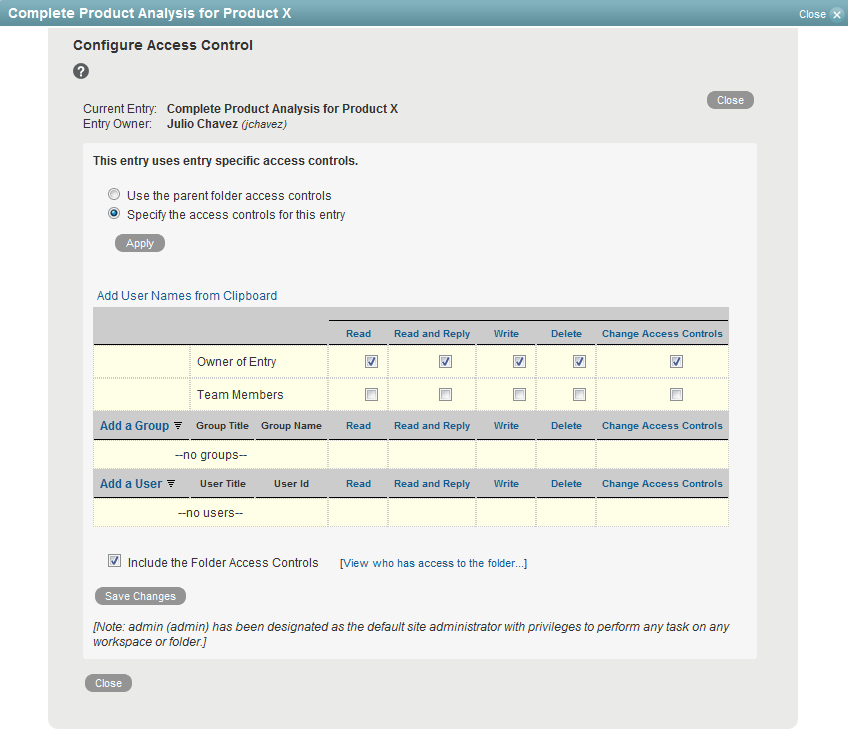
Use the table to modify user access to the entry.
You can assign various roles to team members, groups, or individual users.
For information about the roles that you can assign, see Understanding Default Roles for Entries.
For information about how to add users and groups to the access control table, see Adding Users to the Access Control Table and Adding Groups to the Access Control Table.
-
(Optional) Select if you want to extend the new entry-level access controls to include the access controls that are already in place for the folder. Selecting this option automatically grants users the same access rights to the entry that they have to the folder.
Deselect if you want the new entry-level access controls to override the folder-level access controls. If you deselect this option, you must use the entry-level access controls to specify each user or group that you want to have access to the entry. Users who have access to the folder that contains the entry but have not been granted access rights to the entry itself do not have access to the entry.
-
Click > .
Exposing a Vibe Entry to a Wider Audience Than the Folder Access Controls Allow
You can make a Vibe entry visible to a wider audience than is normally allowed for the folder where the entry resides. For example, if your folder is visible only to team members, the default access controls allow only team members to see all entries that are created in the folder. However, by deselecting , you can enable a wider audience to view a specific entry. You might want to do this if the majority of content in a folder is sensitive and should be restricted to a limited audience, but you want to expose a specific entry to a larger audience.
For example, suppose that you are a member of a finance team that is responsible for the accounting of your company’s quarterly earnings. All the information in your team’s workspace is confidential. However, when it is time to announce the company’s quarterly earnings, you create a Vibe entry that contains the earning results, and you modify the access controls of this specific entry to make the entry visible to all company employees.
To expose a Vibe entry to a wider audience than is currently allowed in the folder:
-
Modify the entry access controls as described in Section 4.2.2, Controlling Access to Entries.
Ensure that you deselect , as described in Step 5 of this section.
NOTE:When you expose a Vibe entry to a wider audience than is currently allowed in the folder, users must perform a search in order to locate the entry, or they must have the entry shared with them. Users cannot locate the entry by navigating the Workspace tree as described in Navigating the Workspace Tree
in the Novell Vibe 3.3 User Guide.