6.3 Setting Up Your Landing Page
After you enable a landing page as described in Section 6.2, Enabling the Landing Page View for a Workspace, you need to set it up to display the desired layout options and content. By default, landing pages in sub-folders and sub-workspaces display the same landing page properties as the parent folder or workspace.
6.3.1 Choosing Layout Options for Your Landing Page
-
Navigate to the landing page that you created in Section 6.2, Enabling the Landing Page View for a Workspace.
-
Click the icon
 next to the workspace or folder title, then click , depending on whether your landing page is on a folder or a workspace.
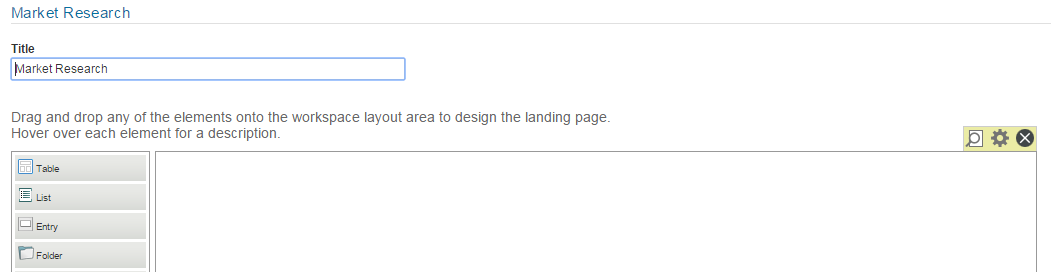
-
Click the icon
 in the upper right corner of the landing page editor.
The Landing Page Properties dialog box is displayed.
-
Deselect to make changes to the landing page properties. (By default, landing page properties are inherited from workspace and folder landing pages higher up in the workspace hierarchy.)
-
Click the tab.
-
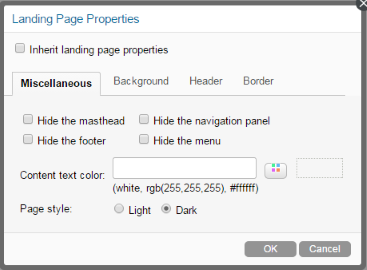
The following options for modifying the display of your landing page are available:
-
Hide the Masthead: Select this option to hide the masthead (Navigation toolbar). This hides everything above the Action toolbar.
-
Hide the Navigation Panel: Select this option to hide the Navigation panel.
-
Hide the Footer: Select this option to hide the Footer toolbar.
-
Hide the Menu: Select this option to hide the menu (Action toolbar) from all users who do not have rights to edit the workspace. Users who have rights to edit the workspace still see the menu.
-
Content text color: Specify the color of the text that appears on the landing page.
-
Page style: Select from the following options to modify the style of your landing page:
-
Light: No background shading is displayed on landing page elements.
-
Dark: (Default) Displays a dark background on each element to provide contrast between the landing page elements.
-
-
-
Click to save your changes.
You can preview your changes by clicking the icon
 in the upper right corner of the landing page editor.
6.3.2 Adding a Background Image or Color to Your Landing Page
-
Navigate to the landing page that you created in Section 6.2, Enabling the Landing Page View for a Workspace.
-
Click the icon
next to the workspace or folder title, then click , depending on whether your landing page is on a folder or a workspace.
-
Click the icon
in the upper right corner of the landing page editor.The Landing Page Properties dialog box is displayed.
-
Deselect to make changes to the landing page properties. (By default, landing page properties are inherited from workspace and folder landing pages higher up in the workspace hierarchy.)
-
Click the tab.
-
Configure the following options to modify the background image or color for the landing page:
Background Image: To add images to be used as the background image, you must first add them to the drop-down list before you can select them. Click the icon
 , then navigate to and select the image that you want to add. Select the image from the drop-down list that you want to use as the background image.
Background image repeat: In the drop-down list, select whether you want the image to repeat horizontally and vertically, only horizontally, only vertically, or not at all.
Background color: Click the icon
 to choose a color from a list of colors.
 -
Click to save your changes.
You can preview your changes by clicking the icon
in the upper right corner of the landing page editor.
6.3.3 Changing the Background and Text Color of Landing Page Headings
You can configure the background and text color that is displayed in the headings for landing page elements:
-
Navigate to the landing page that you created in Section 6.2, Enabling the Landing Page View for a Workspace.
-
Click the icon
next to the workspace or folder title, then click , depending on whether your landing page is on a folder or a workspace.
-
Click the icon
in the upper right corner of the landing page editor.The Landing Page Properties dialog box is displayed.
-
Deselect to make changes to the landing page properties. (By default, landing page properties are inherited from workspace and folder landing pages higher up in the workspace hierarchy.)
-
Click the tab.
Configure the following options to modify the background and text color that is displayed in the headings for landing page elements:
Header background color: Click the icon
to choose a color from a list of colors.Header text color: Click the icon
to choose a text color. -
Click to save your changes.
You can preview your changes by clicking the icon
in the upper right corner of the landing page editor.
6.3.4 Changing the Color and Width of the Landing Page Border
-
Navigate to the landing page that you created in Section 6.2, Enabling the Landing Page View for a Workspace.
-
Click the icon
next to the workspace or folder title, then click , depending on whether your landing page is on a folder or a workspace.
-
Click the icon
in the upper right corner of the landing page editor.The Landing Page Properties dialog box is displayed.
-
Deselect to make changes to the landing page properties. (By default, landing page properties are inherited from workspace and folder landing pages higher up in the workspace hierarchy.)
-
Click the tab.
Configure the following options to modify the color and width of the landing page border:
Border color: Click the icon
to choose a color.Border width: Specify how thick you want the border to appear. Specifying a 1 in this field results in a thin border, and specifying a 10 results in a very thick border.
-
Click to save your changes.
You can preview your changes by clicking the icon
in the upper right corner of the landing page editor.