9.3 Using Novell Conferencing with Novell Vibe
Novell Vibe 3 and later supports the use of Novell Conferencing. Before you can use Conferencing with Vibe as described in this section, your Vibe administrator must enable these integrations, as described in Integrating Conferencing with Vibe
in the Novell Vibe OnPrem 3 Administration Guide.
For more information about Novell Conferencing, see the Conferencing documentation Web site.
9.3.1 Specifying Your Conferencing ID and Password
Depending on how your Vibe administrator has configured Conferencing for your Vibe system, you might need to manually specify your Conferencing ID and Conferencing Password before you are able to use Conferencing within Vibe.
To specify your Conferencing ID and Conferencing Password:
-
Navigate to your personal workspace, then click .

-
Click .
-
Scroll to the and fields, then specify the username and password that you use to log in to Conferencing.
-
Click .
9.3.2 Starting or Scheduling a Team Meeting
-
Navigate to the team workspace where you want to start a team meeting.
-
Click > in the Action toolbar.
The Add Meeting page is displayed.
-
Specify the following information for your meeting:
Users: Specify individual users you want to invite to the meeting.
Clipboard User Names: Select users whose names are on the Vibe clipboard to invite to the meeting.
For more information about the Vibe clipboard, see Section 9.6, Using the Vibe Clipboard.
Team Members: By default, all team members are selected to be invited to the meeting. Deselect team members to exclude them from the meeting.
Meeting Password: Specify a password for the meeting. If you specify a password, it is included in the e-mail invitation and is required to access the meeting.
Title: Specify a title for the meeting.
Agenda: Specify an agenda for the meeting.
Start Time: Specify a start time for the meeting. This option applies only to scheduled meetings.
Length: Specify a length of time for the meeting.
-
Click or , depending on when you want to hold your meeting.
If you start the meeting now, your meeting is launched in Novell Conferencing. If you schedule the meeting for later, your meeting is scheduled in Novell Conferencing and starts at the time that you specified.
9.3.3 Starting or Scheduling a Meeting from a User’s Presence Icon
Sometimes an instant messaging conversation can’t convey enough information. For example, you might want to quickly share your desktop with another Vibe user. Clicking a user’s presence icon can be a quick way to start a Conferencing meeting with that user.
-
Click a user’s presence icon
 .
.
Presence is displayed in the following locations in Vibe:
-
In a folder entry next to a user’s name
-
In a user’s profile
-
In the home page of a user’s personal workspace
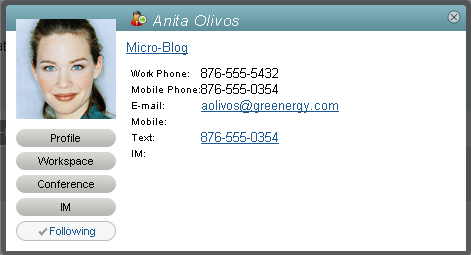
The Profile Quick View is displayed.
-
-
Click .
The Add Meeting page is displayed.
-
Specify the following information for your meeting:
Users: By default, the user whose presence icon you clicked is an invitee. You can specify additional users you want to invite to the meeting.
Clipboard User Names: Select users whose names are on the Vibe clipboard to invite to the meeting.
For more information about the Vibe clipboard, see Section 9.6, Using the Vibe Clipboard.
Team Members: Team members are available to invite only when you are creating a team meeting, as described in Section 9.3.2, Starting or Scheduling a Team Meeting.
Meeting Password: Specify a password for the meeting. If you specify a password, it is included in the e-mail invitation and is required to access the meeting.
Title: Specify a title for the meeting.
Agenda: Specify an agenda for the meeting.
Start Time: Specify a start time for the meeting. This option applies only to scheduled meetings.
Length: Specify a length of time for the meeting.
-
Click or , depending on when you want to hold your meeting.
If you start the meeting now, your meeting is launched in Novell Conferencing. If you schedule the meeting for later, your meeting is scheduled in Novell Conferencing and starts at the time that you specified.
9.3.4 Starting or Scheduling a Meeting from a Workspace or Folder
-
Navigate to the workspace or folder where you want to start a team meeting.
-
Click > in the Action toolbar.
or
Click > in the Action toolbar.
The Add Meeting page is displayed.
-
Specify the following information for your meeting:
Users: Specify individual users you want to invite to the meeting.
Clipboard User Names: Select users whose names are on the Vibe clipboard to invite to the meeting.
For more information about the Vibe clipboard, see Section 9.6, Using the Vibe Clipboard.
Team Members: Team members are available to invite only when you are creating a team meeting, as described in Section 9.3.2, Starting or Scheduling a Team Meeting.
Meeting Password: Specify a password for the meeting. If you specify a password, it is included in the e-mail invitation and is required to access the meeting.
Title: Specify a title for the meeting.
Agenda: Specify an agenda for the meeting.
Start Time: Specify a start time for the meeting. This option applies only to scheduled meetings.
Length: Specify a length of time for the meeting.
-
Click or , depending on when you want to hold your meeting.
If you start the meeting now, your meeting is launched in Novell Conferencing. If you schedule the meeting for later, your meeting is scheduled in Novell Conferencing and starts at the time that you specified.