6.2 Setting Up Your Landing Page
After you enable a landing page as described in Section 6.1, Enabling the Landing Page View for a Workspace, you need to set it up to display the desired layout options and content, as described in the following sections:
6.2.1 Choosing Layout Options for Your Landing Page
-
Navigate to the landing page that you created in Section 6.1, Enabling the Landing Page View for a Workspace.
-
Click > in the Action toolbar.
-
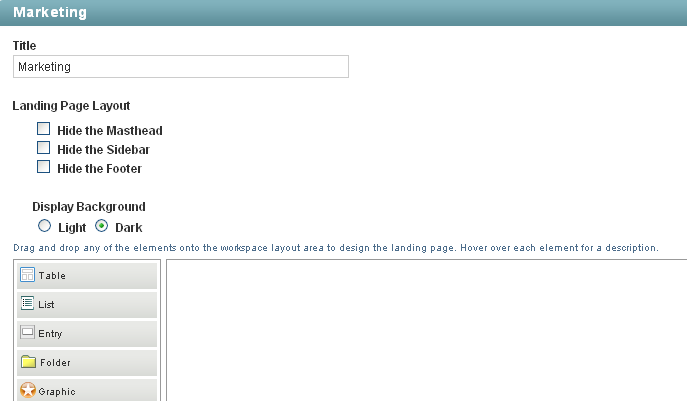
In the section, below the workspace field, you can select from the following options to modify the display of your landing page:
-
Hide the Masthead: Select this option to hide the masthead (Navigation toolbar). This hides everything above the Action toolbar.
-
Hide the Navigation Panel: Select this option to hide the Navigation panel.
-
Hide the Footer: Select this option to hide the Footer toolbar.
-
-
Click to save the layout changes.
6.2.2 Adding Content to Your Landing Page
-
Navigate to the landing page that you created in Section 6.1, Enabling the Landing Page View for a Workspace.
-
Click > in the Action toolbar.
-
In the section, in the content editor, use the element palette to select the landing page element that you want to display on your landing page.

You can add the following elements:
-
Table: Creates a table with the number of columns that you specify. You can add other elements inside this table.
-
List: Creates a list where you can add other elements.
-
Entry: Enables you to reference an entry that has previously been created in Novell Vibe.
-
Folder: Enables you to reference a folder that has previously been created in Vibe. You can choose how many entries from the folder that you want to display on your landing page at any one time.
-
Graphic: Enables you to reference a graphic that has previously been added to the workspace.
-
Link (URL): Enables you to create a link to a Web URL.
-
Link to Folder/Workspace: Enables you to add a link to a Vibe folder or workspace.
-
Link to Entry: Enables you to add a link to a Vibe entry.
-
Utility Element: Enables you to add various utilities, such as the My Workspace link.
-
Custom JSP: Enables you to reference a custom JSP file that has previously been created by a Vibe administrator.
-
-
Drag the element that you want to display on your landing page and drop it onto the landing page canvas.

After you drop the element onto the landing page canvas, you are prompted to configure it.
The way you configure a landing page element depends on the type of element that you add.
-
Configure the landing page element as described in Section 6.2.3, Configuring Landing Page Elements.
6.2.3 Configuring Landing Page Elements
You need to configure the elements of your landing page when you are first creating them, as described in Section 6.2.2, Adding Content to Your Landing Page.
You can also reconfigure the elements of your landing page at any time, as described in Section 6.4, Modifying the Contents of Your Landing Page.
After you have added and configured the elements of your landing page, you are ready to publish the landing page. For information on how to do this, see Section 6.3, Publishing Your Landing Page.
Adding a Table
To add a table to the landing page:
-
In the section, in the content editor, click in the element palette, then drag it and drop the table into the desired area of the landing page canvas.

-
Set the following configuration options to finish setting up the table:
-
Show border: Select this option if you want the border of the table to be visible.
-
Number of columns: Specify the number of columns that you want the table to have. You can have up to five columns.
-
Column 1 width: Specify the width that you want the first column to have.
If your table has multiple columns, you can specify the width for each column.
-
-
Click .
After you add a table to a landing page, you can add content within the table.
-
Select an element from the element palette and drag and drop it into the location of the table where you want to add the content.
Adding a List
To add a list to the landing page:
-
In the section, in the content editor, click in the element palette, then drag it and drop it into the desired area of the landing page canvas.

-
Set the following configuration options to finish setting up the list:
-
Title: Specify a title for the list.
-
Show border: Select this option if you want the border of the list to be visible.
-
-
Click .
After you add a list to a landing page, you can add content within the list.
-
Select an element from the element palette and drag and drop it into the location of the list where you want to add the content.
Adding an Entry
The actual content of your landing page is created in entries. The landing page simply references entries that have already been created within Vibe.
To add an entry to the landing page:
-
In the section, in the content editor, click in the element palette, then drag it and drop it into the desired area of the landing page canvas.

-
Set the following configuration options to finish setting up the entry:
-
Current entry: This field is populated only if you have already configured this element, as described in this section. After you have configured this element as described in this section, the entry that is being referenced is shown here.
-
New entry: Specify the entry that you want to display on the landing page.
This field uses type-to-find functionality, so Vibe displays the available options as you type.
-
Show the title bar: Select this option if you want the title bar of the entry to be visible.
-
-
Click .
Adding a Folder
-
In the section, in the content editor, click in the element palette, then drag it and drop it into the desired area of the landing page canvas.

-
Set the following configuration options to finish setting up the folder:
-
Current folder: This field is populated only if you have already configured this element, as described in this section. After you have configured this element as described in this section, the folder that is being referenced is shown here.
-
New folder: Specify the folder that you want to display on the landing page.
This field uses type-to-find functionality, so Vibe displays the available options as you type.
-
Number of entries to show: Specify the number of folder entries that you want to be displayed at any one time.
-
Show the title bar: Select this option if you want the folder title bar to be displayed.
-
Show the folder description: Select this option if you want the folder description to be displayed.
-
Show entries opened: Select this option if you want opened entries to be displayed.
-
-
Click .
Adding a Graphic
Before you can add a graphic to your landing page, you need to attach the graphic to the landing page, as described in Section 6.8, Enabling Graphics to Be Used on a Landing Page.
-
In the section, in the content editor, click in the element palette, then drag it and drop it into the desired area of the landing page canvas.

-
Set the following configuration options to finish setting up the graphic:
-
Graphic: In the Graphic drop-down list, select the graphic that you want to display.
All attachments that are attached to the landing page workspace are displayed in this list. Attachments are also displayed in the section at the bottom of the page.
-
Show border: Select this option if you want the border of the list to be visible.
-
-
Click .
Adding a Link (URL)
-
In the section, in the content editor, click in the element palette, then drag it and drop it into the desired area of the landing page canvas.

-
Set the following configuration options to finish setting up the URL link:
-
Title: Specify the title that you want to be displayed.
-
URL: Specify the URL that you want to link to.
To link to a URL outside of Vibe, you must include http:// at the beginning of the URL.
To link to a page within Vibe, the best method is to use the Link to Folder/Workspace element or the Link to Entry element.
An alternative is to paste a Vibe permalink into this field. To get the permalink URL of a Vibe page, simply navigate to the page that you want to link to, click in the footer toolbar, then copy the permalink URL from the field.
-
Open URL in a new window: Select this option if you want to open the URL in a new browser window.
-
-
Click .
Linking to a Folder/Workspace
You can create a link to any folder or workspace for which you have appropriate rights.
-
In the section, in the content editor, click in the element palette, then drag it and drop it into the desired area of the landing page canvas.

-
Set the following configuration options to finish setting up the link:
-
Current folder/workspace: If you are editing this element after it has already been created, this field displays the folder or workspace that you are currently linking to. If you are creating a new element, this field is blank.
-
New folder/workspace: Specify the folder or workspace that you want to link to.
-
Title: Specify a title for the link.
-
Open the folder/workspace in a new window: Select this option if you want to open the folder or workspace in a new browser window.
-
Linking to an Entry
Enables you to create a link to any entry for which you have appropriate rights.
-
In the section, in the content editor, click in the element palette, then drag it and drop it into the desired area of the landing page canvas.

-
Set the following configuration options to finish setting up the link:
-
Current entry: If you are editing this element after it has already been created, this field displays the entry that you are currently linking to. If you are creating a new element, this field is blank.
-
New entry: Specify the folder entry that you want to link to.
-
Title: Specify a title for the link.
-
Open the entry in a new window: Select this option if you want to open the entry in a new browser window.
-
Adding a Utility Element
Most utility elements are options that are normally displayed either in the Vibe masthead or Navigation panel; however, because it is often desirable to hide the masthead and Navigation panel in order to make more room for information on your landing page, utility elements enable you to display important features in a more concise view.
-
In the section, in the content editor, click in the element palette, then drag it and drop it into the desired area of the landing page canvas.

-
Select from the following utility elements:
Link to “Vibe administration page”: Provides a link to the Vibe Administration page.
This link is visible only to Vibe users who have administrative rights.
Link to “My Workspace”: Displays a link to your personal workspace.
Link to “Share this folder or workspace”: Displays a or link.
Link to “Follow this folder or workspace”: Displays a or r link.
Sign-in form: Displays a Sign In form when users are not logged in to Vibe.
-
Click .
Adding a Custom JSP
Custom JSP files are stored in the WEB-INF\jsp\custom_jsps directory. If you want to include a custom JSP file in your landing page, you must store the file in this directory in order to reference it from Vibe.
Typically, only Vibe administrators have access to this directory. If you want to create a custom JSP file, consult your Vibe administrator.
After the custom JSP file has been placed in the WEB-INF\jsp\custom_jsps directory:
-
In the section, in the content editor, click in the element palette, then drag it and drop it into the desired area of the landing page canvas.

-
In the field, type the name of the custom JSP file that you want to reference.
You must obtain this filename from your Vibe administrator. Only your Vibe administrator can enable JSP files to be used in the Vibe site.
-
Depending on how you want to use this custom JSP file, select either , or .
For example, if your administrator has enabled a custom JSP file that enhances the way entries are displayed on the landing page, and you want to utilize this JSP file for a specific folder, you would select .

-
Set the appropriate configuration options to finish setting up the custom JSP:
Current folder: If you are editing this element after it has already been created, this field displays the folder that the custom JSP file is currently associated with. If you are creating a new element, this field is blank.
New folder: Begin typing the name of the folder that you want the custom JSP file to be associated with, then select the folder name when it appears in the drop-down list.
Number of entries to show: Specify how many folder entries you want to be displayed on the landing page at any one time.
Show the title bar: Select this option if you want the title bar of the entry to be visible.
-
Click .