4.1 Overview of JSP Support
This section explains the relationship between the Novell Vibe UI and the content of the JSP files, and provides other information to assist in your use of JSP customizations. If you prefer to learn by doing, you may want to skip this section and review the examples (see Section 4.2, Examples of Custom Entries).
This section includes these subsections:
4.1.1 Directory Structure
In the Novell Vibe implementation of JSP-based customizations, you specify the JSP files using the designers, which are located in the administration portlet.
The designer interface expects to find the JSP files relative to this location within the server directory structure:
/WEB-INF/jsp/custom_jsps
Vibe ships sample JSP customizations in this directory:
/WEB-INF/jsp/custom_jsps/samples
By default, Vibe includes in this directory three files that you can use to practice applying a small JSP customization to a single element within a page:
custom_jsp.html
custom_jsp_form.html
custom_jsp_view.html
custom_jsp_mail.html
A section that follows describes how to apply this sample customization and what it looks like in the Vibe user interface (UI). For more information, see Section 4.2.1, A JSP That Defines Only One Data Element.
Because the /custom_jsps directory contains JSP files for all customizations in the installation, Novell strongly recommends that you create subdirectories for each customization. For more information, see Enabling Custom JSPs to Be Used on Your Vibe Site
in the Novell Vibe OnPrem 3.1 Administration Guide.
For example, a section that follows shows sample JSPs that produce almost the entire bodies of the form and view pages for an entry, as it implements a W-4-form application. (A W-4 form is a government form in the U.S.A. that is used to withhold federal taxes from an employee’s paycheck.) For example, the sample W-4 application places its JSP files in this subdirectory:
.../custom_jsps/samples/w4
See Section 4.2.2, A JSP-Defined Entry (W-4 Form), for more information about the sample W-4 JSP customization.
4.1.2 Applicable Pages
You can apply JSP customizations to several types of Novell Vibe pages:
-
Form: This is the page used to create a workspace, folder, entry, or comment.
-
View: This is the page that displays the content of the created workspace, folder, entry, or comment.
-
Landing Page: This is the page that displays the summarized content of the workspace or folder.
For information on how to reference a JSP file from a landing page, see
Adding a Custom JSP
inCreating and Managing Landing Pages
in the Novell Vibe OnPrem 3.1 Advanced User Guide. -
Mail: This is the e-mail message that Vibe sends as a result of the footer toolbar function.
For example, while viewing an entry, if you click , Vibe places this content into the body of the e-mail message to be sent.
4.1.3 JSPs and the Vibe Designers
Using the Vibe designers, you can remove or add elements of a binder (workspace or folder) or an entry. Using these tools, you can include one or more JSP files to customize content.
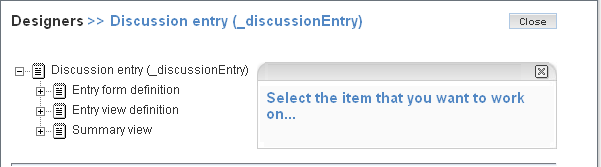
For example, after accessing the form and view designers in the administration portlet, you can edit the definition for a discussion entry:
Figure 4-1 Using a Designer to Edit the Definition for a Discussion Entry
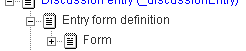
Expand the line so that you see the line:
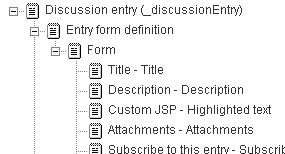
Figure 4-2 Expand the Form Definition
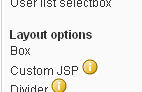
After clicking , click in the tools box on the right side of the designer, and notice the link in the section:
Figure 4-3 Locate the Link that Adds the Custom JSP File
Click , and, in the form, provide a caption (which is often used as the displayed title next to the page element), an internal-use name, and the JSP files that implement this customization. The following graphic shows the form used to specify JSP files, and provides the caption :
Figure 4-4 Completed Form for a JSP Customization
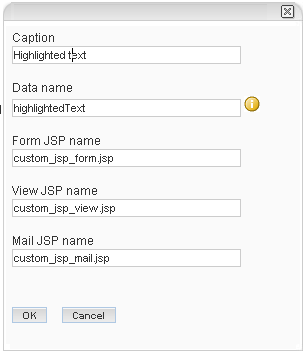
NOTE:Be sure to add the path to the filenames specified in the previous graphic. For example, the correct path for the form customization is samples/custom_jsp_form.jsp.
This example uses the sample JSP files provided in the /WEB-INF/jsp/custom_jsps directory.
After submitting the form, the JSP customization appears in the definition for the discussion-entry form, which allows you to position it, remove standard elements, and so on. Notice the JSP element positioned just below the standard element:
Figure 4-5 The JSP Element Within the Definition
Because you provided the file specifications for the form, view, and mail when you added the JSP form element, Vibe remembers this new element and you can locate it within the designer tools using its caption.
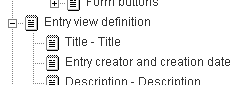
For example, after adding a custom form element, you usually want to add the corresponding custom view element. To do so, click the plus sign () next to the line to see the elements contained within the view page:
Figure 4-6 Expand the View Definition
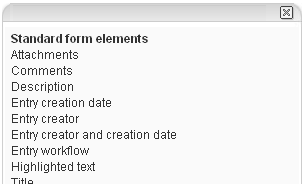
Then, click the text to display tools, and then click in the tools box located on the right side of the designer. Because Vibe recorded the creation of the JSP customization, now appears in the section of the tools box. For example, notice the line toward the bottom of the list in this graphic:
Figure 4-7 The Custom Form Element is Available to the View Definition
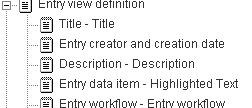
To add the custom_jsp_view.html file to the view definition, click in the section of the tools box, and then click . Vibe adds the custom element to the view definition, and then you can reposition it within the definition as you desire. The following graphic shows the element just under the element:
Figure 4-8 Positioning the Custom Element
See Section 4.2.1, A JSP That Defines Only One Data Element, for more information about how this customization appears in the UI.
4.1.4 Indexing Issues
When you use one JSP to define one page element, Vibe uses the internal-use data name that you assigned to the JSP in the designer to identify the data as well. In the example in the previous section (see Section 4.1.3, JSPs and the Vibe Designers), the internal-use data name was , and it applied to both the JSP file and the actual text collected by the custom text box.
When you use a JSP to define more than one page element, Vibe recognizes the JSPs to the extent that users can create and view a customized entry, but its tools do not recognize the multiple, distinct pieces of custom data within the JSP. As an additional step, you must use the designer to add form elements that match the unique elements found within the JSP file. After you complete this task, Vibe tools then recognize each distinct piece of custom data defined within the JSP. For example, users can now use the advanced search form to search based on exact values provided in those custom elements.
For more information about this additional task that must be performed when adding more than one custom element to the form using a JSP file, see Identifying Multiple Data Items Defined in One JSP File.
4.1.5 JSPs and Vibe Data Access
To enable all of the definition elements and building blocks for your custom JSP, include this line at the top of your JSP file:
<%@ include file="/WEB-INF/jsp/definition_elements/init.jsp" %>
Because JSP customizations within Novell Vibe are applied to a section of larger web pages, do not specify the html, head, or body HTML tags in your JSP file.
When using custom JSPs, you can customize binders and entries. Binders include all types of workspaces and include folders. Entries include entries as well as comments. Because customization of entries is most common, the rest of this section discusses data accessible when customizing an entry.
To access entry data, you access the properties of the ssDefinitionEntry object. For example, this tag from a Vibe JSP file tests for the existence of the entry title:
<c:if test="${empty ssDefinitionEntry.title}">
Here is a list of some of the object attributes that you can access from your custom JSPs:
ssDefinitionEntry.title
ssDefinitionEntry.description
ssDefinitionEntry.fileAttachments
ssDefinitionEntry.creation.principal.title
ssDefinitionEntry.creation.date
ssDefinitionEntry.modification.principal.title
ssDefinitionEntry.modification.date
The identifier principal corresponds to the user who created or modified the entry.
Vibe provides Java beans that enable a JSP file to access the caption and the internal data name specified for the JSP file using designer tools:
property_name
property_caption
Use these beans when you are using one JSP file to add one custom element. In this scenario, the name and caption specifications for the JSP file are also applied to the custom data. (When using a JSP file to add more than one element, you specify the name and id HTML elements explicitly. For more information, see Section 4.2.2, A JSP-Defined Entry (W-4 Form).)
When accessing the value of properties other than the name and caption, use the customAttributes method. For example, the following example shows a tag from a form JSP:
<input type="text" id="${property_name}" name="${property_name}"
value="${ssDefinitionEntry.customAttributes[property_name].value}"/>
The tag both provides an HTML-tag identifier (id) and name (name) for the custom form element, and uses the customAttributes method to retrieve the value of the custom element (if it exists). Examples in a subsequent section demonstrate the use of beans and the customAttributes method, when customizing part of a standard entry form, view, or mail message (see Section 4.2.1, A JSP That Defines Only One Data Element).
The description of properties, beans, and methods in this section is not exhaustive. To learn about other types of data available to you while using JSP files to create customizations, review the Vibe JSP files, which are found here:
/WEB-INF/jsp/definition_elements
For example, when searching this folder for occurrences of the ssDefinitionEntry object, you can locate this code, which is found in the popular_view.jsp file:
<c:if test="${!empty ssDefinitionEntry.totalReplyCount}">
The totalReplyCount property provides an integer that tells you the number of comments for the current entry.
4.1.6 Text Display in the HTML Editor
Unlike most property data, description data almost always requires additional processing within the JSP file. Remember that users create the description text using an HTML editor and that users can place coded items within the text (for example, inline graphics or the double-bracket notation ([[text]]) often used in wiki entries to create a link to another entry).
Consider the following tagging from the /WEB-INF/jsp/definition_elements/view_entry_data_description.jsp file:
<span><ssf:markup type="view" entity="${ssDefinitionEntry}"><c:out
   value="${ssDefinitionEntry.description.text}" escapeXml="false"/></ssf:markup></span>
The ssf:markup tag takes raw text, but processes the information so that it includes properly coded HTML for inline graphics and links to other entries. The escapeXml element of the ssf:markup tag provides an escape for HTML tags. In other words, the false setting for escapeXml in the last example indicates that the system should escape the angle bracket characters (<tag-text>). In this way, HTML tags are included and properly processed by the browser.
4.1.7 Standard Styles
When creating JSP customizations, you are free to style your page elements as needed. However, if you would like to use the standard styles used by the Vibe product, you can find their definitions here:
/WEB-INF/jsp/common/ssf_css.jsp
As you explore the standard JSPs that ship with the product in the /WEB-INF/jsp/definition_elements directory, note the name of the standard style, and view its CSS definition in the ssf_css.jsp file.