4.3 Scheduling the Deployment of the Collection Data Form
NOTE:If you selected on the Collection Data Form configuration page, the Collection Data Form is always available to the workstation user to run at anytime. For more information, see Section 4.1, Configuring the Collection Data Form.
You can define the schedule at three levels:
-
Management Zone: The settings are inherited by all device folders and devices. To schedule the deployment of the Data Collection Form for the Management Zone, see Section 4.3.1, Scheduling the Deployment of the Collection Data Form for the Management Zone.
-
Device Folder: The settings are inherited by all devices in the folder. Overrides the settings at the Management Zone level. To schedule the deployment of the Data Collection Form for a device folder, see Section 4.3.2, Scheduling the Deployment of the Collection Data Form for Devices in a Folder.
-
Device: The settings apply only to the device for which they are configured. Overrides the settings at the Management Zone level. To schedule the deployment of the Data Collection Form for a device, see Section 4.3.3, Scheduling the Deployment of the Collection Data Form for a Device.
4.3.1 Scheduling the Deployment of the Collection Data Form for the Management Zone
-
In ZENworks Control Center, click .
-
In the Management Zone Settings panel, click .
-
In the field, select the type of schedule you want to use to send out the Collection Data Form. You can select from the following options:
No Schedule: No deployment is scheduled. See No Schedule.
Date Specific: The Collection Data Form is deployed on specified dates. See Date Specific.
Recurring: The Collection Data Form is deployed on a recurring schedule. See Recurring.
Event: Deployment is triggered by an event. See Event.
No Schedule
-
Select in the field.

-
Click or .
The Collection Data Form is not scheduled to deploy.
Date Specific
To deploy the Collection Data Form on a specified date:
-
Select in the field.

-
Click the + icon to the right of the field to open a calendar, then select a date. To select more than one date, click the + icon again. Click the - icon to delete a selected date.
-
(Optional) Select to deploy the Collection Data Form annually on the dates you selected.
-
(Optional) For some reason, if the event does not run on the schedule you configured, to trigger the event immediately, select .
-
Select whether you want to deploy the Collection Data Form at a specified time or at a random time between specified start and end times.
-
Specify a start time, and if you selected , specify an end time.
-
(Optional) Select Use Coordinated Universal Time (UTC). Recommended, if the management zone is across geographical locations.
-
Click or .
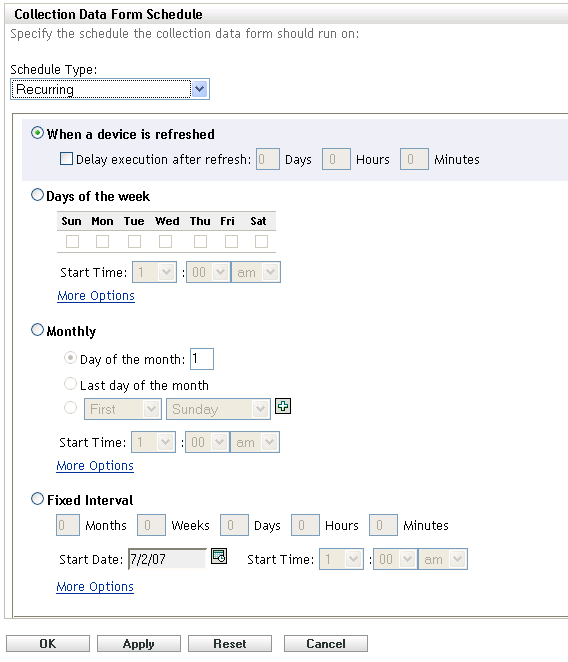
Recurring
Select whether you want to deploy the Collection Data Form when a device is refreshed, on certain days of the week, monthly, or at a fixed interval.
To deploy the Collection Data Form when a device is refreshed:
-
Select in the field.
-
Select .

-
(Optional) If you want to delay deploying the Collection Data Form for a set time after a refresh, select and specify the time in days, hours, and minutes.
-
Click or .
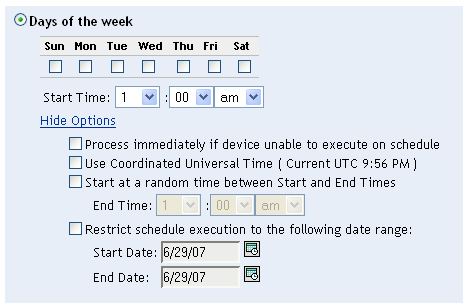
To deploy the Collection Data Form on certain days of the week:
-
Select in the field.
-
Select .

-
Select the days on which you want to deploy the Collection Data Form.
-
In the field, specify the time you want to deploy the Collection Data Form.
-
Click .
-
(Optional) For some reason, if the event does not run on the schedule you configured, to trigger the event immediately, select .
-
(Optional) Select Use Coordinated Universal Time (UTC). Recommended, if the management zone is across geographical locations.
-
(Optional) If you want to deploy the Collection Data Form at a random time between a specified start and end time, select then specify an end time.
-
(Optional) If you want to restrict the deployment of the Collection Data Form to a certain date range, select , then specify the start and end dates.
-
Click or .
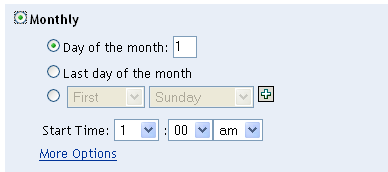
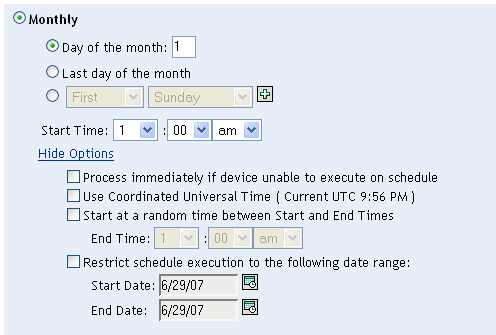
To deploy the Collection Data Form monthly:
-
Select in the field.
-
Select .
-
Select either and specify a number between 1 and 31, , or select the configurable field where you can choose a combination of days of the month for a recurring schedule.
-
In the field, specify the time you want to deploy the Collection Data Form.
-
Click .
-
(Optional) For some reason, if the event does not run on the schedule you configured, to trigger the event immediately, select .
-
(Optional) Select Use Coordinated Universal Time (UTC). Recommended, if the management zone is across geographical locations.
-
(Optional) If you want to deploy the Collection Data Form at a random time between a start and end time, select then specify an end time.
-
(Optional) If you want to restrict the deployment of the Collection Data Form to a certain date range, select then specify the start and end dates.
-
Click or .
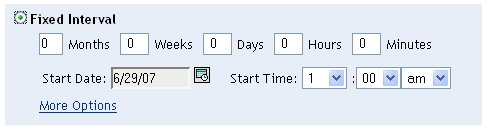
To send out the Collection Data Form at a fixed interval:
-
Select in the field.
-
Select .
-
Specify the number of months, weeks, days, hours, and minutes in their respective fields.
-
Specify a start date and time.
-
Click .
-
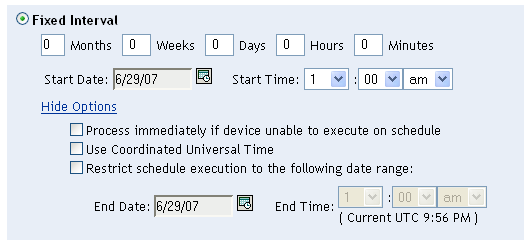
(Optional) For some reason, if the event does not run on the schedule you configured, to trigger the event immediately, select .
-
(Optional) Select Use Coordinated Universal Time (UTC). Recommended, if the management zone is across geographical locations.
-
(Optional) If you want to restrict the deployment of the Collection Data Form to a certain date range, select then specify an end date and end time.
-
Click or .
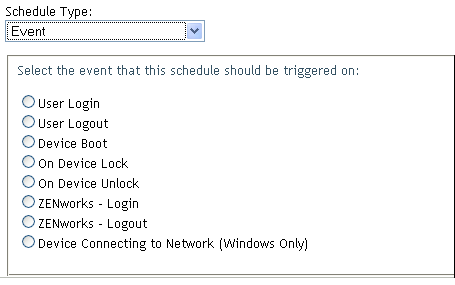
Event
-
Select in the field.
-
Select one of the following:
-
User login
-
User logout
-
Device boot
-
Device shutdown
-
On device lock
-
On device unlock
-
ZENworks Reauthorization - Login
-
ZENworks Reauthorization - Logout
-
Device connecting to network (Windows only)
-
-
Click or .
4.3.2 Scheduling the Deployment of the Collection Data Form for Devices in a Folder
-
In ZENworks Control Center, click .
-
Click next to the folder whose devices you want to configure.
-
Click the tab.
-
In the Settings panel, click .
-
Click .
This overrides the Management Zone settings.
-
In the field, configure the schedule you want to use.
For configuring the schedule type, perform steps from Step 3 through Step 3 listed in Section 4.3.1, Scheduling the Deployment of the Collection Data Form for the Management Zone.
4.3.3 Scheduling the Deployment of the Collection Data Form for a Device
-
In ZENworks Control Center, click , then click the tab.
-
Click the folder containing the device you want to configure a schedule for.
-
Click the device.
-
Click the tab.
-
In the Settings panel, click .
-
In the Catalog list, click .
-
In the Inventory panel, click .
This overrides both the Management Zone and folder settings.
-
In the field, configure the schedule you want to use.
For configuring the schedule type, perform steps from Step 3 through Step 3 listed in Section 4.3.1, Scheduling the Deployment of the Collection Data Form for the Management Zone.