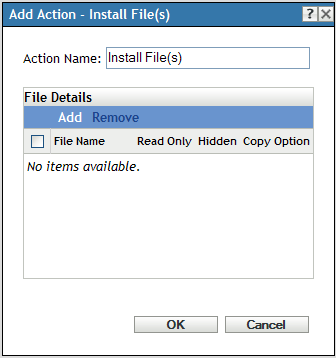
E.14 Action - Install Files
The Action - Install Files dialog box lets you specify the file to copy to the content server and from content server to the device, the destination directory and filename, and the copy options.
Figure E-14 Action - Install Files Dialog Box
You access this dialog box by using the following methods:
-
As part of the process of creating a Directive bundle by using the bundle category. For more information, see Section 2.1, Creating Directive Bundles.
-
As part of the process of creating a File bundle. For more information, see Section 2.2, Creating File Bundles.
-
In ZENworks Control Center, click the tab, click the underlined link of a bundle in the column of the list, click the tab, click one of the action set tabs (Install, Launch, Verify, Uninstall, Terminate, or Preboot), click the drop-down list, then select an available action.
In the Action- Install dialog box, click to display the Select Files dialog box.
Figure E-15 Select Files Dialog Box
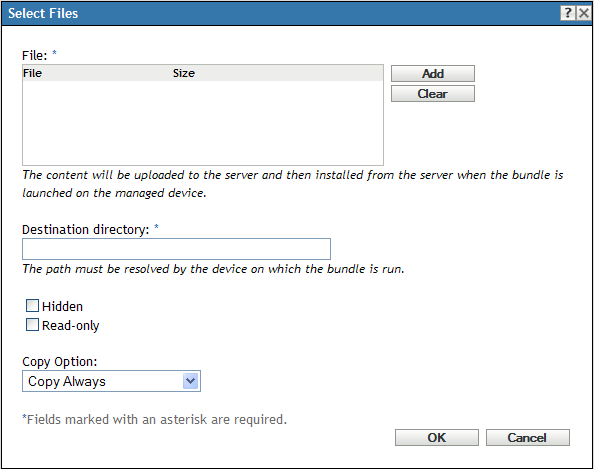
The Select Files dialog box lets you specify the files to be copied, specify a destination and source directory, specify whether the files are hidden or read-only after being copied to the device, and specify a copy option. You can also use this page to install the Novell File Upload extension, which must be installed before you can browse for and upload files.
Copying a file or directory copies the file or directory from one location to another without uploading the files into the ZENworks content repository. Copying a file or directory is described as copying without using content. When copying a file or directory, the managed device performs the copy operation and must be able to resolve both the source and destination paths. Also, when copying a file or directory, the file or directory is not cached on the managed device.
Installing a file or directory uploads the file or directory to the ZENworks content repository before it is distributed to assigned devices. Installing a file or directory is described as copying using content. When installing a file or directory, the file or directory is cached on the managed device.
Installing an executable file does not launch or execute the file. To launch or execute the file, you must add a launch executable action (Launch Executable, Launch Java Application, and so forth) to the bundle.
File: Click to display the Select Files dialog box, specify the files you want to copy to the device, then click . Repeat this step as many times as necessary to copy the desired files.
If the Novell File Upload extension is not installed on this device, you must install it before you can browse for file paths. For more information, see Novell File Upload Extension.
By default, the content uploaded to the ZENworks content repository is encrypted and compressed before it is distributed to assigned devices. However, if you do not want the content to be encrypted and compressed, then select the option.
Click to upload the files to the server. The File option lists all the uploaded files, the size of the files, and how the content is packaged
Destination Directory: Specify the destination directory on the device in which you want to install the file.
Hidden: Select the check box to specify that the file is hidden after installation.
Read-Only: Select the check box to specify that the file is read-only after installation.
Copy Option: Select a copy option from the list:
-
Copy Always: Copies the file regardless of whether the file currently exists on the workstation.
-
Copy If Exists: Copies the file only if the file currently exists on the workstation.
-
Copy If Does Not Exist: Copies the file only if the file does not currently exist on the workstation.
-
Copy If Newer: Copies the file only if its modified date and time is newer than the existing file’s date and time, or if the file does not currently exist on the workstation.
-
Copy If Newer and Exists: Copies the file only if it already exists on the workstation and the date and time of the file is newer than the existing file’s date and time.
-
Copy if Newer Version: Copies the file only if its internal version is newer than the existing file’s version (if version information is present).
-
Request Confirmation: Prompts the user to confirm that the file should be copied when the file already exists on the workstation.
-
Copy If Different: Copies the file if its creation date, creation time, or size is different than the existing file’s date, time, or size.
Executable Security Level: Click to specify the executable security level options.
On Windows 2000/XP/Vista, the application executable can run in either the “user” space or the “system” space. By default, the option is selected, which causes the application to run in the “user” space and inherit the same workstation security level as the logged-in user.
If the logged-in user's security level does not provide sufficient rights and file access to run the application, you can configure the application to run in the “system” space or as a dynamic administrator, as described below:
-
Run as logged in user: The action uses the logged-in user’s credentials. For example, the action has the same rights to the registry and the file system as the logged-in user.
-
Run as secure system user (Don't allow system to interact with desktop): The application is run under the Local System user and inherits Administrator-level credentials. For example, the application has full rights to the registry and the file system. Because the security level is set to , the application's interface is not displayed to the user and the application is only visible in the Task Manager. This option is useful when running applications that require full access to the workstation but require no user intervention. If you use mapped network drives to specify files and directories, the action fails because system users do not have access to user mapped drives.
-
Run as dynamic administrator: A dynamic administrator is an administrator account that is created on the fly to perform certain procedures, such as installing applications. Using a dynamic administrator is helpful when installing applications (some MSI applications, for example) that cannot be installed in the system space. When you select this action, the dynamic administrator is created, it performs the required tasks, and then the account is deleted.
You cannot use mapped network drives to specify files and directories because dynamic administrators do not have access to mapped drives.
NOTE:Performing this action as dynamic administrator on a Windows domain controller fails because Microsoft does not allow the use of local administrator accounts on domain controllers.