2.4 Creating Windows Bundles
A Windows bundle lets you distribute a Microsoft Windows Installer (MSI) package, Microsoft Windows Software Patch (MSP) package, thin-client application, or other Windows-based applications to a Windows device.
You can use ZENworks Control Center or the zman command line utility to create bundles. The following procedure explains how to create a bundle using ZENworks Control Center. If you prefer the zman command line utility, see Bundle Commands
in ZENworks Command Line Utilities
.
To create a Windows bundle:
-
In ZENworks Control Center, click the tab.
-
In the list, click , then click to display the Select Bundle Type page.

-
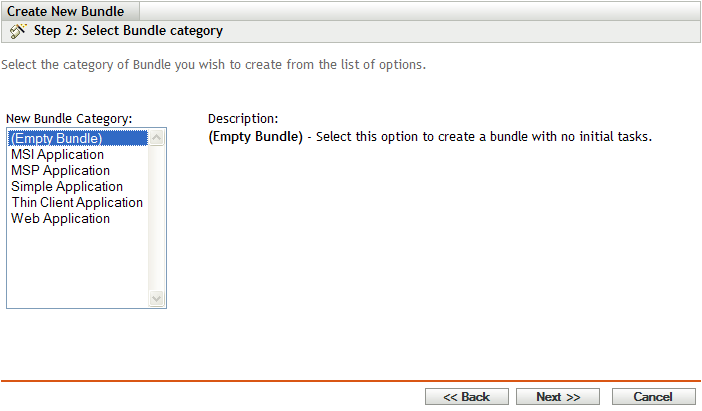
Select , then click to display the Select Bundle Category page.
-
Select the desired bundle category:
Empty Bundle: A bundle with no initial tasks. This bundle category is useful to quickly create a bundle without performing all of tasks in the Create New Bundle Wizard. After you create the empty bundle, you can edit its details to add assignments, actions, and so forth, at a later time.
MSI Application: An application that is packaged as a .msi file so that it can be installed by the Microsoft Windows Installer program.
For important information about creating MSI Application bundles, see Section 1.3, Packaging Considerations.
MSP Application: An application patch that is packaged as a .msp file so that it can be applied by the Microsoft Windows Installer program.
For important information about creating MSP Application bundles, see Section 1.3, Packaging Considerations.
Simple Application: An example of a Simple Application would be launching Windows Notepad. Typically, Simple Applications requires ZENworks Adaptive Agent to copy a few files to the workstation or make a few changes to the workstations registry, INI files, environment variables, and so forth.
If you have a non-MSI application that is more complex than this, we recommend that you use ZENworks Software Packaging, powered by AdminStudio ZENworks Edition, to create an MSI package for the application and then use the MSI Application option to create a bundle. For more information on installing AdminStudio, see AdminStudio ZENworks Edition Installation Guide.
For more information on the Software Packaging, see AdminStudio ZENworks Edition User Guide.
Thin-Client Application: An application, running on a terminal server, that is accessed through a terminal server client session (either RDP or ICA).
Web Application: An application that is launched by using a URL in a Web browser.
-
Click to display the Define Details page, then fill in the fields:
Bundle Name: Provide a name for the bundle. The bundle name must be different than the name of any other item (bundle, group, folder, and so forth) that resides in the same folder. The name you provide displays in ZENworks Control Center and the ZENworks Adaptive Agent (on managed devices).
For more information, see
Naming Conventions in ZENworks Control Center
.Folder: Type the name or browse to and select the ZENworks Control Center folder where you want the bundle to reside. The default is /bundles, but you can create additional folders to organize your bundles.
Icon: ZENworks Configuration Management lets you select an icon that users see during installation of a particular bundle. This icon applies only to the icon displayed by ZENworks Adaptive Agent on the managed device. ZCC uses default icons to represent the different bundles (Directive, File, Imaging, and Windows).
To select an icon, click , then browse to and select the icon you want to display on managed devices.
If the desired icon is embedded in a .exe, .dll, or .ico file that has multiple icons from which to choose, you must install additional items before you can browse to and select the desired icon.
For Mozilla Firefox, if you have not already installed the Novell File Upload extension on this device, you must do so before you can download and install the download plugin or browse to and upload the icon. For more information, see Novell File Upload Extension. After you install the Novell File Upload extension, you must also install the download plugin. To do so, click the message box that displays in the Select Icon dialog box (if you have already installed the plugin on this device, the plugin box does not display), click , then click .
For Microsoft Internet Explorer, you must install the Novell File Upload ActiveX control only; there is no download plugin for Internet Explorer. For more information, see Novell File Upload Extension.
After you have downloaded and installed the necessary extensions and plugin, click
 to browse to and select the icon you want ZENworks Adaptive Agent to display to represent the bundle. If the icon in embedded in a .exe, .dll, or .ico file that contains multiple icons, an additional dialog box displays to let you select the desired icon.
If you do not specify an icon, a default icon is used.
Description: Provide a short description of the bundle's contents. This description displays in ZENworks Control Center and in the ZENworks Adaptive Agent.
-
Click , then skip to the appropriate step, depending on which bundle category you chose in Step 4:
-
(Conditional) If you are creating an MSI Application bundle, follow the wizard prompts until you reach the Summary page, then skip to Step 12.
Click for information about each page or refer to the following table:
Wizard Page and Field
Details
Select .msi File page > field
Use this option if you want the .msi file copied to the ZENworks Server and then distributed from the ZENworks Server to assigned users and devices. This is referred to a normal install because ZENworks Adaptive Agent copies the .msi file to the managed device’s local drive and then the Microsoft Windows Installer program installs the application from the local .msi file.
Click
 to display the Select .msi File dialog box. Click to select the .msi file to upload. Select the option to include all the supporting files that are within the directory containing the .msi file and the subdirectories within it.
NOTE:By default, ZENworks Control Center has a 30-minute timeout value. If you leave ZENworks Control Center idle on your computer for more than 30 minutes, you are prompted to log in again before continuing. Because the upload process can take considerable time for a large .msi file, the default timeout value does not apply for this page.
Select .msi File page > field
Use this option if you want the Microsoft Windows Installer program to install the application from the .msi file on a network location. You must specify the complete path to the .msi file to use as the source file during distribution to the workstation.
You can use a mapped drive or UNC path. If you use a drive mapping, you must ensure that all workstations have the same drive mapped to the source location. For this reason, we recommend that you specify a UNC path.
After you create the MSI bundle, you cannot change the .msi filename; however, you can change the path to the .msi file. If you change the .msi filename, the installation fails.
Select .msi File page > link
If you have not installed the Novell File Upload extension on this device, you must do so before you can browse to and upload files. For more information, see Section C.0, Novell File Upload Extension.
field
Click
 to display the Install Parameters dialog box, then specify the desired parameters. For more information, click the button or see Section A.1, Install Parameters.
Select .msi File page > field
Click
to display the Uninstall Parameters dialog box, then specify the desired parameters. For more information, click the button or see Section A.2, Uninstall Parameters.
Select .msi File page > field
Click
to display the Repair Parameters dialog box, then specify the desired parameters. For more information, click the button or see Section A.3, Repair Parameters.
Select .msi File page > field
Click to browse to and select the desired transform file. You can upload the transform file or you can specify its location.
Different groups within an organization often use the same application, but that doesn’t mean they require the same feature set. One of the benefits of Windows Installer is that if you have 10 groups needing 10 different feature sets or other alterations for the same application, you can deploy the same MSI package to all 10 user groups, but with a different transform file (MST) applied for each group.
A transform file is a collection of changes applied to an MSI installation. It contains all modification information, such as whether features are installed; how they are installed; which files, shortcuts, and registry entries are included; and Add/Remove Programs applet information.
If you have vendor-supplied MSI packages, you can use AdminStudio ZENworks Edition to create and manage transforms.
Select .msi File page > field
The MSI package contains the property values that were defined during the administrative installation of the application. These property values determine the way the Microsoft Windows Installer installs the application to the workstation. In some cases, you might want to change one or more of the property values. For example, a property value might define the default location for a user’s work files. By adding the property to the list and changing the property’s value, you can override the default location defined in the MSI package.
If necessary, you can add public properties that were not included in the MSI package. When doing so, you should be careful to add only those properties that are valid for the package.
To override a property value, you change the property value and add the property to the Properties list so that Application Launcher knows to use that property value rather than the one defined in the MSI package. To do so, click to display the dialog box. In the field, select the property whose value you want to override, specify the new value in the field, then click to add the property to the list.
To modify a property that is in the list, select the property, click , modify the value data, then click .
To remove a property from the list, select the property, then click . Deleting the property causes future installations of the application to use the property value defined in the MSI package.
Select Command page field
The Select Command page lets you specify an optional executable to run after the .msi file installs. Click to browse for and select the executable to run.
If the executable is installed in the Program Files directory on the managed device, you must use macros as follows:
-
On 32-bit managed device: %ProgramFiles%\filename.
-
On 64-bit managed device: %ProgramFiles32%\filename.
If you have not installed the Novell File Upload extension on this device, you must do so before you can browse to and upload files. For more information, see Section C.0, Novell File Upload Extension.
-
-
If you are creating an MSP Application bundle, follow the wizard prompts until you reach the Summary page, then skip to Step 12.
Click for information about each page or refer to the following table:
Wizard Page and Field
Details
Select .msp File page > field
Use this option if you want the .msp file copied to the ZENworks Server and then distributed from the ZENworks Server to assigned users and devices. This is referred to a normal install because ZENworks Adaptive Agent copies the .msp file to the managed device’s local drive and then it is installed from the local .msp file.
Select .msp File page > field
Use this option if you want to install from the .msp file on a network location. You must specify the complete path to the .msp file to use as the source file during distribution to the workstation.
You can use a mapped drive or UNC path. If you use a drive mapping, you must ensure that all workstations have the same drive mapped to the source location. For this reason, we recommend that you specify a UNC path.
After you create the MSP bundle, you cannot change the .msp filename; however, you can change the path to the .msp file. If you change the .msp filename, the installation fails.
Select .msp File page > link
If you have not installed the Novell File Upload extension on this device, you must do so before you can browse to and upload files. For more information, see Section C.0, Novell File Upload Extension.
Select .msp File page > field
After you select the .msp file, the field is automatically populated, for example /p patch_package /qn where /p designates a patch file, patch_package specifies the .msp file, and /qn specifies an installation with no user interface (silent installation). To install a .msp file, you should normally use the /qn option.
You can, however, specify additional options. For more information, see the MSDN Web site.
-
If you are creating Simple Application bundle, follow the wizard prompts until you reach the Summary page, then skip to Step 12.
Click for information about each page or refer to the following table:
Wizard Page and Field
Details
Enter the Command to Run page > field
Specify the command to launch the application. You should include the full path to the executable in case the executable is not in the device’s search path. This path, whether the application is on the device’s local drive or a network resource, must be relative to the device.
For example, if the executable file is on the device’s local drive, you would specify something like c:\winnt\notepad.exe. If the executable file is on a network resource, you would specify something like j:\apps\notepad.exe (if all users will have J: mapped to the location) or \\server1\vol1\apps\notepad.exe.
Enter the Command to Run page > link
If you have not installed the Novell File Upload extension on this device, you must do so before you can browse to and upload files. For more information, see Section C.0, Novell File Upload Extension.
Enter the Command to Run page > field
Specify any command line parameters that need to be passed to the executable.
ZENworks Adaptive Agent passes the parameters exactly as they are specified. Therefore, the parameter syntax you use must exactly match the syntax the executable requires. For example, if word.exe has a /f=filepath parameter that requires paths with spaces to be enclosed in quotation marks, you would specify the following:
/f="c:\my docs\sample.doc"
Enter the Command to Run page > field
Specify the path to the directory you want the application to use for its working files.
-
If you are creating a Thin Client Application bundle, follow the wizard prompts until you reach the Summary page, then skip to Step 12.
Click for information about each page or refer to the following table:
Wizard Page and Field
Details
Configure Thin Client Details page > field
Type the published application name exactly as it is defined in Citrix.
Configure Thin Client Details page field
Add the Citrix servers that host the application. To add a server, specify the server’s IP address or hostname, then click .
The order in which the servers are listed is the preferred order for launching. You can use the and buttons to change the order if necessary.
Configure Thin Client Details page > field
Type the terminal server’s IP address or hostname.
Configure Thin Client Details page field
If the terminal server is not using the default port 3389, specify the correct port number.
Configure Thin Client Details page > field
If the terminal server is part of a Windows NT domain or an Active Directory domain, enter the domain name. If the user’s name and password in the domain matches the user name and password in Novell eDirectory, the user is not prompted to log in to the terminal server when launching the application.
Configure Thin Client Details page > field
Specify the path to the application’s executable file from the perspective of the terminal server.
Configure Thin Client Details page > field
Specify the path to the directory you want the application to use for its working files.
Configure Thin Client Details page field
Select the number of colors for the RDP client session. You can select , , , or . The default is .
Configure Thin Client Details page > field
If you want the RDP client session to use the entire desktop area, select . Otherwise, select and manually set the width and height (in pixels).
-
If you are creating a Web Application bundle, follow the wizard prompts until you reach the Summary page, then skip to Step 12.
Click for information about each page or refer to the following table:
Wizard Page and Field
Details
Enter URL page > field
Specify the location (URL) of the Web application. The URL should point to the primary file for the Web application or to a Web page that allows access to the Web application.
Click the button to test the URL.
-
Review the information on the Summary page, making any changes to the bundle settings by using the button as necessary.
-
(Conditional) Select the check box to display the bundle’s Summary page after the wizard completes. You can use the various tabs to edit the bundle’s assignments, system requirements, actions, settings, and content replication settings.
-
Click to create the bundle as configured per settings on the Summary page.
When you click Finish, the bundle is created but it does not have users or devices assigned, schedules, and group membership. At some point in the future, you need to configure additional options for the bundle by continuing with Section 3.2, Assigning Existing Bundles to Devices or Section 3.3, Assigning Existing Bundles to Users.