22.2 Deploying Updates
-
(Optional) Before deploying the updates, ensure that the health of the Primary Servers and the database in the Management zone is conducive for the deployment by performing diagnostic tests on the Primary Server using the ZENworks Diagnostic Center tool.
For detailed information about the ZENworks Diagnostic Center tool, see
ZENworks Diagnostic Center
in the ZENworks 10 Configuration Management Command Line Utilities Reference. -
(Optional) If you want to use deployment stages, set them up if you have not previously done so.
For more information, see Section 20.2, Creating Deployment Stages.
-
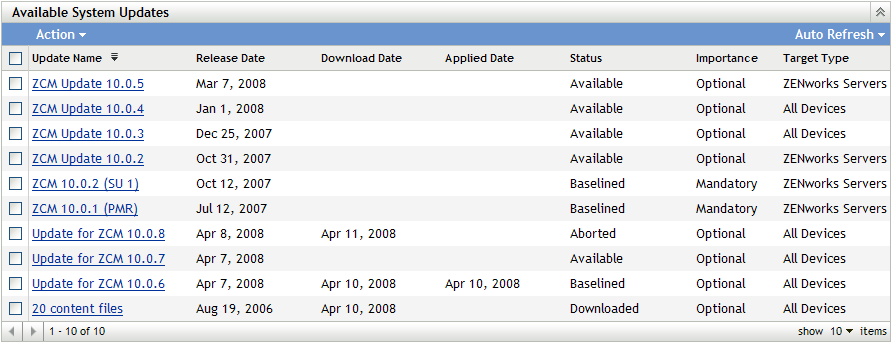
In ZENworks Control Center, click in the left pane, then click the tab to display the Available System Updates panel:

-
(Conditional) If new updates are not being displayed, click > .
The following illustrates available updates:
-
(Optional) To view the content of an available update, click the name of the update (in the column) to display the Release Details page:
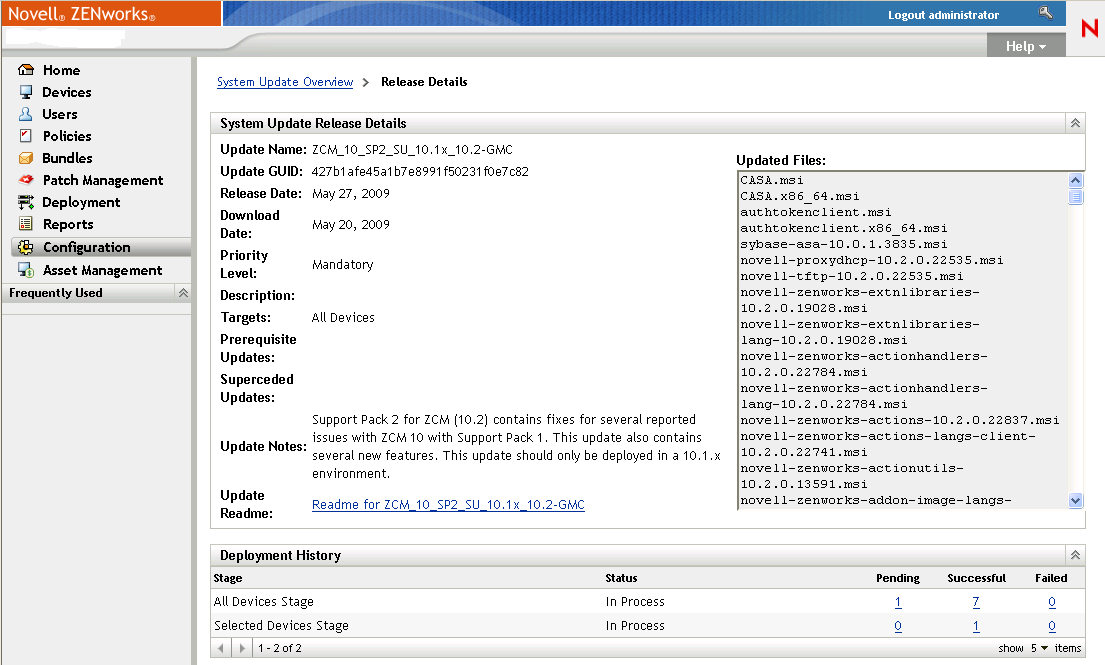
For more information, see Section 24.0, Reviewing the Content of an Update.
-
To download an update, select the check box for it, click > then click .
After an update has completed downloading, its status is automatically changed to Downloaded. The length of time to download an update depends on its size and your hardware configuration.
You can download multiple updates at a time, but you can only deploy one at a time. Because these steps are repeated for each update, you only need to download the update you plan to deploy at this time.
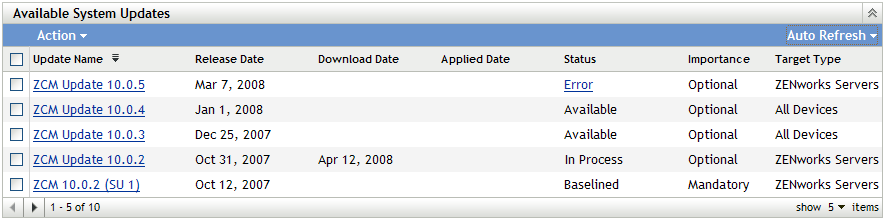
The following illustrates downloaded updates:
-
Determine whether to deploy the downloaded update, then select its check box.
You can deploy only one update at a time.
If you want to review the content of the update that you downloaded, see Section 24.0, Reviewing the Content of an Update for instructions about reviewing the content of a downloaded update.
If you want to download a different update for deployment, return to Step 5.
-
Click > .
This starts the Create System Update Deployment Wizard for deploying the update to all applicable devices. If deployment stages are enabled, they can be used.
The Deployment Wizard provides you with many options, including scheduling the deployment.

-
In the Deployment Wizard, complete the following steps:
-
On the Choose the System Update and Deployment Option page, select a deployment option (all of them can be scheduled in a subsequent wizard page).
NOTE:Depending on the size of your ZENworks system, we recommend as a best practice to deploy the selected update to one ZENworks Primary Server before deploying the update to other Primary Servers and to the managed devices that contact those servers.
We recommend that you perform the following actions in order:
-
Designate a ZENworks Primary Server to download the system update.
-
After the system update is in the state, assign the update to only the designated Primary Server you chose above.
-
Refresh the ZENworks Agent on the Server and let the system update finish, then reboot the Server.
-
After the Server is restarted and running, update the other Primary Servers in your system, followed by managed devices.
In a production environment, we recommend that you use the option to update the first Primary Server, update the remaining Primary Servers, and then update the managed devices. Or you should use the option to deploy the update to a stage containing the first Primary Server before deploying the update to other stages containing the remaining Primary Servers and managed devices.
-
Deploy System Updates to Selected Devices in the Management Zone: Deploys the selected update to only the devices that you select in Step 9.e. Stages are not used. If you choose this option, the next page of the wizard lets you select the reboot behavior for the devices included in the deployment.
-
Deploy System Updates to All Devices in the Management Zone: Deploys the selected update to all devices in the Management Zone. Stages are not used. If you choose this option, the next page of the wizard lets you select the reboot behavior for the devices included in the deployment.
This option does not guarantee that ZENworks Servers are updated before managed devices. In a large ZENworks system or in a production environment, we recommend that you use one of the other options.
-
Deploy System Updates Using Stages to Devices in the Management Zone: The selected update is deployed to only the devices that have membership in one of the stages. The stages are executed one after the other; that is, a stage does not start until the previous stage completes. After all stages complete, the stage is run. If you choose this option, and because the reboot behavior is set per stage, the next page of the wizard lets you select the reboot behavior for the All Devices Stage, which runs automatically after all other stages.
For more information on stages, see the Section 20.2, Creating Deployment Stages.
-
-
Click to display the following page:

-
Select one of the following options:
-
Prompt User to Reboot When Update Finishes Applying: After the update has been applied, a request to reboot is immediately displayed. If the user initially rejects rebooting, the user is periodically requested to reboot the device, until the device is rebooted. This is the default.
-
Do Not Reboot Device: The device does not reboot; however, the user is periodically requested to reboot the device, until the device is rebooted.
-
Force Device to Reboot: After the update has been applied, the device is automatically rebooted without user intervention, if a reboot is required by the update.
Some updates do not require a device to be rebooted after they have been deployed to a device. However, if a reboot is required to complete the update process, the deployment is not completed until the device is rebooted.
-
-
Click .
-
(Conditional) If you selected in the Management Zone in Step 9.a, the following wizard page displays:

-
To add devices or groups to the deployment configuration, click , browse for and select the devices or device groups to include in the update deployment, then click .
-
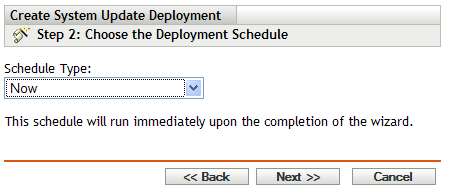
Click to display the Choose the Deployment Schedule page.
-
Fill in the fields:
Schedule Type: Select one of the schedule options:
-
Now: Immediately deploys the update when you finish the wizard.
-
Date Specific: Deploys the update according to the schedule that you set. The following options are displayed for the option:
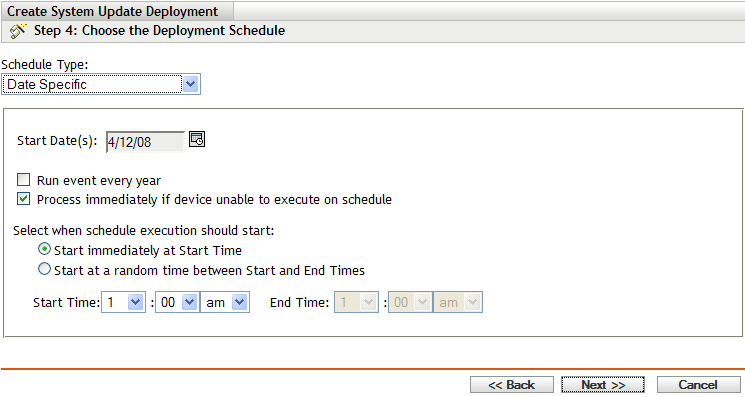
Fill in the fields:
-
Start Date: Select the deployment date from the calendar.
-
Run Event Every Year: Select this option to deploy the update every year on the start date.
-
Process Immediately if Device Unable to Execute on Schedule: Do not use this option for updates. It does not apply to updates.
-
Start Immediately at Start Time: Lets you deploy updates at the start time you specify.
-
Start at a Random Time Between Start and End Times: Lets you deploy updates at a random time between the times you specify. Fill in the fields.
-
-
-
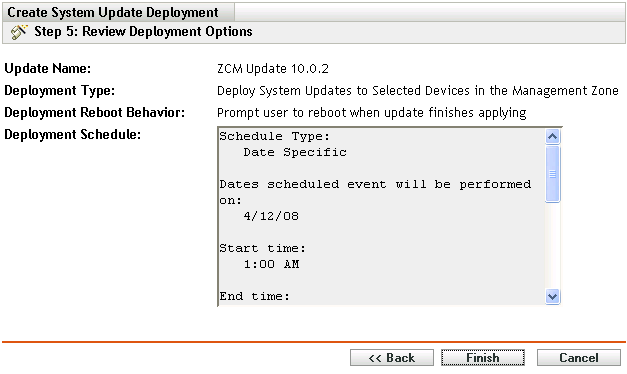
Click to display the Review Deployment Options page, then review the information.
-
-
If you are satisfied, click to start the update’s deployment; otherwise, click to make changes.
-
(Conditional) If you chose the deployment schedule type as in Step 9.h, the update is deployed only during the next device refresh schedule. However, if you want to immediately apply the update to the device, you must manually refresh the managed device in one of the following ways:
-
Click the tab > the tab > or , then select the check box next to the devices you want to refresh, click > .
-
On the managed device, right-click the
 icon, then click .
-
On the Linux unmanaged device, open a terminal, change your current working directory to /opt/novell/zenworks/bin/, and execute ./zac ref.
-
-
To observe the progress of the update deployment, do any of the following:
-
In ZENworks Control Center, observe the panels on the System Updates page:
-
The Available System Updates panel automatically displays Baselined in the column when the deployment has completed.
-
The Deployed System Updates panel displays the update in its listing when the deployment has completed.
-
-
On a Windows device where the update is being deployed, right-click the ZENworks icon, then select to open the ZENworks Progress dialog box.
You cannot view the download progress on a Linux device because these devices are not ZENworks managed devices and do not have the ZENworks icon.
The progress of downloading the update MSI files is displayed. When it has finished, the dialog box automatically closes and the option is dimmed.
After a 5-minute wait, all ZENworks services are closed on the device. Then the MSIs (for Windows) or RPMs (for Linux) are installed and the services are restarted.
-
-
To verify that the update was successfully deployed:
-
To verify that the MSIs or RPMs have been installed and the update process is complete, review the following log files:
Windows: installation_path\novell\zenworks\logs\systemupdate.log
Linux: /var/opt/novell/log/zenworks/SystemUpdate.log
You can also look for the existence of the following file (the same path for both Windows and Linux):
installation_path\novell\zenworks\work\system-update\systemupdate.ini.timestamp
-
Test the ZENworks software on the device to ensure that it is working properly.
-
To ensure that the update has been deployed, do one of the following to determine whether the version number has been incremented (for example, the first update for ZENworks should change the value from 10.0.x to 10.0.2):
-
Open the Windows Registry and browse to the following:
HKEY_LOCAL_MACHINE/Software/Novell
For the key, the update process should have incremented the value.
-
On a Windows device, review the following file:
Installation_path\Novell\ZENworks\version.txt -
On a Linux device, review the following file:
/etc/opt/novell/zenworks/version.txt
-
-
-
(Conditional) If you are receiving e-mail notifications at the completion of the deployment stages and are ready to begin the next stage, go to the Deployed System Updates panel, then click > .
-
To deploy another update, repeat from Step 5.