3.2 Configuring ZENworks News Settings
The ZENworks News Settings page lets you configure a dedicated news server and a schedule to download the ZENworks news. By default, the news is downloaded at midnight by the Primary Server of the Management Zone.
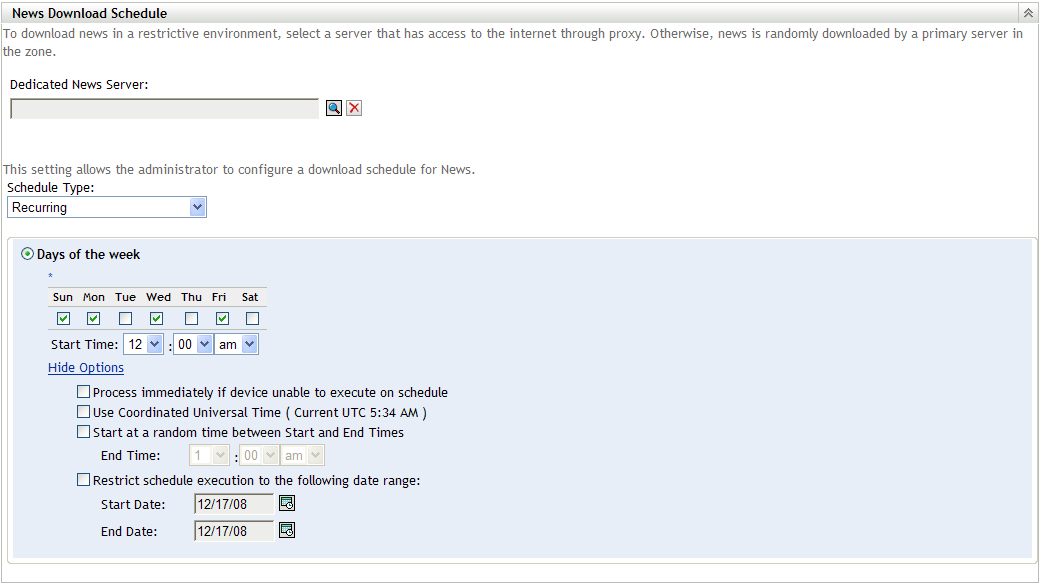
Figure 3-2 News Download Schedule
Review the following sections to configure the settings to download the news:
3.2.1 Dedicated News Server
By default, any available server in the Management Zone can be used to download the news updates. However, you can specify one ZENworks Server to be dedicated to handle the news downloads. The server that you select should have access to the Internet, either directly or through a proxy server.
The following sections contain more information:
Specifying a Dedicated News Server
-
In ZENworks Control Center, click in the left pane.
-
On the tab, expand the section (if necessary), click , then click to display the News Download Schedule panel.
-
In the field, browse for and select a server, then click .
The server’s identification is displayed in the field.
-
(Conditional) If you need to revert to the last saved dedicated server setting, click .
This resets the dedicated server to the last saved setting, such as when you last clicked or .
-
Click to make the changes effective.
-
Either click to close the page, or continue with configuring the schedule type.
If you did not click to make your changes effective, clicking does so. Clicking also closes the page, but loses your unapplied changes.
Clearing a Dedicated News Server
Clearing a dedicated update server causes the news updates to be retrieved randomly from any server in the Management Zone.
-
In ZENworks Control Center, click in the left pane.
-
On the tab, expand the section (if necessary), click , then click to display the News Download Schedule panel.
-
Click
 to remove the dedicated server from the field.
-
(Conditional) If you need to revert to the last saved dedicated server setting, click .
This resets the dedicated server to the last saved setting, such as when you last clicked or .
-
Click to make the change effective.
3.2.2 Schedule Type
You can configure the schedule for downloading the news:
-
In ZENworks Control Center, click in the left pane, then click the tab.
-
Click to expand its options, click to expand its options, then select .
-
(Conditional) To exclude scheduled checking for news updates, click the down-arrow in the field, select , click to save the schedule change, then skip to Step 6.
With this option selected, you must download the news updates manually. For more information, see Updating the News Alerts.
-
(Conditional) To set a recurring schedule for checking for the news updates, click the down-arrow in the field, then select .
-
Fill in the fields:
-
Select one or more check boxes for the days of the week when you want to check for news updates.
-
Use the box to specify the time of day for checking to occur.
-
(Optional) Click , then select the following options as necessary:
-
Process Immediately if Device Unable to Execute on Schedule: Causes checking for news updates to occur as soon as possible if the checking cannot be done according to schedule. For example, if a server is down at the scheduled time, checking for news updates occurs immediately after the server comes back online.
-
Use Coordinated Universal Time: Causes the schedule to interpret the times you specify as UTC instead of local time.
-
Start at a Random Time Between Start and End Times: Allows checking for news updates to occur at a random time between the time you specify here and the time you specified in Step 5.b. Fill in the fields.
-
Restrict Schedule Execution to the Following Date Range: In addition to the other options, you can specify a date range to check for the news updates.
-
-
(Conditional) If you need to revert to the last saved schedule, click at the bottom of the page.
This resets all data to the last saved state, such as when you last clicked or .
-
When you have finished configuring the recurring schedule, click to save the schedule change.
-
-
To exit this page, click when you are finished configuring the schedule.
If you did not click to make your changes effective, clicking does so. Clicking also closes the page, but loses your unapplied changes.