

In ZfD 3.2, you can use the existing inventory information of ZENworks 2.
If you have configured ZENworks 2 for a large number of workstations, you need not disrupt the inventory process when upgrading to ZfD 3.2. You need to follow this procedure to continue using the inventory information:
The following sections will help you migrate your ZENworks 2 inventory information to ZfD 3.2.
After successfully migrating the policies and the database, the inventory information of ZENworks 2 should exist in ZfD 3.2. Also, the inventory information in ZENworks 2 and ZfD 3.2 can coexist. The workstation inventory is stored in the ZENworks 2 database as specified in the ZENworks 2 Inventory policies. The inventory information is also stored in the ZfD 3.2 database. You can configure the Inventory policy settings to ensure a full scan of the workstations.
If you have a large number of workstations associated with Inventory policies in ZENworks 2, you can continue to use the same policies in ZfD 3.2. Migrating ZENworks 2 Inventory policies is an easy method of importing the same policy settings for the associated workstations to ZfD 3.2.
The Inventory policy migration tool associates the workstations that were associated with the Inventory policy in ZENworks 2. After you migrate, you may need to further configure the policy settings in ZfD 3.2.
The Inventory policy migration tool does not remove the Inventory policies in ZENworks 2.
To migrate ZENworks 2 Inventory policies:
Migrate the Workstation Inventory Package in ZfD 3.2. See Migrating Workstation Inventory from ZENworks 2 in Workstation Inventory in Deployment.
In ConsoleOne, click the Inventory Service object to which the workstations are attached.
You must select an Inventory Service object that supports the role of an inventory server.
Click Tools > Inventory Policy Migration.
Specify the following options:
Server Address IP/DNS: If your ZENworks 2 inventory server is a NetWare® 4.x server, specify the Server Address.
NDS Search Context: Specify the context for searching the Workstation Inventory object. By default, this tool will search the Workstation object in the current root context.
Click Find.
If any ZENworks 2 Inventory policies are found, these policies are listed in the Reports window.
Click Migrate.
All the listed Inventory policies will be migrated. You can see the list of the Inventory policies that were migrated in the Report window.
To ensure that the migration is successful, open the Inventory policy in ZfD.
In ConsoleOne, double-click the Inventory Service object for which you have migrated the policies > click the Workstation Inventory policy tab. You will see the same inventory settings as specified in ZENworks 2.
The Database Migration tool migrates the existing inventory information from the ZENworks 2 database to the ZfD 3.2 database. The Migration tool provides an easy way to migrate a large amount of existing data into the ZfD 3.2 database. Once you migrate the database, you can choose when you want to rescan the workstations in the inventory policies.
The migration tool migrates the following list of inventory information:
NOTE: The migration tool does not migrate the DMI scan data.
When you install ZfD 3.2, the migration tool that uses the DBMIGRATE.NCF file is installed on NetWare servers. This file is in the SYS:\SYSTEM directory on a NetWare server and in the PUBLIC\ZENWORKS\WMINV\BIN on a Windows* NT/2000 server. On Windows NT/2000, the batch file, DBMIGRATE.BAT is installed.
The contents of DBMIGRATE.NCF file are as follows:
envset JDBC_DRIVER=SYS:\PUBLIC\ZENWORKS\LIB\JDBCDRV.ZIP;SYS:\PUBLIC\ZENWORKS\LIB\CLASSES111.ZIP
envset WORKING_PATH=SYS:\PUBLIC\ZENWORKS\WMINV\LIB\STATUSLOG.JAR;SYS:\PUBLIC\ZENWORKS\WMINV\LIB\DESKTOPCOMMONUTILITY.JAR; SYS:\PUBLIC\ZENWORKS\MWUTILITY.JAR
envset CLASSPATH=.;$JDBC_DRIVER;$WORKING_PATH;$CLASSPATH
#
# Running the DBMigrate Utility
# *********
# To run the DBMIGRATE Utility, do the following:
#
#1. Check if the environment variable JDBC_DRIVER points to the path where JDBCDRV.ZIP is present.
#2. Check if the environment variable WORKING_PATH points to the path where ZENINVSERVER.JAR, STATUSLOG.JAR, and DESKTOPCOMMONUTILITY.JAR are present.
# 3. Enter the IP address ZENworks for Desktops 3 Inventory database server after the switch -DBLOC. For example, $CLASSPTH -dbloc 164.99.156.184
# 4. Enter the IP address of ZENworks 2 Inventory database after the switch -zen2dbloc. For example, $classpath -dbloc 164.99.156.134 -zen2dbloc 164.99.156.135
# **********
# If the ZENworks for Desktops 3 Inventory database is running on Oracle, then uncomment the below the line and comment the Sybase line.
# java -ns com.novell.zenworks.desktop.inventory.migration.database.Loader -classpath $classpath;$tmppath -nds -dbloc 164.99.135.198 -zen2dbloc 164.99.156.42 -oracle -sid abuorcl -Logfilename sys:\etc\dbmigrte.log
# If the ZENworks for Desktops 3 Inventory database is running on Sybase, then uncomment the below line and comment the above Oracle line.
-classpath $classpath;$tmppath -nds -dbloc 164.99.156.42 -zen2dbloc 164.99.145.53 -Logfilename SYS:\ETC\DBMIGRATE.LOG
The contents of DBMIGRATE.BAT are as follows:
echo .
IF "%1"=="" goto no3
IF "%2"=="" goto no3
call InvEnv.bat
java -Xbootclasspath:..\..\lib\vbjapp.jar;..\..\lib\vbjorb.jar;%java_dir%\lib\rt.jar -mx128m -classpath %tmppath%;%classpath% com.novell.zenworks.desktop.inventory.migration.database.Loader -nds -dbloc %1 -zen2dbloc %2 -logfilename dbmigrate.log
goto end
:no3
echo Migration source and destination addresses not specified.echo Incorrect parameters.echo USAGE : DBMIGRATE "ZfD3 database IPAddress" "ZfD2 database IPAddress"
:end
echo .
You must modify the file to specify the location of the ZENworks 2 database server and the ZfD 3.2 database and the path settings.
To migrate a database from ZENworks 2:
Ensure that the Inventory database is installed when you install ZfD 3.2.
Stop the Inventory Gatherer in ZENworks 2.
Also, ensure that all the .STR files are stored in the database. If the .STR file data is updated in the database, the directory containing the .STR files (ZENWORKS\STRDIR) will be empty. For more information about unloading the Inventory Gatherer, see the ZENworks 2 documentation Web site.
In ZfD 3.2, stop the Service Manager.
Modify the settings on the server as follows:
dbmigrate ipaddress_of_zfd3.2_database server ipaddress_of_zenworks2_database_server
By default, the commands in the DBMIGRATE.BAT file apply to the Sybase* database on Windows NT/2000. If you have an Oracle* database you must modify the following entry in DBMIGRATE.BAT:
java -Xbootclasspath:..\..\lib\vbjapp.jar;
..\..\lib\vbjorb.jar;%java_dir%\lib\rt.jar -mx128m -classpath %tmppath%;%classpath% com.novell.zenworks.
desktop.inventory.migration.database.Loader -nds -dbloc %1 -zen2dbloc %2 -logfilename dbmigrate.log
Between these two parameters, %2 and -logfilename, type
-oracle -sid sid.
sid refers to the Oracle database ID. An example for sid is orcl.
Save the file. On the database server console, run the DBMIGRATE batch file:
dbmigrate ipaddress_of_zfd3.2_database server ipaddress_of_zenworks2_database_server
You will see a list of workstations that have been successfully migrated into the ZfD database.
On NetWare server, the database migration tool creates a log file (DBMIGRATE.LOG) in the SYS:\ETC directory. On Windows NT/2000, this log file is in the same directory where you run the DBMIGRATE.BAT file.
If you have installed more than one ZfD 3.2 database, you must migrate the ZENworks 2 database to each database, repeating the database migration procedure for each database.
The database information from the ZENworks 2 database will not be removed.
You can remove the inventory information from the ZENworks 2 Inventory database, ZENINV.DB, using the Delete tool.
Before you run this tool, ensure that the ZENworks 2 and ZfD 3.2 databases are not loaded. You can run this tool on any inventory server that has the ZENworks 2 and ZfD 3.2 databases connected to the server.
To run this tool:
Modify the MGMTDBS.NCF file.
Load the ZfD 3.2 database. At the server prompt, enter mgmtdbs.
This will also load the ZENworks 2 database (ZENINV.DB).
Stop the Naming server.
On NetWare servers, at the inventory server prompt, to view the ID of the Naming server, enter JAVA -show
Enter JAVA -KILLid_of_the_naming_server
At the server prompt, enter zen2remove.
Displays the message that the inventory information is being deleted.
On completing the removal of inventory information from the ZENINV.DB database, the status of the deletion is displayed. To view the log file for the Delete tool, open the file DROPZEN2.LOG file in the SYS:\ETC directory.
Remove the modifications in the MGMTDBS.NCF file.
Delete the -d parameter in the MGMTDBS.NCF file and save the changes.
In this type of inventory configuration in ZENworks 2, the inventory server components and the database are located on different servers. The scenario is illustrated in the following figure:
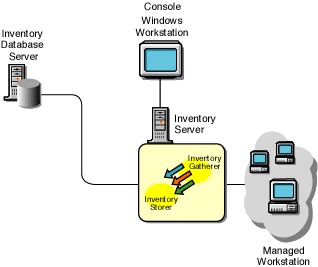
To migrate the inventory information, you need to migrate the Workstation Package and the Workstation Inventory policies associated with the inventory server. Later you migrate the Inventory database and configure the Database Location policy.
In another type of inventory configuration in ZENworks 2, there is more than one inventory server. These inventory servers are connected to one Inventory database server. The scenario is illustrated in the following figure:
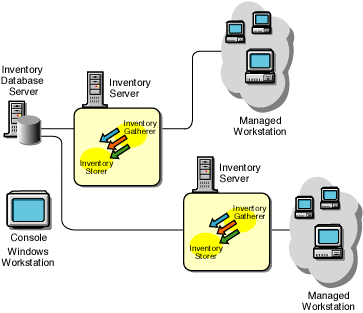
To migrate the inventory information, you migrate the Workstation Package and the Workstation inventory policies associated with each inventory server. Later you migrate the Inventory database and configure the Database Location policy.
In the following inventory configuration in ZENworks 2, there is more than one inventory server. Also, an inventory server has an Inventory database; the other inventory servers connect to this inventory server with the database. The scenario is illustrated in the following figure:
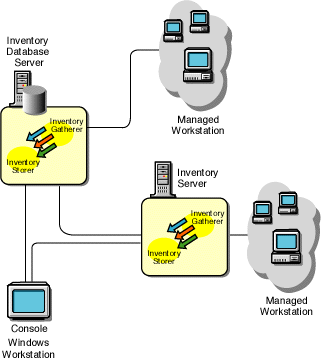
To migrate the inventory information, you need to migrate the Workstation Package and the inventory policies associated with the inventory server with a database. Later, you migrate the other inventory servers. You must stop the Inventory components (Inventory Gather and Inventory Storer) on the server.