The process of distributing an application consists of four main tasks:
Create the application's installation package and copy it to a network location.
Create an Application object in NDS using the installation package.
Define the system requirements that a workstation must meet before Novell® Application LauncherTM/Explorer will distribute the application to it.
Associate the Application object with the users or workstations you want to distribute the application to.
This process assumes that you have already set up Application Launcher/Explorer on users' workstations. Application Launcher/Explorer displays, installs, and configures the application on the workstation after you complete the tasks listed above. If you have not installed Application Launcher/Explorer, see Setting Up Application Launcher/Explorer .
The following sections provide instructions for completing the tasks listed above:
HINT: After you create an Application object, there are many different Application object property settings you can configure to better manage the application. The above tasks provide information about the basic settings you must configure in order to distribute the application. For information about additional settings you can configure, see Application Object Settings .
Creating an Application's Installation Package
An installation package consists of the files and information needed to install the application on a workstation. The following sections explain the options available to you to help you create an application's installation package:
Some applications require few files to be copied to the workstation and few (or no) changes to the workstations configuration (registry, INI files, environment variables, and so forth). The installation package for these applications may very well consist of only one or two files. In this case, you can copy the files to a network directory. After creating the NDS object for the application, you can configure the Application object to instruct Application Launcher/Explorer to simply run the application from the network directory or to first copy the files to the workstation and then run the application locally. You can also configure the Application object to modify any workstation settings required by the application.
To manually create an installation package:
Create a network directory for the application's files.
Copy the files to the network directory.
Creating a snAppShot Installation Package
Some applications require many files to be installed and many changes to be made to the workstation. This can require a complex installation package.
ZENworks® for Desktops (ZfD) Application Management includes the snAppShotTM utility to automate the process of creating complex installation packages. You run snAppShot on a workstation that has never had the application installed to it. SnAppShot records the workstation's state (files and configuration) before you install the application and after you install the application. From this information, snAppShot creates an installation package consisting of an Application object template file (.AOT or .AXT file) and the application's files (.FIL files). This installation package is saved to a network directory you specify. When you create the NDS object for the application, the .AOT file is used. When Application Launcher/Explorer distributes the application to a workstation, it uses the .FIL files as well as the configuration information (registry changes, INI file changes, and so forth) stored in the Application object.
To use snAppShot to create an installation package:
Set up a "clean" workstation. This needs to be a workstation where the application has never been installed.
Run snAppShot (SNAPSHOT.EXE) from the SYS:\PUBLIC\SNAPSHOT directory.
Follow the on-screen prompts to create the installation package. For more detailed information about snAppShot, see SnAppShot .
Creating a Microsoft Windows Installer Package
Microsoft* Windows* 2000 (and patched versions of Windows 95/98 and Windows NT* 4.0) include an installation and configuration service referred to as Microsoft Windows Installer. Microsoft Windows Installer, similar to Application Launcher/Explorer, installs applications to a workstation from an installation package consisting of a .MSI file and various support files.
ZfD Application Management enables you to distribute applications that are installed through Windows Installer. Rather than using a snAppShot .AOT/.AXT file when creating the Application object, you simply use the application's .MSI file. Distributing .MSI applications through Application Launcher/Explorer enables you to control who has access to the application while still gaining the benefits associated with the Windows Installer (such as on-demand installation, transforms, and source resiliency).
To use a Windows Installer package:
Create the installation package in a network location by running the application's setup program using the administrative option. For more information, see you application's installation documentation.
or
Copying the application's preconfigured .MSI files and supporting files to a network location (if this method is supported by the application).
Creating an Application Object
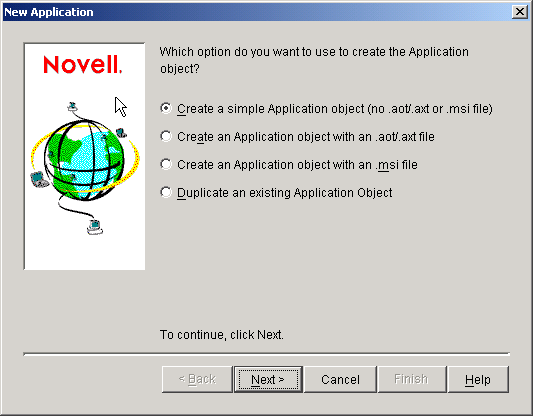
In ConsoleOne®, right-click the container where you want to create the Application object > click New > click Object to display the New Object dialog box.
Click App:Application > OK to display the New Application dialog box.
Select the option you want to use to create the Application object:
Manually (No .AOT/.AXT File or .MSI File): Lets you enter a path to the application's executable file. After the Application object is created, you can modify additional properties if necessary. Skip to Manually Creating an Application Object .
Using an .AOT/.AXT File: Lets you specify an .AOT or .AXT file you've created with snAppShot. The .AOT or .AXT file is used to populate the Application object's property fields. Skip to Using an .AOT/AXT File to Create an Application Object .
In the New Application dialog box, select Manually (No .AOT/.AXT File or .MSI File) > click Next.
In the Object Name box, type a name for the Application object.
In the Path to Executable box, enter the path to the location from which the application's executable file will be run. Include the executable file in the path.
IMPORTANT: If you plan for users to run the application from the network or the file is already located on the users' workstations, the path should be to the actual executable file on the network or the workstation. If you plan to have Application Launcher/Explorer copy the file to a target directory on the workstation, the path must be to the executable file in the target directory.
Click Finish to create the Application object.
If Application Launcher/Explorer will need to copy files to the workstation, right-click the Application object > click Properties > complete the remaining steps.
Using an .AOT/AXT File to Create an Application Object
In the New Application dialog box, select Using an .AOT/AXT File > click Next.
Enter the path to the .AOT or .AXT file > click Next.
HINT: The file should be in the network location you saved it to when creating it with snAppShot.
If necessary, modify the following fields to customize the Application object.
Object Name: This field defaults to the Application object name that was specified when running snAppShot to create the installation package. You can change the name if you want. If another Application object in the same container has the same name, you need to select a different name. No two objects in the same container can have the same name.
SOURCE_PATH: This field defaults to the location where the application's installation files (.FIL) files where stored when running snAppShot to create the installation package. You should verify that the path is correct.
TARGET_PATH: This field defaults to the location where the application was installed when running snAppShot to create the installation package. You should verify that this is the workstation directory where you want the application installed.
Click Next.
Review the Application object settings > click Finish to create the Application object.
Using an .MSI File to Create an Application Object
In the New Application dialog box, select Using an .MSI File > click Next.
Enter the path to the .MSI file > click Next.
HINT: The file should be in the network location where you installed or copied the application.
If necessary, modify the following fields to customize the Application object.
Object Name: This field defaults to the Application object name that was specified when running snAppShot to create the installation package. You can change the name if you want. If another Application object in the same container has the same name, you need to select a different name. No two objects in the same container can have the same name.
SOURCE_PATH: This field defaults to the administrative installation location defined in the .MSI file. You should verify that the path is correct.
Click Next.
Review the Application object settings > click Finish to create the Application object.
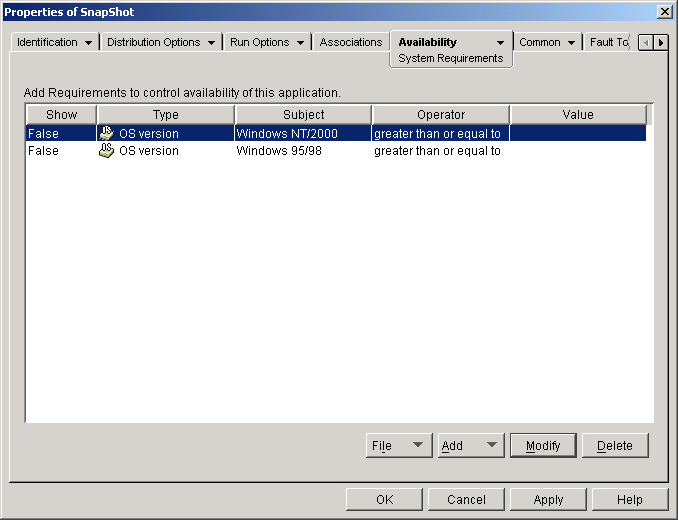
To ensure that Application Launcher/Explorer does not distribute the application on a workstation that cannot support the application, you need to define the application's system requirements. An application will not even be displayed on users' workstations until you do so.
For example, the application may run on Windows 95/98 but not on Windows NT/2000/XP. In this case, you would want to set one of the system requirements to be Windows 95/98. Or, the application may require 100 MB of free disk space, in which case you could establish that as a system requirement.
In ConsoleOne, right-click the Application object > click Properties.
Click the Availability tab > System Requirements to display the System Requirements page.
Verify that the list contains an OS Version requirement (Windows NT/2000/XP or Windows 95/98) for the workstation you want to distribute the application to. If the correct OS version is not listed, click Add > Operating System > enter the requirements for the operating system > click OK to add it to the list.
IMPORTANT: An OS Version requirement must be defined before an application will be distributed.
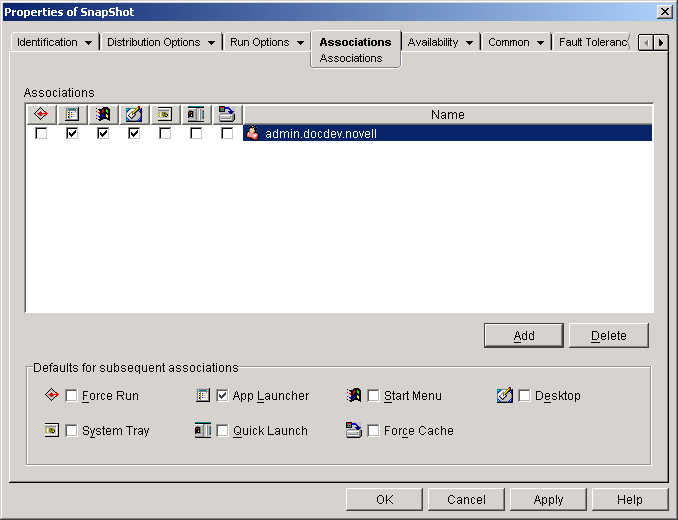
Associating the Application Object with Users or Workstations
For Application Launcher/Explorer to display the application on a workstation, you must associate the Application object with the user logged in at the workstation or with the workstation itself.
You associate the application with a user by adding the User object, a Group object to which the user belongs, or a container object (Organizational Unit, Organization, or Country) in which the user resides to the Application object's association list.
In ConsoleOne, right-click the Application object > click Properties.
Click the Associations tab to display the Associations page.
Click Add > browse and select a User object, Group object, or container object > click OK to add the user, group, or container to the Associations list.
Select the options you want applied to the Application object. By default, the App Launcher option is already checked, which causes the Application object to be displayed in the Application Launcher/Explorer window.
Force Run: Automatically runs the application. With a user-associated application, the application runs immediately after Application Launcher/Explorer starts.
You can use the Force Run option in conjunction with several other settings to achieve unique behaviors. For example, if you use the Force Run option with the Run Application Once option (Run Options tab > Applications page), as soon as the Application object is distributed it will be run one time and then removed from the workstation. Or, suppose that you want to run the Application object immediately one time at a pre-determined time. If so, select Force Run, select the Run Application Once option on the Application page (Run Options tab), and define a schedule using the Schedule page (Availability tab).
If you want to force run several applications in a specific order, mark each of them as Force Run. Then give each Application object a numeric order by using the Order Icon Display option on the Icon page (Identification tab).
IMPORTANT: When associating an Application object with a workstation, Force Run will not work if the Application object uses a Microsoft Windows Installer (.MSI) package. This is true only when the Application object is associated with a workstation. Force Run works with .MSI Application objects associated with users.
App Launcher: Adds the Application object's icon to the Application Launcher/Explorer window.
Start Menu: If the workstation is running Application Explorer, this option adds the Application object to the Windows Start menu. The Application object will be added to the top of the Start menu, unless you assign the Application object to a folder and use the folder structure on the Start menu. See the Application object's Folders page (Identification tab).
Desktop: If the workstation is running Application Explorer, this option displays the Application object's icon on the Windows desktop.
System Tray: If the workstation is running Application Explorer, this option displays the Application object's icon in the Windows system tray.
Quick Launch: Displays the Application object's icon on the Windows Quick Launch toolbar.
Force Cache: Forces the application source files and other files required for installation to be copied to the workstation's cache directory. The user can then install or repair the application while disconnected from NDS. The files are compressed to save space on the workstation's local drive. For more information about caching applications, see Running in Disconnected Mode .
IMPORTANT: This option is required only if you want to ensure that the user can install or repair the application while disconnected from NDS. Without this option selected, the user will still be able to launch the application in disconnected mode, provided the application has already been distributed (installed) to the workstation.
Click OK to save the Application object information.
Associating the Application Object with Workstations
To associate an Application object with a workstation and have it successfully distributed and run on the workstation, you need to complete the following tasks:
Associating the Application Object with Workstations
You associate the application with a workstation by adding the Workstation object, a Workstation Group object to which the workstation belongs, or a container object (Organizational Unit, Organization, or Country) in which the workstation resides to the Application object's associations list.
In ConsoleOne, right-click the Application object > click Properties.
Click the Associations tab to display the Associations page.
Click Add > browse and select a Workstation object, Workstation Group object, or container object > click OK to add the workstation, group, or container to the Associations list.
Select the options you want applied to the Application object. By default, the App Launcher option is already checked, which causes the Application object to be displayed in the Application Launcher/Explorer window.
Force Run: Automatically runs the application. With a workstation-associated application, the application runs whenever the workstation starts up (initial startup or reboot).
You can use the Force Run option in conjunction with several other settings to achieve unique behaviors. For example, if you use the Force Run option with the Run Application Once option (Run Options tab > Applications page), as soon as the Application object is distributed it will be run one time and then removed from the workstation. Or, suppose that you want to run the Application object immediately one time at a pre-determined time. If so, select Force Run, select the Run Application Once option on the Application page (Run Options tab), and define a schedule using the Schedule page (Availability tab).
If you want to force run several applications in a specific order, mark each of them as Force Run. Then give each Application object a numeric order by using the Order Icon Display option on the Icon page (Identification tab).
IMPORTANT: When associating an Application object with a workstation, Force Run will not work if the Application object uses a Microsoft Windows Installer (.MSI) package. This is true only when the Application object is associated with a workstation. Force Run works with .MSI Application objects associated with users.
App Launcher: Adds the Application object's icon to the Application Launcher/Explorer window.
Start Menu: If the workstation is running Application Explorer, this option adds the Application object to the Windows Start menu. The Application object will be added to the top of the Start menu, unless you assign the Application object to a folder and use the folder structure on the Start menu. See the Application object's Folders page (Identification tab).
Desktop: If the workstation is running Application Explorer, this option displays the Application object's icon on the Windows desktop.
System Tray: If the workstation is running Application Explorer, this option displays the Application object's icon in the Windows system tray.
Quick Launch: Displays the Application object's icon on the Windows Quick Launch toolbar.
Force Cache: Forces the application source files and other files required for installation to be copied to the workstation's cache directory. The user can then install or repair the application while disconnected from NDS. The files are compressed to save space on the workstation's local drive. For more information about caching applications, see Running in Disconnected Mode .
IMPORTANT: This option is required only if you want to ensure that the user can install or repair the application while disconnected from NDS. Without this option selected, the user will still be able to launch the application in disconnected mode, provided the application has already been distributed (installed) to the workstation.
Assigning Users as Trustees of the Application Object
Associating the Application object with the workstation enables Application Launcher/Explorer to display the object on the workstation. In addition, any users who will run the application on the workstation must be trustees of the Application object. Trustee rights are not granted automatically; you must manually give default trustee rights to each user.
On the Application objects properties page > click the NDS Rights tab > Trustees of This Object.
Click Add Trustee > select the user you want to add as a trustee > click OK to add the user to the trustee list. Repeat this step for all users you need to add.
Giving Workstations File System Rights to the Application
With workstation-associated applications that are run on Windows NT/2000/XP, the Application Launcher/Explorer Service for Windows NT/2000/XP launches and runs the applications. You need to ensure that the Application Launcher/Explorer Service has the appropriate file system rights to run the application.
If the application's executable resides on the workstation's local drive, the Application Launcher/Explorer Service automatically has the required file system rights. You don't need to do anything additional.
If the application's executable resides in a network location, you need to assign the appropriate file system rights for that location to the Workstation object. The Application Launcher/Explorer Service receives its network file system rights through the Workstation object.