Ensure that the necessary prerequisites are met.
- Ensure that you have installed the JVM. See Obtaining and Installing the JVM for Your NetWare Server for more information.
- Ensure that you have installed ConsoleOne. See Obtaining and Installing ConsoleOne.
- Use top-down deployment for Inventory installation. Always begin the installation at the topmost level server and proceed with the next lower-level servers. For example, in an inventory setup with a Root Server and a Leaf Server, complete the inventory installation at the Root Server, and then run the installation for the Leaf Server.
Run the installation program.
Choose the following options to install the Inventory components on the server:
- Select the Custom Install option.
- Select the Workstation Inventory and Sybase components.
- Select the Files, Schema Extensions, and NDS Objects options.
If you are installing ZfD 3.2 on an existing ZfD3/SP1 server, you must select the Files, Schema Extensions, and NDS Objects options.
Select the NDS tree where you want to install ZfD.
The installation program detects if ZfD 3 already exists. If ZfD 3 exists, the installation program prompts you to choose either Upgrade or Full Install. If you are installing on an existing ZfD setup, see Installing Workstation Inventory in an Existing ZfD 3 Setup in Workstation Inventory in Deployment.
Select the server from the displayed list of servers to which you have logged in to while installing.
On the server, the installation program will create an Inventory Service object with the following name servername_ZenInvservice in NDS for each server. This object contains the inventory settings.
(Optional) Select the database server from the displayed list of servers connected to the tree you have logged in to.
The Sybase database (MGMTDB.DB) and related database files will be installed on the server you specify. To install the Inventory database on the different servers, run ZfD installation for each database server.
During the database installation, if you are prompted that a newer version of the Inventory database files exist, choose to overwrite the existing database.
Choose a role for each selected server.
For information about each server role, see Implementing the Inventory Server Roles in Workstation Inventory in Deployment.
The installation program copies all Inventory components on each server, irrespective of the server role.
Specify the location of the Scan Directory (SCANDIR) on the server.
The location of SCANDIR that contains the scan data files is specified_scandir_volume\ZENWORKS\SCANDIR on the specified server. These files grow with each scan cycle and depend on the number of scanned workstations, choose a directory on a volume other than SYS:. If you place files other than the STR files in this directory, the inventory components will delete these files.
Assign unique site information for each database.
This information identifies the database so that you can query an individual database, report information, and view inventory information for the database.
In the following illustration, each Inventory database has been given unique identification. The database at the Root Server has site ID 101 and site name AusInvDB, the database at the Intermediate Server has site ID 102 and site name Brisbane, and the database at the Leaf Server has site ID 103 and site name Sydney. To obtain inventory information, you can query the database with the name Sydney, or you can view the collective information from the AusInvDB Root Server.
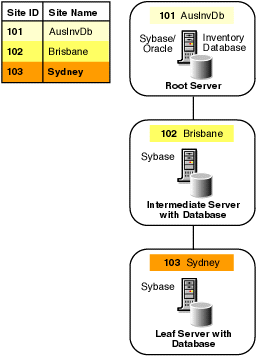
The site ID must be between 0 to 255. Also, the site name should not contain any underscore characters ( _ ). ZfD does not verify whether the site information is unique.
To understand the changes that the inventory installation makes, see Understanding the Effects of Workstation Inventory Installation in Administration.
On NetWare servers, after installing the Inventory components on the server, the server need not be rebooted.
Install the Inventory files on the workstations.
-
Ensure that the workstations meet the requirements specified in Specific Hardware and Software Requirements for Workstation Inventory.
-
(Optional) On an existing ZfD setup, ensure that Inventory scanning is not scheduled on the workstation. The Workstation Manager in the System tray should display No for Inventory - Currently Running tab.
-
Run the Novell Client installation program on the workstation. Novell Client will install the inventory files. See Obtaining and Installing the Novell Client.
If the required Novell Client already exists, the preferred method for installing the inventory files is to add the Inventory Application object to the Application Launcher and associate the Application object with the managed workstation. The Inventory Application object is created in NDS during installation. Use ConsoleOne to configure the Inventory Application object. The Inventory Application object on Windows 95/98 is ZFD3INV95. On Windows NT/2000, the Inventory Application object is ZFD3INVNT. You can use NAL to execute the Application object.
When you configure the policies, ensure that you schedule the Inventory task for the workstation.
Load the database on the server.
- On a NetWare server, enter mgmtdbs at the server console. The MGMTDBS.NCF file in the SYS:\SYSTEM directory loads the Inventory database (MGMTDB.DB) maintained in Sybase.
- On a Windows NT/2000 server, the installation program creates the database server as a service: Adaptive Service Anywhere - ZENworks for Desktops 3. At server startup, this service is automatically loaded.
To set up the workstations for scanning, the workstations must be registered in NDS and be imported as NDS Workstation objects. See Setting Up Automatic Workstation Import for more information.
Configure the policies for the servers. For more information, see Configuring the Policies on the Servers.
NOTE: Do not rename any ZfD NDS objects such as the Inventory Service object or the Database object, and other policy objects that ZfD generates. ZfD will not function properly if you rename any ZfD objects.
There may be optional tasks that you need to do to implement Workstation Inventory. See Other Things You Can Do for more information.