1.1 The Job Scheduler View
Click on the main toolbar of the ZENworks Orchestrator Console to open the Job Scheduler view.
Figure 1-1 Job Scheduler View of the ZENworks Orchestrator Console
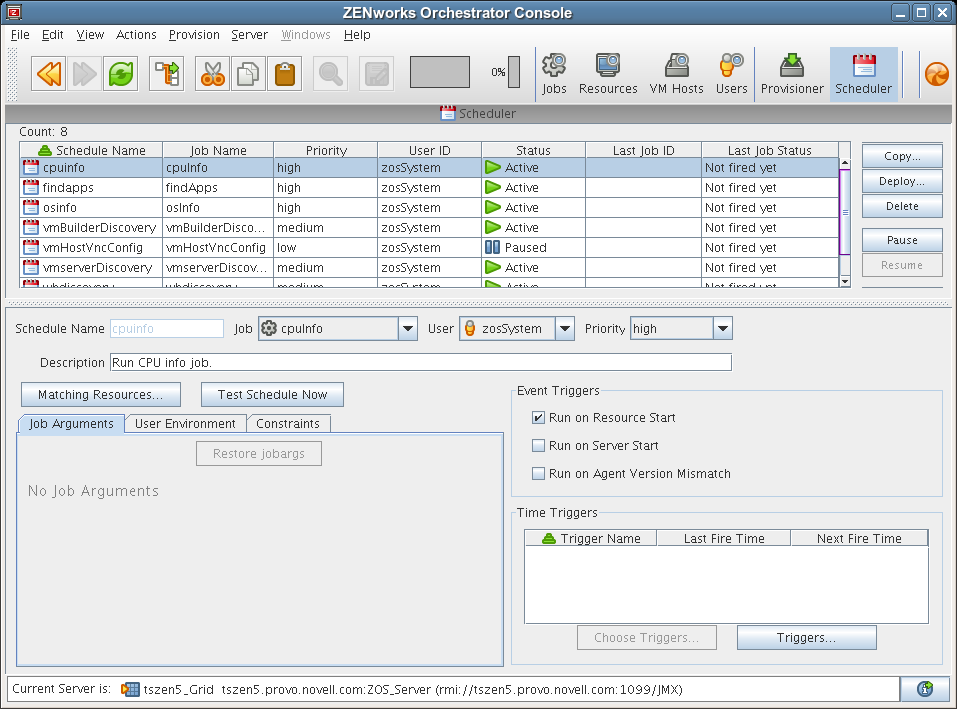
This section includes information to help you understand the functions of the Job Scheduler and how to use it to launch Orchestrator jobs.
1.1.1 Navigating The Job Schedules Table
ZENworks Orchestrator includes several predefined and predeployed discovery jobs that have predefined launch schedules. Among these jobs are the cpuinfo, findapps, osinfo, and other jobs, depending on the options (that is, the “server profile”) you chose and the configuration you used during the installation. After installation, these jobs are listed by name in a table in the Job Scheduler view.
Figure 1-2 The Job Schedules Table in the Job Scheduler View
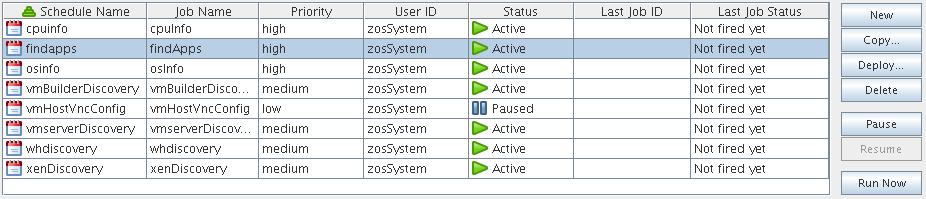
By default, ZENworks Orchestrator uses schedule names that are similar to the job name so that schedules are easy to match (although this is not required). The schedules list shows all of the existing job schedules that accompany predefined jobs, along with the schedules that you create in the Job Scheduler.
NOTE:The Job Scheduler view is not a real-time monitor view of jobs, so if a job attribute (for example, Last Job Status or Last Fire Time) has changed, it might not be displayed until you click .
The Job Schedules Table has functionality that lets you decide how you want to display information about the job schedules:
-
You can drag any column in the table to move it left or right in the table according to your preference.
-
You can mouse over any column heading in the table to view tool tip text about the purpose of the data in that column.
-
You can right-click any column heading in the table to open the Job Scheduler Column Editor dialog box.
Figure 1-3 Job Scheduler Column Editor Dialog Box
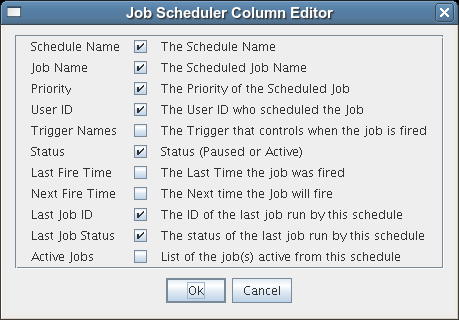
You can select any column heading in this dialog box to display it in the Job Schedules Table. The columns display the attributes of a previously configured job schedule. As the figure shows, this dialog box also includes text that clarifies the purpose of the data in each column.
In the Job Scheduler view, there are seven function buttons next to the Job Schedules Table that let you take action on any schedule you select inside the table. (Only one schedule at a time can be selected.)
-
New: Opens a dialog box where you can create a new schedule. When you create a new schedule, the Job Scheduler adds a new line to the Job Schedules Table. When the new line is added, you can use the Job Schedule Editor to edit the attributes of the schedule. A new schedule must be given a unique schedule name.
The Job Scheduler forces a new schedule to be created in the state to prevent it from running while it is being defined. You click when a job is ready to be used.
-
Copy: Copies a schedule you have selected in the Job Schedules Table. Clicking this button opens a dialog box where you rename the copy. If you want to create a schedule similar but not identical to an existing schedule, use this button to save time in adding attributes to a job schedule configuration. A copy of a schedule must be given a unique schedule name.
-
Deploy: Opens a dialog box where you can select a schedule (that is, a deployable .sched file) to deploy.
-
Delete: Deletes the selected schedule from the Job Schedules Table. You cannot recover a deleted job schedule.
NOTE:Deleting a schedule that was deployed as part of a .job or .sar displays a confirmation dialog box. Deleting the schedule undeploys all contents of the .job or .sar that contains the schedule.
-
Pause: Pauses (disables) the selected schedule in the Job Schedules Table. The jobs associated with the schedule are not re-run, but any currently running instances of this job continue to run.
-
Resume: Resumes (enables) a paused job schedule.
-
Run Now: Forces the specified schedule to run immediately. This updates statistics such as .
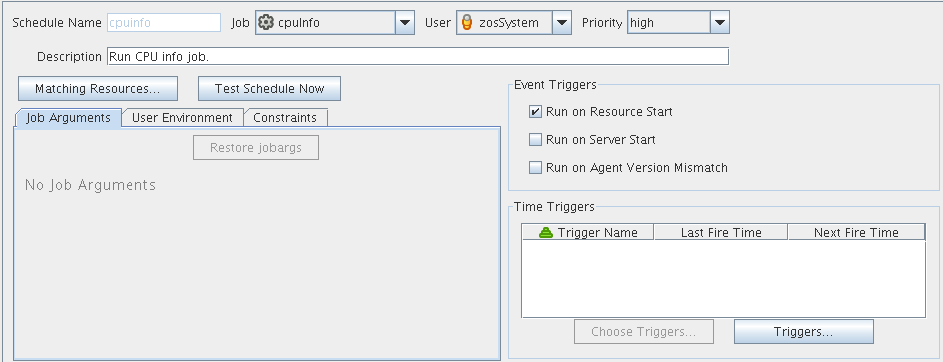
1.1.2 Creating or Modifying a Job Schedule
The Job Schedule Editor is located immediately below the Job Schedules Table in the Job Scheduler view.
Figure 1-4 The Job Schedule Editor in the Job Scheduler View
There are several times when you can use this part of the Job Scheduler tool:
-
When you create a new schedule by clicking
-
When you modify the attributes of an existing schedule (available when you select a schedule in the table)
-
When you create a copy of an existing schedule by clicking
The Job Schedule Editor lets you create or modify a job schedule by specifying its attributes.
You can use the following controls and data when you create or modify a job schedule:
Schedule Name
When you create a new schedule, the unique name you specify is displayed in this field. If you select a schedule from the Job Schedules Table, the name of the schedule is displayed in this field. The field is not editable, because schedules cannot be renamed after they are created. (You can use a copy if this is required.)
Job
When you create a new schedule, you need to associate a deployed job with it. You can select the job you want to run from this drop-down list.
If you want to use a previously created schedule to run a different job, you can change the job here.
User
When you create a new schedule, you need to associate a user with it. The user represents the user for whom the job will run. The choice of user might affect the permissions, privileges and constraints of the job. You can select the user from this drop-down list.
If you want a different user to run a job on a previously created schedule, you can change the user here.
If you decide to change the user who runs the job, check the field to make sure that the priority you want is selected.
Priority
When you create a new schedule and associate a job and a user with it, a list of possible run priorities becomes available in this drop-down list. The list of priorities varies, depending on the user that is specified in the previous field. In this field, you select the priority of the job that is to be run so that if other jobs are to start concurrently or are competing for resources, the Orchestrator can determine which job takes priority.
Description
For predeployed jobs, this field contains a default description of what the job’s schedule does. The field is editable, so you can enter a description of your own for job schedules that you create.
Matching Resources
This button displays a list of resources where the job runs now or where it could run. This list is useful for checking the context of constraints that might have been affected by a choice of user or by manually specifying additional constraints under the tab. The list is also useful to verify that a discovery job (that is, one that is triggered by the option) runs on the preferred set of machines.
Test Schedule Now
Click this button to test the new or modified schedule you are working with. The test runs the new or modified schedule without permanently saving the current configuration of the schedule or recording statistics. This control differs from the control in the Job Schedules Table, which runs a saved (persisted) schedule, disregarding any unsaved modifications that have been made to it in the Job Schedule Editor.
Job Arguments
This tab displays an area (in the lower left corner of the Job Schedule Editor) where possible job arguments are listed. If you select an existing schedule in the Job Schedules Table, any optional job arguments (jobargs) for the associated job are displayed in this area.
Figure 1-5 The Job Arguments Area of the Job Scheduler View
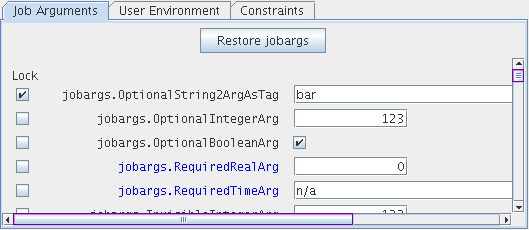
The jobargs are defined by the deployed job. Some jobs might already have a default value displayed, but others must have values specified in order for the job to be able to run.
IMPORTANT:Job arguments displayed in blue are required. You must supply data in the accompanying fields.
A job argument defines the values that can be passed in when a job is invoked. These values let you statically define and control job behavior. To learn more about each job argument, mouse over each jobarg line to display tool tip text.
The Job Scheduler uses the values you enter into the fields of this area to build a jobargs namespace in the policy for this job.
Each job argument has an accompanying check box. When is not selected, the accompanying job argument uses the default value specified in the job’s policy. When is selected, the value specified in the field is locked down and overrides the default value in the policy. A locked value continues to be used even if the policy value is modified.
You can click to restore job arguments to the values specified in the job policy. This function removes any changes you might have specified in the Job Scheduler and deselects all check boxes.
For more information, see Job Arguments and Parameter Lists
in the Novell ZENworks Orchestrator 1.2 Developer Guide and Reference.
User Environment
This tab displays an area (in the lower left corner of the Job Schedule Editor) that includes the check box. Select this check box if you want to pass the assigned user’s environment variables to the job when it runs. When environment variables are recorded on the user account, selecting the check box makes those environment variables available to the job and joblet.
A user’s environment is recorded under the user.env fact on his or her account. This fact can be set when a user logs in to the Orchestrator and is persisted until changed. A user’s environment variables can be uploaded with the zos command line tool at login time in one of two variations:
-
zos login --user=foo --env
This command uploads the entire environment to the Job Scheduler. The upload can also be seen on the User object in the Orchestrator Console.
-
zos login --user=foo --env=PATH
When the user logs in, he or she can specify one or more environment variables to use at login. The example above would result in just the PATH environment variable being uploaded.
Multiple environment variables can be specified by delimiting with a comma, as in the following example:
--env=PATH,LD_PATH,ID
NOTE:The user’s environment variables can also be passed to the server when the user implements the zos command line tool when running a job (as opposed to logging in). The command passes the environment variable only for that particular job run.
zos run jobname --env=environment_variable
Constraints
This tab displays a constraint editor that you can use to create additional constraints for the job being scheduled. Typically, additional “resource constraints” (such as “start”) are useful to delay the start of a job when it is triggered.
Event Triggers
An event trigger is the signal to the Job Scheduler to initiate, or “fire” a job when a given event occurs. An event trigger can be used in conjunction with a time trigger to allow flexibility in scheduling the job application for maximum effectiveness or convenience.
The Job Scheduler has three possible event triggers: , , and . The first two triggers are self-explanatory. The third trigger, , triggers the job when an Orchestrator Agent of an incompatible version attempts to connect to this Orchestrator Server. It is used to initiate a configuration management tool for an agent software update. Jobs triggered by must specify a job argument (jobarg) named “resource.id” as in the following example:
	<jobargs>
          <fact name="resource.id"
              type="String"
              description="The id of the mismatched resource"
              value=""
              visible="true" />
          <fact name="resource.ip"
              type="String"
              description="IP address of the mismatched resource"
              value=""
              visible="true" />
	</jobargs>
You can select any combination of these event triggers.
Time Triggers
A time trigger is the signal to the Job Scheduler to initiate, or “fire” a job at a given point (or points) in time. A time trigger can be used in conjunction with an event trigger to allow flexibility in scheduling the job application for maximum effectiveness or convenience.
When you click in the Job Scheduler view, the following dialog box opens:
Figure 1-6 The Time Trigger Dialog Box

In this dialog box, you can define the time triggers you want to associate with the launching of your jobs. You can create as many time triggers as you want to meet any scheduling situation you might have. Multiple time triggers can be associated with a given schedule and multiple schedules can use a given time trigger.
The time triggers you create are retained by the Job Scheduler for you to choose from when you create a schedule for a job. These are displayed in the list with the name and the description of the trigger.
The following controls and information are available in the dialog box:
-
New: Opens a secondary dialog box where you can create a new time trigger name. When you create the trigger name, the attribute fields in the Triggers dialog box are cleared and you can specify new attributes for the trigger. A new trigger must be given a unique trigger name.
-
Copy: Lets you modify an existing time trigger by giving it a new name and attributes. This can be helpful if there are only slight differences in the new attributes. A copy of a trigger must be given a unique trigger name.
-
Delete: Deletes a selected time trigger.
IMPORTANT:Deleted triggers are not recoverable. If the trigger is used by existing schedules, it is removed from all of those schedules when it is deleted.
-
Trigger Name: Specifies the unique name of the trigger you are creating or modifying. This name is displayed in the Job Scheduler if you choose to associate this trigger with the schedule. After you create the trigger name, it cannot be modified.
-
Description: Specifies a description for the time trigger you are creating or modifying. The description is optional and can be as detailed as you want.
Click the
 button to open a dialog box where you can edit more lengthy time trigger descriptions.
-
Save: Saves the defined time trigger and its attributes.
-
Fire Starting In: Displays multiple fields specifying the time increment and frequency to be used by the trigger to fire the job. If you select this type of time trigger, the button becomes inactive.
NOTE:You can use this control to create either a “one-shot” time trigger or a “reoccurring” time trigger.
A one-shot time trigger fires just once after a specified period of time. To specify a one-shot trigger, click , specify the amount of time before firing, and then enter 0 as the time to .
A reoccurring time trigger fires after a specified period and then either fires repeatedly for an indefinite number of times or it fires for a specified number of times. To specify a reoccurring, indefinite trigger, click , specify the amount of time before firing, then select . To specify a reoccurring but finite trigger, click , specify the amount of time before firing, select , then enter the number of times you want the trigger to fire.
-
Fire using CRON Expression: Specifies the cron expression that enables the job to fire automatically at a specified time or date. You need to be familiar with cron to use this field.
A list box of selected cron expressions and their associated descriptions is located just below this button. You can use a listed expression as is, or use it as a template to modify the expression to meet your needs.
If you select this type of time trigger, the button becomes inactive.
For an example of how a cron expression can be implemented in a trigger, see Creating and Assigning a Time Trigger for the New Schedule.
Choose Triggers
Opens a dialog box where you can choose the predefined time triggers you want to associate with this job schedule.
Figure 1-7 Choose Triggers Dialog Box
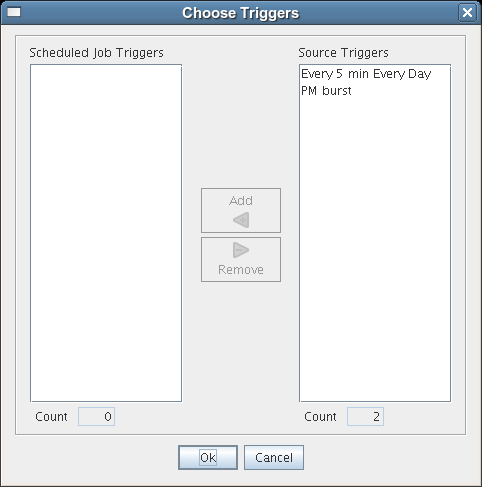
In this dialog box, you can click to move a selected trigger to the active, scheduled time triggers that are to be associated with this job schedule. You can also click to unassociate a trigger.
When a trigger is moved to the scheduled list, it becomes associated to the job schedule and it is displayed in the Job Scheduler view.