4.3 Independent Installation of the Agent and Clients
You have two options for installing the Orchestrator Agent and the Orchestrator Clients after the initial installation:
4.3.1 Installing the Agent and Clients by Using the Product ISO
If you want to independently install the Orchestrator Agent or the Orchestrator Clients to a node in your grid, you can do so, but the procedures for doing so vary depending on the platform where you are installing them.
Using the ISO to Install the Agent or the Clients on SLES Machines
Use the following procedure if you want to use the Add-on CD method to install just the Orchestrator Agent or the Orchestrator Clients to a SLES machine.
IMPORTANT:The Orchestrator Clients are not supported on SLES 9 SP3. The Orchestrator Agent is supported on SLES 9 SP3 and SLES 10 SP1.
-
To verify that the device where you want to install the agent and client software fulfills the necessary requirements, review Section 3.0, Planning the Installation.
-
Download the appropriate ZENworks Orchestrator Server ISO (32-bit or 64-bit) to an accessible network location.
-
(Optional) Create a DVD ISO (32-bit or 64-bit) that you can take with you to the machine where you want to install it.
-
Install ZENworks Orchestrator Agent or ZENworks Orchestrator Clients software:
-
Log in to the target SLES server as root, then open YaST2.
-
In the YaST Control Center, click , then click to display the Add-on Product Media dialog box.
-
In the Add-on Product Media dialog box, select the ISO media ( or ) to install.
-
(Conditional) Select , click , insert the DVD, then click .
or
-
(Conditional) Select , click, select the ISO Image check box, browse to the ISO in the file system, then click .
-
-
Read and accept the license agreement, then click to display YaST2.
-
In YaST2, click the drop-down menu, then select to display the install patterns available on the ZENworks Orchestrator ISO.
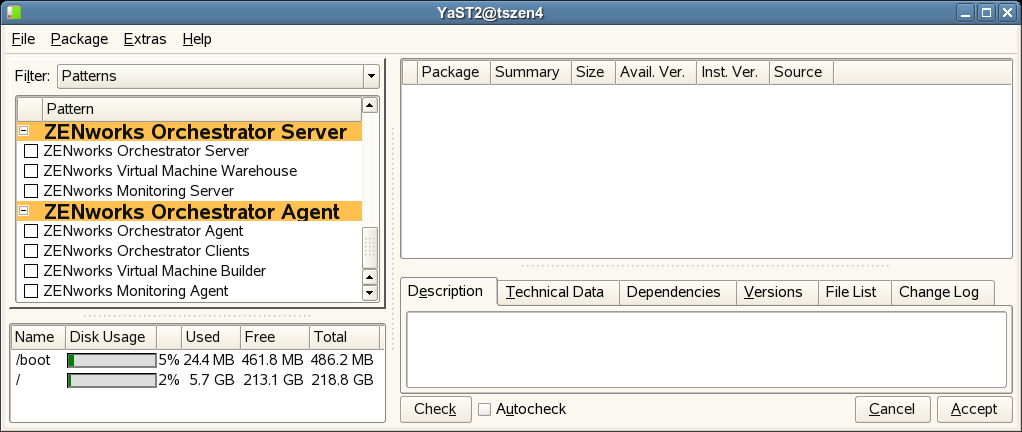
-
Select the ZENworks Orchestrator installation patterns that you want to install:
-
ZENworks Orchestrator Server: Manages computing nodes (resources) and the jobs that are submitted from applications to run on those resources.
-
ZENworks Virtual Machine Warehouse: Stores VM images and image data, versions the images, designates the gold master VM image, and checks out and in the VM images.
We recommend for better scale and performance that this pattern be installed to a different server than where the Orchestrator Server is installed.
-
ZENworks Monitoring Server: Uses open source Ganglia monitoring of the performance of certain data on network resources in a user-defined time period.
This pattern can be installed on a server where any other ZENworks Orchestrator pattern is installed, or on a server by itself.
-
ZENworks Orchestrator Agent: Runs applications on all managed nodes under the management of the Orchestrator Server. An agent reports its status to the Orchestrator Server.
-
ZENworks Orchestrator Clients: Lets a computing resource administrator troubleshoot, initiate, change, or shut down server functions for ZENworks Orchestrator and its computing resources. For information about the client tools, see ZENworks Orchestrator Clients:.
-
ZENworks Virtual Machine Builder: This pattern is an agent that builds the VM images as the jobs are sent to it by the Orchestrator Server. The Xen hypervisor must exist on the server where this pattern is installed.
We recommend for better scale and performance that this pattern be installed to a different server than where the Orchestrator Server is installed. Also, it must be installed on the same server where the VM Warehouse pattern is installed.
-
ZENworks Monitoring Agent: This pattern is installed with any installation of the Orchestrator Server, and it installs the Ganglia Agent on each monitored node, which collects performance metrics and sends the data to the ZENworks Monitoring Server.
Refer to the information in Section A.0, ZENworks Orchestrator Components: Install Patterns for details on the installation data that you need to know.
-
-
Click to install the packages.
-
-
Configure the ZENworks Orchestrator components that you have installed. You can use one of two information gathering methods to perform the configuration:
-
(Optional) Run the Orchestrator product configuration script.
-
Make sure the product ISO is accessible. The script copies some files from the ISO.
-
Make sure you are logged in as root to run the configuration script.
-
Run the script, as follows:
/opt/novell/zenworks/orch/bin/config
When the script runs, the following information is initially displayed:
Welcome to Novell ZENworks Orchestrator. This program will configure Novell ZENworks Orchestrator 1.2 Select products to configure # selected Item 1) yes ZENworks Monitoring Service 2) yes ZENworks Orchestrator Server 3) yes ZENworks Orchestrator Agent 4) yes ZENworks Orchestrator VM Builder 5) yes ZENworks Orchestrator VM Warehouse Select from the following: 1 - 5) toggle selection status a) all n) none f) finished making selections q) quit -- exit the program Selection [finish]: -
Determine which installed products you want to configure. The options are listed with option numbers.
-
Select or deselect an option by typing its number to toggle its selection status, or type a and press Enter to select all of them.
-
When you have selected the products you want to configure, type f and press to finish the selection and begin the configuration, then continue with Step 8.
-
-
-
(Optional) Run the GUI Configuration Wizard.
-
During the configuration process, refer to the information in Table 4-1, Orchestrator Configuration Information for details about the configuration data that you need to provide.
Default values are built into the script; most of these defaults are set to configure all of the product patterns that were installed using the Add-on Product Media utility in SLES 9 and in SLES 10.
-
(Optional) Increase the heap size that the JVM handles to enable the console to manage a large number of objects.
-
Open the zoc bash shell script at /opt/novell/zenworks/zos/server/bin.
-
Inside the script, find the following line where the JVM parameters are defined:
JVMARGS="-Xmx256m -Xms256m -Xmn64m -XX:NewSize=64m -XX:MaxNewSize=64m"
The -Xmx argument specifies the maximum heap size for the JVM. Increasing the heap size prevents a JVM out of memory condition.
-
Change the value in the -Xmx argument from 256MB to 512MB.
-
Using the ISO to Install the Orchestrator Agent on RHEL 4 Machines
NOTE:Use the following procedure if you want to use the Add-on method to install just the Orchestrator Agent and the ZENworks Monitoring Agent to a RHEL 4 machine.
-
To verify that the device where you want to install the agent and client software fulfills the necessary requirements, review Section 3.0, Planning the Installation.
-
Download the appropriate ZENworks Orchestrator Server ISO (32-bit or 64-bit) to an accessible network location.
-
Mount the Orchestrator ISO as a loopback device as in the following example:
mount -o loop zenworks_orch-1.1.x86_64.iso /mnt
This mounts the ISO in the /mnt folder.
-
Navigate to the directory path where the RHEL 4 packages reside. For example:
cd /mnt/RHEL4
There are four packages in the /RHEL4 directory:
- novell-zenworks-monitor-gmond
- novell-zenworks-orch-config
- novell-zenworks-zos-agent
- novell-zenworks-zos-java
-
Use the rpm command to install the packages. For example:
rpm -Uvh *.rpm
If you encounter an issue regarding missing dependencies, you can use the up2date command to download and install those. For example, if you were missing libcaplso or libcap.so.1, you would run the following:
up2date --solvedeps=libcp.so,libcap.so.1
-
Configure the ZENworks Orchestrator components that you have installed.
NOTE:Before you launch the configuration script, make sure the product ISO is mounted. The script copies some files from the ISO. You must be logged in as root to run the configuration script.
-
Run the Orchestrator product configuration script as follows:
/opt/novell/zenworks/orch/bin/config
When the script runs, the following information is initially displayed:
Welcome to Novell ZENworks Orchestrator. This program will configure Novell ZENworks Orchestrator 1.2 Select products to configure # selected Item 1) yes ZENworks Monitoring Service 2) yes ZENworks Orchestrator Server 3) yes ZENworks Orchestrator Agent 4) yes ZENworks Orchestrator VM Builder 5) yes ZENworks Orchestrator VM Warehouse Select from the following: 1 - 5) toggle selection status a) all n) none f) finished making selections q) quit -- exit the program Selection [finish]: -
Determine which installed products you want to configure. The options are listed with option numbers.
-
Select or deselect an option by typing its number to toggle its selection status, or type a and press Enter to select all of them.
-
When you have selected the products you want to configure, type f and press to finish the selection and begin the configuration, then continue with Step 8.
-
-
-
During the configuration process, refer to the information in Table 4-1, Orchestrator Configuration Information for details about the configuration data that you need to provide.
Default values are built into the script; most of these defaults are set to configure all of the product patterns that were installed.
-
(Optional) Increase the heap size that the JVM handles to enable the console to manage a large number of objects.
-
Open the zoc bash shell script at /opt/novell/zenworks/zos/server/bin.
-
Inside the script, find the following line where the JVM parameters are defined:
JVMARGS="-Xmx256m -Xms256m -Xmn64m -XX:NewSize=64m -XX:MaxNewSize=64m"
The -Xmx argument specifies the maximum heap size for the JVM. Increasing the heap size prevents a JVM out of memory condition.
-
Change the value in the -Xmx argument from 256MB to 512MB.
-
Using the ISO to Install the Orchestrator Agent on RHEL 5 Machines
NOTE:Use the following procedure if you want to use the Add-on method to install just the Orchestrator Agent and the ZENworks Monitoring Agent to a RHEL 5 machine.
-
To verify that the device where you want to install the agent and client software fulfills the necessary requirements, review Section 3.0, Planning the Installation.
-
Download the appropriate ZENworks Orchestrator Server ISO (32-bit or 64-bit) to an accessible network location.
-
Mount the Orchestrator ISO as a loopback device as in the following example:
mount -o loop zenworks_orch-1.1.x86_64.iso /mnt
This mounts the ISO in the /mnt folder.
-
Navigate to the directory path where the RHEL 5 packages reside. For example:
cd /mnt/RHEL5
There are four packages in the /RHEL5 directory:
- novell-zenworks-monitor-gmond
- novell-zenworks-orch-config
- novell-zenworks-zos-agent
- novell-zenworks-zos-java
-
Use the rpm command to install the packages. For example:
rpm -Uvh *.rpm
If you encounter an issue regarding missing dependencies, you can use the up2date command to download and install those. For example, if you were missing libcaplso or libcap.so.1, you would run the following:
up2date --solvedeps=libcp.so,libcap.so.1
-
Configure the ZENworks Orchestrator components that you have installed.
NOTE:Before you launch the configuration script, make sure the product ISO is mounted. The script copies some files from the ISO. You must be logged in as root to run the configuration script.
-
Run the Orchestrator product configuration script as follows:
/opt/novell/zenworks/orch/bin/config
When the script runs, the following information is initially displayed:
Welcome to Novell ZENworks Orchestrator. This program will configure Novell ZENworks Orchestrator 1.2 Select products to configure # selected Item 1) yes ZENworks Monitoring Service 2) yes ZENworks Orchestrator Server 3) yes ZENworks Orchestrator Agent 4) yes ZENworks Orchestrator VM Builder 5) yes ZENworks Orchestrator VM Warehouse Select from the following: 1 - 5) toggle selection status a) all n) none f) finished making selections q) quit -- exit the program Selection [finish]: -
Determine which installed products you want to configure. The options are listed with option numbers.
-
Select or deselect an option by typing its number to toggle its selection status, or type a and press Enter to select all of them.
-
When you have selected the products you want to configure, type f and press to finish the selection and begin the configuration, then continue with Step 8.
-
-
-
During the configuration process, refer to the information in Table 4-1, Orchestrator Configuration Information for details about the configuration data that you need to provide.
Default values are built into the script; most of these defaults are set to configure all of the product patterns that were installed.
-
(Optional) Increase the heap size that the JVM handles to enable the console to manage a large number of objects.
-
Open the zoc bash shell script at /opt/novell/zenworks/zos/server/bin.
-
Inside the script, find the following line where the JVM parameters are defined:
JVMARGS="-Xmx256m -Xms256m -Xmn64m -XX:NewSize=64m -XX:MaxNewSize=64m"
The -Xmx argument specifies the maximum heap size for the JVM. Increasing the heap size prevents a JVM out of memory condition.
-
Change the value in the -Xmx argument from 256MB to 512MB.
-
Using the ISO to Install the Orchestrator Agent or the Orchestrator Clients on Windows Machines
The ZENworks Orchestrator Agent is supported on Windows 2003, but not on Windows XP, Windows 2000, or earlier releases (Windows ME, Windows 95, etc.). The ZENworks Orchestrator Clients are supported on both platforms. Use the following steps to download the Orchestrator component you want to install:
-
To verify that the device where you want to install the agent and client software fulfills the necessary requirements, review Section 3.0, Planning the Installation.
-
Download the appropriate ZENworks Orchestrator Server ISO (32-bit or 64-bit) to an accessible network location.
-
Create a DVD from the ISO or use a tool that will mount the ISO.
-
Navigate to the directory path where the Windows packages (Windows 2003 or Windows XP) reside.
-
Double-click the appropriate file (.exe) to launch an installation and configuration wizard. See Installing and Registering the ZENworks Orchestrator Agent and Installing the Orchestrator Console in Installing the Agent and Clients from the Administrator Information Page for information about this wizard.
4.3.2 Installing the Agent and Clients from the Administrator Information Page
After you install the server for ZENworks Orchestrator on the network, you can launch the ZENworks Orchestrator Administrator Information page. The page has links to various installer programs that you can use to install required Orchestrator software on the computing resources that you will be utilizing in the grid system.
NOTE:Installing ZENworks Orchestrator 1.2 components from the ZENworks Orchestrator Administrator Information page allows non-RPM installation of the Orchestrator client and agent components. Installing the agent component using this method is supported for high performance computing (HPC) agent installation only.
The following browsers support the ZENworks Portal and ZENworks Orchestrator Administrator’s Web page applications:
-
Internet Explorer, version 6.0 or higher
-
Netscape* Navigator*, version 6.0 or higher
-
Mozilla*, version 1.5 or higher
-
Mozilla Firefox*
Using a supported browser, enter the following URL to access the Administrator Information page for ZENworks Orchestrator from the server:
http://server_name_for_ZENworks_Orchestrator:8001/
This URL is the DNS name (or IP address) of the server for ZENworks Orchestrator. Be sure to use Port 8001 in the address to access and display the page, as shown in the following illustration:
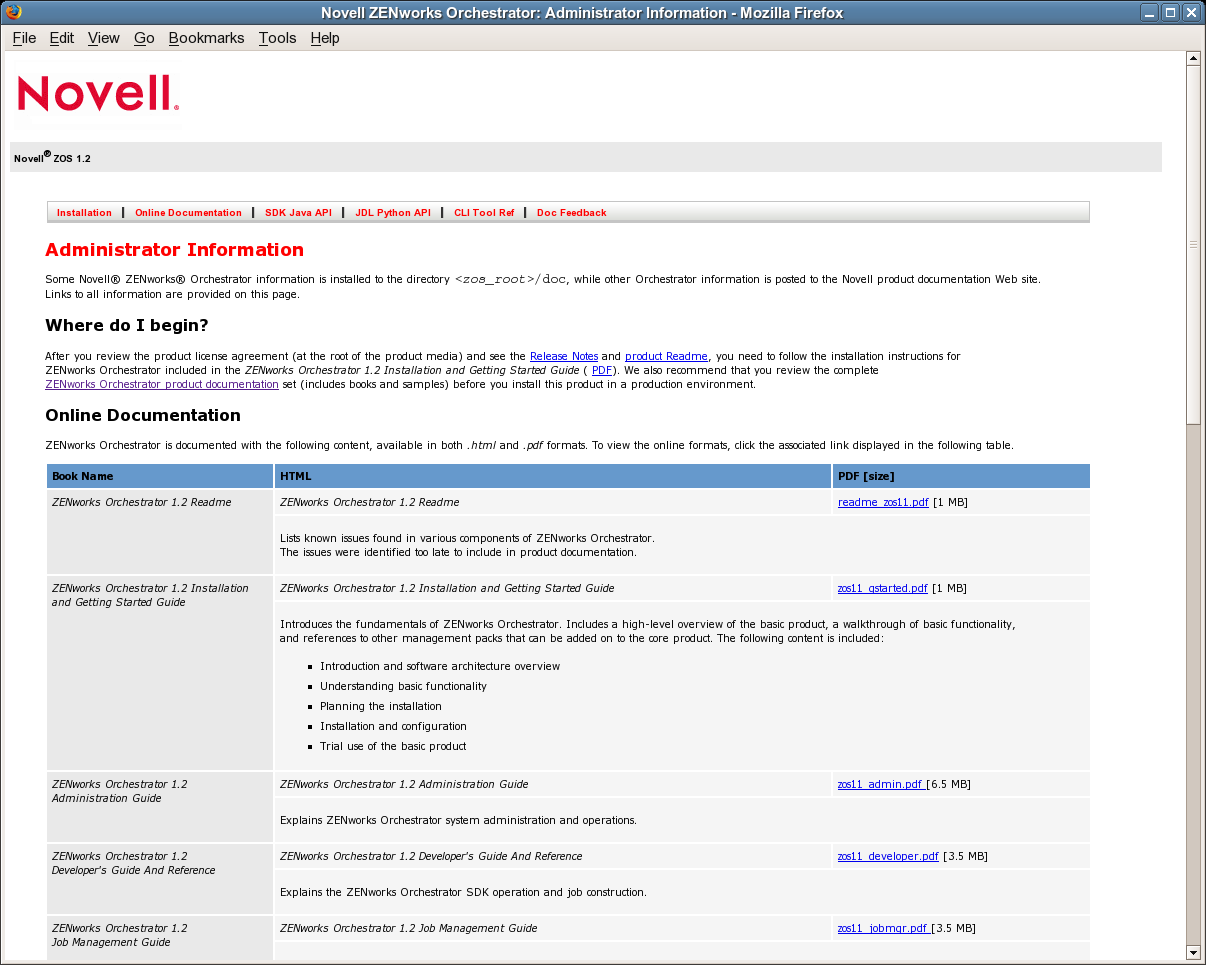
The page includes links to information for ZENworks Orchestrator administrators, including product documentation, Release Notes, and the installers for the console and the agent for ZENworks Orchestrator.
This section includes the following information about installing the Orchestrator Agent and Orchestrator Clients from the Administrator Information page:
Installing and Registering the ZENworks Orchestrator Agent
ZENworks Orchestrator requires computing resources in order to run applications. The ZENworks Orchestrator Agent must be installed on each managed device to add that computing resource to the grid where the Orchestrator Server can manage it.
Use the following steps to install the agent on a computing resource:
-
From the managed device desktop, launch a browser to access the Web page for ZENworks Orchestrator, as described in Section 4.3.2, Installing the Agent and Clients from the Administrator Information Page.
-
Scroll to the section of the page:
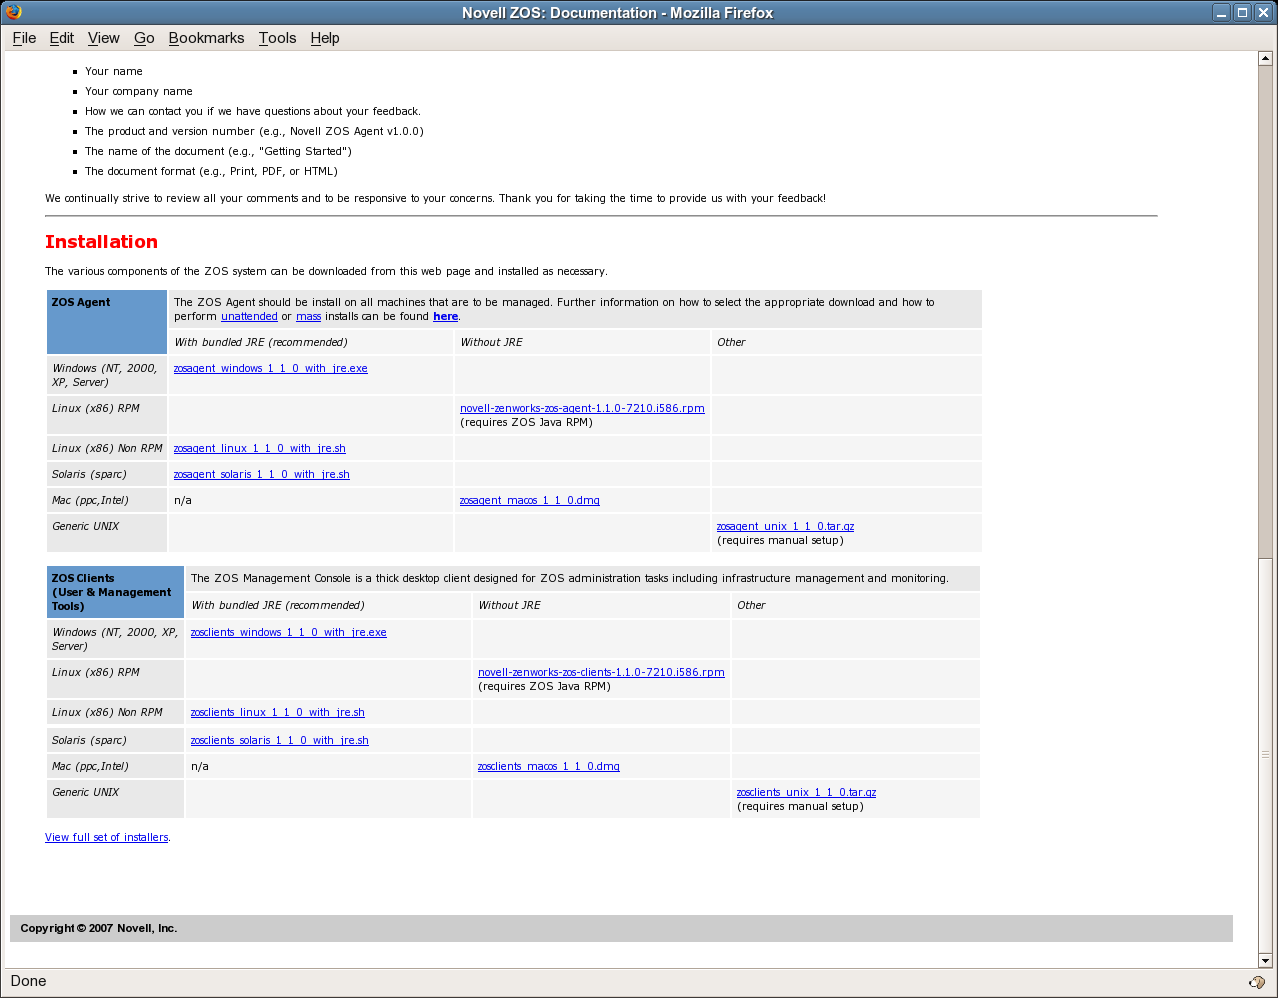
-
In the agent section of the Orchestrator Web page, identify the installer link for the operating system (that is, Windows, Linux, Solaris*, Mac*, Generic UNIX*) of the device where you want to install the agent.
For this release, only the Windows and Linux clients and agents are supported. For more information, see Section 3.0, Planning the Installation.
The ZENworks Orchestrator Agent can be installed with or without Java runtime (JRE*.) The computing resource might already have Java runtime installed, but to ensure that you have a compatible version of Java runtime with the agent, we recommend that you select the installer for both the agent and Java runtime.
If the operating system for the managed device does not have a link available, it is not currently supported.
-
Click the installer link to launch the installation wizard to install the agent on the computing resource.
-
Follow the prompts in the wizard until the page displays. Here, you need to ensure that you correctly enter IP_or_hostname_for_ZENworks_Orchestrator_ Server in the field.
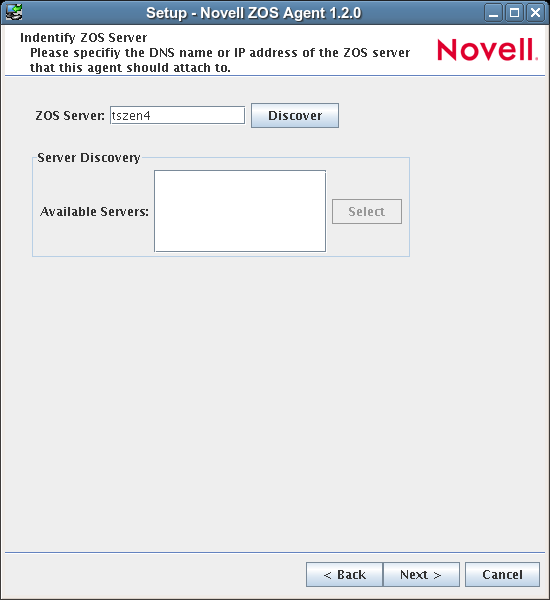
You might find it easier to click so that the installer searches for and finds the server for ZENworks Orchestrator on the network.
-
Accept the remaining defaults on the wizard pages to complete the installation of the agent.
-
When the installation is complete, click to exit the installer.
Repeat Step 1 through Step 7 for each computing resource you want to add to the grid.
Agents can be automatically installed on multiple computing resources or groups of computing resources using your favorite configuration management software.
Installing the Orchestrator Console
Before you can perform any ZENworks Orchestrator management functions, such as creating user accounts and managing activities of the server, you need to install the console for ZENworks Orchestrator. The console is a thick desktop client designed for administrative tasks including infrastructure management (for example, managing computing resources) and monitoring. You can install the console on the server itself or on another network computer.
-
On the computer where the console is to be installed, launch the ZENworks Orchestrator Administrator Information page. For information about how to do this, see Section 4.3.2, Installing the Agent and Clients from the Administrator Information Page.
-
Scroll to the section of the page:
-
In the clients section of the Web page, identify the installer link for the operating system running on the computing resource.
The ZENworks Orchestrator Console can be installed with or without Java runtime (JRE.) The computing resource might already have Java runtime installed, but to ensure that you have a compatible version of Java runtime with the agent, we recommend that you select the installer for both the console and Java runtime.
If the operating system for the managed device does not have a link available, it is not currently supported. For more information, please contact the Novell Business Partner from whom you purchased ZENworks Orchestrator.
-
Click the installer link to initiate the installation of the console for ZENworks Orchestrator on the computer. Follow the setup wizard for setting up the console.
-
On the page of the setup wizard, select .
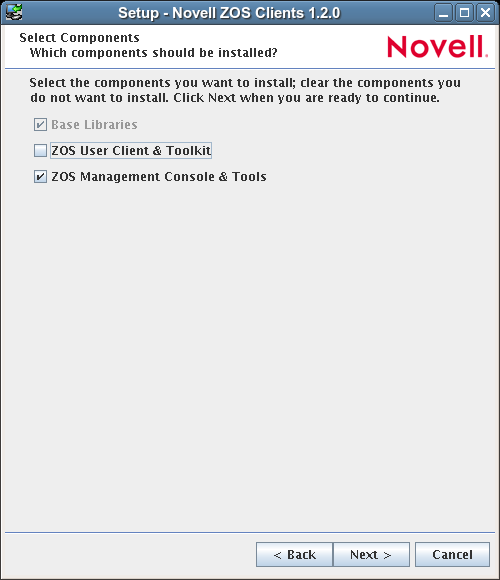
Do not select the check box. ZENworks provides an installed client and an HTML Web client to grid users for creating, submitting, and managing running jobs.
-
Accept the remaining defaults in the setup wizard to complete the console installation.
-
When the wizard completes the installation, click .