2.2 Getting Started with the User Portal
This section describes how to perform some basic tasks with the ZENworks Orchestrator User Portal. The following content is included:
2.2.1 Starting the Portal
The Orchestrator Server includes a Web server that hosts the User Portal in HTML. This portal is an administration tool that helps users manage the jobs that are deployed to managed computing resources, but it does not provide a facility to run jobs, even if you are logged in as an administrator.
Use the following steps to run the portal and log in at a workstation:
-
Create a new Orchestrator user account.
-
Log in to the ZENworks Orchestrator Console, using the steps in Section 1.2.2, Logging in to the Orchestrator Server Console.
-
In the Explorer view of the console, click the container to open it, then right-click > to open the Create a new User dialog box.
-
In the Create a new User dialog box, enter the name of the new user, then click .
-
On the Info/Groups page of the workspace panel in the console, expand the section.
-
In the field of the Personal Information section, enter a password for the new user you created, then click the save icon
 in the toolbar.
-
In the Password Confirmation dialog box, re-enter the password in the C field, click , then click the save icon again.
-
-
Start any Internet browser.
-
Enter the URL (server name) of the Orchestrator Server to display a page where the user can log in to the server:
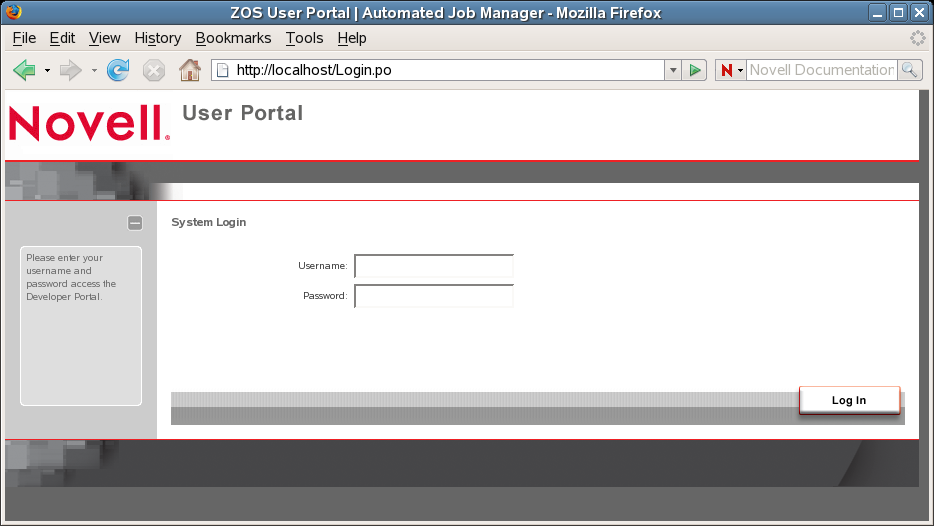
NOTE:You can also enter the name localhost as the address to the server if the browser is running locally on the server where the Orchestrator Server is installed.
-
Enter the username and password for the user you created.
-
Click to log into the portal.
The User Portal Interface
After you log in to the portal, you will see the following interface displayed in the browser:
Figure 2-1 The User Portal Interface
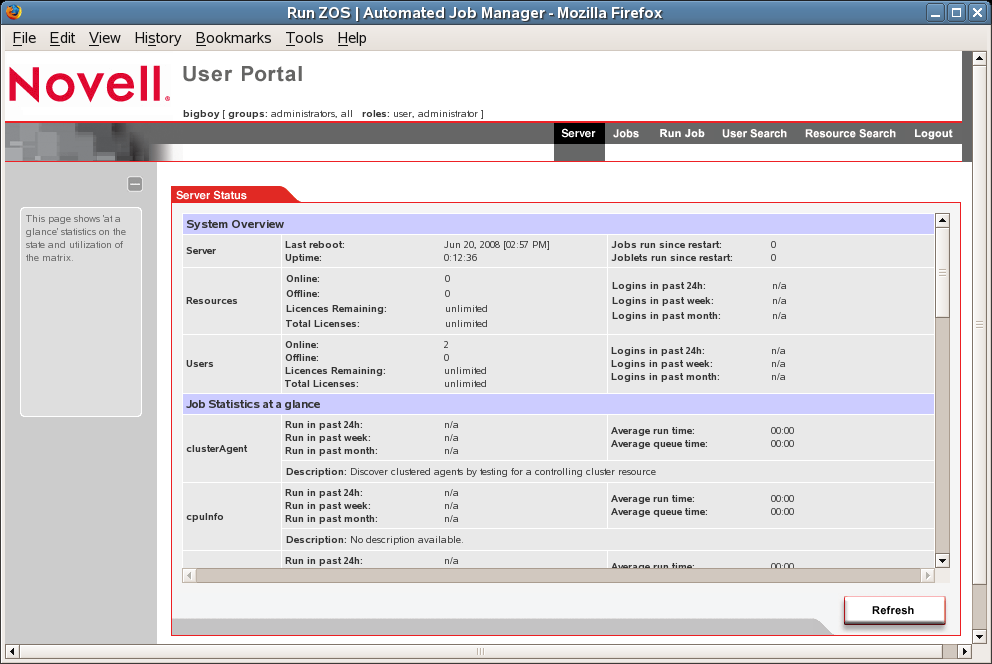
The table below provides details about the various labeled areas of the interface.
Table 2-1 Descriptions of the Areas of the User Portal
2.2.2 Identifying Available Jobs
After you log in, you can use the portal for Orchestrator to identify the available jobs that can be run in the ZENworks Orchestrator system. The portal lists the same runnable jobs that are available for viewing in the console for Orchestrator.
IMPORTANT:A job must exist before you can configure it. Creating a job involves the creation of an application executable and a job file. If you want to create your own jobs, see the ZENworks Orchestration Developer’s Toolkit Guide [not available in this release]. The guide has more information about creating and building jobs using the Orchestrator Job Description Language (JDL) and job policies.
ZENworks Orchestrator includes prepackaged jobs for demonstration. Prepackaged jobs are automatically deployed with each new server each time it is started. These jobs include demoIterator, failover, quickie, and subjobs.
To see runnable jobs from the portal command menus, click in the menu bar to open the menu screen.
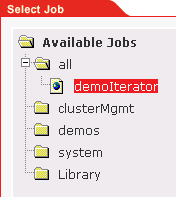
The tab is listed in the section of the portal interface. The explorer is located on the left side of this interface. The section is located on the right side. The section is associated with job selections in the explorer. To view all jobs, expand the explorer under > .
Figure 2-2 The Available Jobs Explorer View Expanded to Show All Jobs
2.2.3 Starting a Local Job from the Server
There are three stages to running an Orchestrator job on managed computing resources. This section uses the example job, “quickie,” to illustrate these stages:
NOTE:Quickie is a demonstration job used primarily to show computing resource utilization. Its purpose is to simply start its executable program on an appropriate computing resource in the grid, wait for a period of time, and then stop to free the computing resource again.
Selecting the Job You Want to Run
When you want to start a job locally from the server, you need to first select the job and its parameters. The portal interface labels this as the stage of running a job.
Use the following steps to select the job and job parameters you want to run:
-
From the Explorer, expand the directory tree to .
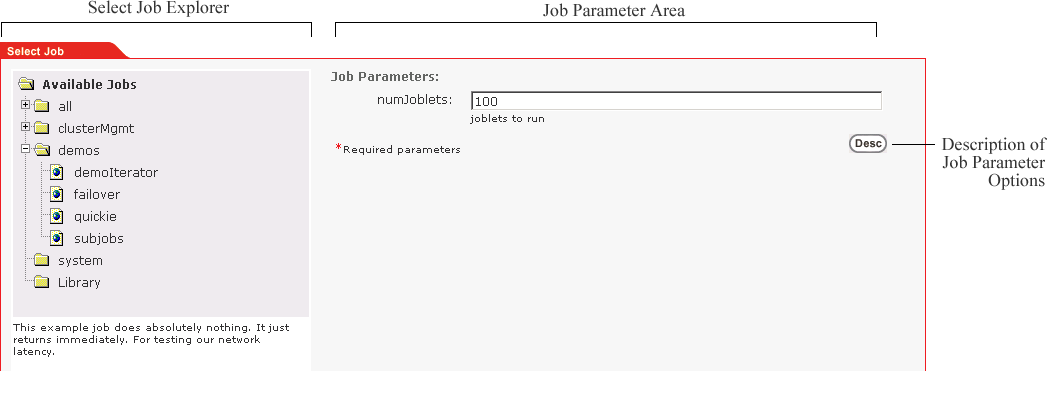
This lists the demo jobs highlighted above that come with the server for Orchestrator.
-
Select the job to display its job parameters in the area of the interface.
NOTE:If you need more information about a job parameter, click to expand the description of the fields of the area.
-
Accept the default values for the parameters.
NOTE:The parameter is an argument for the associated job. The default parameter value for the job is 100.
-
Click (located at the bottom-right of the Function Area of the Portal) to select the job.
The stage on the interface now lists the job selection. If you want to change the job selection or its parameters, you can click on this stage anytime before you actually run the job.
Selecting Computing Resources to Run the Job
After the job is selected, users need to identify the computing resources where the job is to be run. The portal interface labels this as the stage.
Searching for computing resources is possible using the facility accessed from the main menu. When the Resource Search page is displayed, users can select computing resource search criteria to use as operators to search for the computing resources they want.
IMPORTANT:The tab area shows a set of filters for identifying computing resources. A resource is a computing resource that can run jobs. Your grid might have different kinds of computing resources, identified by a set of facts about that computing resource. A resource fact includes many attributes about that computing resource such as its name, hardware configuration, operating system, and other characteristics. If the grid has uniform resources, the stage is less useful, but for a grid with multiple resource characteristics, the stage is very important.
Depending on the resources that you have set up with the server for Orchestrator, you might have multiple computing resource operating system types (operating system fact). For example, you could have both Windows and Linux operating system resources available. Some of the sample demo jobs that come with the server for Orchestrator have executables for both operating systems, and others do not. The job can run on both Windows and Linux.
Using Expressions to Identify Appropriate Computing Resources
A simple expression is used for identifying the computing resources appropriate for running a job. Multiple expressions can be applied, but all expressions must be true. Each expression is entered using the expression criteria listed in the following table.
Table 2-2 Expressions Used to Filter Computing Resources Eligible to Run Jobs
Multiple criteria may be entered in the same fashion. The selection of computing resources must match all criteria entered. You can alter your choice of expressions using the following functions:
-
To remove criteria, click the minus icon located to the right of the criteria.
-
To start a new search or to start over, click located below the criteria list.
-
To add more criteria, click on the plus icon.
When you have entered all of the search criteria, click . The matching resources are listed at the lower part of the page under .
Sample Job: Selecting Computing Resources for Running a Job
IMPORTANT:If no search facts are selected, the Orchestrator assumes that all computing resources are to be selected.
The following steps demonstrate how the quickie job is configured to run only on Windows XP operating system computing resources:
-
From the drop-down list, select the operating system fact.

-
Specify the operator to use for the fact. In this case the default, , is used.
-
Specify the fact value, .
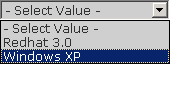
NOTE:Each of the drop-down items is context sensitive. When a fact is selected, the values update with the valid options for that fact, based on the current set of available computing resources. The values change automatically as computing resources are added or removed in the grid of managed resources.
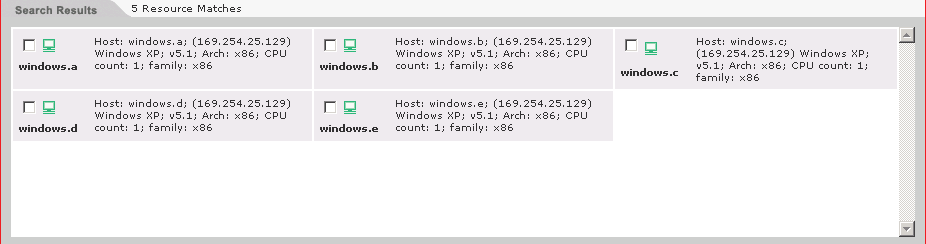
-
Click to check whether any computing resources match the current search filter criteria. If so, these computing resources are listed at the bottom of the Function area of the portal. See the figure below for an example.
-
Click (located at the bottom-right of the Function area of the portal) to select the computing resources.
Notice the section (located at the top of the Function area of the portal) now shows the job resource selections. To change the computing resource selection, click before running a job.
Scheduling a Time to Run the Job
After you have selected a job and the computing resource where you want to run it, you need to select a start time for running the job. The portal labels this as the stage of running a job.
The tab area shows start and end requirements, as well as a priority setting for running the job. You can set up policies associated with the user’s profile to control when a job can be run. In the stage, however, the user can add an additional scheduling requirement and job priority for this running this job.
Use the following steps to specify when the job is to be run.
-
Click the tab, click the calendar icon located adjacent to the field to open a calendar scheduling utility, then select a date and time to run the job. You can accept the default in the field: if you want to.
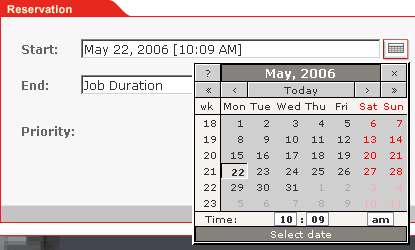
-
(Optional) Click the calendar icon located adjacent to the field, then select a date and time to complete the job. You can also accept the default in the field: .
-
(Optional) If the field, click the drop-down list to select a priority for the job, or accept the default.
Use the parameter to increase or decrease the priority of the job in relation to other jobs that are already running or scheduled to run. This option is used only if computing resources are inadequate at the scheduled job start time to run the job. The options in the drop-down list are context sensitive to the available priorities associated with the user profile.
-
Click (located at the bottom-right of the Function area) to finalize the time to run the job.
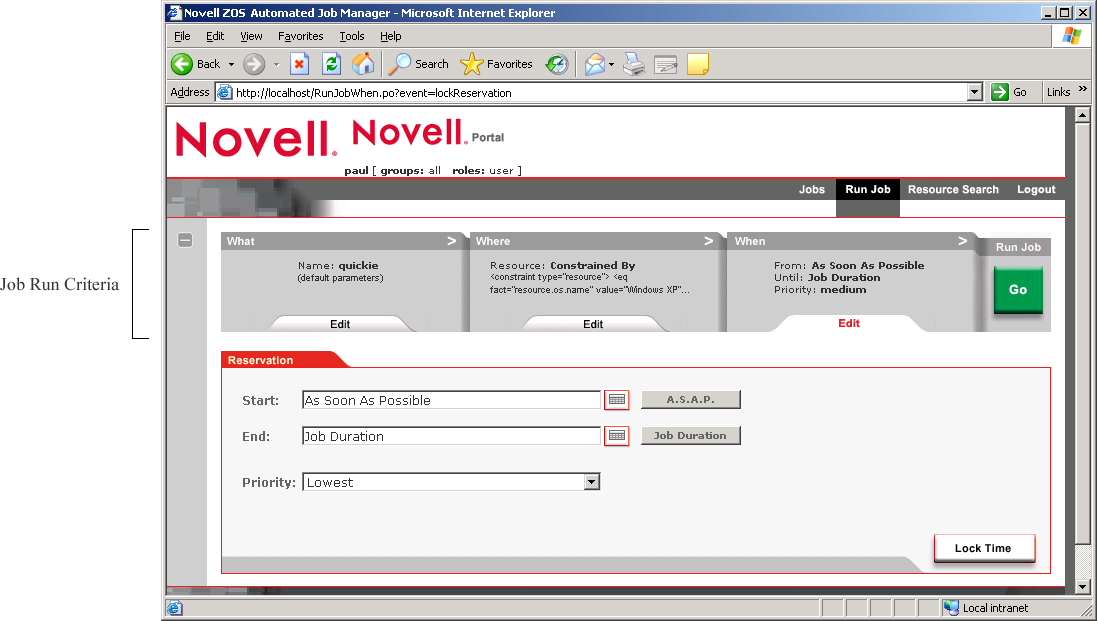
The job is now ready to run. The job criteria are displayed in the upper part of the Functional area of the portal.
Figure 2-3 The User Portal Displaying the Job Run Criteria Previously Selected
Running the Job
When you have established the job run criteria in the User Portal, click to schedule the job to run. A progress log is displayed in the tab in the Function area of the portal.
Figure 2-4 Progress Message Displayed for the “Quickie” Job
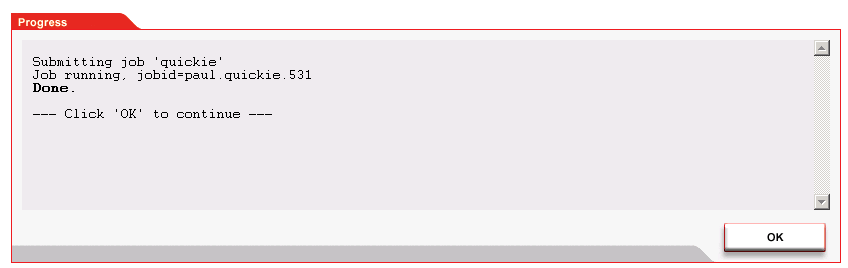
A message indicates that the job was successfully submitted to the server for ZENworks Orchestrator.
Click to close the Progress log and return to the Home page to monitor the running job.
NOTE:This same job could also be run using the following zos command:
zos run quickie.job -- priority=high -- policy=os.windows/xp
For more information about using the zos command line interface, see Section A.0, The Zos Command Line Tool.
2.2.4 Monitoring a Job
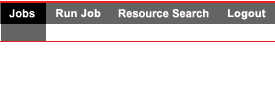
Users can access a list of the Orchestrator jobs that are currently running by clicking the command menu and then the submenu on the User Portal.
Figure 2-5 Jobs Command Menu on the User Portal
The page under the submenu lists information about jobs submitted to the Orchestrator. Users can use this information to monitor and manage those jobs.
Figure 2-6 Job Status Page Showing the Job Filter Drop Down List
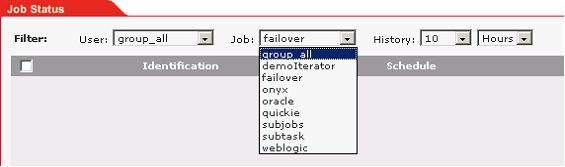
A list of jobs is displayed based on the filter criteria selected. The default filter criteria is all jobs for the current logged-in user. Filter options include:
-
Users: Select a user, or one of the built-in group types: for all user groups, or for all system jobs.
-
Job: Select a specific job, or the built-in group types: for all jobs.
-
History: Select jobs submitted within the last nn hours or nn days from the current date and time. The minimum time you can set is 1 hour. The maximum time you can set is 24 days. If you select as the history time, all jobs are selected.
When you have selected the filter criteria you want, you can update the current job status. Click (located at the bottom-right of the interface) to show the status.
Figure 2-7 Status Information for a Current Job

The job status report includes the following columns:
-
The far left column indicates the result for the job status report as sampled at refresh time. The column displays the result with both an icon and text indicators. The job result types are , , , or .
-
Identification: This column lists job submission information, including , , , and .
-
Schedule: This column lists information about when the job is scheduled, or its actual start time. It also includes how long the job has been running. If the job is completed, the column also includes the total elapsed run time for job.
-
Status: This column lists information about the cost and progress of a job. For jobs that are currently running, the progress indicator bar is partially filled with the percentage of job completion. indicates the current cost utilization for a running job, or the total cost for completed and failed jobs. The cost of a job is based on policies set up by administrator for Orchestrator.
-
Misc: This column lists other useful information about a job, including its , its (the number of independent pieces of work running on each computing resource), its .
If the number of subjobs is greater than 0, a link displays in this column. Click this link to show a Job Tree hierarchy under the settings for the job. All of the subjobs in the job hierarchy are shown.
Figure 2-8 Job Tree Hierarchy Displayed on the Job Status Page

Click in the tree to return to the default Job Status display, which is based on the current filter criteria.
Using the Command Line Interface to Monitor Jobs
Use the following command repeatedly if you want to use the command line interface to monitor the job:
zos status
By default, Orchestrator returns the status of the last job to run.
For more detailed information about using the zos command line interface, see Section A.0, The Zos Command Line Tool.
2.2.5 Viewing the Job Log
From the menu in the portal interface, some jobs might display a link on the Identification column of the page.
Figure 2-9 Job Identification with an Available Log Link
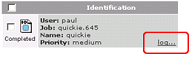
Selecting this link displays the logging information for the job. The logging display stays current for the job shown running. When the job is completed, its complete log is displayed.
2.2.6 Pausing and Resuming a Running Job
From the menu in the portal, display the job to pause or resume by including it in the list using the filters. Select the running job to pause or resume using the check box on the left side. Then click or on the bottom of the page. A new page displays indicating the status of the request. Click to return to the page.
2.2.7 Cancelling a Running Job
Use the following steps to cancel a job that is already running.
-
From the menu, display the job to cancel by including it in the list using the filters.
-
Select the running Job you want to cancel using the check box on the left side.
-
Click .
A new page displays indicating the status of the cancel request.
-
Click to return to the page.
2.2.8 Logging Out of the Portal
To log out of the User Portal, click the option under the Main Menu.