2.4 Scheduling Reports
The following sections provide information to help you schedule reports:
2.4.1 Scheduling and Running a Report
You can set up the job, when to run it, and how often to run it.
-
On the Home page, click , or click .
-
Right-click the report name, then select
-
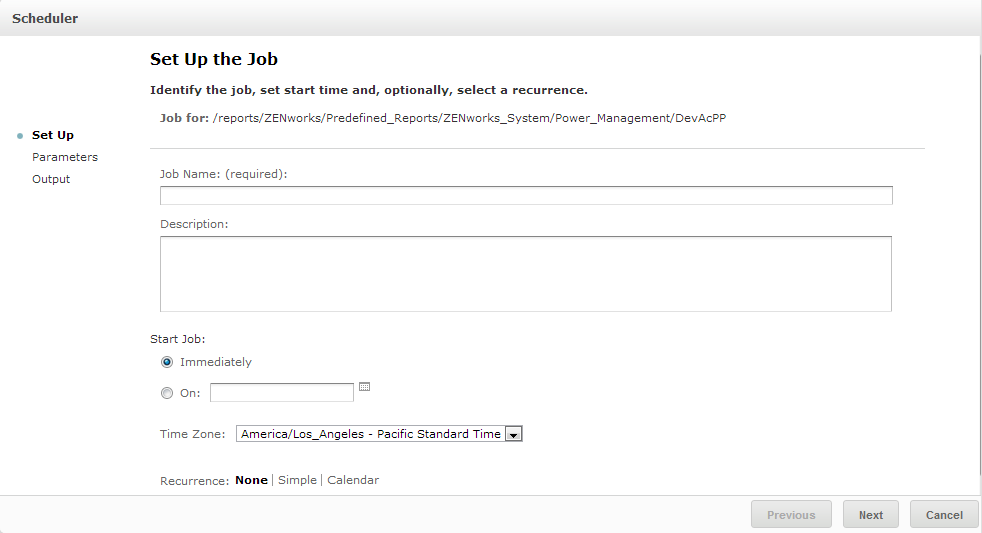
Click , to display the panel.
-
In the field, specify a name for the job, for example, Weekly Report. The description is optional.
-
Set the following schedule attributes:
-
: Choose one of the following:
-
: Start the job as soon as you finish it.
-
: Start the job at future time. Click the calendar
 icon and select the future start date and time. To set the time for the job to run, at the bottom of the calendar, click the hours and minutes.
-
-
: Specify the time zone for the schedule. The default time zone is the time zone of the server, the time zone you entered at log in. If you are in a different time zone, set this field accordingly.
-
: Choose one of the following settings:
-
: Run the report once.
-
: Repeat the job at an hourly, daily, or weekly interval.
-
: Repeat the job on days of the week or days of the month.
If you select or , additional fields are displayed. For more information, see Section 2.4.4, Simple and Calendar Options.
-
-
-
Click .
-
(Conditional) If the report you are scheduling has input controls, you are prompted for the input.
If there are any Saved values, they display in a drop-down list at the top of the panel. In the drop-down, you can set the input controls defined for the report that you are scheduling. You can set the input values for the scheduled report, and click to save the input value.
-
Choose a set of saved values, or set the input controls, then click .
-
Set output options in the panel.
For more information, see Section 2.4.2, Output Options.
-
Click .
The job displays in the list of Scheduled Jobs, as shown in Step 2.
-
Click to run the report in the background.
2.4.2 Output Options
In the panel, you can change the output settings. You must first setup the job, then output options.
For information, see Section 2.4.1, Scheduling and Running a Report.
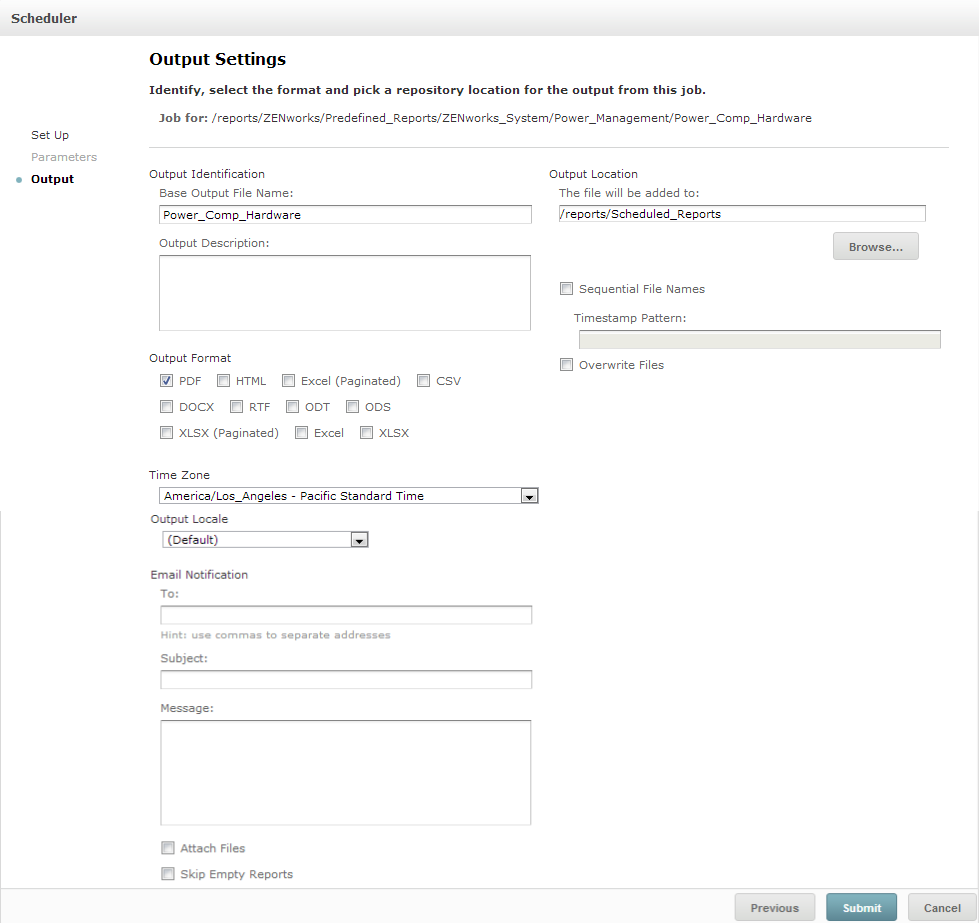
On the panel, you can change these settings:
-
: Specify a name for the Job file.
-
(Optional) Specify a description for the Job file.
-
Select the format in which you want to save the Job file. When you select more than one format, each format is stored as a separate file in the repository and attached as a separate file to the email notification.
-
Select the locale settings for generating the report.
The report must support locales, for example a report based on a domain with language bundles.
-
Specify the email addresses for email notifications.
-
Specify a subject for the email notification.
-
: Specify a message for the email notification.
-
: Select this option to send the output of the report with the email notification.
-
Select to prevent the server from attaching empty report output files to email notifications when report execution fails.
-
: Browse to the folder where you want to save the report. You must have the write permission for the folder.
-
Select this option to append a timestamp to the names of files created by the job. This is useful for the output of recurring jobs or for time-sensitive reports where the output must be dated. When the timestamp is used, the output of the file name is <basename>-<timestamp>.<extension>.
-
An optional pattern for the timestamp. Valid patterns for report output files can only contain letters, numbers, dashes, underscores, and periods. The default pattern is yyyyMMddHHmm. For example, 201307030601.
-
Select this option to overwrite old output files with new files. This is useful when you do not have sequential file names or when you specify a timestamp pattern that could lead to identical file names.
2.4.3 Viewing the List of Scheduled Jobs
Scheduled jobs are displayed in the panel with a ![]() icon. Users can view the jobs that they have defined; administrators can view the jobs defined by all users.
icon. Users can view the jobs that they have defined; administrators can view the jobs defined by all users.
-
On the Home page, click .
-
Right-click the report, then select .
The list of scheduled jobs is displayed.

The panel displays the ID for the job, the owner who created the job, and the status of the job. The job statuses includes the following:
-
The job is scheduled.
-
The server is generating the report.
-
The server has finished running the job and placed the output file in the repository.
-
The scheduler encountered an error while scheduling or triggering the job. This does not include cases in which the job is successfully triggered but an error occurs while it runs.
-
: The scheduler encountered an error with the triggered job.
The panel includes the following options:
-
You can edit the scheduled job and save the changes.
-
You can delete the scheduled job.
When the server receives a request to delete a job that is running, the server finishes running the job before deleting it.
You can perform the following tasks from the panel:
-
Click to go back to the list of reports.
-
Click to define a new job.
-
Click to run the report in the background, while you continue working on the server.
-
Click to view the latest jobs.
2.4.4 Simple and Calendar Options
To run reports automatically on a regular basis, select simple or calendar recurrences on the Set Up the Job page:
-
A recurrence regularly runs the job at an hourly, daily, or weekly interval. If you use , the report runtime can change if the server is restarted.
-
A recurrence involves more settings: time of day, days of the week, or days of the month and months of the year. If you use , the report runs at the same time, even if the server is restarted.
Simple recurrence options are:
-
: Sets the interval between jobs, in minutes, hours, days, or weeks.
-
Runs the job until you delete it.
-
Runs the job for a specified number of times.
-
Runs a job until the specified date is reached. Click
to select the date.
-
: A holiday calendar specifies a list of days when the scheduled report will not run. Only one holiday calendar can be selected at a time.
Calendar recurrence options are:
-
The months during which the report runs.
-
The days on which the report runs:
-
Every Day
-
Week Days
-
Month Days: Enter dates or date ranges, separated by commas. For example: 1, 15.
-
-
The time of day in minutes and hours when the job should run. The hours use 24-hour format.
You can also enter multiple minutes or hours, and ranges, separated by commas. For example, if you specify 0, 15, 30, and 45 for the minutes, and 9-17 for the hours, the report runs every 15 minutes from 9:00 A.M. to 5:45 P.M. Enter an asterisk (*) to run the job every minute or every hour.
-
: The Calendar recurrence runs until the specified date is reached. Click
to select the date.
-
: A holiday calendar specifies a list of days when the scheduled report will not run. Only one holiday calendar can be selected at a time.