3.13 ZENworks WinPE Imaging

3.13.1 Limitations of Using ZENworks WinPE Imaging

Following are some of the limitations of using ZENworks WinPE imaging:

  • ZENworks image taken using WinPE and add-ons extracted from the image cannot be restored in Linux distro and vice versa.

  • Peer-to-peer multicasting cannot be performed between WinPE and Linux distro.

  • By default, PowerShell packages are not added in the WinPE. For more information, see Section 3.13.13, Adding the PowerShell Package to WinPE.

  • Ensure that all WinPE img command arguments are prefixed with a - (hyphen).

3.13.2 Using WinPE Maintenance Mode Prompt to Make an Image Locally

Using the WinPE maintenance mode prompt, the following example explains the syntax and available parameters that you can use with the “make locally” (-makel) mode command:

img -make -local drive_letter\filename.zmg [-exclude=partition_number] [-include=partition_number]

You can abbreviate -make -local as: -m -local, -makel, or -ml.

You can also abbreviate -exclude as -x and -include as -I.

For more information, see:

Command Details

Table 3-5 Make Local Commands and Parameters

Parameter

Specifies

drive_letter\filename.zmg

The image file name, including the .zmg extension, and any drive letter, which has local file share or any mounted storage disk. However, the directories in the path must exist.

If the file already exists, an error occurs. You must use a different file name or delete the existing image file in order to use the same filename.

-comp=comp_level

comp_level is the amount of compression used when creating the image. Specify any number from 0-9. 0 means no compression. 1 is the same as Optimize for Speed and is used by default if the parameter is not specified. 6 is similar to Balanced. 9 is the same as Optimize for Space, which provides the slowest performance.

-exclude=partition_number or -x=partition_number and -include=partition_number or -I=partition_number

The partition number of a local partition to exclude from the image or include in the image. You can repeat this parameter as needed to exclude or include multiple partitions.

Available partitions can be displayed using img -p.

If you omit the exclude parameter, all partitions are included in the image except the one where the image is stored.

Examples

Table 3-6 Make Local Examples

Examples

Explanation

img -makel Q:\image.zmg

Takes an image of all partitions and saves it to Q:\(Drive mounted to share the folder path where the image needs to be stored)\image.zmg.

Where Q:\ can be a mounted network share or a removable disk.

3.13.3 Using the WinPE Maintenance Mode Prompt to Make an Image on a Proxy

Using WinPE maintenance mode prompt, the following example explains the syntax and available parameters that you can use with the “make to proxy” (-makep) mode command:

img -make -proxy added_filepath\filename.zmg -ip=IP_address [-comp=comp_level] [-exclude=partition_number] [-include=partition_number]

You can abbreviate -make -proxy as: -m -proxy, -makep, or -mp.

You can also abbreviate -exclude as -x and -include as -I.

To set the proxy address, run the set PROXYADDR=<SERVER_IP> command.

For more information, see:

Command Details

Table 3-7 Make Proxy Commands and Parameters

Parameter

Specifies

added_path\filename.zmg

The image file name, including a .zmg extension (which is case sensitive) and any added path. The Imaging engine automatically saves images to the default images directory on the Imaging Server:

Windows: %ZENWORKS_HOME%\work\content-repo\images\

Linux: /var/opt/novell/zenworks/content-repo/images/

If no folders are specified in the path (added_path), the image is created in this images directory.

A forward slash is not needed at the beginning of any added path.

You can create subdirectories under images for organizing your image files. However, any such subdirectories that you specify in the path must already exist when you use this command. ZENworks does not create the directories during imaging.

If the image file itself already exists, the Imaging Server won’t overwrite it unless you enable this behavior in ZENworks Control Center for the Imaging Server. To enable the behavior in ZENworks Control Center, click Configuration > Management Zone Settings > Device Management > Preboot Services > Device Imaging Work Assignment, select the Allow Preboot Services to overwrite existing files when uploading option.

-ip=IP_address

The IP address or DNS name of an imaging server. If you do not use this parameter, the value for PROXYADDR is used.

-comp=comp_level

comp_level is the amount of compression used when creating the image. Specify any number from 0-9. 0 means no compression. 1 is the same as Optimize for Speed and is used by default if you do not specify this parameter. 6 is similar to Balanced. 9 is the same as Optimize for Space, which provides the slowest performance.

-exclude=partition_number or -x=partition_number and -include=partition_number or -I=partition_number

The partition number of a local partition to exclude from the image or include in the image. You can repeat this parameter as needed to exclude or include multiple partitions.

Available partitions can be displayed using img -p or img -partition.

If you omit either parameter, all partitions are included in the image.

Example:

Table 3-8 Make Proxy Examples

Example

Explanation

img -makep subdir1\myimage.zmg

Takes an image of all partitions and saves the image to the Imaging Server.

3.13.4 Using the WinPE Maintenance Mode Prompt to Restore an Image Locally

Using the WinPE maintenance mode prompt, the following example explains the syntax and available parameters that you can use with the “restore from local” (-restorel) mode command:

img -restore -local drive_letter\filename.zmg [-s=file_set] [-ap=advanced_options]

You can abbreviate -restore -local as: -r -local, -restorel, or -rl.

For more information, see:

Command Details

Table 3-9 Restore Local Commands and Parameters

Parameter

Specifies

-restorel

The partition number (as displayed by img -p) of the local partition to retrieve the image from. It must be a primary partition. This partition is not changed by the imaging operation.

‑s=fileset

The number of the image file set to be restored. Valid values are 1 through 10. For information on creating file sets of an image, see Section 1.6.2, Creating, Installing, and Restoring Standard Images.

If you omit this parameter, file set 1 is used.

‑ap=partition:partition

A mapping between a partition in the image archive (apartition) and a target physical partition on the local machine (ppartition). Use this parameter to selectively restore a specific part of the image to a specific local partition.

IMPORTANT:If you use this parameter, none of the existing local partitions are removed, and only the target local partition is updated. The update process does not remove any existing files; however, any existing files of the same names are overwritten. If you want to remove all existing files from the target partition before updating it, first use the Partition Operations Mode to delete and recreate the partition. If you choose to restore the base image, you need to delete and recreate the target partition before restoring the image because your system might be left in an inconsistent state if the Selective Partition Image restoration fails.

For apartition, use the partition number displayed for the source partition in the Image Explorer (zmgexp) utility. For partition, use the partition number displayed by img -p or img -partition for the target partition. The target partition must be a partition of a supported file system. You can repeat this parameter as needed to request multiple selective restorations in a single operation. In doing so, you can apply multiple parts of the image to a single local partition, but you can’t apply the same part of an image to multiple local partitions in a single operation.

Examples

Table 3-10 Restore Local Examples

Example

Explanation

img -restorel Q:\myimage.zmg

Removes all existing local partitions, retrieves the image from Q:\myimage.zmg.

Where Q:\ can be a mounted network share or a removable disk.

3.13.5 Using the WinPE Maintenance Mode Prompt to Restore an Image from a Proxy

At the WinPE maintenance mode prompt, use the “restore from proxy” (-restorep) mode command to restore an image from a proxy.

  • To restore an image by specifying the image file path:

    img -restore -proxy added_filepath\filename.zmg -ip=IP_address [-s=set] [-ap=advanced_options]

You can abbreviate -restore -proxy as: -r -proxy, -restorep, or -rp.

To set the proxy address, run the set PROXYADDR=<SERVER_IP> command.

For more information, see:

Command Details

Table 3-11 Restore Proxy Mode Commands and Parameters

Parameter

Specifies

added_filepath\filename.zmg

The file name and added path of the image to retrieve, including the .zmg extension (case sensitive).

‑s=fileset

The number of the image file set to be restored. Valid values are 1 through 10. For information on creating file sets of an image, see Section 1.6.2, Creating, Installing, and Restoring Standard Images.

If you omit this parameter, file set 1 is used.

-ip=IP_address

The IP address or DNS name of an imaging server. If you do not use this parameter, the value for PROXYADDR is used.

‑ap=partition:partition

A mapping between a partition in the image archive (apartition) and a target physical partition on the local machine (ppartition). Use this parameter to selectively restore a specific part of the image to a specific local partition.

IMPORTANT:If you use this parameter, none of the existing local partitions are removed, and only the target local partition is updated. The update process does not remove any existing files or overwrite any existing files of the same names if they are newer. If you want to remove all existing files from the target partition before updating it, first use the Partition Operations Mode to delete and re-create the partition. If you choose to restore the base image, you need to delete and recreate the target partition before restoring the image because your system might be left in an inconsistent state if the Selective Partition Image restoration fails.

For apartition, use the partition number displayed for the source partition in the Image Explorer (zmgexp) utility. For ppartition, use the partition number displayed by img dump for the target partition. The target partition must be a partition of a supported file system. You can repeat this parameter as needed to request multiple selective restorations in a single operation. In doing so, you can apply multiple parts of the image to a single local partition, but you can’t apply the same part of an image to multiple local partitions in a single operation.

Examples

Table 3-12 Restore Proxy Mode Examples

Example

Explanation

img ‑restorep subdir1\myimage.zmg

Removes all existing local partitions, retrieves the image from subdir1\myimage.zmg on the Imaging Server, and restores the partitions and contents of that image on the available local writable devices (assuming there is sufficient local space).

NOTE:In ZENworks, you only need to provide the image file name (the .zmg file) because the images are stored in a fixed location. For example, if you saved the image file in the default location, enter:

img -rp myimagefile.zmg

Because you can organize your images under the \images directory by adding subdirectories, the additional path where you created the image file should be provided. For example:

img -rp \windows\vista\myimagefile.zmg

3.13.6 Using ZENworks Control Center for WinPE Auto Imaging

The following imaging tasks that are available in ZENworks Control Center for WinPE imaging:

Auto Take Image using WinPE

For more information, see Taking a Base Image of a Device.

Auto Restore Image using WinPE

For more information, see Configuring the ZENworks Image Bundle for Automatic Imaging.

3.13.7 Image-Safe Data Viewer and Editor (zisview and zisedit)

The Image-Safe Data Viewer and Editor features that are supported on the ZENworks Linux Imaging are now supported on the ZENworks WinPE Imaging as well.

For more information, see Section D.5, Image-Safe Data Viewer and Editor (zisview and zisedit).

3.13.8 Prerequisites for Taking and Restoring an Image Partition-wise Using WinPE

Let us consider an example of a system with default installation having 100MB boot partition and a system partition.

  1. If the system has 100MB partition (on Windows 7, or later), take an image of the 100 MB partition separately. To take an image of the 100 MB partition, run the following command:

    # img -mp <bootpartition>.zmg -I=1

    In the above command, -I =1 indicates that you include partition number 1, which is the 100 MB partition.

    You can use the following command to take image of all partitions on the system, where I indicated the partition number.

    # img -mp <windows_os_partition>.zmg -I=2

To restore the Windows images partition-wise, do the following:

  1. Delete all the partitions by using the img -pd command. For example:

    img -pd 1

    img -pd 2

    1 and 2 in the above commands correspond to the hard disk partition number.

  2. Create the partitions by using the img -pc command. For example:

    img -pc 1 -type=NTFS -size=100(for the 100 MB partition for Windows 7, or later).

    img -pc 2 -type=NTFS (to restore the C:\drive)

  3. Mark the partition 1 as Active by using the img -pa 1 command.

  4. Restore images partition-wise.

Partition wise restore for UEFI systems

To take an image partition wise:

  1. On the system with UEFI boot enabled, install the operating system and take the image partition wise using the following commands:

    1. img -mp <WRE>.zmg -I=1

    2. img -mp <ESP>.zmg -I=2

    3. img -mp <MRP>.zmg -I=3

    4. img -mp <windows_os_partition>.zmg -I=4

  2. Make a note of the size of each partition on the base system. The same values can be used during the restoration of the image.

To restore the image partition wise:

  1. Run the img -pc 1 -type=NTFS -size=<xxxxMB> -guid=PartitionType command to create a GPT partition on a device.

    The PartitionType attribute in the above command can take any of the following values:

    • MBD: Microsoft Basic Data Partition

    • MRP: Microsoft Reserved Partition

    • WRE: Windows Recovery Environment Partition

    • ESP: EFI System Partition

    This command will create a xxxx MB partition with GUID partition type, and initialize the partition with the NTFS file system.

    Ensure that the following conditions are met for a successful partition creation:

    • If the partition type is ESP, then the -type value in the command should be FAT32.

    • Size of MRP partitions depends on the size of the disk. For a disk size less than 16 GB, the MRP partition is 32 MB, and for a disk size more than 16 GB, the MRP partition is 128 MB.

      Example:

      img -pc 1 -type=NTFS -size=300 -guid=WRE
      img -pc 2 -type=FAT32 -size=100 -guid=ESP
      img -pc 3 -type=RAW -size=128 -guid=MRP
      img -pc 4 -type=NTFS -size=40000 -guid=MBD
  2. Mark the following three partitions as active by using the img -pa <partition number> command:

    • Recovery: Windows Recovery Environment

    • System: EFI system partition

    • Reserved: Microsoft reserved partition

    • Primary: Windows partition (Microsoft basic data partition)

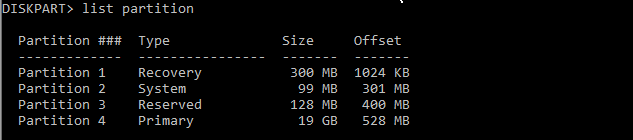
    For example, to make the first partition active, run the img -pa 1 command. For information about the three partitions, refer to the following image.

  3. Restore each partition using the advanced switches:

    • img -r -p <WRE>.zmg -ap=a1:p1

    • img -r -p <ESP>.zmg -ap=a1:p2

    • img -r -p <MRP>.zmg -ap=a1:p3

    • img -r -p <windows_os_partition>.zmg -ap=a1:p4

3.13.9 WinPE Add-on Imaging

Following are the features supported for Add-on imaging using ZENworks WinPE:

  • Add-on extracted from ZENworks images taken using WinPE

  • The bundle add-on created from ZENworks Control Center

  • The add-on created using the Image Explorer

For more information, see Creating an Add-On Image for an Existing Bundle.

3.13.10 Multicast Images using ZENworks WinPE

Following are the features supported for Multicasting images using ZENworks WinPE:

Auto Multicasting

Auto multicast can be performed by assigning multicast image set bundles to clients from ZENworks Control Center.

NOTE:While creating multicast image set bundles for WinPE, ensure that you select the ZENworks WinPE Imaging option.

For more information, see Section 3.3, Multicasting Images for ZENworks Imaging.

Manual Multicasting

On the ZENworks Imaging Server, do the following to initiate a multicast session:

On a Windows Primary or Satellite Server

  1. In the Services window, determine whether the ZENworks Preboot Service is running.

    If it is not running, then right-click the service and select Start.

  2. On the command line, enter the following to enable a multicast session:

    %ZENWORKS_HOME%\bin\preboot\zmgmcast.exe -mcast arguments

    where arguments represents the following that you can append to the command line:

    Argument

    Description

    session_name

    (Required) The session name is any string that uniquely identifies this multicast session from other multicast sessions that might be in progress on the network.

    -p path

    (Required) The path to the image to be multicast, which is located on the Imaging Server. This must be the full path.

    -i IP_address

    (Optional) The IP address of the Imaging Server. If not specified, the IP address of the Primary Server is considered by default.

    -t time_wait

    (Optional) If not enough devices have booted to fulfill the Client Count requirement, the multicast session begins if a participating device boots and a certain amount of time passes without another participating device booting. Specify this amount of time. The default is 5 minutes.

    -c client_count

    (Optional) The number of participating devices you want to have booted before the multicast session begins. If you do not specify a number, the default is 1.

    IMPORTANT:The image is sent and placed on each participating device only after you initiate the multicast session from each participating client.

  3. To view the list of multicast sessions, enter:

    %ZENWORKS_HOME%\bin\preboot\zmgmcast.exe -list -i proxy_IP_address

    The -i argument is optional.

  4. To stop a multicast session, enter:

    %ZENWORKS_HOME%\bin\preboot\zmgmcast.exe -stop session_name -i proxy_IP_address

    The session_name is required and the -i argument is optional.

  5. Continue with Initiating a Multicast Session from Each Client.

On a Linux Primary or Satellite Server

  1. On the command line, enter the following to make sure the imaging software is running:

    /etc/init.d/novell-pbserv status

    If it is not running, then enter:

    /etc/init.d/novell-pbserv start
  2. On the command line, enter the following to enable a multicast session:

    /opt/novell/zenworks/preboot/bin/novell-zmgmcast -mcast arguments

    where arguments represents the following that you can append to the command line:

    Argument

    Description

    session_name

    (Required) The session name is any string that uniquely identifies this multicast session from other multicast sessions that might be in progress on the network.

    -p path

    (Required) The path to the image to be multicast, which is located on the Imaging Server. This must be the full path.

    -i IP_address

    (Optional) The IP address of the Imaging Server.

    -t time_wait

    (Optional) If not enough devices have booted to fulfill the Client Count requirement, the multicast session begins if a participating device boots and a certain amount of time passes without another participating device booting. Specify this amount of time. The default is 5 minutes.

    -c client_count

    (Optional) The number of participating devices you want to have booted before the multicast session begins. If you do not specify a number, the default is 1.

    IMPORTANT:The image is sent and placed on each participating device only after you initiate the multicast session from each participating client.

  3. To view the list of multicast sessions, enter:

    /opt/novell/zenworks/preboot/bin/novell-zmgmcast -list -i proxy_IP_address

    The -i argument is optional.

  4. To stop a multicast session, enter:

    /opt/novell/zenworks/preboot/bin/novell-zmgmcast -stop session_name -i proxy_IP_address

    The session_name is required and the -i argument is optional.

  5. Continue with Initiating a Multicast Session from Each Client.

Initiating a Multicast Session from Each Client

To initiate each participating device in the multicast session, enter the following at the prompt of every device.

img -session session_name

Peer-to-peer Manual Multicasting

To perform peer-to-peer manual multicast session using ZENworks WinPE:

Master session

To start a peer-to-peer multicasting session using ZENworks WinPE:

Start the master session from WinPE using the following command:

img –session (session_name) –master [-clients=count] [-timeout=minutes]

Example: img -session test1 -master -clients=10 -timeout=5

In this example, test1 is the session name, 10 is the number of clients and 5 minutes is the timeout.

Arguments

Description

(session_name)

(Required) The session name is any string that uniquely identifies this multicast session from other multicast sessions that might be in progress on the network.

[–clients=count]

Minimum number of clients participating in the multicast session.

[–timeout=minutes]

The number of minutes the master device waits (without reaching the required registered clients) after the last client has registered before starting the imaging process. This option only applies to devices designated as session masters (where the ‑m parameter is used).

If you omit this parameter, the default timeout is 5 minutes.

The imaging process does not start until the client value is reached, or the timeout value has transpired. After that, any clients attempting to register are denied.

Client session

Start client session WinPE using the following command:

img –session (session_name) –client

Example: img –session test1 –client

In this example, test1 is the session name

Argument

Description

(session_name)

(Required) The session name is any string that uniquely identifies this multicast session from other multicast sessions that might be in progress on the network.

-client

(Optional) Indicates that the device participates as a client in the multicast session.

3.13.11 WinPE ISDTool

For more information on WinPE ISDTool, see Section 3.9, ISDTool.

3.13.12 Creating WinPE ISO

To create a WinPE ISO (BootCD or USB), perform the following:

  1. Go to ZENworks setup page.

    https://<server_IP>/zenworks-setup/?pageId=tools

  2. Download the novell-zenworks-zcc-helper-<version_number>.msi file.

    Where <version_number> is the latest version of ZCC Helper.

  3. Extract or install the MSI to get the wimprocessor.exe file.

    After installing the ZCC Helper, the wimprocessor.exe file can be located in the following location:

    <Drive_letter>:\Users\Administrator\AppData\Roaming\Novell\ZENworks\ZCCHelper\bin

  4. In the command prompt, run the following command on a device in which WAIK or WADK is installed:

    wimprocessor.exe makeiso processor_architecture [zenworks_folder]

    Accepts the following arguments:

    • processor_architecture: Valid values are: x86 for 32-bit and amd64 for 64-bit processor architecture.

    • zenworks_folder: The folder which contains the ZENworks imaging files downloaded from the Primary Server location is as follows:

    On Windows server:

    For amd64: %ZENWORKS_HOME%\share\tomcat\webapps\zenworks\ext\3PIUtils\x86_64

    For x86: %ZENWORKS_HOME%\share\tomcat\webapps\zenworks\ext\3PIUtils

    On Linux Server:

    For amd64: /opt/novell/zenworks/share/tomcat/webapps/zenworks/ext/3PIUtils/x86_64

    For x86: /opt/novell/zenworks/share/tomcat/webapps/zenworks/ext/3PIUtils

While creating a WinPE imaging CD, if the Imaging Server is specified in the zensettings.ini file, then this imaging CD can be used for auto WinPE bootcd. If imaging server is not specified in the zensettings.ini file, then the CD can be used for manual imaging.

For 32-bit zensettings.ini image file is available in the 3PIUtils folder and for 64-bit zensettings.ini image file is available in the 3PIUtils\x86_64 folder.

While copying the 32-bit image files, ignore the x86_64 folder.

NOTE:The ISO file will be generated in the location where the wimprocessor.exe file is located.

The winpe.wim file available in the following location will be used to create the ISO file:

Windows_Drive:\Program Files (x86)\Windows Kits\<version_number>\Assessment and Deployment Kit\Windows Preinstallation Environment\<architecture>\en-us

Use this ISO file to burn the CD or DVD or USB, and then boot into ZENworks WinPE.

3.13.13 Adding the PowerShell Package to WinPE

By default, PowerShell packages will not be included in WinPE. To add the PowerShell packages to winpe.wim, perform the following:

  1. Take a backup of the winpe.wim file available in the following location:

    Drive_letter:\Program Files (x86)\Windows Kits\<version_number>\Assessment and Deployment Kit\Windows Preinstallation Environment\<architecture>\en-us

    Where <version_number> can be 8, 8.1 or 10 and <architecture> can be x86 or amd64

  2. Add following packages to winpe.wim and upload to ZCC third party settings from a WAIK or WADK device.

    • WinPE-NetFx.cab

    • WinPE-NetFx_en-us.cab

    • WinPE-PowerShell.cab

    • WinPE-PowerShell_en-us.cab

    For more information, see Section 3.13.14, Adding Drivers and Packages to an Existing WIM File

  3. Upload the winpe.wim file to ZCC using wimprocessor.exe.

NOTE:The WinPE ISO created using the above winpe.wim will include the PowerShell packages in the WinPE ISO files.

These packages are separate for 32-bit and 64-bit architectures.

The Packages are available in the following locations in devices on which WAIK or WADK is installed:

  • x86: C:\Program Files (x86)\Windows Kits\<version>\Assessment and Deployment Kit\Windows Preinstallation Environment\x86\WinPE_OCs

  • x86 en-us cab files: C:\Program Files (x86)\Windows Kits\<version>\Assessment and Deployment Kit\Windows Preinstallation Environment\x86\WinPE_OCs\en-us

  • x64: C:\Program Files (x86)\Windows Kits\<version>\Assessment and Deployment Kit\Windows Preinstallation Environment\amd64\WinPE_OCs

  • x64 en-us cab files: C:\Program Files (x86)\Windows Kits\<version>\Assessment and Deployment Kit\Windows Preinstallation Environment\amd64\WinPE_OCs\en-us

3.13.14 Adding Drivers and Packages to an Existing WIM File

To add drivers or packages to an existing WIM file, use addDrivers (Adding custom drivers) and addPackage (Adding custom packages) commands.

Adding Drivers: To add drivers to an existing WIM file, run the following command:

Wimprocessor.exe addDriver <wim FilePath> <Driver FilePath>

Example: wimprocessor.exe adddriver "D:\winpe.wim" "D:\smsc_x86\net9500-x86-n630f.inf"

Where D:\winpe.wim is the location of the WIM file and D:\smsc_x86\net9500-x86-n630f.inf is the location of the driver that should be added to the WIM file.

  • <wim FilePath>: The path of the WIM file for which drivers should be added.

  • <Driver FilePath>: The path of the driver files that should be added into the WIM file. The driver file should be in the INF file format.

Adding Packages: To add packages to an existing WIM file, run the following command:

wimprocessor.exe addPackage <wim FilePath> <Package FilePath>

Example: wimprocessor.exe addpackage "D:\winpe.wim" "D:\WinPE-NetFx.cab"

Where D:\winpe.wim is the location of the WIM file and D:\WinPE-NetFx.cab is the location of the package that should be added to the WIM file.

  • <wim FilePath>: The path of the WIM file for which packages should be added.

  • <Package FilePath>: The path of the package files that should be added into the WIM file. The package file should be in the CAB file format.

NOTE:If you need a WinPE ISO with custom drivers and packages, then use the addDriver and addPackage commands to add required drivers and packages, and then use makeISO command to create an ISO file.