6.2 Moving an Embedded PostgreSQL Database from One Primary Server to another Primary Server
Moving the data is a two step process:
IMPORTANT:While moving the database, we refer the source database server as PSDB1 and the destination database server as PSDB2.
6.2.2 Step 2: Restoring the Database
Depending on the target database platform, refer to the following section to restore the database:
Restore the Database on a Windows Primary Server (PSDB2)
If you are planning to restore the database on a Windows Primary Server, then perform the following steps:
-
Stop the ZENworks services on all Primary Servers by running the following command:
microfocus-zenworks-configure -c Start
-
Install PostgreSQL by running the following command:
msiexec /i <postgresql_MSI_FILE> TARGETDIR="%ZENSERVER_HOME%\install\downloads\msi" ALLUSERS=2
Example
msiexec /i "%ZENSERVER_HOME%\install\downloads\msi\microfocus-zenworks-postgres-12.4.x86_64.msi" TARGETDIR="%ZENSERVER_HOME%\share" ALLUSERS=2
-
After installing the PostgreSQL, create the folder %ZENSERVER_HOME%\database\pgsql\data, and ensure that you give write permission to the folder:
To provide write permissions, perform the following steps:
-
In Windows Explorer, right-click a file or folder and select Properties.
-
In the Properties window, click the Security tab.
-
In Group or user names, select a user, and then click Edit.
-
In the Permissions window, select the logged in user.
-
Select Allow for the Write permission and then click OK or Apply.
-
-
Open the command prompt, and then set the following environment variables:
-
PGDATA: <embedded_database_location>
NOTE:This is the data directory created in the previous step.
-
PGPORT: <existing source DB port configured> ZENworks default is 54327
-
PGDATABASE: <existing database name> ZENworks default is postgres
Example:
-
SET PGDATA=%ZENSERVER_HOME%\database\pgsql\data
-
SET PGPORT=54327
-
SET PGDATABASE=postgres
-
-
To initialize the Postgres database, open the console and go to %ZENSERVER_HOME%\share\postgres\bin, and then run the following command:
pg_ctl.exe initdb
NOTE:If the following error is displayed, then install the vc_redist.x64.exe and try again.
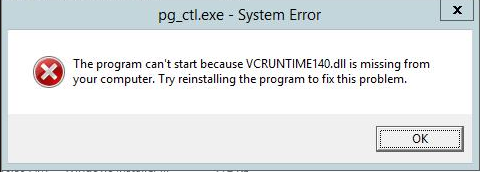
The vc_redist.x64.exe file is available in the ZENworks installation ISO. You can mount the ISO to any drive. Example: the J:\ drive. The .exe file is available under <zenworks_mount_directory> J:\Common\include
-
To start the database server, run the following command:
pg_ctl.exe start
After executing the command, the last line should say database system is ready to accept connections.
-
Run the following command to restore the database:
psql.exe -v ON_ERROR_STOP=0 -f c:\tmp\postgres_dump.sql -o c:\tmp\postgres_log.txt -L c:\tmp\postgres_log.log template1
The c:\postgres_dump.sql file is created the backup step 6 of the Step 1: Backup the Database on the Embedded Primary Server.
NOTE:Execution of the above command may take time depending on the amount of data in the database.
-
In the postgresql.conf file under %ZENSERVER_HOME%\database\pgsql\data, uncomment the listen_addresses and port entry keys, and update the values as shown below:
listen_addresses = '*'
port= 54327
max_connections = Number of primary severs * 500
-
To stop the database process, run the pg_ctl.exe stop command.
-
Edit the pg_hba.conf file, as shown below:
The pg_hba.conf file is available in the following location:
%ZENSERVER_HOME%\database\pgsql\data
# TYPE DATABASE  USER   ADDRESS     METHOD
# IPv4 local connections:
host    all             all             127.0.0.1/32            md5
# IPv6 local connections:
host    all             all             ::1/128                 md5
# Allow replication connections from localhost, by a user with the
# replication privilege.
local   replication     all                                     md5
host    replication     all             127.0.0.1/32            md5
host    replication     all             ::1/128                 md5
host    all     all     0.0.0.0/0   md5
host    all     all     ::0/0   md5
-
In the local primary server (PSDB2), change the server key in zdm.xml and zenaudit.xml, available in %ZENSERVER_HOME%\conf\datamodel folder with the local host address 127.0.0.1:
-
<entry key="Server">127.0.0.1</entry>
-
<entry key="Embedded">true</entry>
-
-
If you have configured Antimalware in the zone, modify the database.server.address property in %ZENSERVER_HOME%\conf\antimalware\amedatasource.properties file to have the server IP as 127.0.0.1
-
Create the database service by running the following command:
"%ZENSERVER_HOME%\share\postgres\bin\pg_ctl.exe" register -N "Micro Focus ZENworks Embedded Datastore - PostgreSQL" -U LocalSystem -D "%ZENSERVER_HOME%\database\pgsql\data" -S auto
-
Set the description of the service by running the following command:
sc description "Micro Focus ZENworks Embedded Datastore - PostgreSQL" "Embedded datastore used for storing ZENworks objects and resources."
-
Start the Micro Focus ZENworks Embedded Datastore service using the following steps:
-
On Windows: Press the Win + R keys on the keyboard to open the Run window. Enter services.msc and then press the Enter key.
-
Start the Micro Focus ZENworks Embedded Datastore – PostgreSQL service.
-
-
Run the following configure actions to update OSP/Content Configurations:
microfocus-zenworks-configure -c GenerateContentDatasourceConfigureAction
microfocus-zenworks-configure -c GenerateOSPProperties
microfocus-zenworks-configure -c RegenerateOSPAuthCfgXml
-
(Conditional) If Antimalware is configured, run the following commands:
microfocus-zenworks-configure -c ZENServicesFirewallConfigureAction -Dservice=antimalware -Doperation=ADD
microfocus-zenworks-configure -c AntimalwareServiceConfigureAction -Dam.service.action=start
-
Start the ZENworks services by running the following command:
microfocus-zenworks-configure -c Start
-
Assign the database role to the destination database server (PSDB2) by running the following configure action:
microfocus-zenworks-configure -c MigrateServerRoleConfigureAction -DsourceGuid=<GUID of PSDB1> -DdestGuid=<GUID of PSDB2> -Drole=Database
-
To Configure Automatic Maintenance, perform the following:
-
Create a folder pgsql %ZENSERVER_HOME%\conf\pgsql, if it does not exist, on PSDB2, and copy %ZENSERVER_HOME%\conf\pgsql\pgsql-maintenance.xml from thePSDB1 to the pgsql folder on PSDB2.
-
Run the following configure action:
microfocus-zenworks-configure -c AutomaticPostgresMaintenanceConfigureAction
-
-
(Conditional) If you have enabled Kafka, then run zman server-role-kafka-recreate-connectors -f true command to recreate the Kafka connectors.
For more information, see Server Commands in the ZENworks Command Line Utilities guide.
-
If you have the firewall enabled on the server, ensure that port 54327 is open.
NOTE:With this, we complete the Restoring of the Database to the Target Primary Server (PSBD2). Continue further to update other Primary Servers in the zone.
-
Do the following on all the other primary servers in the zone:
-
Change the server key in zdm.xml and zenaudit.xml, available in %ZENSERVER_HOME%\conf\datamodel folder with the IP address of PSDB2:
<entry key="Server">IP OF PSDB2</entry>
-
If you have configured Antimalware in the zone, modify the database.server.address property in %ZENSERVER_HOME%\conf\antimalware\amedatasource.properties file to have the server IP as IP OF PSDB2
-
To update OSP/Content Configurations, run the following configure actions:
microfocus-zenworks-configure -c GenerateContentDatasourceConfigureAction
microfocus-zenworks-configure -c GenerateOSPProperties
microfocus-zenworks-configure -c RegenerateOSPAuthCfgXml
-
(Conditional) If Antimalware is configured, run the following:
microfocus-zenworks-configure -c ZENServicesFirewallConfigureAction -Dservice=antimalware -Doperation=ADD
microfocus-zenworks-configure -c AntimalwareServiceConfigureAction -Dam.service.action=start
-
Run the following commands:
sc stop "Micro Focus ZENworks Embedded Datastore - PostgreSQL"
sc delete "Micro Focus ZENworks Embedded Datastore - PostgreSQL"
NOTE:This step is applicable only on PSDB1.
-
Start all the ZENworks services by running the following command:
microfocus-zenworks-configure -c Start
-
Restore the Database on a Linux Primary Server or Appliance Server (PSDB2)
On a Linux Primary Server or an Appliance Server, perform the following steps:
-
Before executing the following steps, ensure that you have reviewed the information documented in the section Important Commands and Locations.
Ensure that you have noted the database username, password of the source Primary Server by running the zman dgcs command.
-
Stop all the ZENworks services on all Primary Servers by running the following configure action:
microfocus-zenworks-configure -c Start
-
Load zenpostgres docker by running the following commands:
-
docker load -i /opt/microfocus/zenworks/docker-images/zenpostgres.tar.gz
-
docker run --name tmp_postgres -d zenpostgres
-
docker cp /tmp/dump.sql tmp_postgres:/var/opt/microfocus/pgsql/
NOTE:The /tmp/dump.sql file is created in the backup step 5 of the Backup the Database on the Embedded Linux Primary Server (PSDB1)
-
-
Get into the temporary postgres container by running the following command:
docker exec -it tmp_postgres bash
-
To check whether the database server is ready to accept connections, run the following commands:
-
cd /var/opt/microfocus/pgsql/data
-
cat postmaster.log
After executing the commands, the last line should say
Database system is ready to accept connections
. If you did not see this message, wait for some time, and then execute thecat postmaster.log
command again. -
-
Perform the following steps to prepare the default database, for restore.
Run the psql -W postgres command. When prompted for a password, enter novell as the password.
-
To change the default password, run the following SQL query:
ALTER USER zenpostgres with PASSWORD '<Password>';
Replace the <Password> in the above SQL query with the password you noted down in step 1 of the Backup the Database on the Embedded Linux Primary Server (PSDB1).
Example: ALTER USER zenpostgres with PASSWORD 'Zw0#3dde8547adb388306de141850';
-
Drop the following default databases and users:
drop database zenworks;
drop database zenworksaudit;
drop user zenadmin;
drop user zenauditadmin;
drop database zenamdatabase;
drop user zenamadmin;
NOTE:Ignore errors related to missing database or users if any.
-
-
Exit the Postgres interactive terminal by executing the exit command.
-
To restore the database, run the following commands:
-
export PGPASSWORD= <password retrieved from zman dgcs>
-
psql -w postgres -v ON_ERROR_STOP=0 -f /var/opt/microfocus/pgsql/dump.sql -o /var/opt/microfocus/pgsql/dump.log -L /var/opt/microfocus/pgsql/dump.log >/var/opt/microfocus/pgsql/dump.err 2>&1
NOTE:Execution of the above command may take time depending on the amount of data in the database.
-
-
Once the restore is completed successfully, exit the docker container by running the exit command.
-
To copy the database folder from the container to the host, run the following commands:
-
rm -rf /var/opt/microfocus/pgsql
-
docker cp tmp_postgres:/var/opt/microfocus/pgsql/ /var/opt/microfocus/
-
rm -f /var/opt/microfocus/pgsql/data/postmaster.pid /var/opt/microfocus/pgsql/data/postmaster.log
-
-
To clean up the temporary container, run the following commands:
-
docker kill tmp_postgres
-
docker container rm tmp_postgres
-
-
To change the ownership of the data directory, run the following command:
chown -R 1026:1026 /var/opt/microfocus/pgsql/data
-
In the postgresql.conf file, under /var/opt/microfocus/pgsql/data/, uncomment the listen_addresses and port entry keys, and update the values as shown below:
listen_addresses = '*'
Port= 54327
max_connections = Number of primary severs * 500
-
Edit the pg_hba.conf file as shown below:
The pg_hba.conf file is available in the following location:
/var/opt/microfocus/pgsql/data
-
In the pg_hba.conf file, update the content as shown below:
# TYPE DATABASE  USER   ADDRESS     METHOD
# "local" is for Unix domain socket connections only
local   all             all            md5
# IPv4 local connections:
host    all             all         127.0.0.1/32       md5
# IPv6 local connections:
host    all             all             ::1/128          md5
# Allow replication connections from localhost, by a user with the
# replication privilege.
local   replication     all             md5
host    replication     all         127.0.0.1/32      md5
host    replication     all             ::1/128       md5
host    all     all     0.0.0.0/0   md5
-
-
In the local primary server, change the server key in zdm.xml and zenaudit.xml, available in /etc/opt/microfocus/zenworks/datamodel folder with the local host address 127.0.0.1:
-
<entry key="Server">127.0.0.1</entry>
-
<entry key="Embedded">true</entry>
-
-
If you have configured antimalware in the zone, modify the database.server.address property in /etc/opt/microfocus/zenworks/antimalware/amedatasource.properties file to have the server IP as 127.0.0.1
-
To create the Postgres service, create the file in /usr/lib/systemd/system/zenpostgresql.service with the following contents:
[Unit]
Description=PostgreSQL Daemon for ZENworks Databases
After=syslog.target network.target docker.service
[Service]
Type=simple
ExecStart=/opt/microfocus/zenworks/lib/systemd/system/zenpostgresql-systemd
Restart=on-failure
RestartSec=20
StartLimitBurst=5
StartLimitInterval=120
[Install]
WantedBy=multi-user.target
-
To reset the file/folder permissions, run the following command:
permissions.sh
-
Start the zenpostgres service by running the following commands:
systemctl enable zenpostgresql.service
systemctl start zenpostgresql.service
-
Run the following configure actions to update OSP/Content Configurations:
microfocus-zenworks-configure -c GenerateOSPProperties
microfocus-zenworks-configure -c RegenerateOSPAuthCfgXml
microfocus-zenworks-configure -c GenerateContentDatasourceConfigureAction
-
(Conditional) If Antimalware is configured, run the following commands:
microfocus-zenworks-configure -c ZENServicesFirewallConfigureAction -Dservice=antimalware -Doperation=ADD
microfocus-zenworks-configure -c AntimalwareServiceConfigureAction -Dam.service.action=start
-
On the Primary Server (PSDB2), start the ZENworks services by running the following command:
microfocus-zenworks-configure -c Start
-
Assign the database role to the destination database server (PSDB2) by running the following configure action:
microfocus-zenworks-configure -c MigrateServerRoleConfigureAction -DsourceGuid=<GUID of PSDB1> -DdestGuid=<GUID of PSDB2> -Drole=Database
-
To setup Automatic Maintenance, run the following configure action:
microfocus-zenworks-configure -c AutomaticPostgresMaintenanceConfigureAction
-
(Conditional) If you have enabled Kafka, then run zman server-role-kafka-recreate-connectors -f true command to recreate the Kafka connectors.
For more information, see Server Commands in the ZENworks Command Line Utilities guide.
-
If you have the firewall enabled on the server, ensure that port 54327 is open.
NOTE:With this, we complete the Restoring of the Database to the Target Primary Server (PSBD2). Continue further to update other Primary Servers in the zone.
-
Do the following on all the other primary servers in the zone:
-
Change the server key in zdm.xml and zenaudit.xml, available in /etc/opt/microfocus/zenworks/datamodel folder with the IP address of PSDB2:
<entry key="Server">IP OF PSDB2</entry>
-
If you have configured Antimalware in the zone, modify the database.server.address property in /etc/opt/microfocus/zenworks/antimalware/amedatasource.properties file to have the server IP as IP of PSDB2.
-
To update OSP/Content Configurations, run the following configure actions:
microfocus-zenworks-configure -c GenerateOSPProperties
microfocus-zenworks-configure -c RegenerateOSPAuthCfgXml
microfocus-zenworks-configure -c GenerateContentDatasourceConfigureAction
-
(Conditional) If Antimalware is configured, run the following:
microfocus-zenworks-configure -c ZENServicesFirewallConfigureAction -Dservice=antimalware -Doperation=ADD
microfocus-zenworks-configure -c AntimalwareServiceConfigureAction -Dam.service.action=start
-
Run the following commands:
-
systemctl stop zenpostgresql.service
-
systemctl disable zenpostgresql.service
NOTE:This step is applicable only on PSDB1.
-
-
Start all the zenworks services by running the following command:
microfocus-zenworks-configure -c Start
-