2.4 Operations
2.4.1 Request Fulfillment
Overview
The goal of Request Fulfilment is to manage the lifecycle of all Service Requests.
A Service Request is a generic term that describes the numerous and varied demands placed on the service and support organization. Many are small changes, which are considered to be low risk, frequently occurring and low cost in nature, such as change a password or install a software application request. Alternatively, it may simply be a Customer asking for information. It is the scale, frequency and low-risk nature of the Service Requests that require that they be handled by the Request Fulfilment process, and not Incident or Change Management.
The frequent recurrence of Service Requests requires a predefined process Workflow be set with the support Technicians, service targets and escalation paths in place. To cater for the diverse nature of Service Requests, at minimum two Workflows should be customized for Request Fulfilment, one to handle simple requests for information and the other to deal with standard changes.
In the system, Service Requests are logged against Service Items in the Service Catalog and follow Workflows that ensure that each Request is handled with consistency. The Workflows define the actions required to correctly implement any changes to the Service and define the responsibilities, authorization and timeframe expected to manage the changes that may result from a Service Request.
Once a Workflow is assigned to a Service Request, it is routed to an appropriate Technician based on Service Request Workflow State. After a Technician completes their assignment, the Request is forwarded to the next User based on the configuration of the next State for a standard change or closed, if it is a simple request for information.
When Service Requests are raised for Service Item breakdowns, the system allows them to be easily associated with an Incident within the Analysis tab of the Request. Or, if the Service Request results in a change to an Item that is not in the Service Catalog, a Change Request can easily be generated within the Service Request.
If a Service Request is related to an Incident, Problem or Change Request and that related request in the other Process is closed, the Service Request is automatically closed. The system views the request hierarchy from low to high as Service Request, Incident, Problem and Change Request, and if a related request of a higher type is closed, all the lesser type requests are automatically closed,or if the handshaking facility is enabled for the system, moved to the Pending-Approval State.
See: Service Catalog.
Implementing Request Fulfillment
To set up the Request Fulfillment Process in the system, the following steps are to be completed:
-
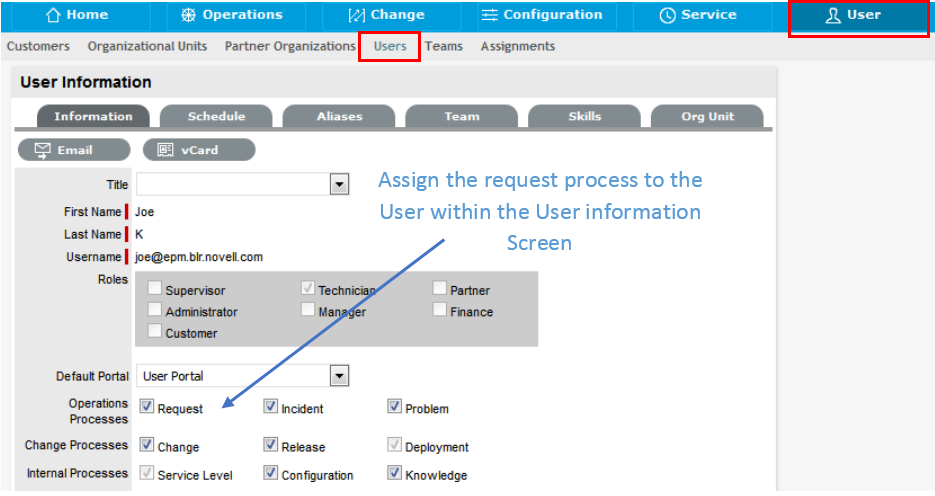
Assign the Request Process to the relevant Users within the User Information screen under the User>Users tab. (See:Create a User.)
-
Create or review the SLA within the Service>SLAs tab, and associate the Incident Service Request Workflow to the SLA in the SLAs Workflow tab. (NB: The Supervisor User setting up the SLA must be assigned the Internal Process of Service Level in their User Information screen to complete this action.)

-
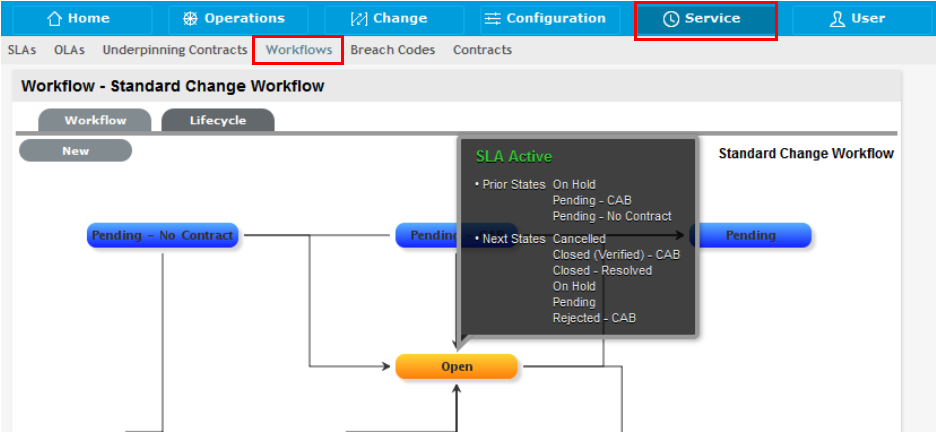
Review the Service Request Workflow within the Service>Workflows tab. (See: Service Request Workflow.)
-
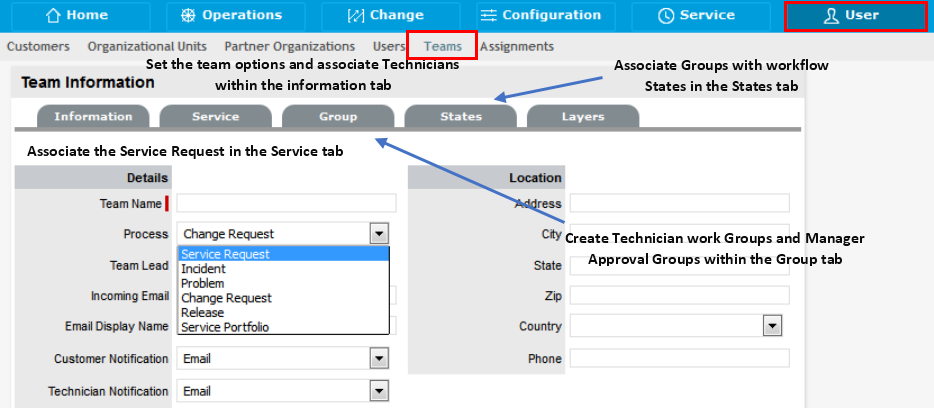
Create a Service Request Team within the User>Teams screen.
-
Associate the SLA to an Item or Customer or Org Unit. This final step ties all the elements together when a Service Request is created, as the SLA associated with the Item, Customer or Org Unit assigned to the Request determines the Workflow, Team and Technicians that are made available within the Service Request Information screen.
Creating a User Account (Internal Authentication)
Users within the system that are to be assigned to support Teams must be allocated one of the following Roles:
The above User Roles can work on requests. The About Roles section of the User Guide provides more information regarding specific User Roles in the system.
Creating a User Account
When creating a new User, the following four tabs are available:
-
Information
-
Schedule
-
Aliases
-
Team
-
Skills
-
Types.
Information Tab
Within the User Information tab, User details can be created, viewed and edited. User Roles, Process assignment and default logins can all be customized within this tab.
To create a new User:
-
Select User>Users
-
Click New
The User Information screen appears.
User Information Fields
Title
Select a title from the drop-down menu options. (This field is displayed if the Enable Titles option is set to Yes in the Admin>Setup>Setup>Privileges>Customer tab.)
First Name*
Enter the User's First Name.
Last Name*
Enter the User's Last Name.
User Name*
Enter a LiveTime User Name (unique).
Password*
Enter a User Password. Note: Passwords can be changed under the Users Tab or reset by the User under their My Account tab.
Roles*
Assign a Role for the User. Each Role has associated permissions. See User Roles.
Every Technician Role assigned also needs a Supervisor assigned.
NOTE:Note: More than one Role can be assigned but only one of Supervisor, Partner or Technician can be allocated per User.
Default Portal*
The Default Portal is the User Interface accessed by default when a User with multiple Roles logs into the system.
NOTE:If the Users Default Portal is set to Customer, the User details will not be accessible in the Users list, but included in the list within the User>Customer tab.
Assignment Template
This option is visible in a new User Information screen if Job Assignment Templates are configured in the User> Assignments tab.
Select a template to assign the new User to multiple Teams, Escalation layers and Processes.
Operations Processes
Assign the licensed access for Request Fulfilment, Incident and Problem Management.
Assigning Processes to the User gives them access to support those Processes and enables them to be assigned as Team members for those Processes' Teams.
See User Processes.
Change Processes
Assign the licensed access for Change, Release and Deployment Management. Note, Users assigned Release are automatically assigned Deployment.
Internal Processes
Enable the Users privilege to maintain Service Level, Configuration and Knowledge Management.
Selecting the Configuration and Knowledge options displays the relevant fields that enable granular controls to be set for those processes.
NOTE:The Finance Role is limited to the processes of Configuration and Service Level Management.
Knowledge
If the User is assigned the Knowledge Management process, their privilege to create, edit, delete and/or publish KBAs can be configured.
Configuration
If the User is assigned the Configuration Management process, their privilege to create, edit and/or delete Items within the CMDB can be configured on a per task basis.
Customer Org Unit
If the User is also allocated a Customer Role within the system, this field is displayed. Enter Company or Department details that apply to the User in their Customer Role.
Line Manager
(This field is visible if the User is also assign a Customer Role within the system. The information can not be edited if the line manager details are set by the LDAP synch.)
If relevant, assign a system user with the Customer Role who can approve/reject requests made by this Customer.
Primary Email*
Enter the User's email address. System messages are sent to this address.
Send To
This field becomes available for Users that have the Customer Role and have alternate email addresses entered on the Aliases tab.
Select the most appropriate email address to be set as the default address applied to Customer correspondence. When the Send To field is set to an alias address the Primary Email address is not included in the cc list, unless specified in the request Information tab cc list.
Phone
Enter telephone details.
Mobile
A mobile number can be entered as a contact number or for use with SMS (Short Mail Service message). An SMS can be sent to notify the assigned Technician when a Service Request is raised.
SMS Messaging options:
-
From the drop down list, select the SMS service provider.
-
Override SMS Address. If your service provider does not appear in the list, click this checkbox and enter an alternate Service Provider.
SMS Override
Enter SMS Gateway override details for the User, if a number other than the one entered in the Mobile field is to be used to send/receive updates via SMS. Enter the complete SMS details in email address format, i.e., 000777891@smsgateway.provider.com.
Fax
Enter known fax details.
Pager
Enter pager details.
Salary
An annual salary can be entered. This value is used for reporting.
Forum Moderator
Select this checkbox to designate this User as a forum moderator. See Forums.
Survey Manager
Select this checkbox to enable this User to create and manage surveys in the system.
Supervisor*
Select a Supervisor, if the User has a technician role. Users with the Technician Role must be allocated a Supervisor.
Partner For
When a User is assigned the Partner Role, their associated Partner Organization must be assigned within this field.
Partner
If the User is also assigned a Customer Role, this field allows the Customer to be associated with a Partner Organization who will handle their requests when they are logged in the system.
Available
Shows if the User is available for requests to be assigned to them. This is based on work hours configured in the Schedule tab of the User and their Vacation Status. If no hours are set within the Schedule tab when the "Define Works Hours" is enabled within Admin>Setup>Privileges>User screen and the User is not on vacation, the system will consider them to be unavailable.
Assignment
**Visible when the Assignment Control is enabled in Admin>Setup>Privileges>User.
Set to Off if the User is not to be assigned new requests, irrespective of their Availability status.
On Vacation
Placing a Technician on vacation excludes them from being assigned new requests automatically. When On Vacation is activated a Technician's existing requests are not reassigned.
Training
This option is only visible for Technician Users, and when enabled allows the User to be included in Teams to view requests but does not allow them to put the request in edit mode or add Notes.
Email Locale
Adjust the default language for email correspondence, if required.
Country
The User automatically adopts the default Country set for the system. However, the Country can be manually adjusted here for the specific User.
State
Set the State information based on the Country selected, if required.
Timezone
The User automatically adopts the default Timezone set for the system. However, the Timezone can be manually adjusted for the specific User.
GPS
The GPS coordinates of the last known address.
-
* Denotes Mandatory Fields
-
Complete the User detail information
-
Click Done.
Emailing User Details

To email a User regarding their system log in credentials, click the Email button within the User Information screen. If Random Passwords is enabled, selecting Email will reset the Password and forward the details to the User. If Password Questions is enabled in Setup>Privileges>System, selecting Email will send a link to the User directing them to a page that includes the security questions set for their account and reset the password based on the answers provided. Customers must complete this process within an hour of the email being sent.
vCard Button

Select this option to download and open the User's information in an electronic business card format, to email or save outside the system.
Schedule Tab
By default the Schedule tab includes the On Vacation option, which can be set to Yes when the User takes leave. The system will automatically reassign the User's active requests, if the Vacation Reassign option has been enabled in the Admin>Setup>Privileges>User tab. If this option has not been enabled, a Supervisor User will need to manually reassign the requests, if required.
If the system Setup has been configured to Define Work Hours and Schedule Vacations, this additional functionality is available within the Schedule tab.
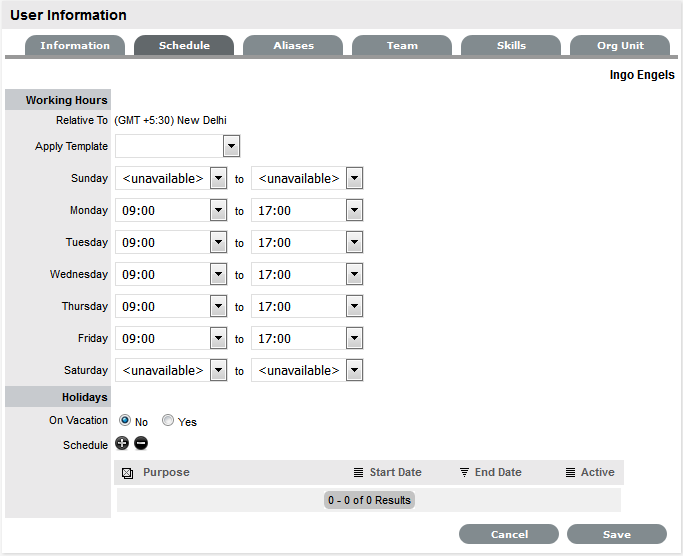
Define Work Hours
Use the drop-down lists to set the hours of work when the User is available for the week. Based on what is set here, the system will assign requests to the User during their available hours. However, if no other Technician is available for requests based on their defined work hours, the system will assign the User new requests outside of their set work hours.
NOTE:If the Technician Define Work Hours option has been enabled, the hours of work MUST be defined, otherwise the system will ignore the Technician Assignment logic and automatically allocate new requests to the Team Lead.
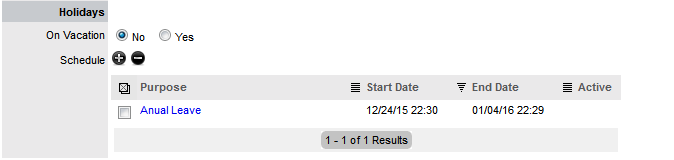
Schedule Holidays
The Schedule Holidays functionality allows the Supervisor to pre-book leave in the system for Users. There are no restrictions on the number of days that can be set, and based on the configuration, when a leave period is activated, the system will automatically reassign active requests to other available Users applying the Technician Assignment logic. If the request was initially drawn from an Incident Queue, it will not return to the Queue but be reassigned to the most relevant Technician based on the Technician Assignment logic.
As a Supervisor User, to schedule User leave:
-
Go to the Users>User option
-
Select the hyperlink name of the User
-
Move to the Schedule tab
-
Click Edit
-
Select

The Vacation Details window is expanded.
-
Enter the reason for leave in the Purpose box
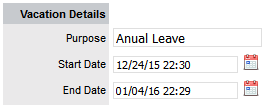
-
Complete the Start and End date details
-
Click Save
The details are recorded in the database and when the Start Date is reached, new requests will not be assigned to the User. After the scheduled End Date, the User account will be automatically re-activated.
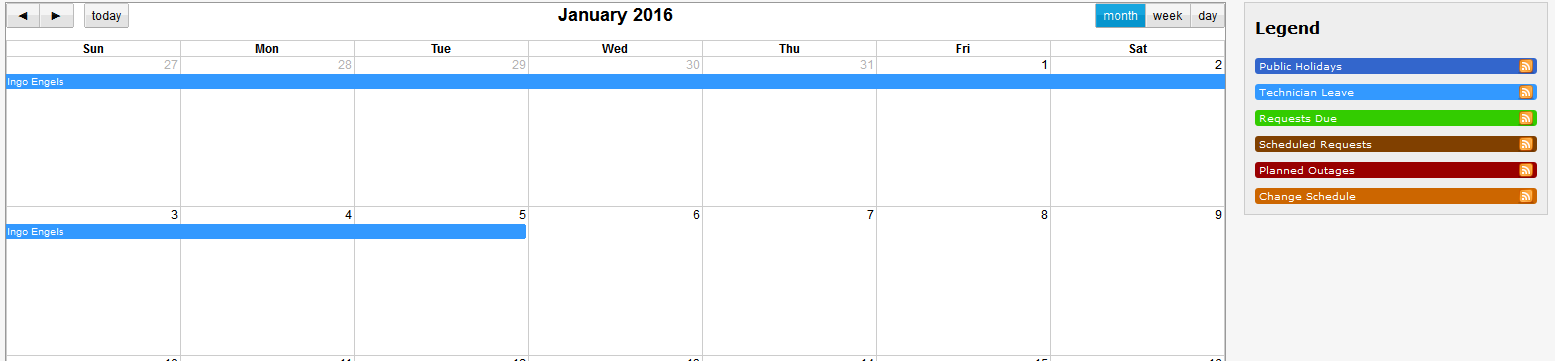
It should be noted that if the User on vacation is a Team Lead for any Teams where there are no Technicians available for new request assignment, the system will allocate new requests to the Team Lead, regardless of their vacation status.
The Supervisor Events calendar in the Home Tab shows when Users on vacation:
Aliases Tab
NOTE:Use the Aliases tab to enter additional email addresses. Email addresses in the Aliases tab allow the User to send emails to the System or Team support addresses from more than one address. The system creates requests from these emails. Notifications for requests created using an address in the Aliases tab, are sent to the main email address and cc'd to the alias address that was used to create the request.
This is only applicable if the User has the Customer Role.
When one or more alias email addresses have been created for a Customer, a Send To field is displayed on the Customer Information screen, which allows the most appropriate email address to be set as the default address applied to Customer correspondence. When the Send To field is set to an alias address the Primary Email address is not included in the cc list, unless specified in the request Information tab cc list.
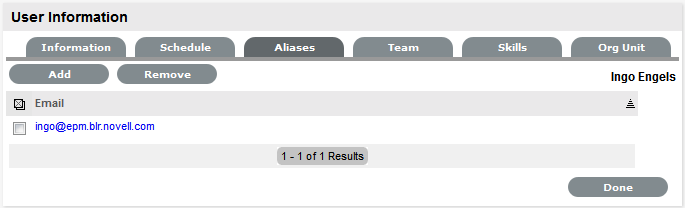
To add an alias email address:
-
Select User>Users
-
Click on the User name
The User Information screen appears.
-
In the Information tab, click Edit
-
Select the Aliases tab
-
Enter an alias email address
-
Click Save.
When an alias email address has been created for a Customer, a Send To field is displayed on the Customer Information screen, which allows the alias email address to be set as the default address applied to Customer correspondence.
An alias will only be used if the User has a Customer Role.
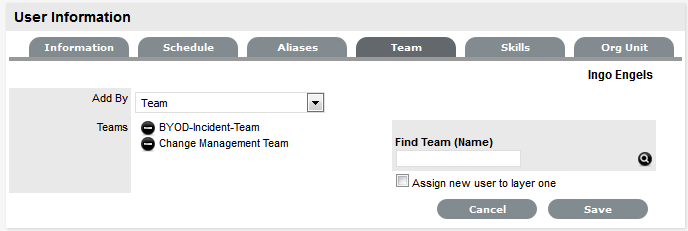
Team Tab
The User Team tab lists Teams associated with the selected User. Use this section to assign the User to one or more support Teams, making the additions by Team or job Assignment templates that have been configured in the system. Processes selected in the Information Tab for the User determine the Teams available in the Team tab.
Once a User is assigned to the Team, the Supervisor must configure the escalation layers for the Team to include the new User. However, the User can easily be added to Layer One of escalation when associated with a new Team by ticking the "Assign new users to layer one option" when assigning the Team within this tab. Also, if Assignment templates are created in the system, by selecting the Team template, the User will automatically be added to Teams,Escalation Layers and Work Groups configured within the selected template.
NOTE:The User must be assigned the relevant Processes for Support Teams to be shown in Team search results. If an Assignment template is selected and includes Teams for Processes the current User is not allocated, those Teams will not be included on the template.
To add a User to a Team within the Team tab:
-
Click Edit
-
Using Add By Team, enter a Team Name in the Find Team field and click

Or, leave the field empty and click
. The Teams for Processes that the User is assigned are displayed in the search results.
-
Tick "Assign new user to layer one", if relevant
-
Select a Support Team link
The User is assigned to the Team and layer one of escalation if appropriate.
-
Click Save.
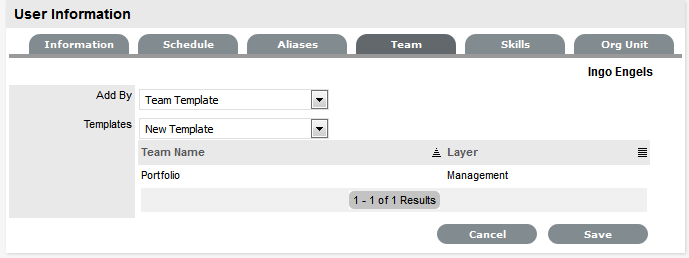
To add a User to a Team within the Team tab using Assignment templates:
-
Click Edit
-
Within the Add By field, select Team Template
Job Assignment Templates that have been configured in the User>Assignments tab are displayed, but only including Teams consistent with the Processes assigned to the User.

-
Select one or more Template options
-
Click Save.
The User is automatically included in the Teams, Escalation Layers and Work Groups configured in the Template.
To remove a User from a Team:
-
Select User>Users
The User Information screen appears.
-
Click on the name of the User
-
Select the Team Tab
-
Click Edit
-
Select
 to remove a Team assignment
-
Click Save
-
Click Done.
NOTE:If a User is the Team Lead or the only person assigned to an escalation layer they cannot be removed from a Team under this tab.
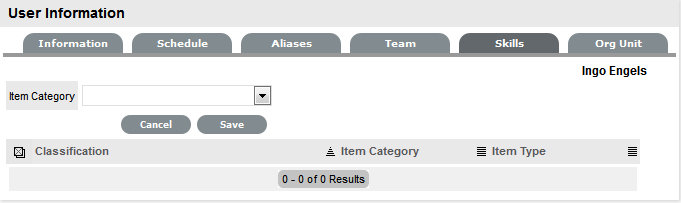
Skills Tab
Use this section to assign any specific Classifications that are to be handled by a Supervisor, Technician or Partner. This assignment assumes areas of expertise for Users assigned to these Classifications. This allows the system to automatically route requests logged against these Classifications to the most appropriate User.
NOTE:Prior to using the Skills tab, the Supervisor should configure Items and Classifications.
Assigning a Classification
To assign a Classification:
-
Select User>Users>Skills
-
Click Edit to display the Add button
-
Click Add
-
Select the Item Category
The Item Type and Classification Type drop-down list is displayed.
-
Choose an Item Type, if relevant
-
Select * to assign all Classifications as Skills or choose a specific Classification
The list displayed will include all Classifications configured for the Item Category and the Item Type, if an Item Type is selected.

-
Click Save
-
Click Done.
NOTE:The Classification assigned to the User is either based on the Classifications of an Item Category or Item Type, hence displaying two columns. However, the Item Type column will only include information when the Classification selected is specific to that Item Type, and not directly related to the Item Category.
To remove a Classification:
-
Select User>Users
The User Information screen appears.
-
Click on the name of the User
-
In the Skills tab, click Edit
The Delete button appears at the bottom right.
-
Click the checkbox next to the Classification. Multiple Classifications can be checked
-
Click Remove
-
Click Done.
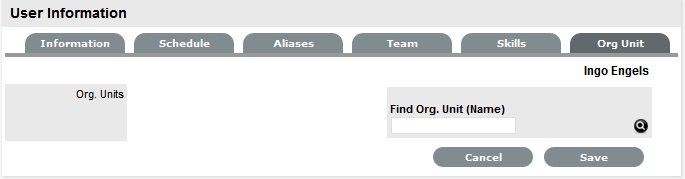
Org Unit Tab
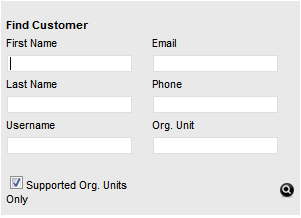
Use this section to assign one or more Org Units to a Supervisor, Technician or Partner, which will result in requests that are logged by these Org Units being routed to the assigned Users. When Users are assigned to support Organizational Units, the Find Customer option during the request creation process displays the "Supported Org. Units Only" option. This limits the Customer search results to those Customers who belong to the Org. Units the logged in Technician is assigned to support.
Assigning an Org Unit
To assign an Org Unit:
-
Select User>Users>Org Units
-
Click Edit to display the Find Org. Unit search field
-
Enter any known Org. Unit details or leave the field blank to return the full list of Org. Units recorded in the system
-
Click
-
Click on the Org. Unit name hyperlink to associate it with the User
Multiple selections may be made, if required.
-
Click Save.
Removing an Org Unit
To remove the association between a User and an Org Unit:
-
Select User>Users
The User Information screen appears.
-
Click on the name of the User
-
In the Org Units tab, click Edit
-
Select
next to the relevant Org Unit/s
The Org Unit/s details are removed from the tab
-
Click Save
-
Click Done.
Re-enabling Deleted Accounts
Administrators have the ability to reactivate deleted User accounts.
To enable a deleted account:
-
Within the User>Users tab, select the Search button
-
Select Deleted as the Account Status search option
-
Click Search
A list of deleted Users is displayed.
-
Select a User to re-enable
The User information page appears.
-
Click the Enable button, to reactivate the account.
The User account becomes active and is available within the application.
Service Requests

Service Requests are customer requests logged against Items that use the Service Category.
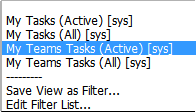
The Request Filter displayed by default in the Request tab is the All Service Requests, which lists all Service Requests logged in the system regardless of their status or assignment. The available List Filters include:
|
Filter |
Description |
|---|---|
|
All Service Requests |
Displays all Service Requests logged in the system regardless of their Status or Assignment. |
|
My Service Requests (Active) |
Displays all Requests in an active Workflow State that are assigned to the logged-in User. |
|
My Service Requests (All) |
Displays all Requests, in active and inactive Workflow States, that are assigned to the logged-in User. |
|
My Teams Service Requests (Active) |
Displays all Requests in an active Workflow State, allocated to the Teams with which the User is associated. |
|
My Teams Service Requests (All) |
Displays all the Requests, in active and inactive Workflow States, allocated to the Teams with which the User is associated. |
|
Pending Approvals |
Provides the User with quick access to a list of Service Requests that require Manager approval. (This is only available if the User has Manager access.) |
|
Service Request Queue |
Displays Requests assigned to the System User by default, which Technicians can reassign after viewing (This is only available if the functionality is enabled for the system and Team.) |
The default display is ten Requests per batch. The list can be re-sorted by clicking on a column header and the number of Requests displayed per batch can be altered using the Display pop-up option.
Creating a Service Request:
To create a Service Request the following information is required:
Service Request Queue
Service Requests that are created by Customers through the Customer Portal or via email, can be forwarded to a holding bay or queue, if this functionality is required by the Service Desk. The capability can be enabled system-wide but applied on a per Service Request Team basis, as needed.
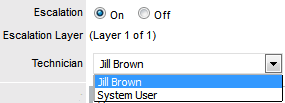
When a Service Request is assigned to the Queue, the name applied in the Technician field is System User.
See: Queues.
Service Request Search Tips:
-
The Request search option has a default status to search only Active Requests. To ensure search success, select the relevant Incident status, if unsure, select All
-
To search for multiple Requests numbers at once, insert a comma separator between ID numbers
-
To search based on a Request status, select the Service Request Workflow option from the Workflow drop-down list. Once selected, a list of States is displayed
-
To search by Classification, select an Item Category from the Category drop-down list. After the Category is chosen, a list of Classifications is displayed
-
To search based on the content of a Service Request Description, select the Full Text option within the Search and enter a relevant term (See:Full text searches.)
-
To search using an Item's Custom field information, select the Item Category to display any Custom Fields enabled for that Item.
NOTE:For information regarding request assignment, reviewing a request, adding notes or updating the status, refer to Working on a Request.
RSS Feeds
To easily access up to the minute details regarding Service Request activity within an RSS feed browser bookmark, Users can subscribe to RSS feeds by selecting the RSS button within the Service Request list. When the RSS button is selected, Users are presented with the application options for subscribing to receive the information and where the Recent Activity information is to be accessed. To readily access the information through a browser window, save the feed the to the Bookmark Bar.
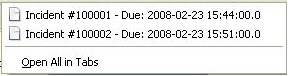
The following is an example of the information obtained by clicking on the RSS bookmark:
Queues for requests
The Queues functionality allows for requests, Incidents, Service Requests or Problems, to be assigned to the System User as part of a Team holding bay. Users within the Team with the Queue option enabled can select relevant requests they decide to work on, or manually assign the System User assigned requests to an appropriate User.
Requests that are assigned to the Queue are allocated to the System User, until they are manually reassigned to a specific User. The unassigned requests are located within the Home tab My Teams Queued Tasks, or the Operations>Incidents tab Filter option called Incident Queue for new Incidents, the Service Requests within the Service Request Queue in the Operations>Service Requests tab and the Operations>Problems tab Filter option called Problem Queue for new Problems .
When the Queue feature is enabled for the application, it can be applied on a Team by Team basis. This means some Teams can be configured to use the business logic of the application for assigning requests to specific Users. While other Teams can use the Queue to select the requests they want to work on, or allows other Users to manually assign the request to a relevant User.
When the Self Assign and Queue options are enabled for a Team and a request is created by a Technician User, the Self Assign option will override the Queue assignment and allocate the request to the User creating the request, if they are in the first layer of escalation. The User can assign the request to the Queue by selecting the System User in the Technician list.
Enabling the Queue
By default, the Queue functionality is disabled in the application Setup. To enable the Queue:
-
Log in as an Administrator
-
Select Setup>Privileges
-
Select the Request tab

-
Enable the Queues option
-
Click Save.
To enable the Queue for a Team:
-
Log in as a Supervisor
-
Select the User>Teams option
-
Select the relevant Team link
-
Click Edit
-
Enable the Queue option
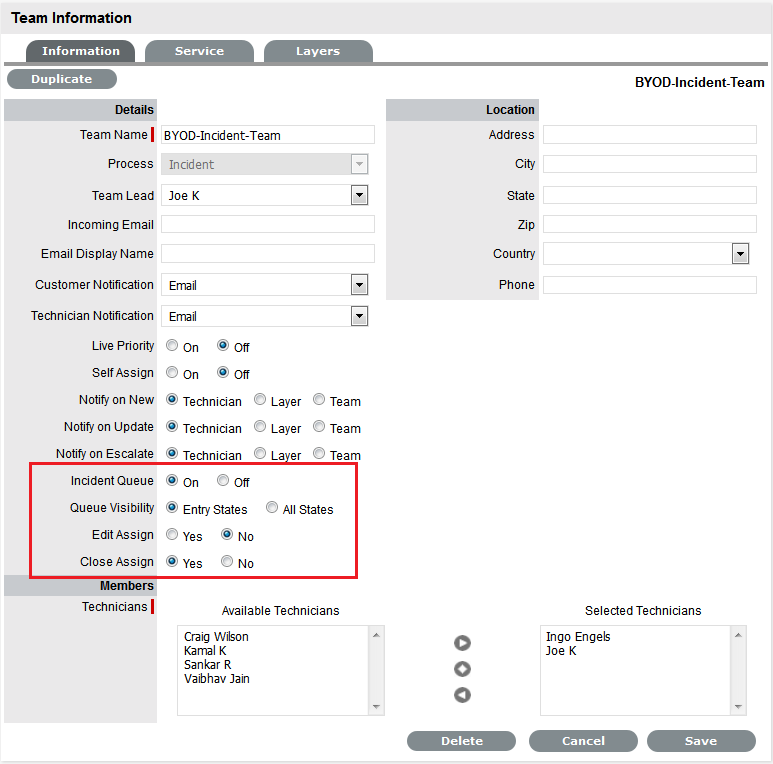
The following options can then be applied to the Queue:
Options
Description
Service Request /Incident/Problem Queue
Allows the Team to use a holding bay for Incidents that are received via email or the Customer Portal. (This option is visible if it has been enabled by the Administrator.)
If the Team has only one Technician assigned to Layer One of Escalation, new Incidents are automatically assigned to that Technician and that Technician is notified of the new Incident assignment.
If the Team has multiple Technicians assigned to Layer One of Escalation, the new Incident is placed in the Queue (i.e., it is assigned to the System User) and all members of the Team are notified that a new Incident has been assigned to the Incident Queue. See: Queues.
Queue Visibility
When the Incident Queue is enabled, the option can be refined to allow the Queue to be available for assigned Workflow entry points, or all stages of the assigned Workflow. If All States is enabled, Users can move requests back to the Queue throughout the request lifecycle. See: Queues.
Edit Assign
When set to Yes and a request assigned to the System User (i.e., Queue) is opened in Edit Mode, the system will automatically assign the request to the User editing the request if they are in the Escalation Layer associated with the request.
Close Assign
When set to Yes and a request assigned to the System User (i.e., Queue) is moved to an Exit State of the Workflow, the system will automatically assign the request to the User who prompted the close action.
-
Set the Queue Visibility
Select All States if Team members are to be allowed to return a request to the Queue regardless of the assigned Workflow State.
-
Set the Edit Assign option
Select Yes, if a request that is assigned to the System User/Queue is to be automatically assigned to a User in the first layer of escalation who opens the request in Edit mode.
-
Set the Close Assign option
Select Yes, if a request that is assigned to the System User/Queue is to be automatically assigned to the User who initiates an action that results in the request being moved to an Exit State.
-
Select Save.
Assigning requests from a Queue
All requests displayed within a Queue list are assigned to the System User. To reassign the request to an appropriate User:
-
Select the Request # hyperlink
-
Click Edit
-
Select an appropriate User from the Technician list
The request will now be assigned to the new User and removed from the Queue.
-
Click Save.
Reassign a request to the Queue
When the All States option has been enabled for the Queue within the Team Information screen, the System User will be retained in the Technician drop-down list for the first layer of escalation after it has been assigned to a User. This allows the assigned User to re-assign the request back to the Queue.
To reassign the request to the Queue/System User:
-
Select the Request # hyperlink
The request should be at layer one of escalation within the assigned Team.
-
Click Edit
-
Select System User within the Technician drop-down list
The request will now be assigned to the System User and returned to the Queue.
-
Click Save
-
Click Done.
The system returns to the request list view.
Queue Filter
Teams that use the Queue method for request assignment can view and allocate requests using the My Teams Queued Tasks within the Home tab list filter, or within the Service Request, Incidents or Problems tab Queue list filter. They can also see Queued Tasks within the My Teams Tasks filters.
To view all types of requests assigned to the Queue within one list, use the My Teams Queued Tasks within the Home tab:
-
Select the Home tab
-
Go to the Filter List
-
Select the My Teams Queued Tasks option from the drop down list.
The screen will list all of the Service Requests, Incidents and Problems that are currently assigned to the System User.
To view the Queue within the Service Requests tab:
-
Select the Operations>Service Requests tab
-
Go to the Filter List
-
Select the Service Request Queue option from the drop down list.
The screen will list all of the Service Requests that are currently assigned to the System User.
To view the Queue within the Incidents tab:
-
Select the Operations>Incidents tab
-
Go to the Filter List
-
Select the Incident Queue option from the drop down list.
The screen will list all of the Incidents that are currently assigned to the System User.
To view the Queue within the Problems tab:
-
Select the Operations>Problems tab
-
Go to the Filter List
-
Select the Problem Queue option from the drop down list.
The screen will list all of the Problems that are currently assigned to the System User.
Customer Tab
The first step in creating a new Service Request requires that a Customer be assigned to the Request. There are two ways to assign a Customer to a Request, either search and select an existing Customer, or create a new Customer.
Create a Service Request for an existing Customer
To search and assign a Customer who already exists in the system:
-
Go to Operations>Service Requests
-
Click New
-
Search and select a Customer
Within the Find Customer field, enter any known Customer details or leave the search field blank to access the complete Customer List. If Custom Fields have been enabled in the Customer Information screen, the Advanced Search option can be used to search on data recorded within these fields.

-
Click
to search the Customer database
-
Select the relevant Customer Name hyperlink to assign the Customer details to the Request.
The screen will open the Find Item field.
Create a Request for a new Customer
If the Customer does not exist within the system, an account can be created when entering the Request:
-
Select Operations>Service Requests
-
Click New
-
Within the Find Customer field, select New
An expanded editable Customer details form is displayed.
-
Enter the Customer details
-
Click Save
The form will revert to a non-editable screen of the newly entered details.
-
Click Next to assign an Item to the Request. Or select Quick Call if a Quick Call template is to be used.
Requests for Partner Organization Customers
NOTE:When a Request is created for a Customer of a Partner Organization it is automatically allocated to the Partner User associated with the Partner Organization.
Supported Org Units Only option
This option is visible within the Find Customer search field, if the logged in User has been assigned to support specific Organizational Units. Uncheck the option, if search results are to include Customers belonging to all Organizational Units recorded in the system.
Advanced Search Option
To search for a Customer or an Item based on custom field information, use the Advanced Search option. The Advanced Search enables the User to search on Customer or Item custom fields, if they have been enabled.
During request creation the option Advanced Search will be visible within the Find Customer and Find Item screens.

To use the search option:
-
Tick the Advanced Search option
For the Find Customer, a custom field list will appear. For Find Item, an Item Category drop-down list is displayed.
-
For Find Item, select the Category. Two custom field lists appear
-
Select the custom field/s to search on
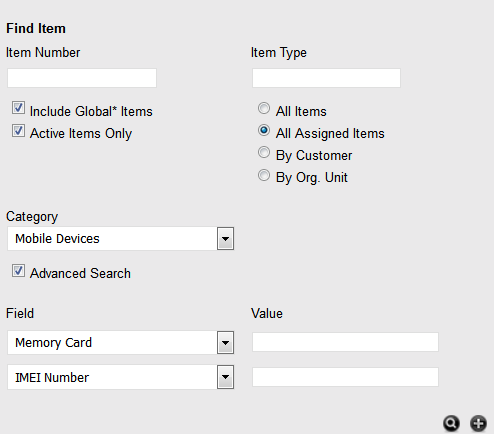
-
In the Value field, enter the details to be searched
-
Click
to return a list of Customers/Items based on the custom field value entered
-
Click the relevant Customer Name or Item number to assign it to the request.
Item Information
After the Customer details are assigned to the Request, an Item or Items are assigned to the Request. This assignment associates all the relationships of the Item(s), including service level agreements and assigned support Team, to the Request.
If the Customer assigned to the Request owns any Items they will be listed below the Find Item search box. By default, the list is defined by the All Assigned Items option. It is also possible to search by:
-
All Items
(Only visible if the Search All Items option is enabled within Admin>Setup>Privileges>User tab.)
-
All Assigned Items (Customer and Organizational Unit)
-
Assigned Items by Customer
-
Assigned Items by Organizational Unit.
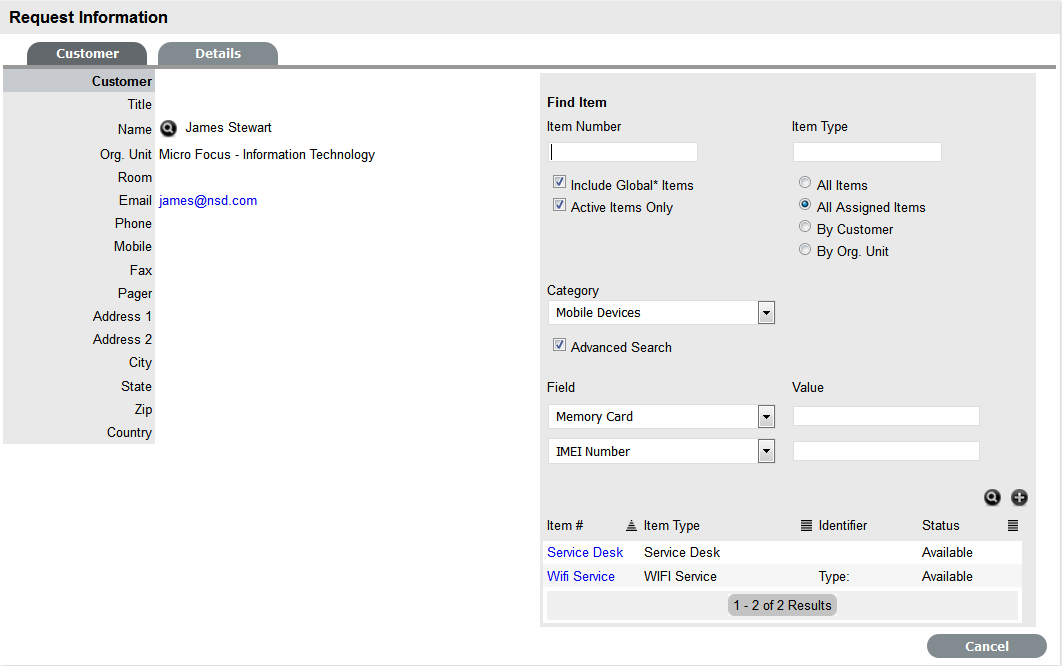
The list can be filtered using the Include Global* Items option. This will display Items that are available to all Users in the system, as they have not been assigned to a specific Customer or Organizational Unit. It can also be filtered using the Active Items Only option, which means only Items that are assigned an active lifecycle state are displayed if the option is checked.
Multi-Item Requests
The system also allows for multiple Items to be assigned to a Request during the Request creation process, if relevant. This results in separate Requests being created for each Item assigned to the initial Request, which are then displayed within the Related Requests window within the Service Request Information screen.
The Requests are managed as individual Requests to cater for any special requirements relative to each Item. For example, consider a situation where a Team rolls-out an update in an organization. In this instance, during the Request creation process multiple Items are assigned to a single Request, which the system automatically allocates to separate Requests that are then managed on an individual basis. This allows appropriate Teams/ Technicians to be assigned to the Requests relative to their skill-set or departmental assignments. The implementation process more effectively differentiates between the tasks and Items being modified and ensures each Item has its own Audit Trail, Attachments and Notes for future reference.
Multi-Item Requests are listed as separate Requests within the Request List View, and can be accessed as a group with the Service Request Groups List View.
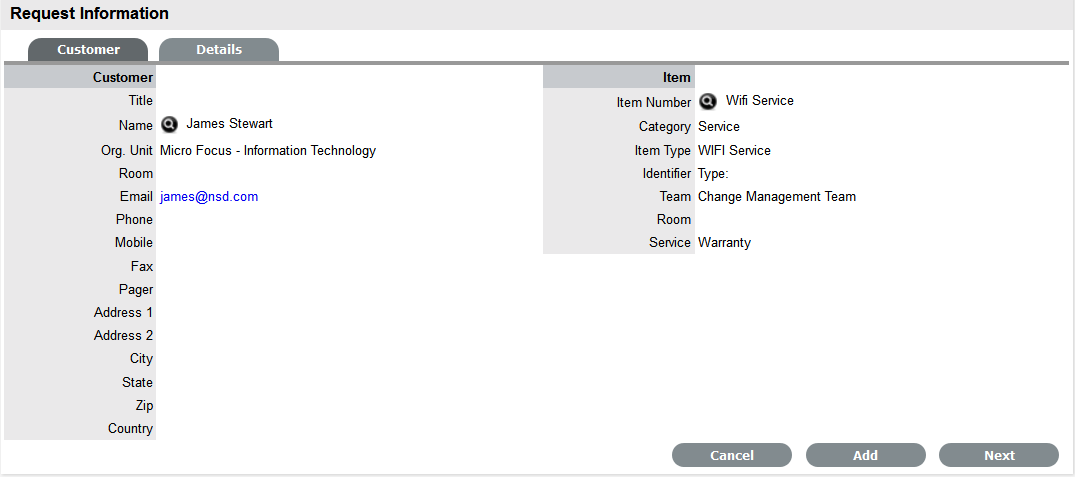
Request Item Assignment
To assign an Item to the Request:
-
Click the relevant Item link if listed below the Find Item search box
Or, Search for an Item or click
to Create an Item.
The option to create an Item is only available to Technicians if the system Administrator has enabled the Create Items option within the Setup>Privileges>User screen.
-
Click Next to move to the Details tab if only one Item is to be assigned to the Request
Or, select Add to assign additional Items. If Add is selected, a Request Selections window will be displayed that lists all the current Items assigned to the Request.
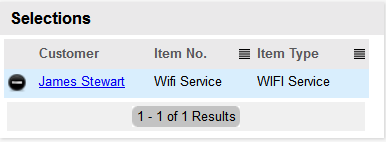
-
Continue to add all the relevant Items to the Request and then select Next to move to the Details tab.
Within the Details tab the Request is profiled by assigning a Classification and Description.
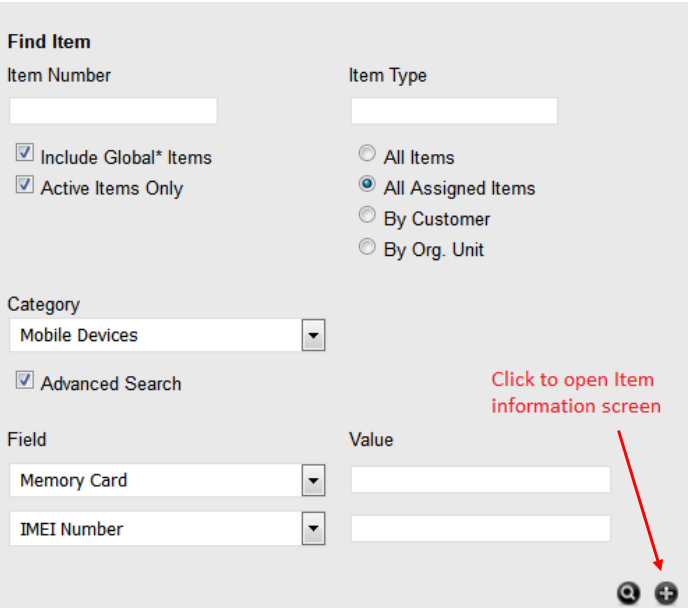
Creating an Item during request creation
To create a new Item for the Customer after they have been assigned to the request:
-
Move to the Find Item field
-
Click
to add a new Item using the Find Item Type field
An expanded Item information screen appears, with the Item number field completed.
-
Enter the Item Type Name in the Find field, or leave empty and click
-
Select the Item Type hyperlink to assign the details to the new Item
-
Enter other required information
-
Click Next
The Item Details tab is displayed.
-
Enter any known Item details
-
Select Save.
The Item details are saved, select Next to complete the request creation process.
NOTE:This option is only available to Technicians if the system Administrator has enabled the Create Items option within the Setup>Privileges>User screen of the application.
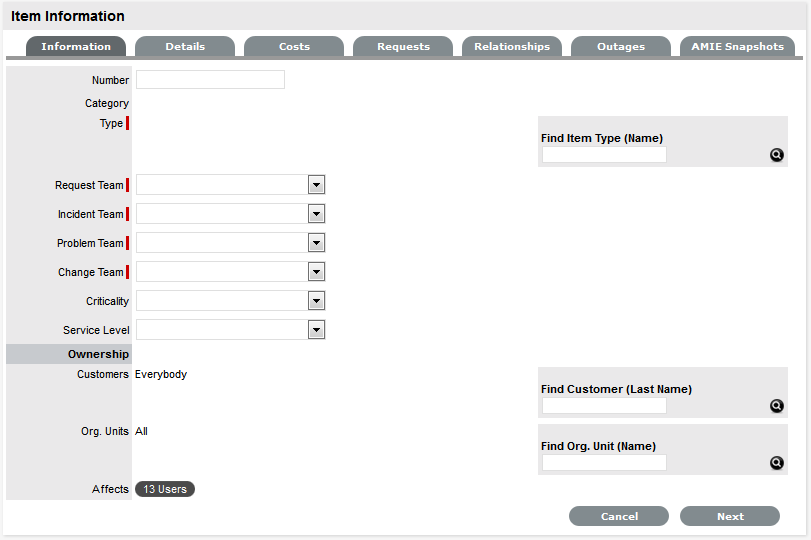
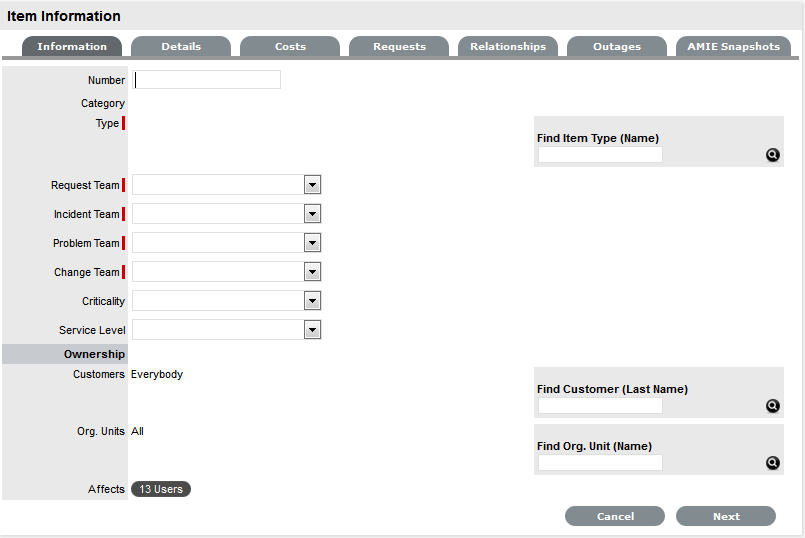
Item Information
Item information allows the User to configure the basic information for the Item, most of which is pre-populated based on the Item Type selected for the Item. Within this screen the owners of the Item are also assigned.
To create an Item:
-
Select Configuration > Items
-
Click New
The Item Information screen appears.
Item
Description
Item Number*
If the Administrator has set the Item Numbers Editable option in Setup> Privileges> System to Yes, the User will have the option of entering a customized Item number. It may contain numbers and/or letters, and be between 1 and 64 characters in length.
As no two Item Numbers can be the same, the User will be prompted to change the value they have entered if it is already in use. If the Item Number field is left blank, the system will automatically create an Item Number.
If the Administrator has set the Item Numbers Editable option to No, an Item Number will be generated automatically and cannot be edited.
Category*
This is auto-filled, based on the assigned Item Type.
Type*
This is the Item Type that the Item represents. Click the Search button to view the list of available Item Types.
Team*
This is the Technician Team that will be assigned to support the Item.
Status*
Select the status from the drop-down options displayed after the Item Type has been assigned.
Criticality*
Rates the degree of importance of an Item Type within an organization. The 'Impact' of a request is initially pulled from the Criticality of the Item, but can be adjusted within the request Information screen if required. Requests logged through the Customer Portal, use the Criticality of the Item to determine the Priority of the request. (See additional information below.)
Service Level
Select the Service Level Agreement from the drop-down list, if required.
Ownership
Customers
These are the Customers who own the Item. A single Customer, a group of Customers or all Customers in the application can be assigned to an Item.
-
Enter a Customer last name, or leave blank then click the Search button to view a list of all available Customers.
-
Click on the hyperlink for the relevant Customer name or names to assign them to the Item.
If no specific Customer is allocated to the Item, it becomes a Global Item and is assigned to Everyone.
Org Units
These are the Org Units who own the Item. The Item can be assigned to one or multiple Organizational Units.
To assign an Org Unit:
-
Enter an Org Unit name, or leave blank then click the Search button to view a list of available Org Units.
-
Click on the hyperlink for the relevant Org Unit name or names to assign them to the Item.
NOTE:If Billing is enabled an owner must be assigned to the Item. The owner can be either a Customer or an Org Unit, but only Org Units that have a Primary Contact, will be displayed in the Org Unit Search list. (See: Primary Contact.)
Notification
Method
This field is visible when an active Item moves into an offline State and allows the User to define who (Primary Contact or All Owners of the Item) and how (Email or SMS), Customers will be notified that the Item is not available.
*Denotes mandatory fields
-
-
Search and select an Item Type
-
Select a support Team for each process
-
Select the Item's Status and Criticality
-
Assign a Service Level
If Contracts are enabled for the system, the assignment of an SLA will result in an annual service contract automatically being applied to the Item. If an SLA is not assigned, a Contract can be created for the Item within the Costs tab.
-
Search and select a Customer and/or an Organizational Unit owner
-
Click Next to view the Details tab.
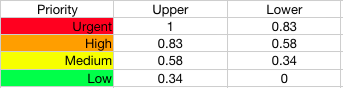
Item Criticality
The Item Criticality is used to identify the degree of importance of an Item to an Organization.
When the Incident Priority is set to Derived in the Administrator Setup, the Impact of a request is mapped from the Criticality of the Item associated with the request and then combined with the selected Urgency, which derives the Priority of the request. If required, the Impact can be manually adjusted within the request Information screen. Requests logged through the Customer Portal, use the Criticality of the Item to determine the Priority of the request, which can be manually adjusted by the Technician User.
The following table displays the calculations applied by the system to the Item Criticality, which is mapped to a request's Impact to determine a request's Priority:

The above calculations result in the following Priorities:
The Incident Analyzer, if enabled by the Administrator in Setup>CMS>Incident Analyzer, can apply the Criticality to automatically detect Problems. The minimum Criticality level can also be used to determine the off-line Items that appear on Outages pages, if the Outages pages are enabled by the Administrator in Setup>Privileges>System.
Create an Item with Contracts Enabled
When Contracts are enabled with Billing, Items, Customers and Organizational Units can be linked together using a service contract. To automatically apply the system default support contract when creating an Item, simply select an SLA and an annual contract is applied. However, if an SLA is not required but a service contract is, the contract can be created within the Costs tab of the Item. See:Costs Tab.
Details
Once the basic information for an Item has been completed, additional details can be defined for the Item. The Details tab displays a list of custom fields set for the Item's Category. The information to be completed within this section is configured by the Supervisor when customizing the Item Type templates in Configuration > Categories. Fields marked as Required, must be completed for the Item Details of the Item to be saved successfully.
For more information about Item custom fields, see: Categories.
Clicking Save at the far bottom of the page after the Details tab has been completed, will create the Item and save it to the database.
NOTE:Items can be duplicated at any time by clicking the Duplicate button. A new Item is created with properties that are identical to the original Item (with the exception of the Item Number, as this must be unique and is generated automatically).
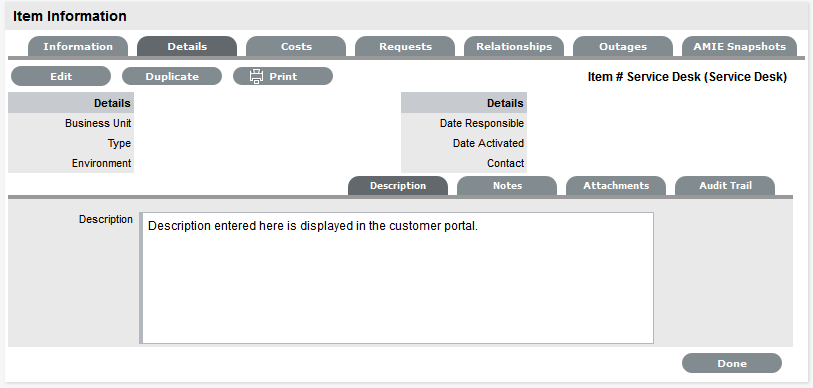
Item Description
Content entered in the Description field is made available on the Customer Portal in the expanded information window for an Item. For Service Items, where a description of the Service may be required within the Customer Portal, details about the Service can be completed within the Item Description field. The Item and Service information can be expanded by completing Item attribute fields that are marked as Customer Visible and therefore displayed in the Customer Portal.
To add an Item Description, within the Item's Details tab:
-
Click Edit
-
Move to the Description tab
-
Add information in the Description field
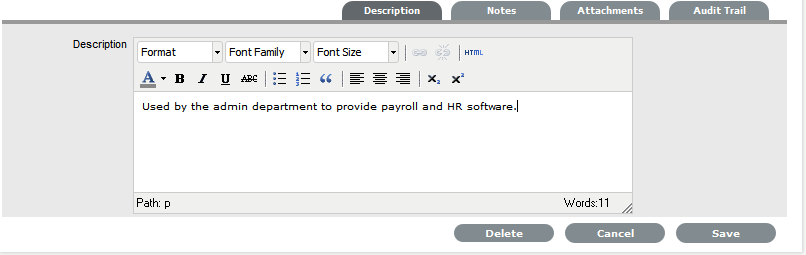
-
Click Save.
Item Notes
To add Notes to an Item, under the Item's Details tab:
-
Click Edit
-
Select the Notes tab

-
Click New
-
Enter details in the Notes field
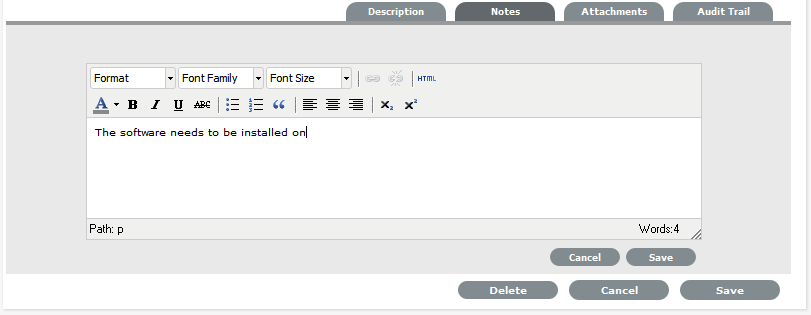
-
Click Save.
The Note will be allocated an identification number hyperlink for access. It will also be time and date-stamped.
Item Attachments
To add Attachments to an Item, within the Item's Details tab:
-
Click Edit to display the Attachment tab New button
-
Click New

-
Browse and select a file
-
Enter a Description, if required
-
Adjust Private and Public option, if relevant
Selecting Public will make it accessible on the Customer Portal, when the Item is in a Customer Visible state.
-
Click
 .
.
Item Outages
Planned outages can be created for an Item under the Outages tab. This is a period of time an Item will not be available for a Customer's use.
If an Item has an SLA with a specified Blackout Period, Outages should be planned to fall within this time. The Blackout Period is an agreement between the Customer and the Service Desk regarding a period of time when the Customer has no service expectations. This can also be the preferred time for Item upgrades and maintenance without affecting service availability.
When an Outage is being created, the Blackout Periods times are displayed to ensure the User creates a new Outage that does not breach the Item's SLA.
Creating an Outage
To create an Outage:
-
Select Configuration > Items
-
Select the Item Number
-
Go to the Details tab
-
Click Edit
-
Go to the Outages tab

-
Click New
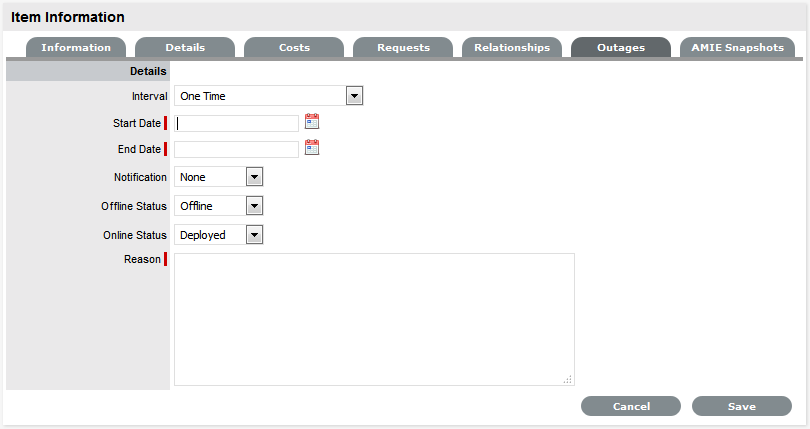
The screen will expand to display the Outage Editor screen including the Blackout Period, if defined for the Item associated SLA. Within the table the start and end time is displayed as Local Time and Actual Time:
-
Local Time is based on the time zone of the logged in User
-
Actual Time is based on the SLA time zone.
-
-
Define the Interval for the Outage
Select One Time if the Outage is a one off, or set regular outages based on a weekly or monthly basis.
-
Enter the Outage details
Select the Start/End Date within the calendar, and modify the Time accordingly inside the calendar pop-up.
-
Set the Notification method and recipients, for when the Outage is saved.
-
Tick the Reminder Email field, if a reminder is to be emailed to defined recipients prior to the Outage time
-
Define the length of time before the Outage occurs that the reminder is to be sent

-
Complete the Reason for the Outage
-
Click Save.
The Outage notification is sent to the defined recipients upon save.
See Outages for more information on setting up and viewing Item Outages.
Item Audit Trail
The Audit Trail tab records all changes that are made to fields within the Item Information and Details screens. These entries are made to record all the alterations made to Items and the CMDB.
To view an audit trail entry, under the Item Details tab:
-
Select the Audit Trail tab
-
Click on the identification number hyperlink to display the entry details.

Rollback Option
All changes recorded in the Audit Trail can be rolled back to reinstate information recorded against an Item.
To return to Item details to previously saved information:
-
Click Edit
-
Select the identification number hyperlink of the entry to be reversed
-
Click the Rollback button
-
Save the Item.
The Item details will revert to information recorded before an update was made.
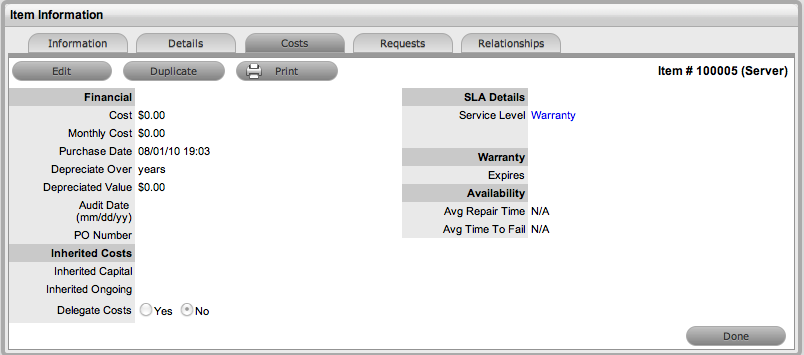
Costs
For Users who are not assigned the Finance Role, the Costs Tab displays SLA Details and Item Availability information. Users who are assigned the Finance Role, also have access to the Item's financial and contractual details. The following Item Costs details include:
-
Base cost
-
Purchase date and related information
-
Depreciation data
-
Inherited costs
-
SLA and Contract details
-
Availability statistics.
Completing the Depreciate Over field causes the application to automatically keep track of the Item depreciation over the specified number of years. The current value of the Item after depreciation is displayed at Depreciated Value. The Audit Date field is used to record the date when the Item was last audited.
For Service Items see: Service Item Costs Tab
The Financial Costs and Inherited Costs fields allow the support organization to assign costs across related Items and charge Users and/or Organizational Units appropriately.
|
Financial |
Description |
|---|---|
|
Cost |
The financial investment made to purchase the Item. This figure is also used when the Delegate Costs is enabled for allocating costs across related Items. |
|
Monthly Cost |
The amount invested on a monthly basis to maintain the running of an Item. This figure is also used when the Delegate Costs option is enabled for allocating costs across related Items. |
|
Purchase Date |
The date the Item was purchased. |
|
Depreciate Over |
Enter the number of years the Item is to be depreciated over, if required. |
|
Depreciated Value |
The system calculates the current value of the Item based on the Purchase Date and the number of years the Item is to be Depreciated Over. |
|
Audit Date |
Set the date the Item is next to be audited. |
|
PO Number |
If Purchase Orders are enabled for the system, the field is visible and automatically populated with the PO number generated by a User within the Finance>Purchase Orders tab, when the Item order was recorded in the system. |
|
Inherited Costs |
|
|
Inherited Capital |
Total infrastructure costs of parent CI's that directly contribute to the cost of the current CI. This figure is derived from all the Cost fields within the Item Information>Costs tab of related Parent Items. |
|
Inherited Ongoing |
Running costs of all associated Items that enable the current CI to continue to function. This figure is derived from all the Monthly Cost fields within the Item Information>Costs tab of related Parent Items. |
|
Delegate Costs |
To enable cost delegation across the relationship map allowing associated Items to inherit the costs of the current CI, select Yes. This will take the figures from the Cost and Monthly Cost fields for the Item and spread them across related Child Items. Define the technique to be used to evaluate the cost split: Child Count:Costs are split by percentage based on the number of child CI's the costs are being delegated across. User Count:Costs are split proportionally based on the number of users of the child CI's the costs are being delegated across. Custom %: The relationship itself allows for the % cost to be assigned |
The figures displayed within the Availability fields are automatically calculated by the application, using the Item Lifecycle as it moves between online and offline States:
|
Availability |
|
|---|---|
|
Avg Repair Time |
Entries displayed here are automatically calculated based on the average length of time an Item is offline. |
|
Avg Time To Fail |
Figures displayed here are automatically calculated based on the average time between an Item being offline. |
Billing Enabled
When Billing is enabled, a Service Level hyperlink is available within the Costs screen. This provides access to the Service Level Agreement details that govern the lifecycle for Requests logged against the Item.
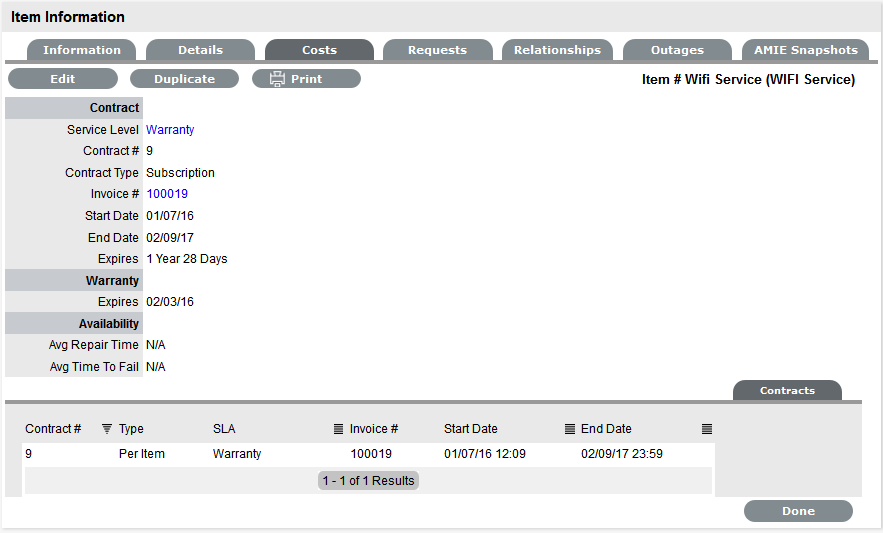
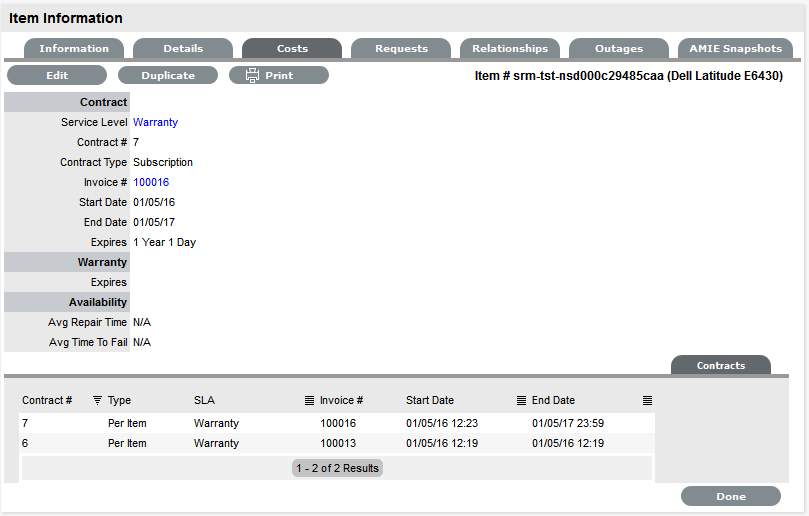
If Invoices are also enabled, an Invoice Number hyperlink is available and when selected, will display the invoice details for the Contract that covers the Item. The Start Date and End Dates stipulate the contract length covered for the Item. It is summarized by the days or hours recorded in the Expires field.
The Contract tab within the Item Information Costs tab summarizes the contract details that cover the Item. Further Contract details can be found within the relevant Contract Number within the Finance>Invoices screen.
Create a Contract
Through the Item Costs tab, Contracts with an associated Invoice Number (if relevant) can be generated for an Item, after it has been logged in the system.
To add a Contract to an Item, within the Configuration>Item screen:
-
Select the Item Number
-
Move to the Costs tab
The Contracts tab is visible in the bottom right corner of the screen
-
Click Edit
The Add and Delete buttons are made available within the Contracts tab

-
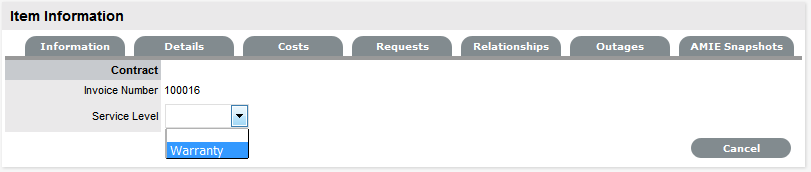
Click Add
(If Invoices are enabled in the system, an Invoice number will be automatically generated and assigned to the Contract).
-
Select an SLA from the drop-down option
The screen will display the SLA details and the Contract Type locked to Per Item.
-
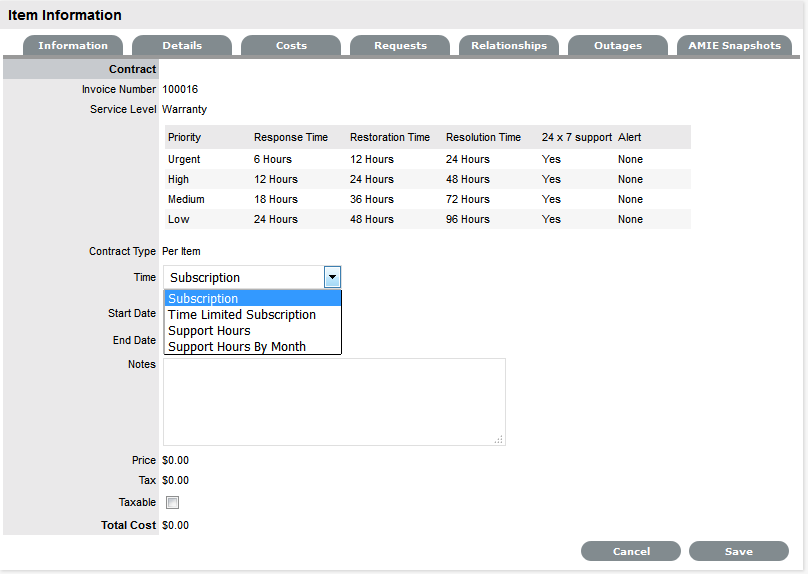
Assign the Time period to be covered by the Contract:
If Subscription is selected, the Start and End Dates are automatically completed by the system, but can be edited if required.
If Time Limited Subscription is selected, the Support Hours field is displayed and the number of support hours purchased by the Customer should be entered. Also, the Start Date and End Date fields should be completed manually, entering the length of time for the subscription period.
If Support Hours is selected, the number of support hours purchased by the Customers should be entered.
If Support Hours by Month is selected, set the number of hours purchased per month and define which day of the month contract is to rollover to start the new month. The Total Support Hours will automatically be calculated based on the Start and End Dates set for the Contract.
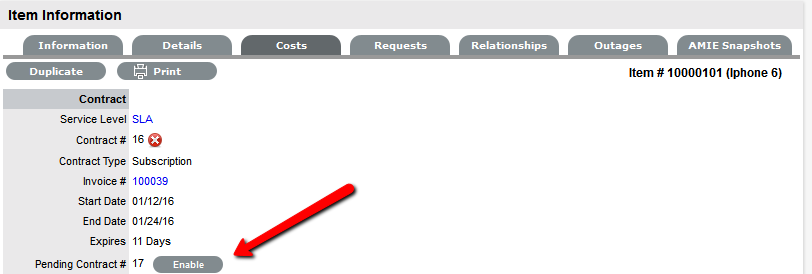
(If a Contract is forward dated with a Start Date set in the future, the Pending Contract status is assigned. See Pending Contracts.)
-
Add any relevant Invoice Notes
-
Check the Taxable box, if the Contract is to be taxed
-
Click Save.
If Invoices are enabled in the system, an Invoice number will be automatically generated for the Contract and made available within Finance>Invoices. Payment will need to be processed by a Finance User before the Contract can be enabled in the system. If invoice payment is required before the contract can be enabled in the system the following Warning message is displayed:

-
Click Next
The Contracts information is only populated after the Invoice has been processed. To process the Invoice, as a Finance User move to the Finance>Invoices tab. Once the relevant Invoice payment has been processed the Contract details will be visible in the Costs >Contracts tab.
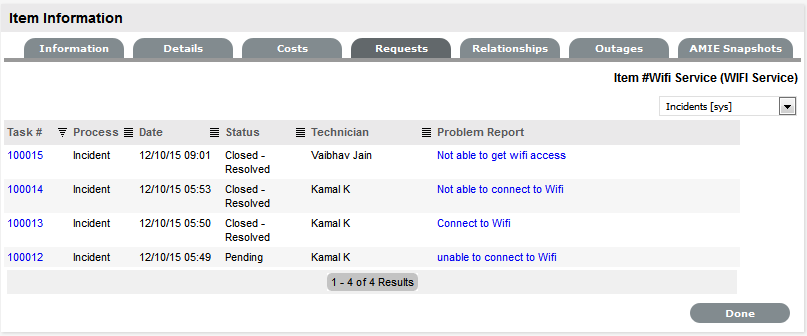
Requests
This section lists all the requests that have been logged against an Item. For Technician Users, this tab is only visible to when the View All Requests option is enabled in the Setup>Privileges>User tab.
Use the system list filter to display the relevant type of request or task. To expand and view the request in full, select the Task # or Problem Report hyperlink.
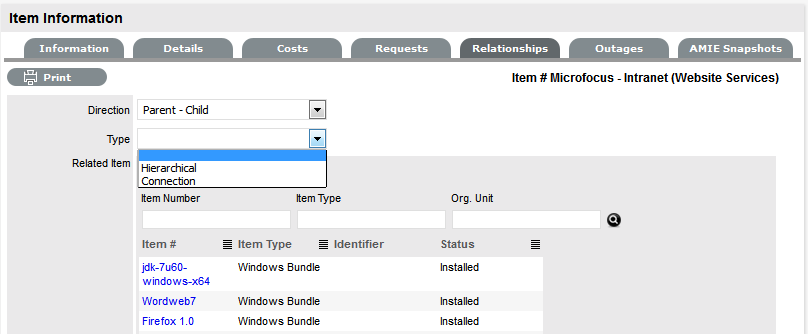
Item Relationships
This Relationship Tab allows Users to view and/or create a Relationship Map for the current Item, with other Items within the CMDB.
The Relationship direction can be defined as:
-
Service Oriented - Parent-Child Relationship
-
Component Oriented - Child-Parent Relationship.
Within each view the Relationship Class can be defined as:
-
Hierarchical Relationship
-
Connection - an association between the selected Items.
For a Service, such as the Email or Web Site Service, it is recommended that the Hardware be defined as the Parent for the Software Items and the Software be defined as the Parent of the Email or Web Site Service.
Create a Relationship
To create a new Item Relationship:
-
Select Configuration>Items
-
Select an Item
-
Select the Item's Relationship tab
-
Click Edit
-
Click New
-
Select the Relationship Direction and Class from the drop-down menus
-
Define the Relationship by selecting a description from the drop-down list
If the Relationship Type has the Inherit Parent Ownership option enabled, Child Items that use this relationship will inherit the Parent Item's owners. The ownership will not be editable and no other Parent Item can be assigned to the Child Item. A warning will be displayed if a relationship type has the Inherit Parent Ownership option enabled.
-
Use the Find Item field to locate the relevant Item
-
Click on the Item Number hyperlink to create the Relationship
-
Click Save to default to the Relationship Map view.
Relationship Map
Within the Relationships tab of the Item Information screen, a Relationship Map visually displays the connections that have been defined for an Item. All Item Relationships are listed in the Relationships Table beneath the Map. The Relationship Map can display up to 48 Child Items and 16 Parent Items in the one diagram.
The central icon of a Map is a visual representation of the selected Item. Scroll over an Item label to view any information recorded on the Information and Details tabs of the Item. To drill-down through the relationships, click on an Item label. To change the focus of the Relationship Map to another Item, click on the Item label and the system will request that OK be selected before updating the central node of the Map.
The Relationship Table data displayed at the base of the map can be filtered using the Direction filter view of Parent-Child or Child-Parent.

The map displays the relationship between each Lifecycle State by using different colors to represent the type of Lifecycle State.
|
Color |
|
|---|---|
|
Green Circle |
CI is assigned an online status. |
|
Red Square |
CI is assigned an offline status. |
|
Blue Triangle |
Service CI is assigned a pre-production status. |
The Lifecycle State name can be accessed by scrolling over the Item icon within the Map.
To delete a Relationship:
To remove the Relationship between Items:
-
Select the relevant Item within the Configuration tab
-
Move to the Relationships tab
-
Click Edit
-
Select Delete
A table with the Relationship details is displayed.
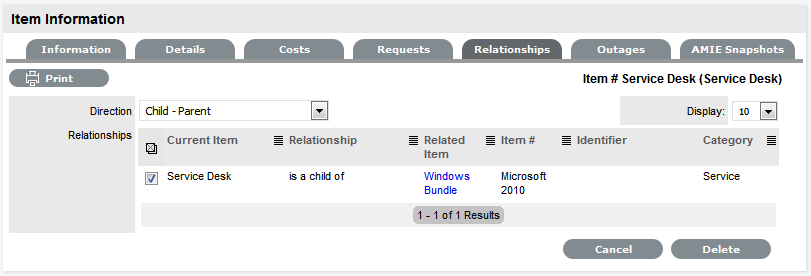
-
Select the Relationship Direction to display the relevant Relationship table
-
Mark the checkbox next to the Relationship that is to be removed
-
Select Delete
-
Click Done to return to the Item list.
Users can view and create relationship maps for current Item with other Items within the CMDB within the Relationships tab to define the infrastructure that underpins Services within the Service Catalog. For more information about creating a Service catalog and relationship mapping, see: Service catalog.
AMIE Item Imports and Relationships
Items with Item relationships that have been imported using the AMIE engine, retain the relationships that exist within the Asset Management Tool. A visible map of the relationships is recorded within the Relationships tab.
Quick Calls
Quick Calls are used for common Requests that are logged using a template during the Request creation process.
If the Quick Call functionality is enabled for the system, after the Customer and, if relevant, Item details are assigned to a
Request, within the Details tab the Quick Call options are displayed below the dashed line in the Request Type drop-down list.
NOTE:Quick Call Templates also define the stage of the Workflow for the Request being created, which enables pre-approved Requests to be created in the system.
Quick Calls and Item Assignment
When creating a Quick Call, an Item can be assigned after the Customer information has been set or when the Quick Call template is applied to the Request.
If the Item is to be assigned to the Request using the Quick Call Template configuration, the User simply selects the Next button after assigning the Customer information to the Request. The application moves to the Details tab and within the Request Type options, the list displayed only includes Templates that have Items preset.
NOTE:The Next button will only be visible after the Customer has been assigned to the Request, if Quick Call templates that have Items assigned are configured in the system.
If a specific Item is associated with the Quick Call Request within the Customer tab, the options displayed within the Request Type drop-down list will include Quick Call templates associated with the Item Type already assigned to the Request, and templates assigned the Unknown Item.
For Requests created with multiple Items assigned that use different Items, Quick Call templates with no Items assigned are displayed. For Requests where the same Item is assigned on multiple occasions, Quick Call templates that have the matching Item and no Items assigned are made available in the Request Type drop-down list.
To create a Request using a Quick Call:
-
After allocating a Customer and Item(s), click Next to move to the Details tab
-
Within the Request Type drop-down list, select the relevant Quick Call template displayed below the dashed line
-
Assign the Classification
The list displayed will be based on the Item assigned to the Request.
-
Click Done.
All Request details will be populated according to the Quick Call template. Any amendments can be made through the Request Summary screen.
NOTE:When saved, the Request created using the Quick Call template can be duplicated, to minimise data entry requirements for multiple similar Requests.
Contract Tab
When Contracts are enabled for the system, the Contract tab is visible within the Service Request Information screen.
The Contract tab of a Request includes the details of the Contract Type and SLA assigned to the Request. If a valid contract is active for the Customer, Item or Organizational Unit assigned to the Request, then the details of the contract will be displayed. If an SLA is not assigned to the Customer, Item or Org Unit and the Billing functionality is not enabled, the system automatically applies a default SLA based on the Item Type or the system default SLA.

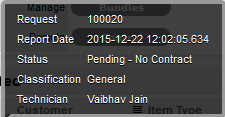
When Billing is enabled and the Contracts or Invoices functionality is active, the system verifies the service entitlement status of the Customer assigned to the Request, and if a valid contract is not in place, the Request is assigned a status of Pending-No Contract and locked until a valid contract is associated with the Request. The Customer is automatically sent the NoContractCreateRequestSummary email when the Request is saved with this Status.
A reminder email can be sent to the assigned Customer by the Technician from within the Summary tab by clicking ![]() .
.
For more detailed information about contracts and billing, see Contracts.
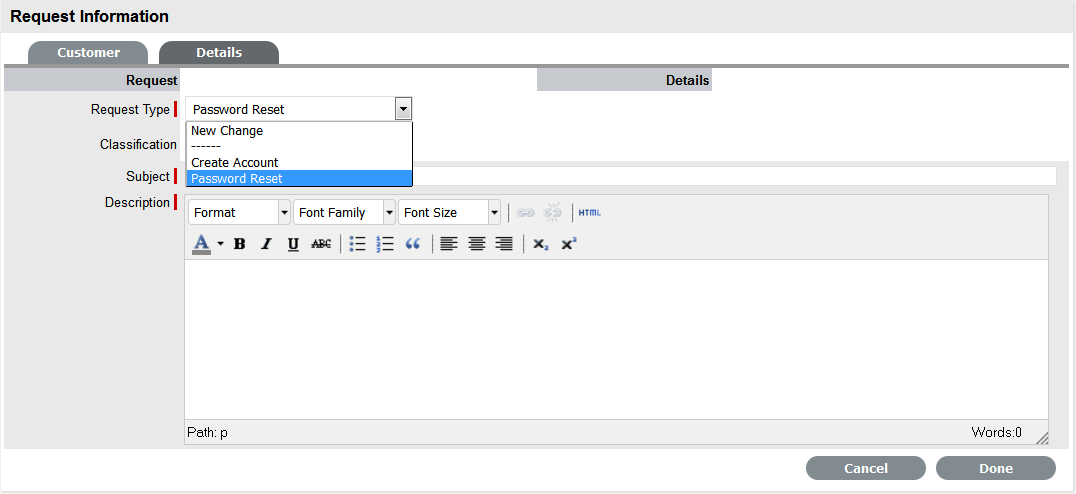
Details Tab
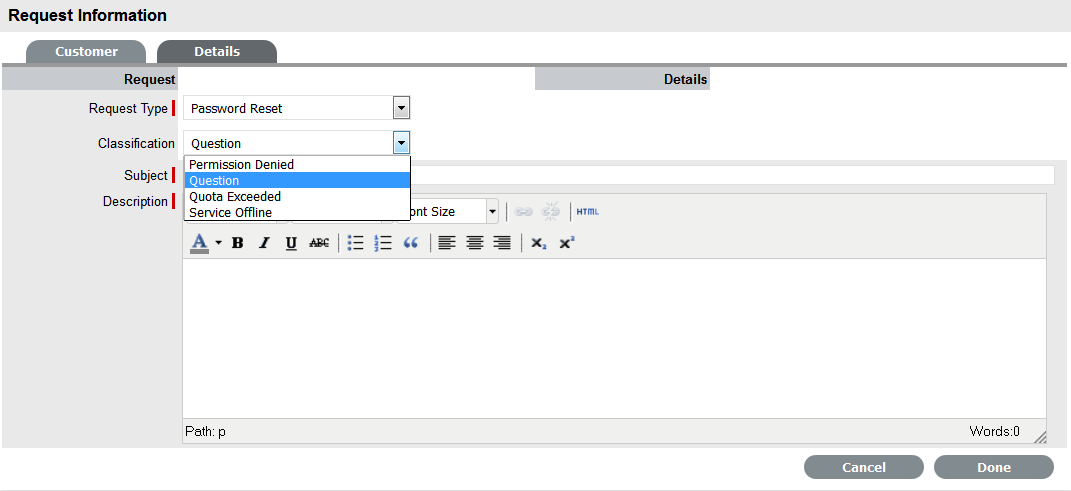
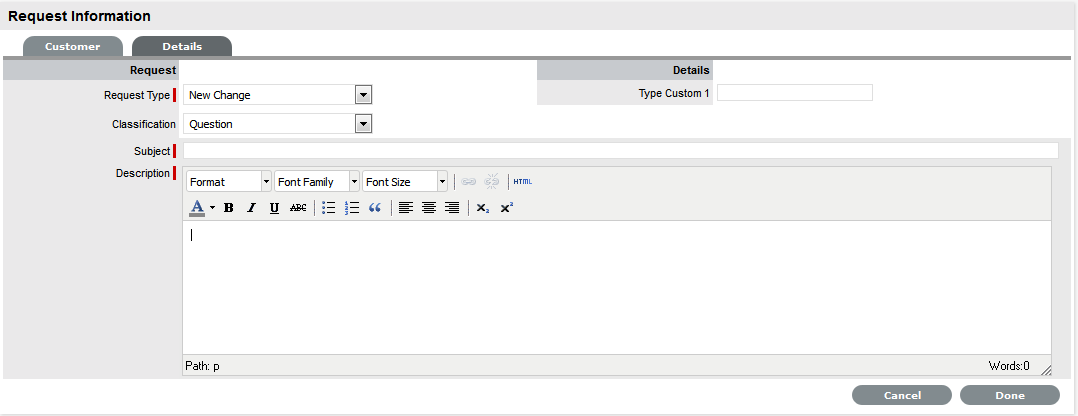
To successfully create a Service Request, the Request must be profiled by completing the Request Type, Classification and Description details. Within the Details tab there is also the option to select any relevant Quick Call Templates that have been configured for the Item Type assigned to the Request.
Entering a Request Description
To profile the Request:
-
Define the Request Type
The New Service Request option is locked in if there are no Quick Call templates available for the Item or Process.
-
Select a Classification
If multiple Items are assigned to the Request, the option to assign a specific Classification for each Item Request is provided.
-
Complete any required customized fields
-
Define the Subject content, if desired or required
(The Subject field can be set as a required field by the Administrator in the Setup>Privileges>User tab.)
-
Enter all relevant information within the Description field
This is a mandatory field.
-
Click Done to enter the new Request into the database.
When a Request is submitted successfully, the Request Summary Tab is displayed. If the Force Analysis functionality is enabled in the application's Setup, the system will move to the Analysis tab.
Request Subject
It is recommended that a summary be included in the Subject field, as the details recorded in the Subject field are displayed in scroll-over summaries throughout the application. For example, when a new Request is being entered for a Customer, a Recent Customer Requests list is displayed during the Request creation process for all Items the Customer owns either directly or via shared ownership. The Requests list includes a scroll-over summary where Subject content is displayed, if the Subject is completed for a Request. Subject information can also be included within a column in the List View, for a quick glance summary of a Request.
NOTE:The system Administrator can make the Subject field mandatory by enabling the Subject Required option in the Setup>Privileges>User tab.
Analysis Tab
Analysis Tab during Request Creation
When the Force Analysis option is enabled by the Administrator, the Analysis tab is automatically displayed after the Description is entered during the Request creation process. Within this tab the User can:
-
Convert a Service Request to an Incident
-
Create or search for a Solution
-
Create or apply a Workaround
-
Link the Request to other requests prior to saving the Request.
(This option is not available to Incidents created with Multiple Items assigned during the Incident creation process.)
-
Create an Alert related to the Request.
NOTE:To include analysis during Request creation, ensure the Administrator>Setup>Privileges>Requests>Force Analysis option is set to Yes.
NOTE:If analysis is not required during the request creation process, click Done to continue to the Summary tab.
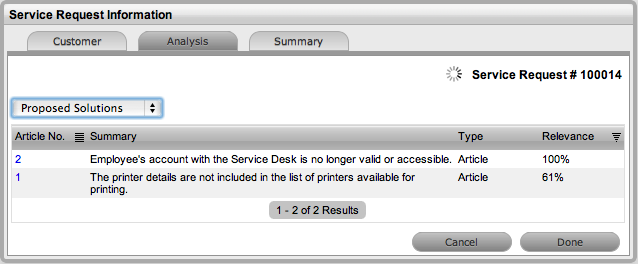
Proactive Solution Analysis
During Request creation after the Description is completed, the system automatically searches the Knowledge Base for possible Solutions that may be related to the Request. This search is based on the Item Type, Classification and text matching of existing Articles with the Incident Description content. Proposed Solutions will be visible when the Proposed Solution filter is selected within the Analysis tab.
To assign a proposed Solution to a Request:
-
Select the Article ID number
-
Click
 to assign the Solution or select Cancel to revert to the Proposed Solution list.
If the Resolved option is selected, the Request is automatically closed and the selected Article is assigned as the Solution.
Analysis
Within the Service Request Analysis tab other requests can be created, similar Service Requests can be viewed and the current Service Request can be related to other requests. It also allows the User to convert a Service Request to an Incident.
To assign a Solution to a Service Request, the User can apply Proposed Solutions presented by the application or use the Search Solution facility. If a Solution Article does not exist, a Service Request solution can be created within this screen. Once a Solution is applied to the Service Request, the application automatically closes the Request.
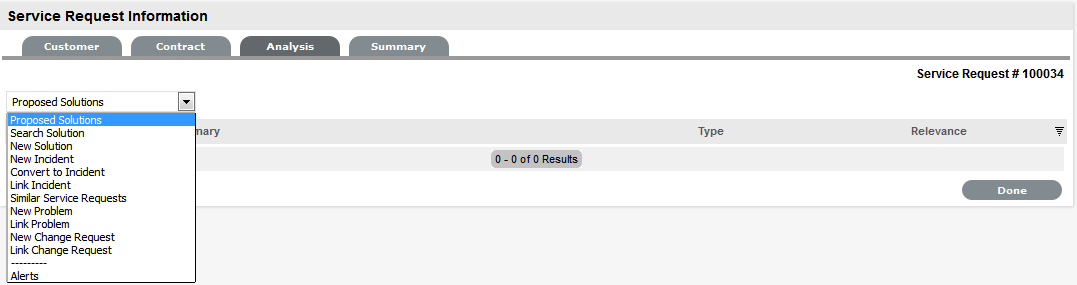
The options with the Service Request Analysis tab include:
|
Analysis Tab Drop-down Options |
|
|---|---|
|
Proposed Solution |
Displays a list of all solutions with a search based on Request Description, Item Type and Classification. To assign a Solution, select the Solution ID number to display the solution in full. Click Resolve if the Solution is relevant. This will close the Request and update the Customer. |
|
Search Solution |
Allows User to enter full text or ID number to search for possible Solution Articles. To assign a Solution, select the Solution ID number to display the Solution in full. Click Resolve if the Solution is relevant. This will close the Request and update the Customer. |
|
New Solution |
Displays Knowledge Base editor to allow the User to enter a new Solution. Solution Articles are used as Proposed Solutions for future Requests. See: Solution Article. |
|
New Incident |
Creates a new Incident and automatically links the Request to the Incident. The Request status will move to ‘On Hold - Process Escalated’. |
|
Convert to Incident |
Allows the User to make the current Request an Incident and maintain the current identification number for Customer correspondence purpose, while recording the action in the Audit Trail. |
|
Link Incident |
Allows the User to enter full text or ID number to search on Incidents. Select a No. link to immediately link the current Request to Incidents. |
|
Similar Service Requests |
Displays similar Requests based on Item Category, Classification and Description. |
|
New Problem |
Creates a new Problem and automatically links the Request to the Problem. |
|
Link Problem |
Allows the User to enter full text or ID number to search on Problems. Select a Problem ID number to immediately link the current Request to other Problems. The Request status will move to ‘On Hold - Process Escalated’. |
|
New Change Request |
Creates a new RFC and automatically links the Request to the RFC. The Request status will move to ‘On Hold - Process Escalated’. |
|
Link Change Request |
Allows the User to enter full text or ID number to search on Change Requests. Select a Change Request ID number to immediately link the current Request with other Change Requests. |
|
Alerts |
Allows the User to create an Alert directly related to the Request. Displays any reminder alerts that have been created in the Summary tab of the Request. Select the Alerts option to view Alerts list, and click on an Alert Publish Date to view Alert Content. |
Searching for a Solution
To Search for a Solution:
-
Click on the number of the required Request
The Request Information screen appears.
-
Select the Analysis tab
-
Click Edit
The drop-down list will become active.
-
Select from the available options, as follows:
Analysis Tab Drop-down Options
Proposed Solution
Displays a list of all solutions with a search based on Request Description, Item Type and Classification. To assign a Solution, select the Solution ID number to display the solution in full. Click Resolve if the Solution is relevant. This will close the Request and update the Customer.
Search Solution
Allows User to enter full text or ID number to search for possible Solution Articles. To assign a Solution, select the Solution ID number to display the Solution in full. Click Resolve if the Solution is relevant. This will close the Request and update the Customer.
New Solution
Displays Knowledge Base editor to allow the User to enter a new Solution. Solution Articles are used as Proposed Solutions for future Requests. See: Solution Article.
Alerts
Shows details of the Alerts that have been created within the Incident.
-
Click Save.
Proactive Analysis during Request Creation
During Request creation after the Request Description is completed, the system automatically searches the Knowledge Base for possible Solutions that may be related to the Request. This search is based on the Item Type, Classification and text matching of existing Articles with the Request Description content. Proposed Solutions are visible when the Proposed Solutions filter is selected within the Analysis tab.
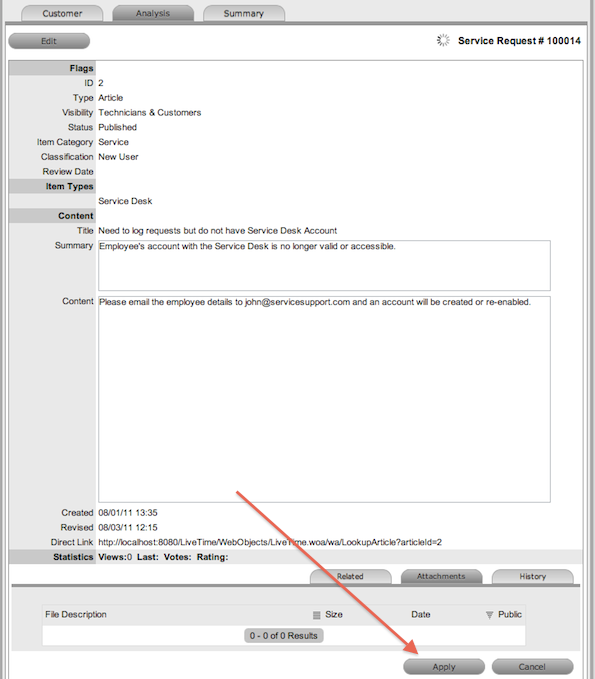
To assign a proposed Solution to a Request:
-
Select the Article ID number
The system will display the Solution details screen.
-
Select the Apply button.
The Service Request is automatically closed when a Proposed Solution is applied.
Converting a Service Request to an Incident
Service Requests are logged against Service Items and can be converted to Incidents within the Analysis tab. This action results in the Incident maintaining the same request identification number and audit trail that records the conversion.
To convert a Service Request to an Incident:
-
Select Edit within the Analysis tab
-
Select the Convert to Incident option.
The Service Request ID # is associated with a new Incident and the Incident is assigned the Entry State of a relevant Incident Workflow. The audit trail of the Incident records the conversion time and date. The customer is not notified about the Process amendment.
Linking Service Requests
Within the Analysis tab, Service Requests can be linked to other Service Requests, Incidents, Problems and RFCs.
To link a Service Request to a Group:
-
Select Edit within the Analysis tab
-
Search for a Request Group using the full text or ID option
-
Select the relevant search result ID number.
This automatically adds the current Request with the existing group.
Creating an Incident, Problem or Change Request within a Service Request
A Service Request can prompt the creation of an Incident, Problem or RFC and this can be achieved within the Analysis tab. This will move the Service Request status to On Hold - Process Escalated, and link it to the new Incident, Problem or Change Request group.
To escalate a Service Request to another Process:
-
Select Edit within the Analysis tab
-
Select the New Incident, New Problem or New Change Request option.
The Service Request is automatically escalated and its status changed to On Hold - Process Escalated.
NOTE:When the related Incident, Problem or Change is moved to an Exit State, the Service Request is automatically moved to the default Exit State, if not already closed.
Creating an Alert
Within the Analysis tab, an Alert that is associated with the Request can be created by:
-
Select Edit within the Analysis tab
-
Select the Alerts option in the drop-down list
The New button is made accessible.
-
Click New
-
Refine the content for each required field:
Alert Details
Description
Created
The current date and time.
Publish
The date the Alert is published. Use the calendar icon to the right of the field, to select a Publish date.
Set to a date in the future, or use the default to publish the Alert immediately.
Dismiss
The date the Alert ceases to be available. Use the calendar icon to the right of the field, to select a Publish date. On this date, the Alert will disappear from a User's Alert list.
Severity
The type of Alert to be published. The choices are:
-
Information – for general Alerts
-
Warning – to warn Users of potential issues
-
Urgent – to publish an urgent actionable message.
The icon appearing with the message will depend on the type of Alert.
User
The type of Users to receive the Alert, which include:
-
Specific Customer or User
-
User Role
-
Personal Alert
-
Organizational Units
-
Public.
In the Find User or Customer list, click search to select the recipient from the drop-down list.
An Alert sent to a User Role will go to all Users with that Role.
A personal Alert appears on the User's own screen at the Publish date.
A Public Alert appears when the Public Alert link is selected on the Login Page.
Title
Enter the title of the Alert.
Message
Enter the main content of the Alert.
-
-
Click Save.
Article Button

When a Solution has been applied or proposed for a request with the Create Knowledge option set to No, the Solution is visible within the Analysis tab and not available within the Knowledge Base. To manually escalate a request Solution to a Knowledge Base Solution Article, with the Analysis tab in Edit mode, select the Article tab.
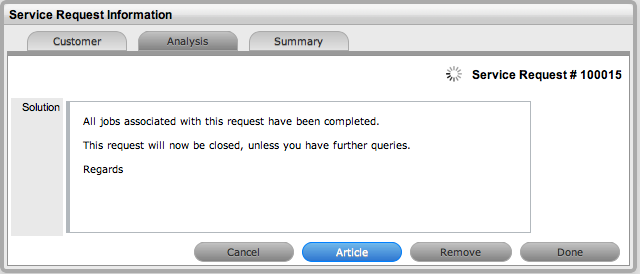
Remove Button

When a Solution has been applied or proposed for a request, the Solution or Knowledge Base Solution Article is visible within the Analysis tab. To disassociate a Solution from a request, with the Analysis tab in Edit mode, click the Remove button. The Analysis tab will now only display the default drop-down list options.
Solution Article
Solution Articles are Knowledge Base Articles generated as fixes for Incidents and Service Requests made available within the Analysis tab of requests. For similar requests that are logged in the future, they can be used as Proposed Solutions.
The Solution options available within the Analysis tab of a request include:
|
Analysis Tab Options |
|
|---|---|
|
Proposed Solution |
Displays a list of all Solutions with a search based on the Problem Description, Item Type and Classification. To assign a Solution, select the Solution ID number to display the Solution in full. Click Resolve if the Solution is relevant. This will close the Problem and notify the Customer. |
|
Search Solution |
Allows User to enter full text or ID number to search for possible Solution Articles. To assign a Solution, select the Solution ID number to display the Solution in full. Click Resolve if the Solution is relevant. This will close the Problem and notify the Customer. |
|
New Solution |
Displays Knowledge Base editor to allow User to enter a new Solution. Define visibility, enter a Summary, a Description and Save. |
Creating a Solution Article
Within a request:
-
Select the Analysis tab
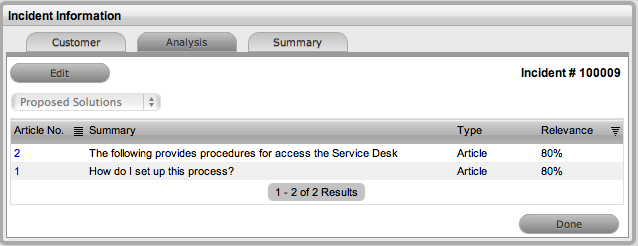
-
Click Edit
-
Select New Solution in the drop-down list options
The screen defaults to the expanded Solution Article editor with the Visibility and Status locked down.
Visibility Options
Description
Assigned Request
The default visibility. This means that the solution is only visible relative to the request through which it was created.
Users
Visible by internal Users only (i.e., not Customers).
Users & Customers
Visible to internal Users and Customers logged into the
application.
Everyone
Available publicly, without logging into the system.
-
Enter a Review Date or leave blank for the field to be automatically populated when saved
The Item Category, Classification and Item Type are all drawn from the related request.
-
Edit the Problem content if required
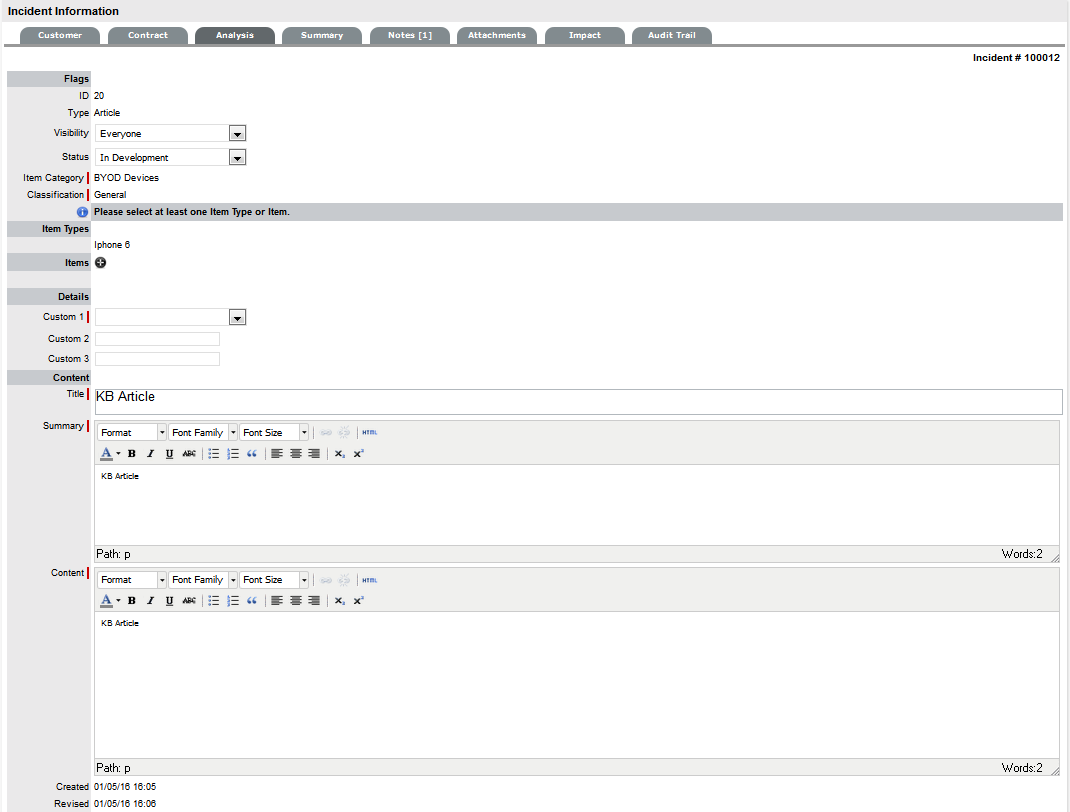
-
Enter the Solution content
-
Upload an relevant attachments within the Attachments tab
-
Click Save.
Requests Tab
Solution Articles generated from requests include a Requests tab. This tab enables the User to view details of the request related to the Article. For detailed information about Knowledge Base Articles see: Articles.
Closing Requests within Groups
Requests within the Related sidebar can be closed individually by moving the Workflow State to a Exit (Closed) State within the Information Summary tab Screen. Grouped Requests can also be closed as a group, by changing the Request Status to a Exit (Closed) State as part of a Bulk update. (See Bulk Updates above.)
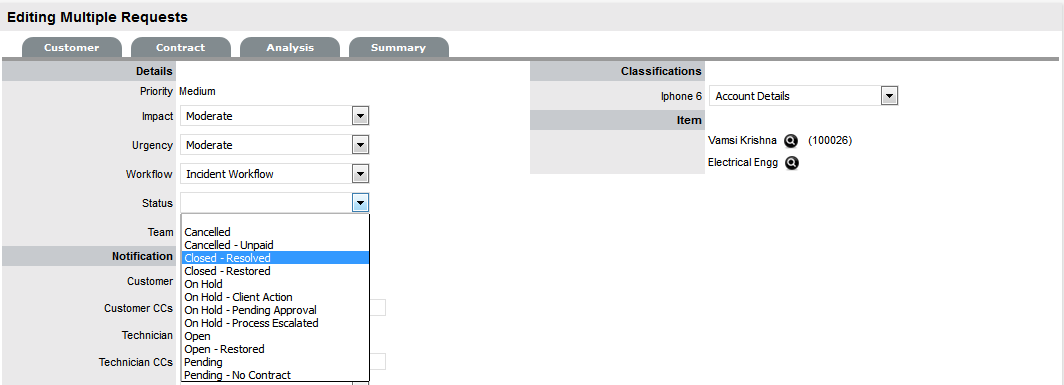
Alternatively, all Requests can be closed by using the Solution button within the Notes tab of a Request. This option is available if the Handshaking facility has not been enabled for the system, within the Administrator>Setup>Privileges>Requests tab.
To close related Requests using this method:
-
Go to Operations>Requests
Or, within Operations>Request Groups select the Group Number and move to the Elements tab.
-
Select the Request # hyperlink of a Request in the relevant Group
-
Click

-
Enter the Note details of the Solution
The Visibility option must be set to Public to access the Solution or Propose button.
-
Check the Apply to Group option
If relevant, add Note Time across the Group.
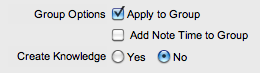
-
If relevant, enable Create Knowledge
This will move the content of the Note field to a Solution Knowledge Base Article with the Visibility of Assigned Request.
-
Click
 .
.
The related Requests are automatically closed and the Note content is also made available in the Knowledge Base if the Create Knowledge was enabled.
Status
Service Request Workflows are a combination of any number of stages or States that cover the lifecycle of a Request for a Service Category Item. A Supervisor creates new Workflow States for the default Service Request Workflow or builds new Workflows in the Service >Workflows tab. See Workflows for more information.
Within the Service Request Information Summary tab, the assigned stage of the Workflow is displayed within the Status field, with the Next Action field displaying the options of where the Request can move to. To view an assigned Workflow in its entirety select  , and scroll over the State fields within the map to view State details.
The system provides the following States for the Service Request Workflow:
|
Status |
Description |
|---|---|
|
SLA Timers On |
|
|
Open |
The Request is open. Request timers are running and the automated SLA triggers fire when appropriate. |
|
Pending |
Work on the Request has not commenced. The Response-time SLA trigger will fire for Requests with this status. |
|
SLA Timers Off |
|
|
On Hold - Pending Approval* |
When the Request is manually moved to this State, SLA triggers will not fire for the Request. |
|
On Hold - Process Escalated* |
A Request moves into this state when a related Request has been created within the Analysis Tab of the Request. The timer stops and there are no future States as the request will be closed when the related Request is closed. |
|
Pending- No Contract* |
Request has been created without a Contract. The Contract must be processed before work on the Request can commence . |
|
Closed (Verified)- CAB |
Request has been resolved and verified by the CAB. |
|
Closed Resolved |
The issue has been resolved and the Request has been closed. SLA triggers will not fire for Requests with this status. |
|
Cancelled |
The Request has been cancelled. SLA triggers will not fire for Requests with this status. |
|
Cancelled- Unpaid* |
The contract for a Request has not been paid. The Request is cancelled. |
*Denote System States that cannot be deleted but can be renamed.
Updating a Service Request's Workflow and Status
The list of available Workflows is derived from the associated SLA. To manually change a Request's Workflow or Status:
-
Select Operations > Service Requests
-
Select a Request #
-
Click Edit
-
Within the Workflow list, modify the Workflow as required.
-
From the Next Action drop-down list select the Request's next Status.
The States listed in Next Action are based on the Service Request Workflow selected. To view the complete Workflow lifecycle click
.
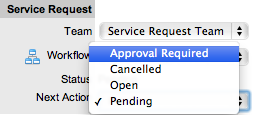
-
Click Save.
The system can automatically move a Request into another State through the following actions:
-
Using the Handshaking feature when a Note is added
-
Closing an Incident when adding a Note using the Solution button
-
Escalating a Request to an Incident, Problem or Change Request
-
When Billing is enabled and payment is not received.
Requests with a Pending-No Contract Status
Requests logged with the system that do not have a valid Contract are assigned the Pending - No Contract status. These Requests are locked until a valid Contract is applied, and if relevant, paid.
Viewing a Status Note
As Requests move into a State with a Status Note, a Note icon is displayed beside the Status field within the Summary tab of the Request. Scroll over  , to view the contents of the Status Note. If the Status Note includes an attachment, click the attachment name link in the pop-up window to download it. Click
  to close the window.
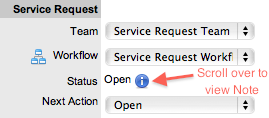
Service Request Reminders
When Requests move into a Customer, Line Manager or Team Manager Approval State, Technicians who are part of the Request Team have access to the Send a Reminder option. Clicking ![]() emails a reminder email to the Manager and records the action in the Request's Audit tab. (The message is customized by the Administrator in the Setup>Email>Templates, Approve Service Request link.)
emails a reminder email to the Manager and records the action in the Request's Audit tab. (The message is customized by the Administrator in the Setup>Email>Templates, Approve Service Request link.)
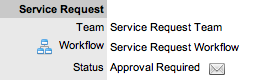
SLA Triggers and Request Status
SLA Triggers fire for Requests that are in a Workflow State that has the Service Timer Active option set to Yes. The default Timer Active set for systems States can be changed if relevant for the organization. For example, it may not be appropriate for an organization to have SLA Triggers fire when a Request is moved to the system default "On Hold" State.
The following icons displayed in the Service Terms box, visually indicate how the Request is tracking against the SLA and if the SLA timers are active:
|
Current SLA Status |
|
|---|---|
|
|
Workflow is in an SLA paused State. Triggers will not fire. |
|
|
Workflow is in an SLA timers on State. Triggers will fire. |
|
|
Workflow is in an Exit State and the SLA has been successfully met. |
|
|
Assigned SLA has been breached and Workflow is in an Exit State. |


Supervisor Users can verify the Timer Active status of a Workflow by scrolling over the Status in the Workflow map available in the Summary Information screen, or within the Service>Workflows>selected Workflow> Lifecycle>selected Status screen.
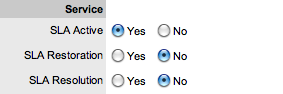
Priority
The Priority determines the timeframe in which a Request should be handled and sets the service level targets adopted by the Request that drive the SLA triggers and actions. It represents the degree of importance of the Service Request to the Customer and also indicates the urgency of the Request to the Technician.
A Request can have one of four possible Priorities:
-
Urgent
-
High
-
Medium
-
Low.
Setting Request Priority
The Administrator configures the options for determining the Priority within the Setup>Privileges>Request tab. The Priority options include:
-
Selected Priority - where the system configured default Priority is applied to the Request but can be manually adjusted by the User
-
Derived Priority - where the Impact is derived from the Item Criticality and the User enters the Urgency, enabling the system to calculate the Priority.
Urgency: The value selected reflects how quickly a resolution is required
Impact: The value selected indicates the impact the Request has on the User and Organization. The higher the Impact the higher the Priority to resolve the Request.
If the Administrator has set the Request Priority option to Derived, the Priority of a Request results from the Impact being mapped from the Criticality of the Item and then combined with the selected Urgency. However, if required, the Impact can be manually adjusted within the Request Information screen to affect the Priority.
The following table displays the calculations applied by the system using the Item Criticality mapped directly to the Request Impact, to determine a Request's Priority:
The above calculations result in the following Priorities:
Request Assignment and Escalation
When a Request is logged within the system, it is allocated to the Team that is associated with the SLA and Workflows used by the Request or to the default Team assigned to a Workflow State. The Request Status is automatically set to the default Entry State of the Workflow.
The appropriate Request Workflow is assigned within the Request Summary tab, by selecting an option from the Workflows drop-down list. This list is derived from the SLA assigned to the Customer, Organizational Unit and Item. Once the Workflow is selected, the associated Teams are available for assignment. Based on the Team assigned, a Technician in the Group associated with the first State of the selected Workflow is allocated to work on the Request. This can be adjusted manually, if required. As the Request moves through the Workflow, it is allocated to an Assigned Technician within the Group associated with the assigned State.
Note, that if the Technician assigned to the Request is also included in the Group associated with the next Workflow State, the system will by default reassign the Request to the same Technician when it moves to that next State.
It should also be noted that for each Service Request Team, there is an over-arching layer of escalation above the Technicians assigned to each Workflow State. This means that throughout the Workflow Lifecycle, in addition to changing the Technician by moving Workflow States, the Request can be escalated to a higher level of support if required.
The Request is automatically escalated according to the SLA assigned to the Request and the triggers configured within the Priority of the SLA. A Request is escalated if the assigned User exceeds the Escalation trigger point defined for the Response, Restoration or Resolution time of the assigned SLA, when the assigned Workflow State is an SLA Active State. Or, it can be manually escalated by a User, if required.
Request Assignment
When a Request is assigned to a User, the system follows a series of steps to look for the most appropriate Technician for the job, based on skill set, location and workload. The order of business logic is as follows:
-
The system will identify the Team associated with the Service Request's SLA and associated Workflows
-
The system will find Technicians/Supervisors assigned to the Team
-
If Users are assigned to an Organizational Unit, the system will identify the Users that belong to the same Organizational Unit as associated with the Request by the Customer assignment
-
If Classifications/Skills are assigned to Users, the system will find Technicians/Supervisors assigned to the Request's selected Classification
-
Based on the Team configuration, if the Live Priority option is enabled for the Team, the system will look for a User who is logged into the system
-
The system verifies Work Hours/Availability of Users within the Team for appropriate Request assignment
-
The system will assign the Request to the User who has the lowest workload, i.e., the fewest number of Open or Pending Requests
-
If there is a tie, the system randomly allocates the Request to a User in the tie.
If a more appropriate Team member is available, the User assigned to the Request can re-assign it manually by selecting a Technician from the drop-down Technician list in the Request Information screen.
Note, if the Self Assign option is enabled for the Team, the system assignment logic is ignored and the User creating the request is automatically assigned the Request.
Automated Escalation
A Request's Service Level Agreement includes trigger points that set the rate at which automated escalations will occur for a Request. Auto-escalation is triggered when the number of support hours specified for either a Request's Service Level Response, Restoration or Resolution time is exceeded and the SLA Trigger action is set to Escalate. When it is escalated, the Service Request is assigned to a Technician in the over-arching escalation layer for the assigned Service Team.
Manual Escalation
The Escalate button next to the Technician name in the Service Request Screen, escalates the Request to an over-arching escalation layer for the Service Team. Any Technician or Supervisor assigned within the escalation layer can be allocated to the Request.
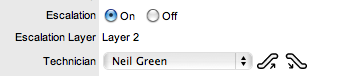
Escalation Control
If the Escalation Control functionality is enabled in Admin>Setup>Privileges>Requests, the option to enable or disable Escalation within the Service Request Information Summary screen is available to Supervisor Users.
NOTE:This option is only visible to Supervisor Users. Once a Request is created, a Supervisor can elect to switch the Escalation option to Off. This means all SLA timers stop, which prevents escalation. Switching the option back to On will re-start the timer and reactivate the SLA triggers.
Notification
The Notify option sets the method of messaging used by the application to notify Customers and Technicians of the following changes to a Service Request:
-
Request created
-
Request closed
-
Request deleted
-
Request Note added
-
Request escalated (Technician only).
The default notification status of Requests is set on a per Team basis, within the Users>Teams>Team Information screen, with the default recipients of new Notes being configured by the Administrator in the Setup>Email>Setup tab. However, these settings can be adjusted on a per Request basis within the Notification Method field and on a per Note basis, when new Notes are created.
The methods of Notification can be set for Technicians and Customers, and include:
-
None, which ensures that no messages are sent
-
Email, which means an email is sent containing the Service Request detail updates
-
SMS notifications, which sends an SMS message about the Request update. This is only available to Users who have a mobile number and a service provider entered in their User and Customer Information screen.
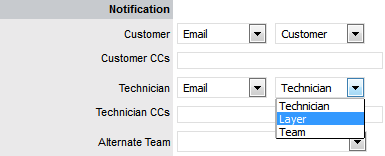
Notifications can be sent to:
-
Customer - the Customer who logged the Request
-
All Owners - all Customers who share the Item assigned to the Request
-
Customer CC's - email addresses to receive Customer email correspondence when the CC field is selected in the New Notes screen
This field may be automatically populated by the system with email addresses included in the CC list of the original email used to create the Request. Multiple addresses should be separated by a comma.
-
Technician - notifications can be sent to the Technician assigned the Request, to all members within the Team assigned to the Request, or restricted to members within the Group to which the Request is assigned
-
Technician CC's - enter email addresses that are to be sent Request Notifications when the Technician CC option is selected in the New Notes screen
Multiple addresses should be separated by a comma.
-
Alternate Team - this option is visible if the Notify Alternate Team option is enabled in the Admin>Email>Setup tab and other Teams assigned to the same Process are configured in the system. Notifications can be sent to a Team within the related Process, by the User selecting an option within the drop-down list.
The following is a sample email sent by the system to the Customer and assigned Technician, confirming the creation of a Request. The message sent can be customized by the system Administrator:
Email Sample
Workflow
When a Service Request is created it is assigned a Workflow that governs the lifecycle of the Request. The SLA allocated to the Request determines the Workflow options made available for the Request. Before saving the Request, the User can adjust the system assigned Workflow, if more than one Workflow option is available.
After the Workflow is assigned to the Request, all stages of the assigned Workflow can be viewed by selecting. The Workflow map displays the entry points (blue boxes), transitional States (yellow boxes) and exit points (red boxes).
The User moves the Request through the Workflow Lifecycle by adjusting the options displayed in the Next Action field.
Moving through the Workflow
To move a Service Request through the stages of the Workflow, in the Summary tab of the Service Request Information screen:
-
Click Edit
The Next Action field with a drop down list of Status options is displayed below the Status field.
-
Click on the Next Action field
The Status options are displayed. This list is based on the configuration of the assigned Workflow.
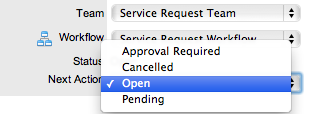
-
Select a State
-
Click Save.
The selected Status is assigned to the Service Request with the updated logic applied (i.e., the SLA Timers may now be active or inactive based on the newly assigned State configuration or an alternative Work or Manager Group may have been assigned to the Request.
Approval State
Approval States in Service Request Workflows provide the facility to approve or reject Request activity to Manager Groups, Customers and Line Managers. When a Request moves into an Approval State, the Edit button is only visible to Manager Users within the Manager Group or the Team Lead when the Request is in a Customer or Line Manager Approval State. For Manager Approval States, Users who are not Managers within the Team, can send a reminder to action a Request, by selecting ![]() .
.
Managers who are assigned a Request for approval can  (approve) or
  (reject) the Request, which automatically moves the Request to the next pre-configured stage of the Workflow. Requests assigned a Customer or Line Manager Approval State can be processed via the Customer Portal or email.
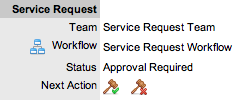
Assigning a State with an Underpinning Contract
Each State of a Workflow can be customized for either internal support contract management that is monitored by an OLA, or out-sourced to an external support provider, which is monitored by an Underpinning Contract.
When a Service Request moves into a State that is governed by an Underpinning Contract, for internal contract control the Service Request can be assigned to the Service Level Manager, if configured in the Workflow. This allows the Manager to maintain control of the Service Request, and to easily follow up with the external service provider, if required. The assigned SLM will be able to adjust the current Status, add Notes and update the Contract Monitor information in the Impact tab.
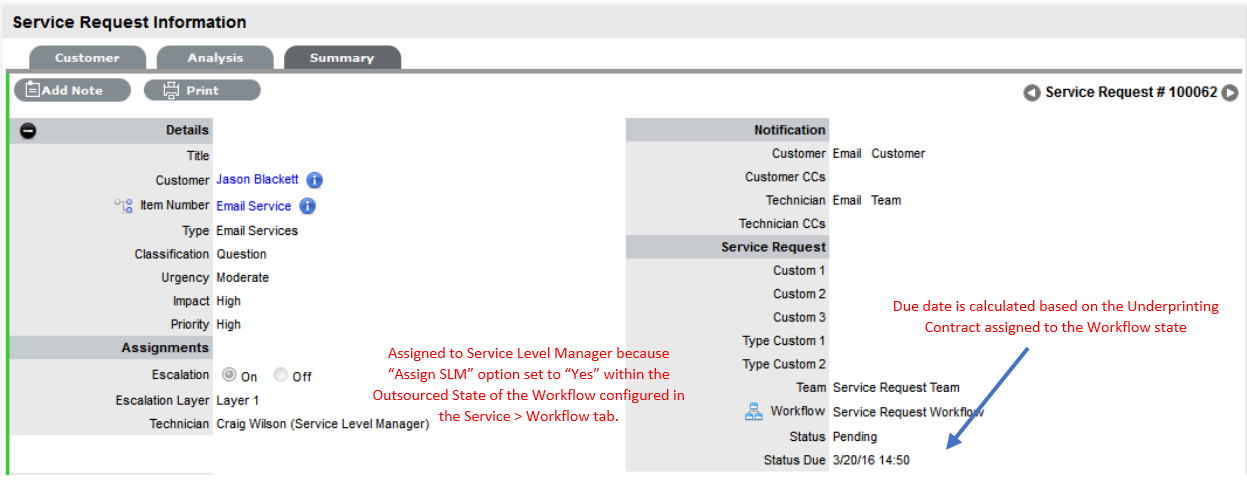
Alternatively, the Workflow State can be configured for the Technician assigned at the time the Request is moved to the Underpinning Contract State to maintain Request editing privileges and manage adherence to the assigned service agreement. If the Workflow is configured for the responsibility of the Request to be maintained by the Technician when the Request is in an external contract state the Technician will be able to adjust the current Status, add Notes and, if the Technician is assigned the Internal Process of Service Level Management amend the Contract Monitor information in the Impact tab.
OLA Status Due
Within the Summary screen, the Status Due field is visible when a Workflow status is monitored by an OLA. The time, date and percentage remaining information displayed is calculated using the OLA's Target Resolution time.
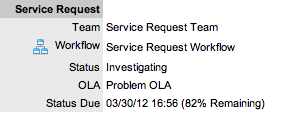
Team Assignment during the Workflow Lifecycle
To ensure that all Requests are managed throughout the Workflow, the Team assigned to the Request when it is first logged within the system is set as the default Team. If a Request moves to a State that has an OLA assigned with a Team, the Request is re-assigned to that OLA's Team. When the Request moves out of the OLA State to a State where no OLA or Team is assigned, the Request is re-assigned to the default Team.
Pending - No Contract Status
When the Contracts or Invoices functionality is enabled and a Request is created, the system will verify the service entitlement status of the Customer and if a valid contract is not in place, the new Request is assigned a Status of Pending-No Contract and locked until a valid contract is associated with the Request.
In a Request Group where the Customer and Organizational Unit does not have a Contract, if an Item applied to a Request has a Contract and another does not, a relevant Status will be applied to each Request. The User will be able to edit the Request with a valid Contract, but the Request without a Contract will be locked down to a Pending - No Contract Status, until a valid Contract is applied to the Request.
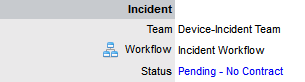
The Customer is automatically sent the NoContractCreateRequestSummary email when the request is saved with the Status. A reminder email can be sent by the Technician from within the Summary tab by clicking ![]() , when the Request maintains this Workflow Status assignment. See: Contracts.
, when the Request maintains this Workflow Status assignment. See: Contracts.
Summary Tab
Summary
The Summary tab provides comprehensive details related to a Service Request. In addition, it also gives access to the tabs that are required to work on the Request.
IMPORTANT:In the Summary page, you can view or update the available details:
-
To view details of a Customer, select the Customer name link within the Service Request Information screen.
-
To update details of the and the assigned to the Service Request, click
within the Summary tab when the request is in Edit mode.
The Service Request Information Summary tab screen includes the following:
|
Summary Tab |
Description |
|---|---|
|
Details |
The following details are displayed:
|
|
Assignments |
The following details are displayed:
|
|
Notification |
The following details are displayed:
|
|
Service Request |
The following details are displayed:
|
|
Service Terms |
The following details are displayed:
|
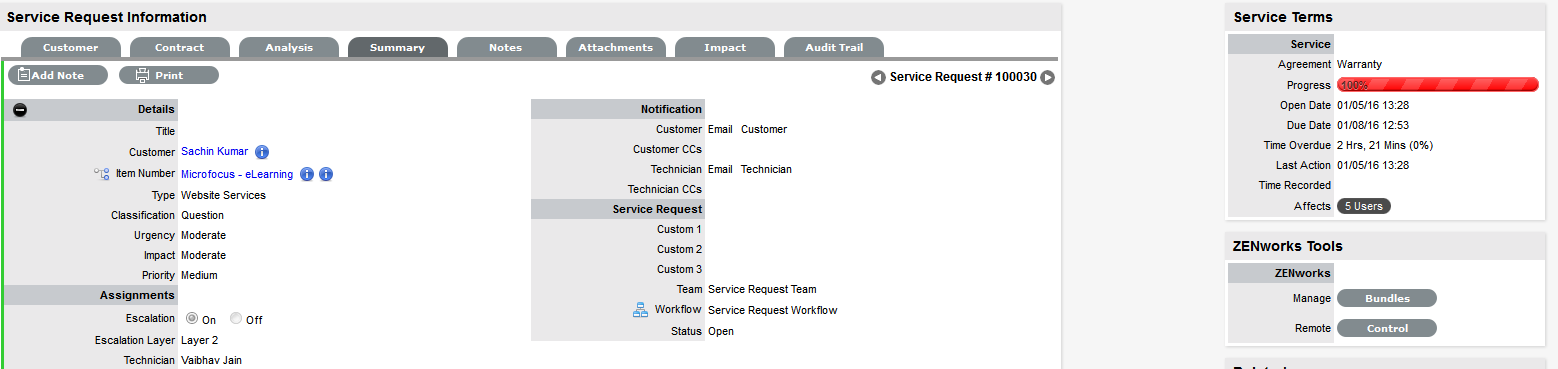
NOTE:Only Technicians assigned to the Workflow Group of the Request can edit the Request.
|
Summary Tab Buttons |
|
|---|---|
|
|
Edit opens the Request in edit mode. This allows the Request details to be amended, Notes to be added and time is automatically recorded against the Request whilst in edit mode. |
|
|
Changes the default assignee of the request to a different technician.This right is available only for technicians belonging to the same layer or team. |
|
|
Opens the Request in edit mode and moves directly to the New Note editor. |
|
|
Duplicate creates a copy of the Request and links the copy to the original Request. The User can then amend the Customer or Item details, if required. |
|
|
Print opens a summary of the Request in a Print View window. This includes a Description and all Notes added to the Request. It is a good alternative for viewing Request information within one window when adding a new Note. |
|
|
Allows the User to create or view reminders related to the Request. When published it will be displayed like the normal alert icon. |
|
|
This option is visible next to the Item Type, if the Request is in a Workflow State with the Item Editable option is set to Yes. Click the icon to edit the Item details. |
|
|
The escalation buttons allow the User to escalate the Request to the next layer within the Team, or de-escalate the Request to the lower level, if required. |


Changing the Customer of a Request or Item
After a Request is created, it may be necessary to change the assigned Customer or Item. This may be the case when the Unknown Item is associated with a Request, or a Service Item has been assigned to the Request and the relevant hardware, software or network Item needs to be associated with the request. When the "Allow Unknown" option is disabled in the Setup>Privileges>Requests tab and a Request that is assigned to the Unknown Item is opened in Edit mode, the User will be prompted to update the Item assigned to the Request before the Save button action can successfully record changes to the Request.
NOTE:This option is required when a Request is created through email, as the Item assigned may be the system's default Unknown Item or the Org Unit's default Item.
To change the Customer:
-
Click the Request's Edit button
-
Select the Request's Customer tab
-
Click
next to the Customer Name
-
Search and select a Customer
-
Click
If the Request's Item needs to be altered as a result of the Customer change the Find Item field appears. Search and select the appropriate Item using the Find Item search.
-
Select the Summary tab, to continue working on the Request
-
Click Save.
To change the Item:
-
Click the Request's Edit button
-
Select the Request's Customer tab
-
Click the Item Number
The Find Item option appears.
-
Search and select a new Item
-
Click
The Request is updated.
-
Select the Summary tab to continue working on the Request, or click Cancel and Done to close the Request with the newly assigned Item.
NOTE:Technicians do not have the ability to delete Requests or Customers.
Converting a Service Request to an Incident
Service Requests are logged against Service Items and can be converted to Incidents within the Analysis tab. This action results in the Incident maintaining the same request identification number and audit trail that records the conversion.
To convert a Service Request to an Incident:
-
Select Edit within the Analysis tab
-
Select the Convert to Incident option.
The Service Request ID # is associated with a new Incident and the Incident is assigned the Entry State of a relevant Incident Workflow. The audit trail of the Incident records the conversion time and date. The customer is not notified about the Process amendment.
Item Relationship Map and Assignment
Selecting  opens a pop-up window that displays a map of Items that are related to the Request Item that can be navigated by clicking on the icons within the map. To view related Item information, scroll over the relevant Item icon.
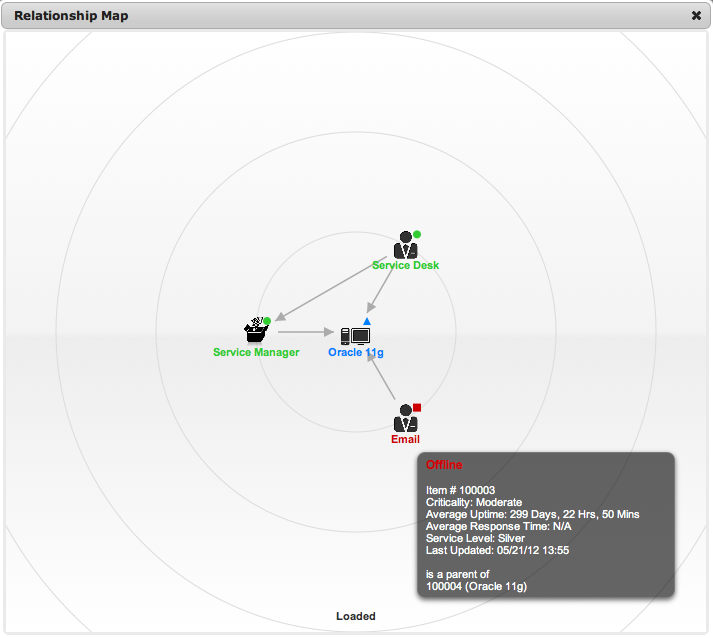
Updating the Item associated with the Request
The Item associated with the Request can be updated when in the request is in Edit mode:
-
Select
-
Navigate the map to move the relevant Item icon to the central point of the map
Select the Item icon label in the Map to move it to the central node.
-
Click the icon label when it is in the middle of the map
A warning message is displayed, prompting the confirmation of the Item change.
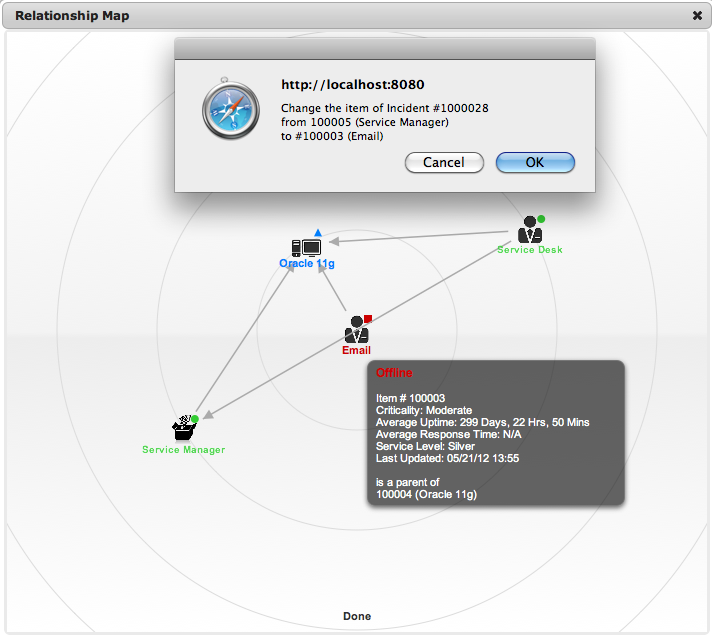
-
Select OK and the Item association will be updated
(If the Enable Item Shadow option is enabled by the Administrator in the Setup>Privileges>Customer tab, the change of Item information will not be visible on the Customer Portal.)
-
Select
 to close the window.
The Item assignment change is recorded in the Audit tab.
See: Item Relationships.
Notes Tab
Notes
The Request Notes tab displays entries made by a User regarding the Request. New Notes are date-stamped automatically and associated with the User logging the Note.
The number of Notes recorded against a Request is displayed in brackets on the Notes tab, and if a Note has been added by a Customer or a Technician other than the Technician assigned to the Request, an asterisk will also be visible on the Notes tab until the assigned Technician opens the Note.
Add Note Button
The Add Note button can be used to open the Request in Edit mode and automatically access a new Note window, as shown in Step 4 below.
Viewing All Notes

Use a Request's Print button to access a list of all Request Notes in one screen. To hide Private Notes in the Print output, remove the tick from the Show Private Notes box.
Adding a Note
When the first Note is created for a Request, the Request Description automatically populates the New Note editor allowing the Technician to enter their response.
To add a Note:
-
Click the Request ID Number
The Service Request Information>Summary tab appears.
-
Click Edit
-
In the Notes tab, click New
-
Enter the Note details
Or, select a Template if a relevant pre-configured response has been set for the Item or Type Category for the Item assigned to the Request.
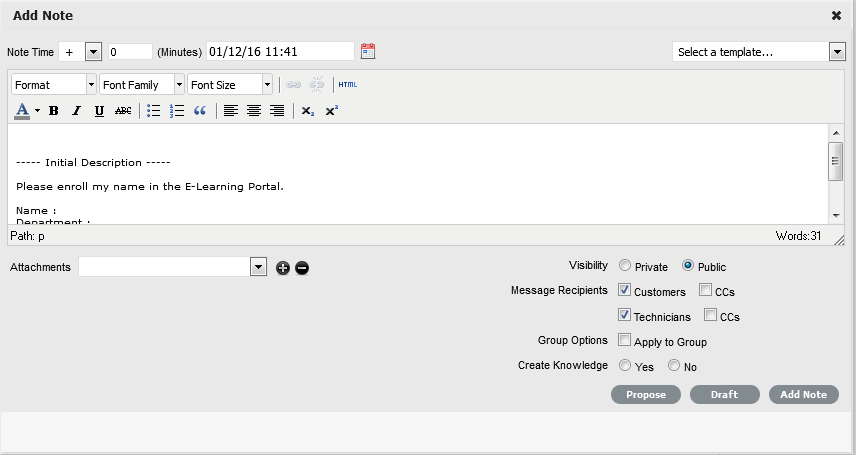
-
Enter Note Time
The time entered represents the amount of time accumulated to formulate the Note's content or time spent working on a request away from the system. If no additional time has been spent on the Request away from the application this field will be automatically populated with the Logged Time when the Request is in Edit mode, if the Manual Request Time option is disabled in the Setup>Privileges>User tab. When this option is disabled,
 is visible next to the Service Request number in the top right corner of the Summary Tab screen when the Request is in Edit mode. (See:Contracts Logged Time.)
-
Adjust the time and date work was completed, if relevant
-
Add attachments to be sent with the Note, if required, by clicking
to search and upload the attachment
A maximum of two attachments can be added per Note.
-
Adjust the Note visibility, if relevant
The default Private or Public visibility for Email Notes is set within Admin>Setup>Privileges>Requests, and can be adjusted on a per Note basis.
-
Refine the Email Recipient options as required
The default Request Notifications for Notes is set within the Team assigned to the Request, and can be adjusted on a per Note basis.
Vendors, as Email Recipients, is displayed as an option if the Request is in a State associated with an Underpinning Contract.
-
Click
 .
.
The Note editor screen will close and the Note will be emailed to recipients, if defined.
NOTE:A Technician can only add Notes if they belong to the work group associated with the current Request status.
Create Knowledge
NOTE:This option is only visible for Public Notes
When a new Note is created for a Request it can be added to the Knowledge Base by selecting the Create Knowledge option. By selecting this option and then clicking the Propose or Solution button, the system automatically moves the Request to the default Closed State for the Workflow and creates a Solution Knowledge Base Article with a visibility of Assigned Request. This visibility allows Customers of a shared Request to view the Solution. For the Solution to be available to other Customers of the same Item Type, the visibility must be adjusted to Technicians and Customers within the Analysis tab of the Request or the Knowledge Tab.
Solution
If a Request Note resolves the Customer issue, the Note can be saved as the Solution. This Solution can be converted to a Solution Article, found under Request Information>Analysis tab and available in the Knowledge Base, by enabling the Create Knowledge option before selecting the Solution button. Clicking the Solution button will automatically move the Request to the default Closed State. If a Solution is applied to a Request containing attachments, the attachments are included in the Solution email.
To save a Note as the Solution:
-
Enter the Note details
-
Select Create Knowledge, if the Note content is to be available in the Knowledge Base
-
Click Solution.
For Create Knowledge enabled Notes the content will be recorded as the solution under the Analysis tab. The Status of the Request will change to default Exit State of the assigned Workflow.
NOTE:This option is not available if the Handshaking facility is enabled in Admin>Setup>Privileges>Requests.
Propose Handshake

If a Note is a possible solution to a Request, it can be sent to the Customer with a notice stating the Request will be closed in a set number of days if no correspondence is received from the Customer. (The time span, in days, is specified by the Administrator in Setup>Privileges>Requests, or adjusted on a per Org Unit basis). This Note can be converted to a Solution Article, found under Request Information>Analysis tab and available in the Knowledge Base, by enabling the Create Knowledge option before selecting the Propose button.
When the Propose button is selected with the Create Knowledge option enabled, the Create Knowledge field is visible when the Summary tab is in edit mode and the Request is waiting to close. If the option is disabled and the Request moves to the Closed State, the proposed Note will not be available in the Knowledge Base.
To send a Note with a Handshake Notification:
-
Within the Notes Editor, enter the possible solution
-
At the bottom of the Notes field, click the Propose button. The proposed solution and handshake notification will be sent to the Customer. The Request will automatically change status to On Hold - Pending Approval.
NOTE:For a Customer to re-open a Request using the link in the handshake email, the web server must be using Port 80.
Draft Note

Use the Draft button to save an incomplete Note entry, which will be displayed in the Notes list. When a Note is saved as a draft, the Status will be displayed as  . If the Add Note button is selected when a draft Note has been recorded against a Request, a warning will be displayed. To continue working on a draft Note, open the request in Edit mode and select the Note No. hyperlink.
Changing the Status of a Note
-
When the Note is created, it can be either public or private. After the Note is saved, it is possible to switch visibility
-
If a Note is marked Private, a padlock graphic is visible. To change the status to Public, click
 to display
-
To change the Public Note to Private, click
to display .
Viewing a Note
An asterisk is visible on the Notes tab when the Technician assigned to the Request is yet to view a Note added to the Request.
To view a Note:
-
Select a Request ID Number
-
Select the Notes tab
-
Click on the Request Note Number hyperlink.
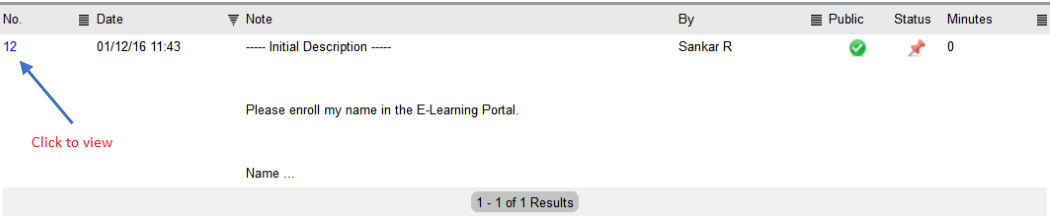
When Notes are viewed without opening the Request in Edit mode by clicking the Note No. link, the User can scroll through the Notes list by selecting
 inside the top right corner of the Notes window.
Replying to a Note

To reply to a Note, which will include the Note as part of the email:
-
Click the required Request ID number
The Service Request Information screen appears.
-
Select Edit
-
Select Notes tab
-
Click on the Note number
The Note is displayed.
-
Click Reply
The new Notes editor is opened and includes the exisiting Customer Note.
-
Enter the Note content
-
Adjust the Visibility and Recipients settings, accordingly
-
Select Add Note to send the Note, or click Draft to finish the Note later.
Emailing Saved Request Notes

To email a Customer after a Note has been saved:
-
Click the required Request ID number
The Service Request Information screen appears.
-
Select Edit
-
Select Notes tab
-
Click on the Note number
The Note is displayed.
-
Click Email to send the Note to the Customer and any other Users added to the Notification list.
Adding Notes to Groups
When a Note is created for a Request that belongs to a Group, the Apply to Group option is visible within the Notes tab. If the new Note is to be assigned to all Requests within the Group, select the Apply to Group option.
NOTE:Any new Requests added to the Group at a later date will also have all pre-existing Notes, with this option selected, applied to the newly Grouped Request.
When the Apply to Group option is selected, the Add Note Time to Group option is displayed. Select this checkbox to also apply the Note Time to each of the Requests.
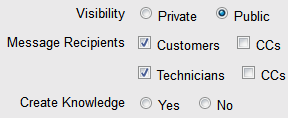
Selecting the Apply to Group option and then clicking the Solution button, closes all Requests within the Group.
Attach Tab
Attach
The Attachments tab displays all attachments recorded against a Request, including ones attached via an emailed Request, attachments added to new Notes created by Technicians and attachments uploaded directly through this tab.
All Users can attach any type of file to a Service Request.
Adding an Attachment
To add an Attachment:
-
Select a Request number ID
-
Click Edit
-
Select the Attachment tab
-
Click


-
Browse and select a file
-
Mark Private, if the attachment is not to be available on the Customer Portal
-
Enter a file description, if necessary
-
Select
to upload the file or  to cancel the process.
The uploaded attachment is automatically date stamped and shown as a File Name link with its file size.
To open an Attachment, select the file name hyperlink.
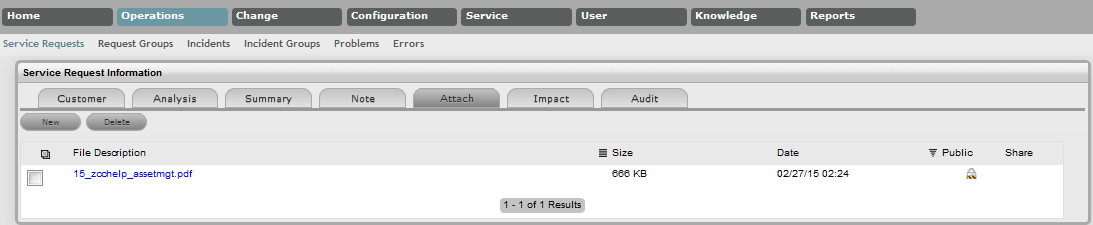
NOTE:Requests that are part of a Request Group and have attachments uploaded within the Request Group Details Screen and are shared within the Group display
 within the Share Column.
Deleting an Attachment
To delete an Attachment, select the checkbox beside the File Description then click Delete. The addition or removal of Attachments is recorded within the Audit Trail of the Request.
Impact Tab
Impact
The Impact tab provides the capability to measure the progress of a Service Request relative to agreed Service Level targets and Workflow time estimates. It also includes a quick reference for identifying other Services or Items affected by the Request. This tab displays a summary of the following:
-
Service targets
-
Workflow estimates
-
The impact of the current Service Request on related infrastructure.
The drop-down filter options within the Impact tab include:
|
Options |
Description |
|---|---|
|
Service Targets |
Displays the target response, restoration and resolution times based on the Service Level Agreement/OLA assigned to the Request. |
|
Service Level Breaches |
Displays service level breaches that have occurred and allows Users to assign a breach code and explanation for the breach. |
|
Services Affected |
Displays the Service Item Number, the Service SLA and number of Affected Users for any Services related to the Item associated with the Request. |
|
Estimates |
Provides a summary of the time estimated for each state of the Workflow based on the OLA assigned to the Request. |
|
Planned Outages |
Provides a list of all the Planned Outages for the Item assigned to the Request. |
|
Contract Monitor |
If the current Service Request Workflow State is assigned an Underpinning Contract or OLA, a table is displayed outlining the response, restoration and resolution milestones. When a milestone is met, the User is required to check the relevant checkbox. The application will automatically calculate the actual time accrued to achieve the milestone. The value displayed here is used for the Contract reports. |
|
Purchases |
When Purchase Orders are enabled in the system, any Purchase Orders associated with Items assigned to the Request are accessible through this option. |
Service Targets
The details displayed here are drawn from the Service Level assigned to the Request. These include the target Response, Restoration and Resolution times for a Request, based on the Priority assigned. If an Underpinning contract or OLA has been assigned to the Request's current state then the targets for that contract will also be listed.

For more information on Service Targets, see: Service Level Agreements.
Service Level Breaches
When a Request Service Level Agreement is violated, a service level breach is recorded against the Request. The User assigned to the Request will be notified and asked to provide a reason for the breach, and assign a Breach Code.
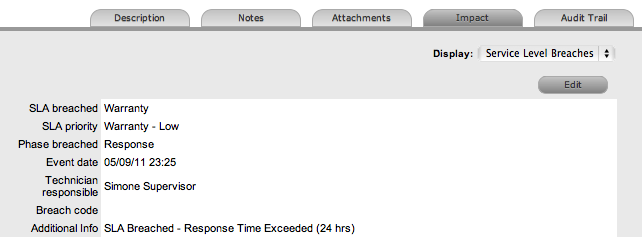
To assign a Breach Code:
-
Click the Request number
-
Click Edit
-
Select Impact > Service Level Breaches
-
Select the Phase of the SLA that was breached
If more than one SLA Phase has been breached, multiple options will be available in the Phase breached field.
-
Click Edit
The breached Phase is locked down and the Additional Info field is opened in Edit mode.
-
Assign a Breach Code
(The available codes are created by the Supervisor within the Service tab.)
-
Add any additional information, if required
-
Click Save.
All breach information is used for reporting on Service Level Agreements.
Services Affected
When the request is logged against an Item that is associated with Services within the Item Relationships tab, the Services Affected option displays the following:
-
Service Item Number
-
Service SLA
-
Number of affected Users
Estimates
The Estimates option allows Users to view an indication of the approximate time a Request should remain in each State of the Service Request Workflow, the amount of time logged in each State and the length of time the Request resided in each State.
|
Options |
Description |
|---|---|
|
Estimate |
Indicates the approximate length of time the Request will spend in the Workflow State. This field is automatically completed if an OLA or UC is assigned to the Workflow State. |
|
Logged |
Is a combination of time accrued against the Request when in edit mode with the automatic timers enabled, and the sum total of Note Times manually entered by Users. |
|
Total |
The total time a Request has resided in the Workflow State. |
|
% Active |
The percentage of the Total time that the Request was actively worked on when in the State. The calculation is, (Logged Time divided by Total Time) x 100. |
The Estimate Times are drawn from the OLA and Underpinning Contract assigned to the current State. However, these can also be adjusted manually for each Request. To manually adjust the estimated time for a Workflow State:
-
Select a Request number ID
-
Click Edit
-
Move to the Impact tab, select Estimates from the drop-down list
-
Select the State hyperlink within the Status column of the Estimate Time to be adjusted
An editor box is displayed.
-
Enter the adjusted time in the available field
-
Click Save within the editor box
-
Make any other time adjustments, if required
-
Select Save to record all manually entered time adjustments against the Service Request.
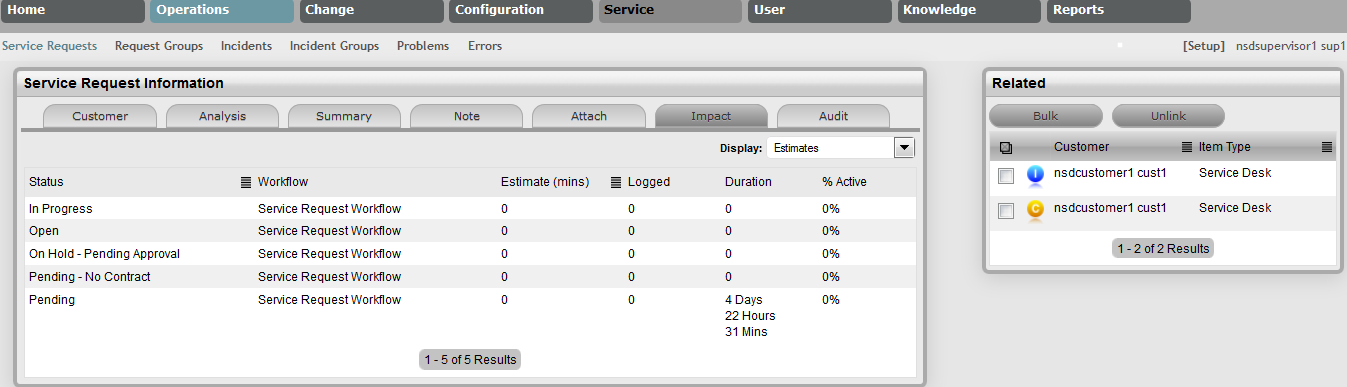
Contract Monitor
When a Workflow State with an OLA or Underpinning Contract is assigned to the Request, the Contract Monitor displays the details of the Contract. The information is used for reporting purposes and includes:
|
Details |
Description |
|---|---|
|
Contract Type |
Specifies if the Contract Type is an OLA or Underpinning Contract. |
|
Start Time |
Auto-generated time the request moved to the current Workflow State. |
|
Milestones |
|
|
Expected Response Time |
Response Time calculated using the Contract target parameters. |
|
Responded |
Actual Response Time auto-calculated when the User checks the box. |
|
Expected Restoration Time |
Restoration Time calculated using the Contract target parameters. |
|
Restored |
Actual Restoration Time auto-calculated when the User checks the box. |
|
Expected Resolution Time |
Resolution Time calculated using the Contract target parameters. |
|
Resolved |
Actual Resolution Time auto-calculated when the User checks the box. |
|
Comments |
Allows for additional comments, if required. |
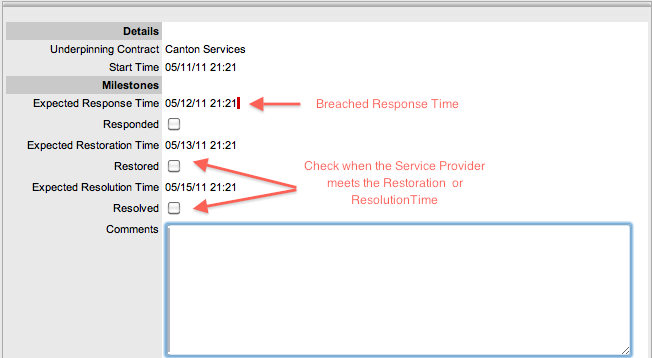
NOTE:If Milestones are breached the Response, Restoration and Resolution times are assigned a red marking.
Audit Tab
Audit
The Audit tab lists all activities that occur within the lifetime of a Request, the resources used and the history of the Request's Item. It provides access to information relating to Approval activities that are logged against the Request.
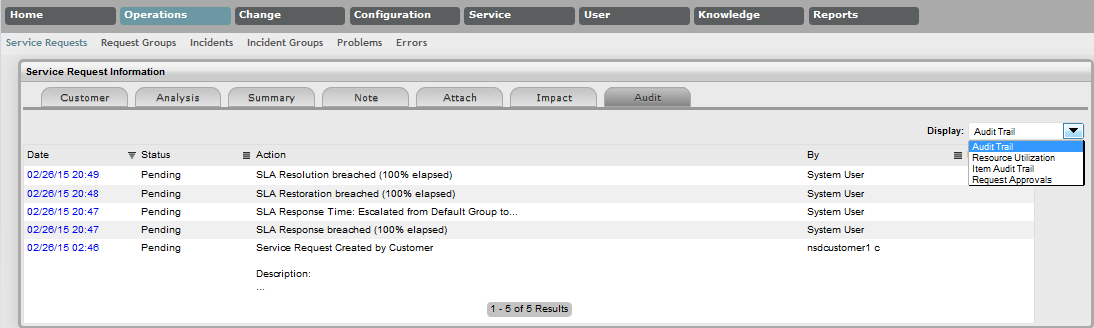
Audit Trail
The Audit Trail option records all the activity related to a Request. The recorded activity, which can be exported to PDF includes:
-
Date and time the Request was assigned and/or reassigned to Users
-
When the Request moved to a new state, or had its Priority or Due Date changed
-
Details of Notes added
-
Attachments activity
-
Classification change
-
Logged time.
Resource Utilization
The Resource Utilization option displays a breakdown of the time a Request was worked on at each level of support. It details the User's name, the escalation layer they belong to, and the amount of time they spent on the Request.
Item Audit Trail
The history of the Item associated with the Request is detailed within Item Audit Trail. To access more information regarding an Item Audit Trail entry, select the ID number hyperlink.
Request Approvals
For Requests that are assigned an Approval State, the details, including the time and date the Request entered and exited the Approval State, are recorded within this tab. Select the Date hyperlink to view the Approval Action information. The complete list and details can be exported using the PDF option.
Item Relationships
Infrastructure Items that have a connection can have the relationships mapped within the CMDB. Items that are linked display the related Item details under the Relationship tab.
Users can view and create relationship maps for an Item opened in Edit mode with other Items within the CMDB within the Relationships tab to define the infrastructure that underpins Services within the Service Catalog. For more information about creating a Service Catalog and relationship mapping also refer to Service catalog.
NOTE:Items imported using AMIE automatically have the relationships mapped within the system.
To create a new Relationship:
-
Select Configuration>Items
-
Select an Item
-
Select the Item Relationship tab
-
Click New
-
Select the Direction from the drop-down menu
The options are:
Parent-Child: A Service Oriented view describes relationships top-down with the Service at the top. For example, the Service Email Provision, would be at the top level with relationships between Configuration Items described, ending at an individual User.
Child-Parent:A Component Oriented view starts from the bottom up, with the Service being the top layer.
For a Service, such as the Email or Web Site Service, it is recommended that the Hardware be defined as the Parent for the Software Items and the Software be defined as the Parent of the Email or Web Site Service.
-
Select the Type
Hierarchical or Connection.
-
Select the Relationship description from the drop-down list
-
Use the Find Item field to locate the relevant Item
-
Click on the Item Number hyperlink to create the Relationship.
-
Click Save to display the newly created Relationship map.
To navigate any connections that may exist within the Relationship map, click on the Item icon and this will automatically move the User to the Information details of the selected Item.
The map displays the relationship between each Lifecycle State by using different colors to represent the type of Lifecycle State.
|
Color |
|
|---|---|
|
Green Circle |
CI is assigned an online status. |
|
Red Square |
CI is assigned an offline status. |
|
Blue Triangle |
Service CI is assigned a pre-production status. |
The Lifecycle State name can be accessed by scrolling over the Item icon within the Map.
AMIE Item imports and relationships
Items with Item relationships that have been imported using the AMIE engine retain the relationships that exist within the Asset Management Tool. A visible map of the relationships is recorded within the Relationships tab.
To delete a Relationship:
-
Select Configuration>Items
-
Select an Item
-
Select the Item > Relationship tab
-
Click Edit
-
Select the Delete button
A list of all the Item relationships are displayed.
-
Select the direction of the relationship
The options are Parent - Child or Child - Parent.
-
Use the checkbox beside the Current Item to select the relationship for deletion
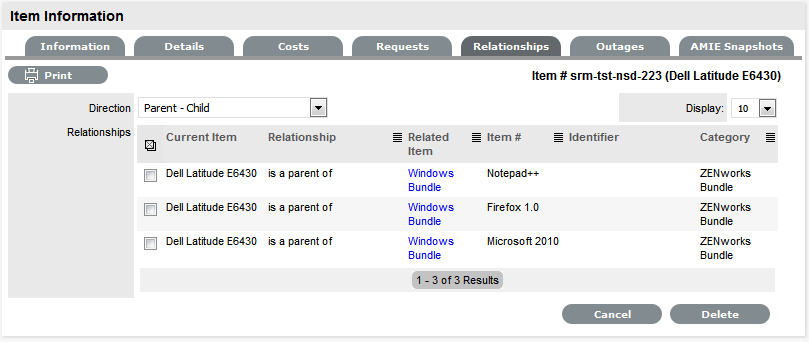
-
Click the Delete button.
The relationship between the Current and Related Item is removed.
Service Terms
The Service Terms sidebar displays the Service Level Agreement (SLA) assigned to the Service Request and provides details of key dates.
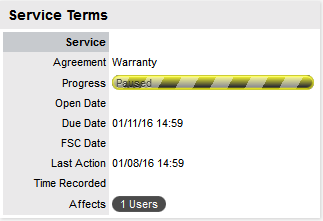
By default the application calculates the Due Date based on the Priority of the SLA assigned to the Customer, Organizational Unit or Item. The email reminders and escalations are then managed accordingly. If an SLA is not associated with the Service Request via the Customer, Org Unit or Item, the system default SLA will be automatically assigned to the Service Request but can be manually adjusted by the Technician. Once the Workflow is moved from the default Open State, the SLA can no longer be edited.
|
Service Terms |
|
|---|---|
|
Agreement |
Displays the Service Level Agreement assigned to the Request. The service level is derived from either the Customer, Organizational Unit or Item. When Contracts are not enabled, the Agreement field can be edited, when the Request is in edit mode. |
|
Service Manager |
Displays the User assigned as the Service Manager for the assigned SLA. |
|
Progress |
Visually displays how the Request is tracking against the assigned SLA. The grey progress bar is gradually filled in based on the status of the SLA:
|
|
Open Date |
The open date field is automatically populated when the Request is created. |
|
Due Date |
By default the application calculates the Due Date based on the SLA Target for the Priority assigned to the Request, and email reminders are sent accordingly. |
|
Fix Date |
Auto-filled when the Request moves into a Workflow State that is defined as meeting the SLA Resolution Time. |
|
Remaining |
Auto-filled and visible when there is SLA time remaining. |
|
Time Overdue |
Auto-filled and visible when the SLA is overdue. |
|
Close Date |
Auto-filled when the status of a Request is set to Closed. This date is fixed. |
|
Resolution Time |
Auto-filled with the number of minutes it took for the Request to move from the first SLA active state to a Workflow State that is defined as meeting the SLA Resolution Time. |
|
Last Action Date |
Auto-filled when Done or Save is selected after the Request has been modified or opened in edit mode. As changes may be made to a Request after it has been Closed, this date may fall after the Close Date. |
|
Time Recorded |
Displays the sum total of automatically logged time, when the Request is in edit mode plus any manually entered Note Times. |
|
Affects |
Number of Customers assigned to the Item associated with the Request. |
NOTE:Each User can customize the date format within the My Account sub-menu option. To change the date format go to Home > My Account, click Edit and select the preferred format.
Time Recorded
Time Recorded uses a combination of auto-timing and manual Note Time entries to measure and monitor the time spent working on a Request.
The Auto-timer is activated when a Request is opened in edit mode, if enabled by the Administrator in the Admin>Setup>Privileges>User>Manual Incident Time. When the Request is saved after any amendments have been made, the timer stops and records the length of time the Incident has been worked on. This total is added to the sum total of any manual Note Time entries made by Technicians when they are adding Notes.
The Time Recorded is used by the system when the Contracts functionality is in use. See: Contracts.
Related Requests
The Related Requests sidebar is automatically displayed when a Service Request is linked to other requests.
Requests can be linked in the following ways:
-
Using the Group option within the Service Request list
-
Using the Service Request Groups feature under the Request tab
-
Linking requests within the Request's Analysis tab
-
A result of multi-Item Request creation.
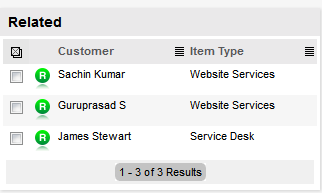
Any Requests that belong to a Group can be viewed within the Related sidebar window, inside the Service Request Information screen. Within this window, all related Service Requests are listed and can be controlled as one. For example, Notes can be applied to all related Requests or the entire Group can be closed.
Managing Related Requests
The details of a Related Request can be viewed by hovering the mouse over the colored Icon. Click on the same Icon, and the system moves to the Request Information screen of that associated request.
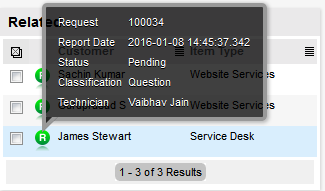
Bulk Options
The Bulk option allows one or more linked Requests to have the following information updated simultaneously:
-
Priority, Workflow, Status, Team, Escalation Layer & Technician
-
Notification method and recipients
-
Request Classification
-
Items
-
Description, Attachments and Notes.
To complete a Bulk update for any of the above elements:
-
Go to Operations>Service Requests
-
Click on the Request # link of the relevant Grouped Request
-
Tick the checkboxes of the appropriate requests in the Related Requests sidebar that are to be updated
-
Select

The system displays the Bulk Editor screen.
The system does not allow Requests with a status of Pending-No Contract to be updated
NOTE:If the Bulk update is only associated with Requests of this Status, an error message is displayed noting that one or more Requests need to be selected.
-
Amend the appropriate element as per the above list
-
Click Save.
Remove Related Requests
To remove a request from a Group:
-
Go to Operations> Service Requests
Or, within Operations>Request Groups select the Group # link and move to the Elements tab
-
Click on the Request # hyperlink of a Grouped Request
-
Click

The Request opens in Edit mode and checkboxes become available next to the requests in the Related sidebar.
-
Tick the checkboxes of the requests to be removed
-
Select
 .
.
The marked requests are removed from the Group.
Managing Related Requests
Grouping Service Requests
Service Requests can be linked to form project Groups when Requests are related in some way (e.g., Requests that have the same solution). New Groups must consist of Requests that are not already linked.
Creating a New Group via the Service Request Tab
Within the Service Requests List View:
-
Select Operations>Service Requests tab
-
Tick check boxes in the far left column of unlinked Requests
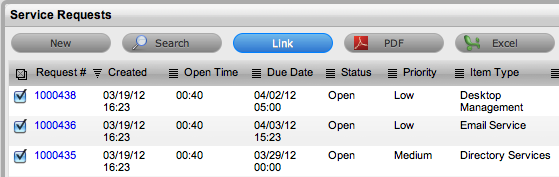
-
Click Link to group the Requests.
A Group Number will be assigned and an instant Group hyperlink will appear under the Group column.

Requests that are included in a Request Group are listed within the Elements tab of the Request Group. See: Request Groups.
Adding Requests to an Existing Group
To add Requests to an existing Group:
-
From the Service Request list, check the boxes of the new Requests and at least one existing member of the Group to which you wish to add the Requests
-
Click Link.
NOTE:This will not work if Requests representing more than one group are included. For instance, if you have two Groups (A and B) each with two Requests (A1, A2, B1and B2), and you want to add two unlinked Requests to Group A, click the check boxes for the unlinked Requests and either A1 or A2 or both. If B1or B2 is also clicked, the linking process will fail because it will not know which group to add the two new Requests to.
Merging Request Groups
Existing Request Groups can be merged within the Request Groups tab, to allow all related Requests within the Groups to be managed as one. To combine Request Groups:
-
Go to Operations>Request Groups
-
Check the fields next to the relevant Group #'s
-
Click Merge
The screen defaults to the Details tab for the Merge Group.
-
Set the Name, Item Type, Classification, Status, Priority and Description that best defines all associated Service Requests
-
Click Save.
The History tab records details of the Groups merged to form the new Group. Click the No. hyperlink to view the details. The Impact tab records the Type and Number of requests associated with the Group.
Grouping Service Requests
Service Requests can be grouped by selecting the checkboxes next to the Request #, followed by the Link button.
NOTE:The type of Request Group created is based on the Service Request type assigned to the Group.
-
If the Group contains Service Requests, it is a Service Request Group
-
If the Group contains Service Requests and Incidents, it is an Incident Group
-
If the Group contains Service Request and Problems, it is a Problem Group
-
If the Group contains Service Request/Incidents/Problem/Change, it is a Change Group.
If a Service Request is related to an Incident, Problem or Change Request and that related request in the other Process is closed, the Service Request is automatically closed. The system views the request hierarchy from low to high as Service Request, Incident, Problem and Change Request, and if a related request of a higher type is closed, all the lesser type requests are automatically closed, or if the handshaking facility is enabled for the system, moved to the Pending-Approval State.
Multi-Item Requests
Also displayed within the Service Request Groups List View are Groups of Requests that are created as Multi-Item Requests. These Requests allow for multiple Items to be assigned during the Service Request creation process and result in separate Requests being created for each Item assigned to the initial Request, which are then displayed within the Related window of the Service Request Information screen.
The Requests are managed as individual tasks, although they may be updated in bulk. This allows for the specific requirements of Items being modified to be managed effectively, ensuring each Item has its own Audit Trail, Attachments and Notes for future reference.
Multi-Item Requests are also listed as separate Service Requests within the Service Requests List View.
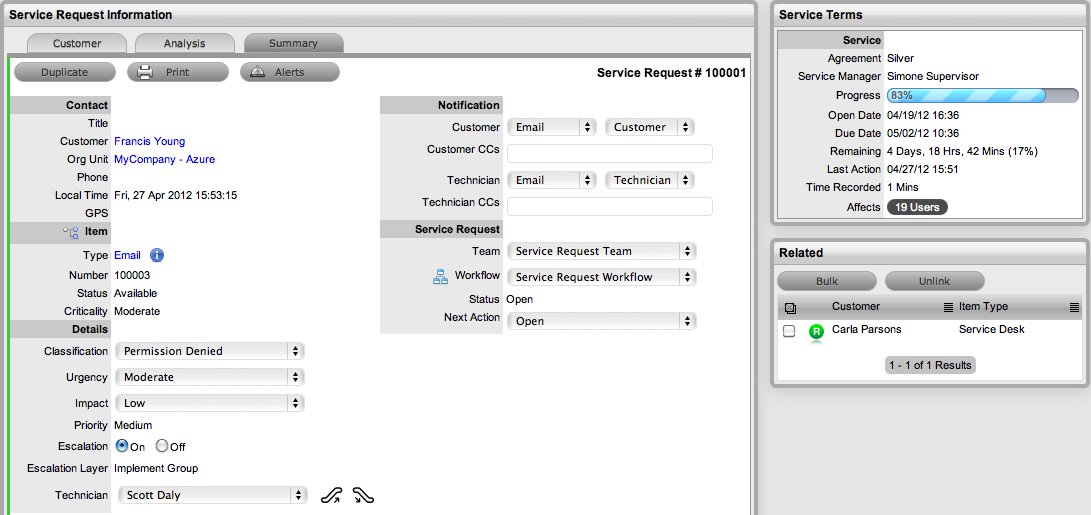
Multi-Item Requests are created like a single Item Request, but have more than one Item assigned during the Service Request creation process. See: Create a Request - Item Information.
Multi-Item Request Item Assignment
After assigning a customer to a Request move to the Find Item field to assign Items to the Request:
-
Click the relevant Item link if listed below the Find Item search box
Or, Search for an Item or click
to Create an Item.
The option to create an Item is only available to Technicians if the system Administrator has enabled the Create Items option within the Setup>Privileges>User screen.
-
Click Next to move to the Details tab if only one Item is to be assigned to the Request
Or, select Add to assign additional Items. If Add is selected, a Request Selections window will be displayed that lists all the current Items assigned to the Request.
-
Continue to add all the relevant Items to the Request and then select Next to move to the Details tab
Within the Details tab the Request is profiled by assigning a Classification and Description.
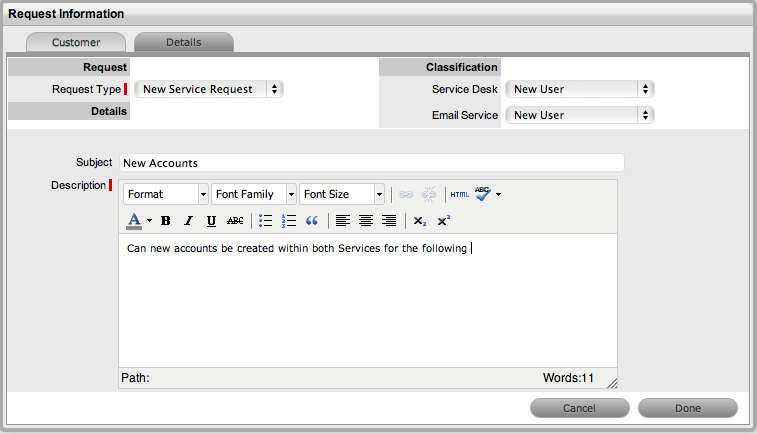
-
Select the Classification, enter the Subject and Description
-
Click Done to enter all Requests simultaneously.
The Requests are created individually and automatically applied to a Group.
Billing: Contracts and Invoices
Billing within the system allows support organizations to manage their Customers' service and support contracts. This can be achieved by the system Administrator enabling the preferences of Contracts, with or without the preference of Invoices, within the Billing option of the Setup tab.
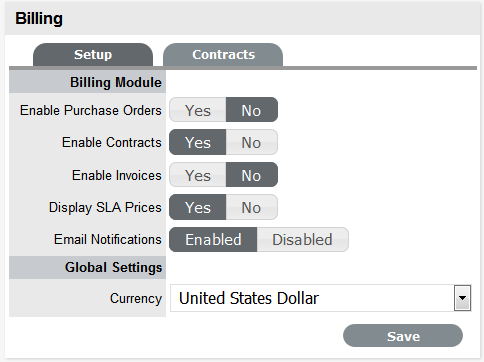
When Contracts are enabled without Invoices, system contracts can be created without the need for charging Customers for the support provided. Whereas, the Contracts option combined with Invoices allows the application to manage service contracts and process payment within the one facility.
There are a number of Contract Types available within the system, and these include:
IMPORTANT:Per Request - covers the period of time for which the request is open and work completed
Per Item - covers the Item, regardless of the number of requests logged against the Item but can be created for the following:
Subscription - a contract that covers a specified period of time
Time Limited Subscription - a contract that covers either a specific time period or number of support hours, whichever limit is reached first
Support Hours - a contract that defines the number of support hours covered
Support Hours by Month - a contract that covers a total number of support hours purchased for a defined timeframe and allocated on a per month basis.
When Billing is enabled in the application's Setup, a maintenance contract must exist for either a Customer, Organizational Unit or Item, before a request can be processed.
Contract Validation Process
When a request is created and Contracts are enabled with Invoices, the system validates the contract status for a Customer, Organizational Unit or Item. As part of the contract validation process, the application selects the first element found on this list:
-
Customer (with a valid contract)
-
Org. Unit (with a valid contract)
-
Item (with a valid contract)
-
Customer (with a pending contract)
-
Org. Unit (with a pending contract)
-
Item (with a pending contract)
-
No contract found, then either a Per Request or Per Item contract is created through the request.
NOTE:When a Pending Contract is selected, the Contract must be processed before work can be undertaken on the request.
Create & Process a Request with Contracts enabled
When the Contracts or Invoices functionality is enabled and a request is created, the system will verify the service entitlement status of the Customer and if a valid contract is not in place, the new request is assigned a status of Pending - No Contract and locked until a valid contract is associated with the request.
In a Request Group where the Customer and Organizational Unit does not have a Contract, if an Item applied to a request has a Contract and another does not, a relevant status will be applied to each request. The User will be able to edit the request with a valid Contract, but the request without a Contract will be locked down to a Pending - No Contract status, until a valid Contract is applied to the request.
The Customer is automatically sent the NoContractCreateRequestSummary email when the request is saved with the Status. A reminder email can be sent to the assigned Customer by the Technician from within the Summary tab by clicking ![]() .
.
Two types of Contracts are used by the system, these include Per Item or Per Request Contracts. They are defined as follows:
-
Per Request - covers the period of time for which the request is open and work is done
-
Per Item - covers the Item, regardless of the number of requests logged against the Item and can be defined as:
Subscription - a contract that covers a specified period of time
Time Limited Subscription - a contract that covers either a specified period of time or number of support hours, whichever limit is reached first
Support Hours - a contract that defines the number of support hours covered
Support Hours by Month - a contract that covers a total number of support hours purchased for a defined timeframe and allocated on a per month basis.
Request with Per Item Contract
To create a Per Item Contract for a request within the Summary tab of the request:
-
Click the Pending - No Contract link
The Contract tab is displayed with Contract Type and Service Level drop-down options.

-
Select the Contract Type of Per Item
For the Per Item Contract Type the Time Period for the Contract can be defined as one of the following:
Subscription if selected, the Start and End Dates are automatically set to a year from the date of creation, but can be edited if required
Time Limited Subscription if selected, the Support Hours field is displayed and the number of support hours purchased by the Customer should be entered. Also, the Start Date and End Date fields should be completed manually by entering the length of time for the subscription period, or the system will default to entering a year from the date of creation
Support Hours if selected, the number of support hours purchased by the Customers should be entered
Support Hours by Month if selected, set the number of hours purchased per month and define which day of the month the contract is to rollover to start the new month. The Total Support Hours will automatically be calculated based on the Start and End Dates set for the Contract.
(If a Contract is forward dated with a Start Date set in the future, the Pending Contract status is assigned.)
-
Click Save
The maintenance contract is created.
-
Click Next to continue to create the request by defining the Classification and Description.
NOTE:If Invoices are enabled, a new invoice is automatically saved within the Finance>Invoices screen for the newly created Contract.
Request with Per Request Contract
To create a Per Request Contract for a request within the Summary tab of the request:
-
Click the Pending - No Contract link
The Contract tab is displayed with Contract Type and Service Level drop-down options.
-
Select the Per Request Contract Type
(The SLA Price and Tax option box is displayed, if Invoices are enabled for the system.)
-
Select the SLA
(If required, check the box to indicate if tax is to be applied to the Invoice, which will be applied to the Invoice that is automatically saved within the Finance>Invoices screen when the newly created Contract is saved.)
-
Click Save
(If the Service Level selected for the request has a cost associated with it, the request will be assigned with the status Pending - No Contract. Work cannot commence on the request until payment for the invoice is received.)
-
If the Service Level has no cost i.e., Warranty, the maintenance contract is created and work can commence on the request immediately
-
Click Done.
The screen defaults to the Summary tab.
Grouped Requests and Contracts
Contracts can be applied to all requests within an Incident Group when a Per Request contract is created within the Contract tab of a grouped request. The following options are available:
-
Per Group - applies the Contract to the Request Group as a whole and assigns a single charge for the Contract. On the associated Invoice, if relevant, the SLA Price is distributed evenly across each Request line-item
-
Per Request - applies the Contract to the Request Group but assigns the SLA Price as an individual charge to each request within the Group. On the associated Invoice, if relevant, the SLA Price is applied to each request line-item.
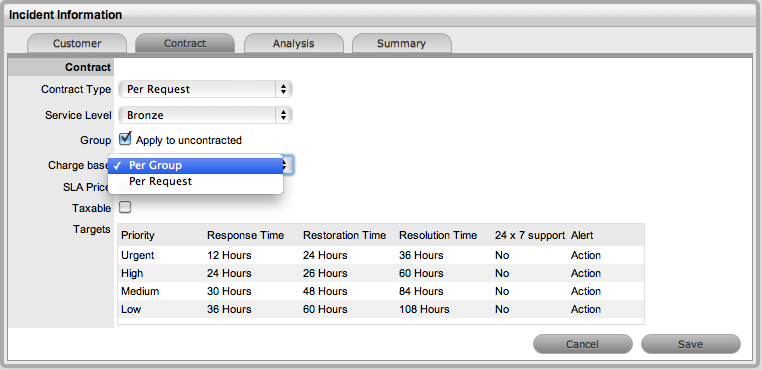
Processing an Invoice
If invoice payment for the SLA contract is required before the User can commence work on the request, the following system message is displayed:

When a request is flagged with this status, the Edit button will not be available within the Summary tab and a User assigned the Finance Role must process invoice payment before the request can be edited.
To process payment for an invoice see: Invoice Payment and Delivery
Invoice Cancellation
To cancel an Invoice for a request:
-
Select the Request # id
-
Select the Request with the Status Pending - No Contract
-
Click the Cancel hyperlink in the Summary tab.
This will cancel the Invoice and change the request Status to Cancelled - Unpaid.
Time Recorded
Although it is important for organizations to know exactly how much time is spent working on requests for internal reasons, it is crucial for organizations using Time Based Subscription contracts and Support Hours contracts. These Contract types rely on the amount of time worked on requests to be subtracted from the number of hours a Customer has purchased as part of their service contract.
Recording Time against Contracts
To give organizations greater control and more accurate data regarding time used to work on a request, the system records the time in two areas:
-
When a Note is added, the User has the option to complete the Note Time field, for the time they spent working on the request away from the application

-
When a request is opened in Edit mode, the system clock monitors the point at which it was placed in Edit mode until it is Saved and moved out of Edit mode. (This functionality is applied if the Admin>Setup>Privileges>User>Manual Incident option is set to No.)
These two amounts are added and recorded within the Time Recorded field in the Service Terms sidebar.

The Time Recorded is then deducted from the number of support hours purchased by a Customer. The remaining contract time can be viewed via the Item > Costs tab, the Customer > Contracts tab, or the Organizational Unit > Contracts tab, where relevant.
Service Request Groups
Service Requests that are related can be linked to form Groups. Once the Group has been created, Requests can be managed as one.
For example, Requests can be grouped if:
-
They are all logged by Users of one department
-
They are all logged by one Customer
-
They are all logged for the same Configuration Item
-
They have a common Description or Solution.
-
NOTE:New Groups must consist of Service Requests that are not already linked, unless the merge facility is used to combine existing Groups.
Users can group Requests manually through the Request Groups tab or Service Requests List. (See: Grouping Service Requests.) Service Requests that have multiple Items assigned to them during the Request creation process, are also listed within the Request Groups tab.
When the last Request in the Group is closed, the Status of the Group is automatically set to Closed.
Creating a New Group via the Request Groups Tab
To create a new Group via the Request Groups tab:
-
Select Operations >Request Groups
-
Click New
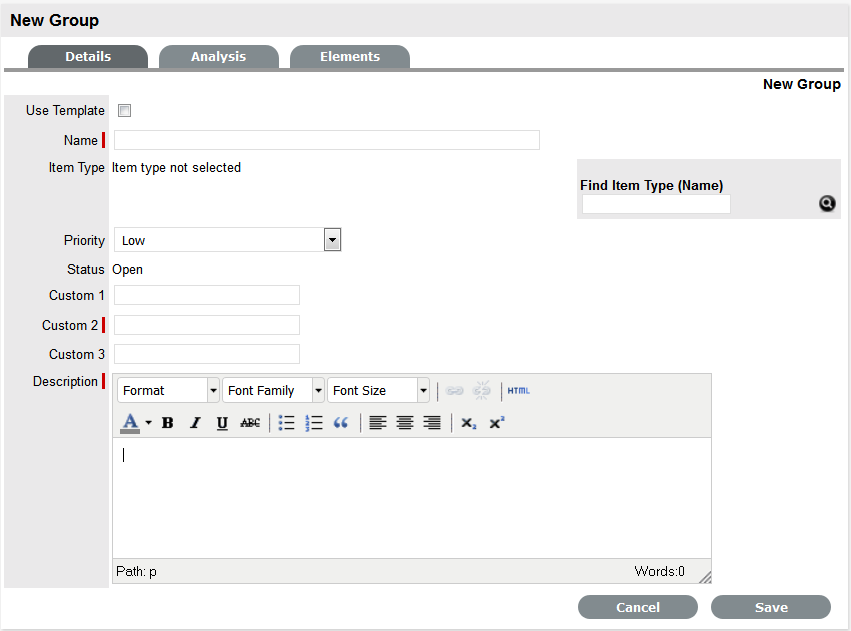
-
Enter a Name for the Group
-
Assign an Item Type, if applicable
-
Assign a Classification, if an Item Type is selected
-
Assign a Group Priority
The Status is set by default to Open.
-
Enter a Group Description
-
Click Save
The screen will default to the Analysis Tab, which allows the User to Group existing Requests. The information displayed can be adjusted by using the Filter options.
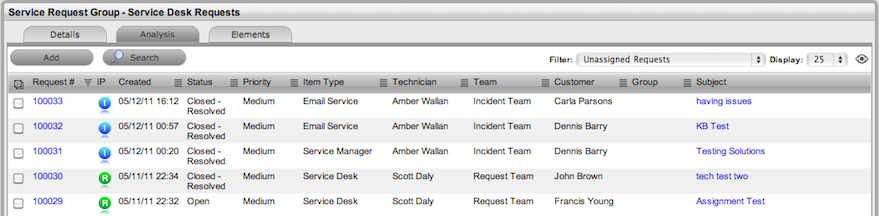
-
Check the field next to the relevant Request # to add Requests to the Group
-
Select Add
The Requests are included in the Elements tab.
-
Click Done to record the new Service Request Group.
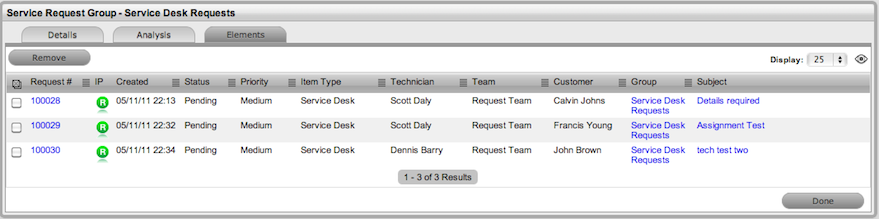
Creating a Service Request Group using a Group Template
A Service Group can be created using a Group Template. A Group Template contains a series of tasks in the form of Quick Calls. For more information, see: Group Templates.
Tasks within the Group Template can be created simultaneously or sequentially in the system. If the In Sequence option is used, the first task within the Group Template is created when the Template is selected. When the first task is closed, the next Task within the Template is automatically created and so goes the auto-creation process until all tasks within the Template have been created and closed in sequence.
To create a new Group using a Group Template:
-
Select Operations>Request Groups
-
Click New
The New Group editor is displayed.
-
Select the Use Template checkbox
A list of Group Templates is displayed
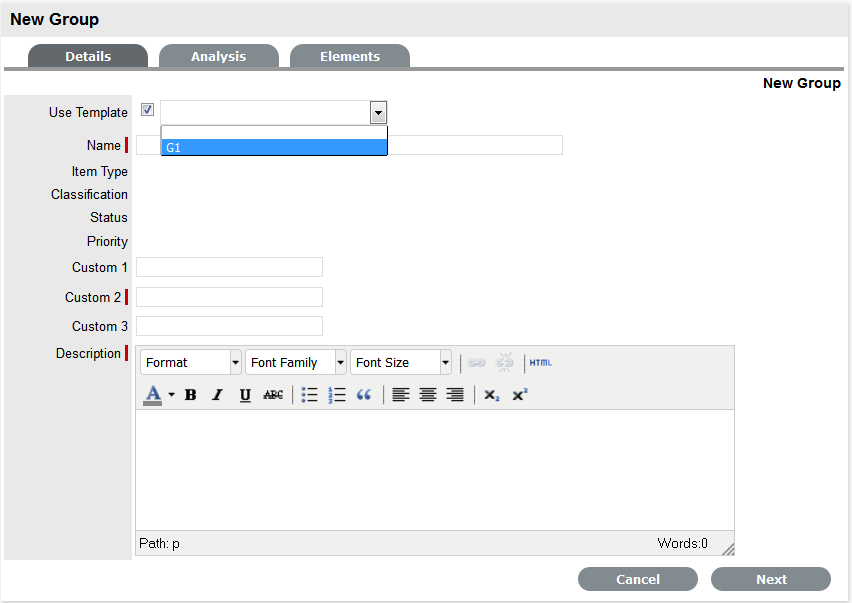
-
Select an appropriate Template
The Group details are listed.
-
Enter a Name, as unique identifier for this Group
The selected requests for the Group are displayed. These requests are the Quick Calls assigned to the Group Template.

-
Click Next
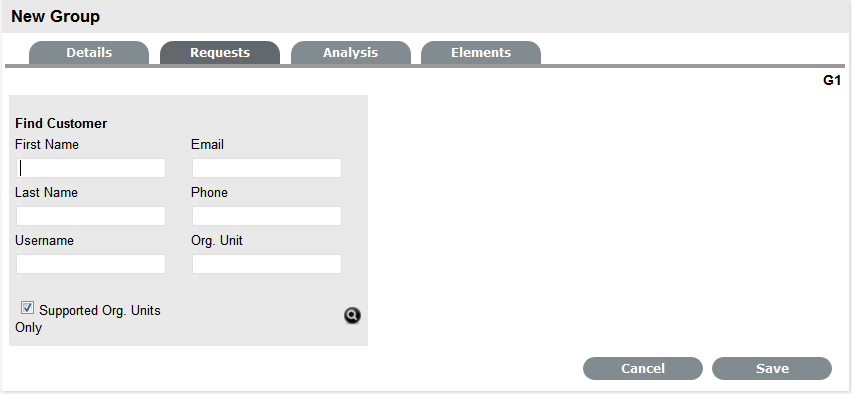
-
Search and select the Customer to be associated with the tasks included in the template
If the Customer details are not in the database and are to be created as part of the tasks included in the template, assign a default customer and update the details in the Customer tab of the Request, when the Customer details exist in the system.
-
Review the Selected Requests displayed for the Group
These Requests are the Quick Calls assigned to the Group Template. To exclude any of the Requests from the newly created Group, untick the checkbox next to the Template name.
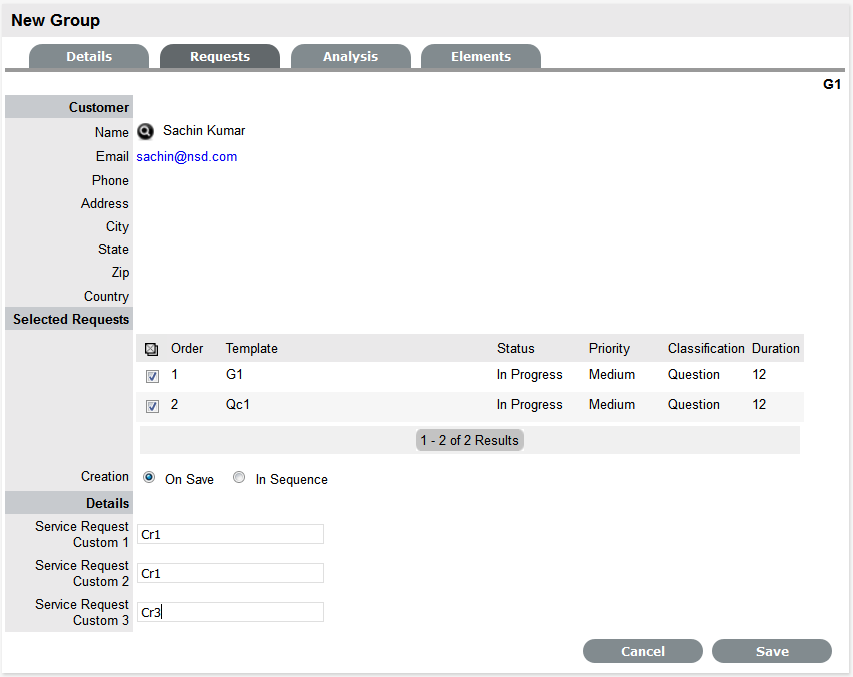
-
Define the Creation option:
-
On Save for all the requests to be created when the Request Group is saved
-
In Sequence for the first request to be created when the Request Group is saved.
-
-
Click Save.
The Group is created including all Quick Call Requests. To add or remove Requests to or from the Group, use the Analysis and Elements tabs (Covered below).
The type of Group created, whether it be a Service Request, Incident, Problem or Change, will depend on the Quick Call Tasks assigned to the Group Template. For example:
-
If all assigned Tasks are Service Requests, the Group will become a Request Group
-
If there are Service Request and Incident Quick Call Tasks, the Group will become an Incident Group
-
If there is at least one Change Quick Call Task, the Group will become a Change Group.
If a Service Request is related to an Incident, Problem or Change Request and the related request in the other Process is closed, the Service Request will be automatically closed. The system views the request hierarchy from low to high as Service Request, Incident, Problem and Change Request, and if a related request of a higher type is closed, all the lesser type requests are automatically closed.
Analysis Tab
Service Requests can be linked to a Group at the Analysis screen of a Service Request Group. To search for Requests to add to the Group, use the system Filters or the Search option.
The system filter includes the following:
|
Unassigned Requests |
Description |
|---|---|
|
Project Requests |
Requests that have been assigned to the Change Group/Project. |
|
Unassigned Requests |
All Requests that exist in the system and have not been assigned to the Group. |
|
Potential Requests- Keyword match |
Requests with keywords that match between the Request description and the Group description. NOTE:Note: The match is only performed on the first 250 characters of the description. |
|
All Service Requests (sys) |
Lists all Requests in the system irrespective of Workflow State or User assignment. Note that this option is not visible to Technicians when the privilege to View All Requests is disabled by the Administrator. |
|
My Service Requests (Active) (sys) |
Displays all Requests in an active Workflow State that are assigned to the logged-in User. |
|
My Service Requests (All) (sys) |
Displays all Requests, in active and inactive Workflow States, that are assigned to the logged-in User. |
|
My Teams Service Requests (Active) (sys) |
Displays all Requests in an active Workflow State, allocated to the Teams with which the User is associated. |
|
My Teams Service Requests (All) (sys) |
Displays all the Requests, in active and inactive Workflow States, allocated to the Teams with which the User is associated. |
|
Pending Approvals (sys) |
If the User has Manager privileges, this view provides them with a list of Requests that are assigned an Approval stage of the Workflow. |
|
Service Requests Queue (sys) |
Displays Requests assigned to the System User by default, which Technicians can reassign after viewing. (This is only available if the functionality is enabled for the system and Team.) |
To link Requests within the Service Request Group Analysis tab:
-
Go to Operations>Request Groups
-
Select the Service Request Group # link
-
Move to the Analysis tab
-
Choose the Filter option
-
Select the relevant Requests checkbox on the left
-
Click the Add button
-
Click Done.
The screen defaults to the Groups list.
Elements Tab
The Elements tab displays all the Requests that belong to the Service Request Group. Any Request can be removed from the Group from within this screen.
To remove a Request:
-
Go to Operations > Request Groups
-
Select the Request Group # link
-
Move to the Elements tab
-
Select the checkbox of the relevant Request
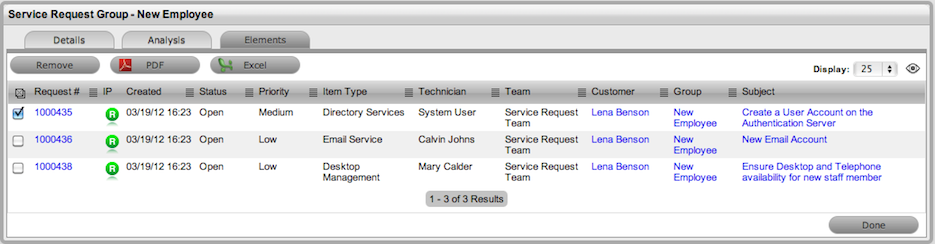
-
Click the Remove button.
Merging Service Request Groups
Existing Service Request Groups can be merged within the Request Groups tab, to allow all related Requests within the Groups to be managed as one. To combine Requests Groups:
-
Go to Operations>Request Groups
-
Check the fields next to the relevant Group #'s
-
Click Merge
The screen defaults to the Details tab for the Merge Group.
-
Set the Name, Item Type, Classification, Priority and Description that best defines all associated Service Requests
-
Click Save.
The History tab records details of the Groups merged to form the new Group. Click the No. hyperlink to view the details. The Impact tab records the Type and Number of requests associated with the Group.
Closing a Request Group
A Request Group is automatically closed when all Requests included in the Group are closed.
To close a Group:
-
Go to Operations>Request Groups
-
Select the Service Request Group # link
-
Move to the Elements tab
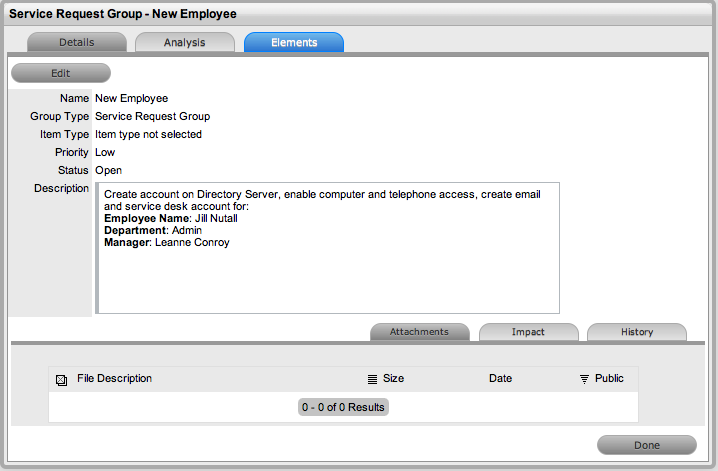
-
Select a Request # hyperlink
The Summary tab of the Request is displayed.
-
Click Edit
-
Within the Related sidebar check all related Service Requests
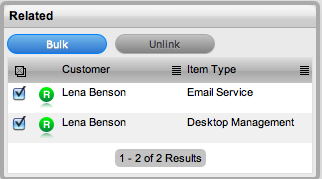
-
Click the Bulk button
The Bulk Editor screen is displayed
-
Select the Status of Closed - Resolved
Or, the relevant Exit State
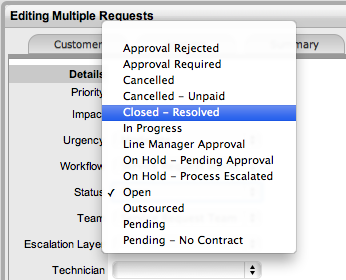
-
Click Save
-
Click Save and Done.
The Details tab of the Group now displays a Status of Closed - Resolved.
Duplicated Service Requests
When a Service Request is duplicated, the new Request is linked to the original Request creating a Request Group. Requests can be unlinked through the Group's Elements tab.
2.4.2 Incident Management
The function of the Service Desk is to act as the point of contact between customers of IT services (end users) and the IT service provider (IT department). Its role is to handle all requests for service, including Incidents, and provide an interface for other activities such as Request Fulfillment, Change, Problem and Configuration Management.
An Incident is defined as any event that is not part of the standard operation of a service, and causes, or may cause, an interruption to, or a reduction in the quality of service. The goal of Incident Management is to restore normal service as quickly as possible, with minimal disruption to the business. This ensures that the highest achievable levels of availability and service are maintained.
Incident Management objectives include:
-
Incident detection and recording
-
Classification of all Incidents and initial support
-
Investigation and diagnosis
-
Escalation
-
Resolution and recovery
-
Incident closure
-
Incident ownership, monitoring, tracking and communication.
As part of the Incident Management Process, if an Incident is related to a Problem or Change Request and that related request in the other Process is closed, the Incident will be automatically closed. The system views the request hierarchy from low to high as Service Request, Incident, Problem and Change Request, and if a related request of a higher type is closed, all the lesser type requests are automatically closed
Implementing Incident Management
To set up the Incident Management Process in the system, the following steps are to be completed:
-
Assign the Incident Management Process to the relevant Users within the User Information screen under the User>Users tab. (See:Create a User.)
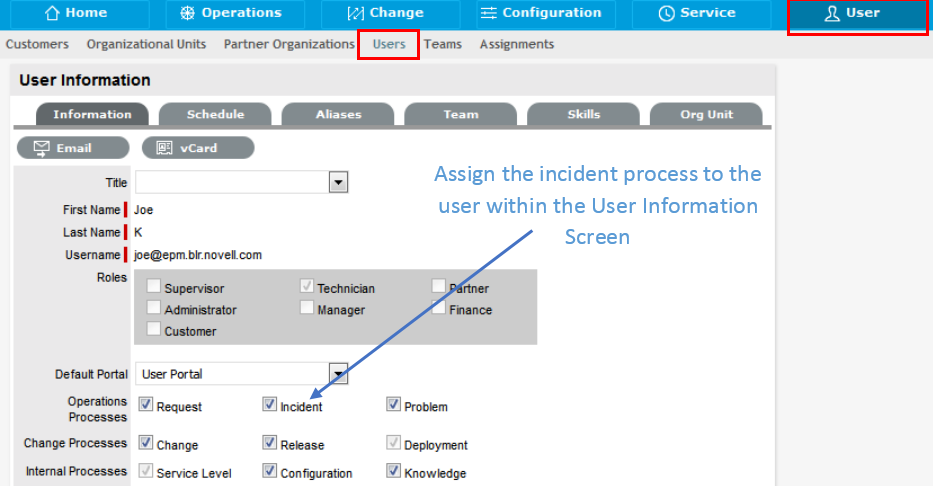
-
Create or review the SLA within the Service>SLAs tab, and associate the Incident Management Workflow to the SLA in the SLAs Workflow tab. (NB: The Supervisor User setting up the SLA must be assigned the Internal Process of Service Level in their User Information screen to complete this action.)
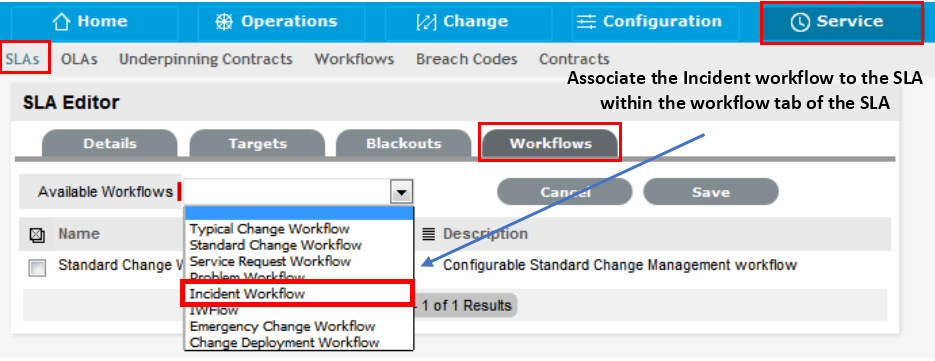
-
Review the Incident Management Workflow within the Service>Workflows tab. (See: Incident Management Workflow.)
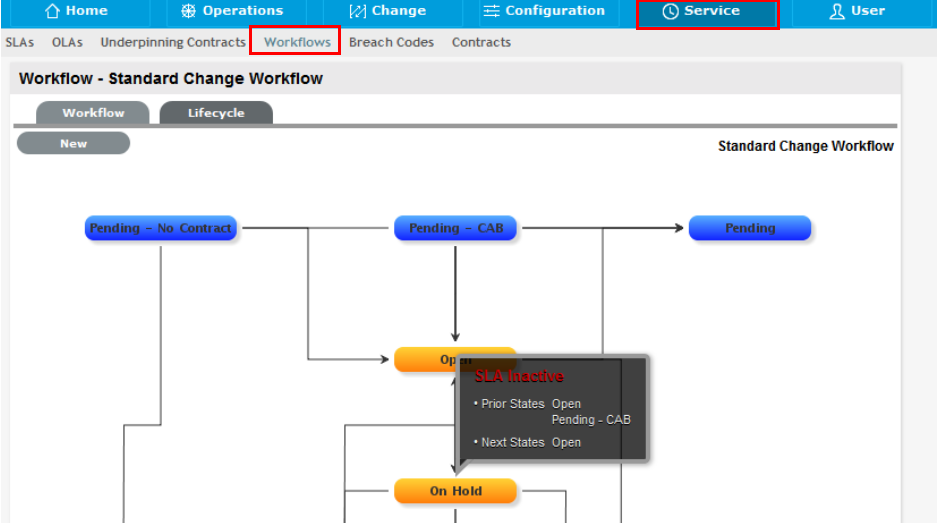
-
Edit the Default Incident Management Team within the User>Teams screen. (See: Incident Management Team.)
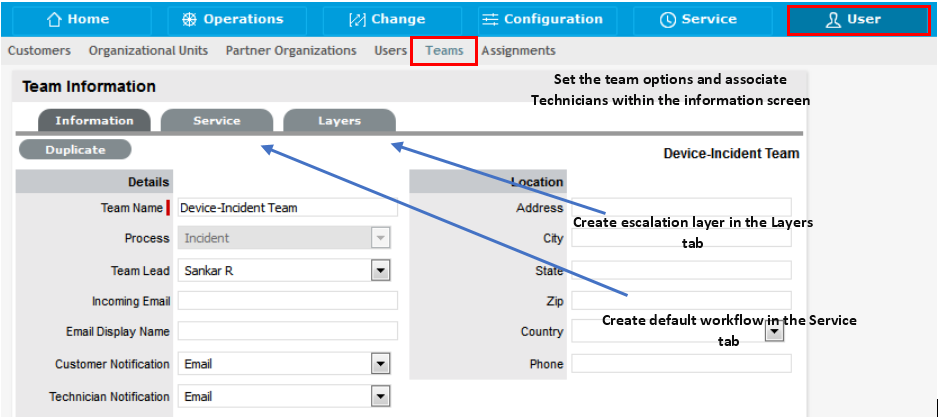
-
Associate the SLA to an Item or Customer or Org Unit. This final step ties all the elements together when an Incident is created, as the SLA associated with the Item, Customer or Org Unit assigned to the Incident determines the Workflow, Team and Technicians that are made available within the Incident Information screen.
Incidents

Incidents are requests raised for Customers, or raised by a Customer through the Customer Portal. An Incident is raised against a Configuration Item (Item), which may also be a Service, within the system. Incidents are assigned to Technicians and are escalated according to the Service Level Agreement (SLA) applied to the Incident.
The Operations>Incidents view defaults to display All Incidents logged within the system irrespective of Incident Status. Available Incident Filters include:
|
Filter |
Description |
|---|---|
|
All Incidents |
Displays all Incidents logged in the system regardless of their Status or Assignment. |
|
Incident Queue |
Displays Incidents assigned to the System User by default, which Technicians can reassign after viewing. (This is only available if the functionality is enabled for the system and Team.) |
|
My Incidents (Active) |
Displays all Incidents in an active Workflow State that are assigned to the logged-in User. |
|
My Incidents (All) |
Displays all Incidents, in active and inactive Workflow States, that are assigned to the logged-in User. |
|
My Teams Incidents (Active) |
Displays all Incidents in an active Workflow State, allocated to the Teams with which the User is associated. |
|
My Teams Incidents (All) |
Displays all the Incidents, in active and inactive Workflow States, allocated to the Teams with which the User is associated. |
The default display is ten Incidents per batch. The list can be re-sorted by clicking on a column header, and the number of Incidents displayed per batch can be altered using the Display pop-up option.
Creating an Incident:
To create an Incident within the system, the following information is required:
Incident Queue
Incidents that are created by Customers through the Customer Portal or via email, can be forwarded to a holding bay or queue, if this functionality is required by the Service Desk. The capability can be enabled system-wide but applied on a per Incident Team basis, as needed.
When an Incident is assigned to the Queue, the name applied in the Technician field is System User.
Incident Search Tips:
-
The Incident search option has a default Status to search only Active Incidents. To ensure search success, select the relevant Incident Status, if unsure, select All
-
To search for multiple Incident numbers at once, insert a comma separator between Incident numbers
-
To search based on an Incident status, select the Incident Workflow option from the Workflow drop-down list
-
To search by Classification, select an Item Category from the Category drop-down list. After the Category is applied, a list of Classifications is displayed
-
To search based on the content of an Incident Description, select the Full Text option within the Search screen and enter a relevant term (See: Full text searches.)
-
To search using an Item's Custom field information, select the Item Category to display any Custom Fields configured for that Item.
NOTE:For information regarding request assignment, reviewing a request, adding notes or updating the status, refer to Working on a Request.
RSS Feeds
To easily access up to the minute details regarding Incident activity within an RSS feed browser bookmark, Users can subscribe to RSS feeds by selecting the RSS button within the Incident list. When the RSS button is selected, Users are presented with the application options for subscribing to receive the information and where the Recent Activity information is to be accessed. To readily access the information through a browser window, save the feed the to the Bookmark Bar.
The following is an example of the information obtained by clicking on the RSS bookmark:
Create an Incident for an existing Customer
To search and assign a Customer who already exists in the system:
-
Go to Operations>Incidents
-
Click New
-
Search and select a Customer
Within the Find Customer field, enter any known Customer details or leave the search fields blank to access the complete Customer list. If Custom Fields have been enabled in the Customer Information screen, the Advanced Search option can be used to search on data recorded within these fields.
-
Click
to search the Customer database
-
Select the relevant Customer Name hyperlink to assign the Customer details to the Incident.
The screen will open the Find Item field.
Create an Incident for a new Customer
If the Customer does not exist within the system, an account can be created when entering the Incident:
-
Select Incident>Incident
-
Click New
-
Within the Find Customer field, select
An expanded editable Customer details form is displayed.
-
Enter the Customer details
-
Click Save.
The form will revert to a non-editable screen of the newly entered details and display the Items Tab.
Incidents for Partner Organization Customers
NOTE:When an Incident is created for a Customer of a Partner Organization it is automatically allocated to the Partner User associated with the Partner Organization.
Customers can be assigned to a Partner, in one of two ways:
-
When a Partner logs in and creates a new Customer, the Customer is automatically assigned to that Partner
-
When the Administrator option Edit Customer Partner is enabled, and the Partner is assigned to the Customer within the Customer Information screen of the User > Customers tab.
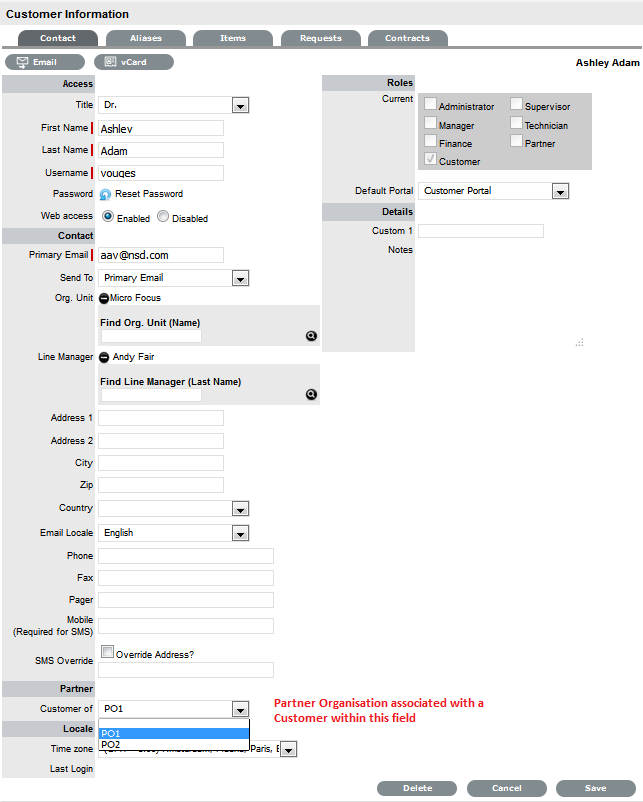
Supported Org Units Only option
This option is visible within the Find Customer search field, if the logged in User has been assigned to support specific Organizational Units. Uncheck the option, if search results are to include Customers belonging to all Organizational Units recorded in the system.
Customer Tab
The first step in creating a new Incident requires a Customer be assigned to the Incident. There are two ways to assign a Customer to an Incident, either search and select an existing Customer, or create a new Customer.
Item Information
After the Customer details are assigned to the Incident, an Item or Items are assigned to the Incident. This assignment associates all the relationships of the Item(s), including Service Level Agreements and assigned support Teams to the Incident.
When creating an Incident, if the Customer assigned to the Incident owns any Items they will be listed below the Find Item search box. By default, the list is defined by the All Assigned Items option. It is also possible to search by:
-
All Items
(Only visible if the Search All Items option is enabled within Admin>Setup>Privileges>User tab.)
-
All Assigned Items (Customer and Organization Unit)
-
Assigned Items by Customer
-
Assigned Items by Organizational Unit.
The list can be filtered using the Include Global* Items option. This will display Items that are available to all Users in the system, as they have not been assigned to a specific Customer or Organizational Unit. It can also be filtered using the Active Items Only option, which means only Items that are assigned an active lifecycle state are displayed if the option is checked.
Multi-Item Requests
The system also allows for multiple Items to be assigned to a request during the Incident creation process, if relevant. This results in separate Incidents being created for each Item assigned to the initial Incident, which are then displayed within the Related Requests window within the Incident Information screen.
The requests are managed as individual Incidents to cater for any special requirements relative to each Item. For example, consider a situation where a Team rolls-out an update in an organization. In this instance, during the Incident creation process multiple Items are assigned to a single Incident, which the system automatically allocates to separate Incidents that are then managed on an individual basis. This allows appropriate Teams/ Technicians to be assigned to the Incidents relative to their skill-set or departmental assignments. The implementation process more effectively differentiates between the tasks and Items being modified and ensures each Item has its own Audit Trail, Attachments and Notes for future reference.
Multi-Item Requests are listed as separate Incidents within the Incidents List View, and can be accessed as a group within the Incidents Groups List View.
Incident Item Assignment
To assign an Item to the Incident:
-
Click the relevant Item link if listed below the Find Item search box
Or, click
to Search for an Item or click to Create an Item.
NOTE:The option to create an Item is only available to Technicians if the system Administrator has enabled the Create Items option within the Setup>Privileges>User screen.

-
Click Next to move to the Details tab if only one Item is to be assigned to the Incident
Or, select Add to assign additional Items. If Add is selected, a Selections window will be displayed that lists all the current Items assigned to the request.
-
Continue to add all the relevant Items to the Incident and then select Next to move to the Details tab.
Within the Details tab the Incident is profiled by assigning a Classification and Incident Description.
Quick Calls
Quick Calls are used for common requests that are logged using a template during the Incident creation process.
If the Quick Call functionality is enabled for the system, after the Customer and if relevant, Item details are assigned to an Incident, within the Details tab the Quick Call options are displayed below the dashed line in the Request Type drop-down list.
Quick Calls and Item Assignment
If the Item is to be assigned to the Incident using the Quick Call Template configuration, the User simply selects the Next button after assigning the Customer information to the Incident. The application moves to the Details tab and within the Request Type options, the list displayed only includes Templates that have Items preset.
NOTE:The Next button will only be visible after the Customer has been assigned to the Incident, if Quick Call templates that have Items assigned are configured in the system.
If a specific Item is associated with the Quick Call Request within the Customer tab, the options displayed within the Request Type drop-down list will include Quick Call templates associated with the Item already assigned to the Incident, and templates assigned the Unknown Item.
For Incidents created with multiple Items assigned that use different Items, Quick Call templates with no Items assigned are displayed. For Incidents where the same Item is assigned on multiple occasions, Quick Call templates that have the matching Item and no Items assigned are made available in the Request Type drop-down list.
To create an Incident using a Quick Call:
-
After allocating a Customer and Item(s) if required, click Next to move to the Details tab
-
Within the Request Type drop-down list, select the relevant Quick Call template displayed below the dashed line
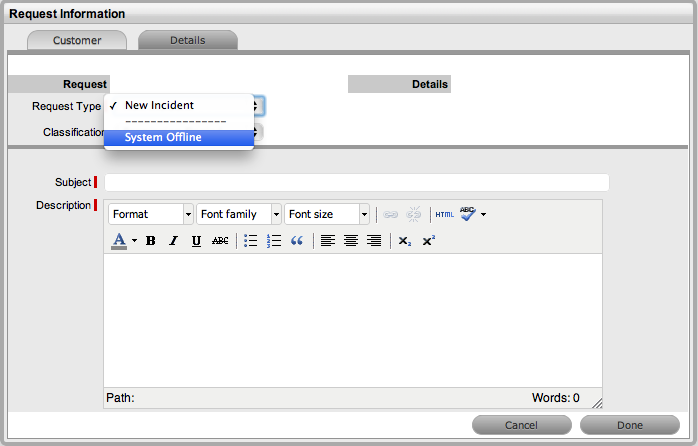
-
Assign a Classification
-
Click Done.
All Incident details will be populated according to the Quick Call template. Any amendments can be made through the Incident Summary screen.
NOTE:When saved, the Incident created using the Quick Call template can be duplicated to minimise data entry requirements for multiple similar Incidents.
Contract Tab
When Contracts are enabled for the system, the Contract tab is visible within the Incident Information screen.
The Contract tab of an Incident includes the details of the Contract Type and SLA assigned to the Incident. If a valid contract is active for the Customer, Item or Organizational Unit assigned to the Incident, then the details of the contract will be displayed. If an SLA is not assigned to the Customer, Item or Org Unit and the Billing functionality is not enabled, the system automatically applies a default SLA based on the Item Type or the system default SLA.
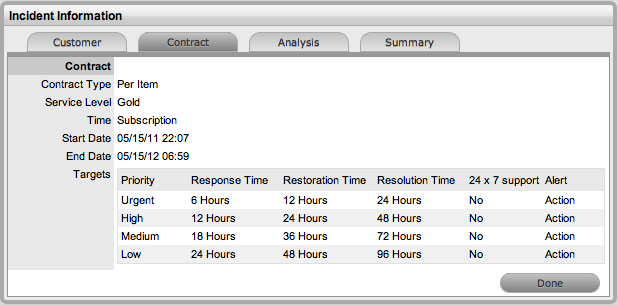
When Billing is enabled and the Contracts or Invoices functionality is active, the system verifies the service entitlement status of the Customer assigned to the Incident, and if a valid contract is not in place, the Incident is assigned a status of Pending-No Contract and locked until a valid contract is associated with the Incident. The Customer is automatically sent the NoContractCreateRequestSummary email when the request is saved with this Status.
A reminder email can be sent to the assigned Customer by the Technician from within the Summary tab by clicking ![]() .
.
For more detailed information about contracts and billing, see Contracts.
Details Tab
To successfully create an Incident, the Incident must be profiled by completing the Request Type, Classification and Description details. Within the Details tab, there is also the option to select any relevant Quick Call Templates that have been configured for the Item Type assigned to the Incident.
Entering an Incident Description
To profile the Incident:
-
Define the Request Type
The New Incident option is locked in if there are no Quick Call templates available for the Item or Process.
-
Select a Classification
If multiple Items are assigned to the Request, the option to assign a specific Classification for each Item Request is provided.
-
Complete any required Custom Fields
-
Define the Subject content, if desired
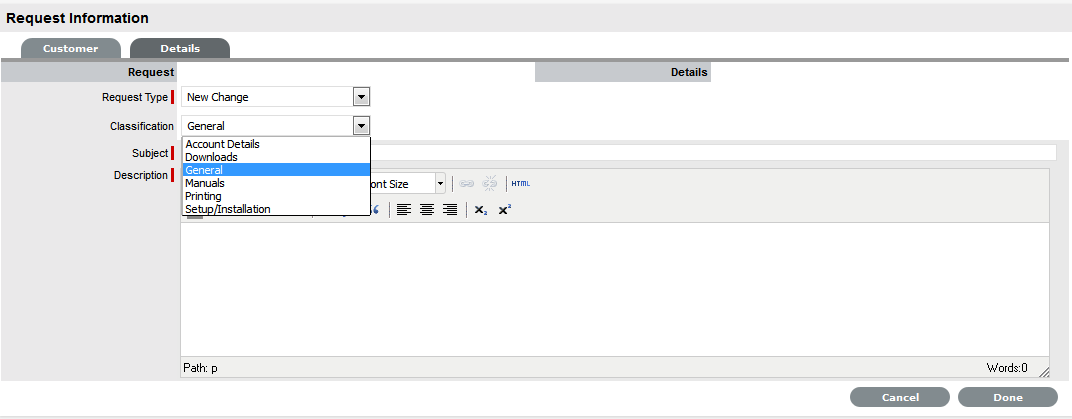
-
Enter all relevant information within the Description field
This is a mandatory field.
-
Click Done to enter the new Incident into the system.
A unique reference number is generated automatically for the request at this point. When an Incident is submitted successfully, the Incident Summary Tab is displayed. If the Force Analysis functionality is enabled in the application's Setup, the system will move to the Analysis Tab.
Request Subject
It is recommended that a summary be included in the Subject field, as the details recorded in the Subject field are displayed in scroll-over summaries throughout the application. For example, when a new Incident is being entered for a Customer, a Recent Customer Requests list is displayed during the Incident creation process for all Items the Customer owns either directly or via shared ownership. The Requests list includes a scroll-over summary where Subject content is displayed, if the Subject is completed for a request. Subject information can also be included within a column in the Incidents List View, for a quick glance summary of an Incident.
NOTE:The system Administrator can make the Subject field mandatory by enabling the Subject Required option in the Setup>Privileges>User tab.
Analysis Tab during Incident Creation
When the Force Analysis option is enabled by the Administrator, the Analysis tab is automatically displayed after the Description is entered during the Incident creation process. Within this tab the User can:
-
Create or search for a Solution
-
Create or apply a Workaround
-
Link the Incident to other requests prior to saving the Incident
(This option is not available to Incidents created with Multiple Items assigned during the Incident creation process.)
-
Create an Alert related to the Incident.
NOTE:To include analysis during Incident creation, ensure the Administrator>Setup>Privileges>Requests>Force Analysis option is set to Yes.

If analysis is not required during the request creation process, click Done to continue to the Summary tab.
Proactive Solution Analysis
During Incident creation after the Incident Description is completed, the system automatically searches the Knowledge Base for possible Solutions that may be related to the Incident. This search is based on the Item Type, Classification and text matching of existing Articles with the Incident Description content. Proposed Solutions will be visible when the Proposed Solution filter is selected within the Analysis tab.
To assign a proposed Solution to an Incident:
-
Select the Article ID number
-
Click
to assign the Solution or select Cancel to revert to the Proposed Solution list.
If the Resolved option is selected, the Incident is automatically closed and the selected Article is assigned as the Solution.
Workarounds
A Workaround is a temporary fix applied to an Incident or Problem when a full resolution is not yet available.
To assign a Workaround to an Incident, the User can apply a Proposed Workaround presented by the application or use the Search Workaround facility. If a Workaround Article does not exist, a Workaround can be created within this screen. Once a Workaround is applied to the Incident it can be viewed in the Analysis tab under the View Workaround option.
Analysis
The Analysis tab is used to search for Solutions, Workarounds or to relate the current Incident with other requests. It also allows the User to convert an Incident, logged against a Service Item, to a Service Request.
To assign a Solution to the Incident, the User can apply Proposed Solutions presented by the application or use the Search Solution facility. If a Solution Article does not exist, an Incident solution can be created within this screen. Once a Solution is applied to the Incident, the application automatically closes the Incident.
Searching for a Solution
To Search for a Solution:
-
Click on the number of the required Incident
The Incident Information screen appears.
-
Select the Analysis tab
-
Click Edit
The drop-down list will become active.
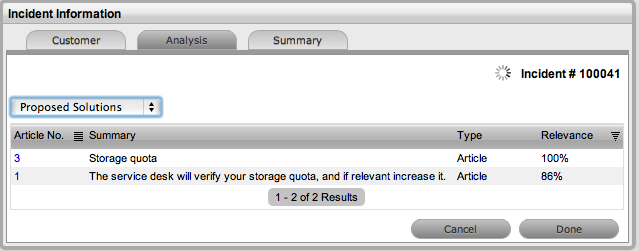
-
Select from the available options, as follows:
Analysis Tab Drop-down Options
Proposed Solution
Displays a list of all solutions with a search based on Incident Description, Item Type and Classification. To assign a Solution, select the Solution ID number to display the solution in full. Click Resolve if the Solution is relevant. This will close the Incident and update the Customer.
Search Solution
Allows Users to enter full text or ID number to search for possible Solution Articles. To assign a Solution, select the Solution ID number to display the Solution in full. Click Resolve if the Solution is relevant. This will close the Incident and update the Customer.
New Solution
Displays Knowledge Base editor to allow the User to enter a new Solution. Solution Articles are used as Proposed Solutions for future Incidents. See: Solution Article.
Convert to Service Request
Allows the User to make the current Incident a Service Request and maintain the current identification number for Customer correspondence purpose, while recording the action in the Audit Trail.
Proposed Workaround
Displays a list of all Workarounds with a search based on Incident Description, Item Type and Classification. To assign a Workaround, select the Workaround ID number to display the Workaround in full. Click "Apply" if the Workaround is relevant.
Search Workaround
Allows User to enter full text or ID number to search for an existing Workaround Article. To assign a Workaround, select the Workaround ID number to display the Workaround details. Click "Apply" if the Workaround is relevant.
New Workaround
Displays Knowledge Base editor to allow the User to enter a new Workaround. Workaround Articles are used as Proposed Workarounds for future Incidents.
Alerts
Shows details of the Alerts that have been created within the Incident.
-
Click Save.
Proactive Analysis during Incident Creation
During Incident creation after the Incident Description is completed, the system automatically searches the Knowledge Base for possible Solutions or Workarounds that may be related to the Incident. This search is based on the Item Type, Classification and text matching of existing Articles with the Incident Description content. Proposed Solutions or Workarounds are visible when the Proposed Solutions or Proposed Workarounds filter is selected within the Analysis tab.
To assign a proposed Solution or Workaround to an Incident:
-
Select the Article ID number
The system will display the Solution or Workarounds details screen.
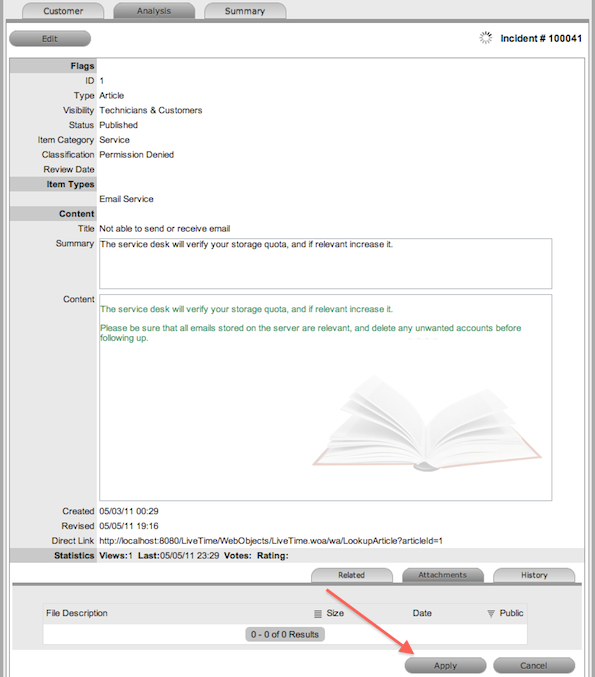
-
Select the Apply button.
The Incident is automatically closed when a Proposed Solution is applied. When a Proposed Workaround is applied the Incident status remains unchanged.
Converting an Incident to a Service Request
An Incident that has been logged against a Service Item, can be converted to a Service Request within the Analysis tab. This action results in the Service Request maintaining the same request identification number and audit trail, which records the conversion.
To convert an Incident logged against a Service Item to a Service Request:
-
Select Edit within the Analysis tab
-
Select the Convert to Service Request option.
The Incident ID # is associated with a new Service Request and the Request is assigned the Entry State of a relevant Service Request Workflow. The audit trail of the Service Request records the conversion time and date. The customer is not notified about the Process amendment.
Linking requests
Within the Analysis tab, Incidents can be linked to other Incidents within a pre-existing Incident Group, or linked with existing Problem and Change Groups. A new Problem or Change Request can also be automatically created and associated to the Incident within this Tab.
|
Link with other requests |
|
|---|---|
|
Link Incident |
Allows User to enter full text or ID number to search on Incidents. Select an Incident ID number to immediately link the current Incident to a Grouped Incident. |
|
Similar Incidents |
Displays similar Incidents based on Item Type, Classification and Description. |
|
New Problem |
Allows the User to create a new ‘Problem Group’ that links the Problem and Incident to the new Group. The Incident status will move to ‘On Hold - Process Escalated’. |
|
Link Problem |
Allows User to enter full text or ID number to search on Problems. Select an Problem ID number to immediately link the current Incident to a Problem Group. |
|
New Change Request |
Allows the User to create a new ‘Change Group’ and links the RFC and Incident into the new Group. The Incident status will move to ‘On Hold - Process Escalated’. |
|
Link Change Request |
Allows the User to enter full text or ID number to search on Change Requests. Select a Change Request ID number to immediately link the current Incident to a grouped Change Request. |
|
Alerts |
Allows the User to create an Alert directly related to the Incident. Displays any reminder alerts that have been created in the Summary tab of the Incident. Select the Alerts option to view Alerts list, and click on an Alert Publish Date to view Alert Content. |
To link an Incident to a Group within the Analysis tab:
-
Select Edit
The drop-down list becomes available.
-
Search for a request Group using full text or ID number
-
Select the relevant search result ID number.
This automatically adds the current Incident to the existing Group.
Creating a Problem or Change Request within an Incident
An Incident can prompt the creation of a Problem or RFC within the Analysis tab. This will move the current Incident status to On Hold - Process Escalated, and link it to the new Problem or Change Request group.
To escalate an Incident to another Process:
-
Select Edit within the Analysis tab
-
Select the New Problem or New Change Request option.
The Incident is automatically escalated and its status changed to On Hold - Process Escalated.
NOTE:When the related Problem or Change is moved to an Exit State, the Incident is automatically moved to the default Exit State, if not already closed.
Creating an Alert
To create an Alert that is associated with the Incident, within the Analysis tab:
-
Select Edit within the Analysis tab
-
Select the Alerts option in the drop-down list
The New button is made accessible.
-
Click New
-
Refine the content for each required field:
Alert Details
Description
Created
The current date and time.
Publish
The date the Alert is published. Use the calendar icon to the right of the field, to select a Publish date.
Set to a date in the future, or use the default to publish the Alert immediately.
Dismiss
The date the Alert ceases to be available. Use the calendar icon to the right of the field, to select a Publish date. On this date, the Alert will disappear from a User's Alert list.
Severity
The type of Alert to be published. The choices are:
-
Information – for general Alerts
-
Warning – to warn Users of potential issues
-
Urgent – to publish an urgent actionable message.
The icon appearing with the message will depend on the type of Alert.
User
The User type to receive the Alert, which include:
-
Specific Customer or User - In the Find User or Customer list, click search to select the recipient from the drop-down list.
-
User Role - An Alert sent to a User Role will go to all Users with that Role.
-
Personal Alert - A personal Alert appears on the User's own screen at the Publish date.
-
Organizational Units - In the Find Org. Unit field, search and select the recipients.
-
Public - A Public Alert appears when the Public Alert link is selected on the Login Page.
Title
Enter the title of the Alert.
Message
Enter the main content of the Alert.
-
-
Click Save.
Article Button
When a Solution has been applied or proposed for a request with the Create Knowledge option set to No, the Solution is visible within the Analysis tab and not available within the Knowledge Base. To manually escalate a request Solution to a Knowledge Base Solution Article, with the Analysis tab in Edit mode, select the Article tab.
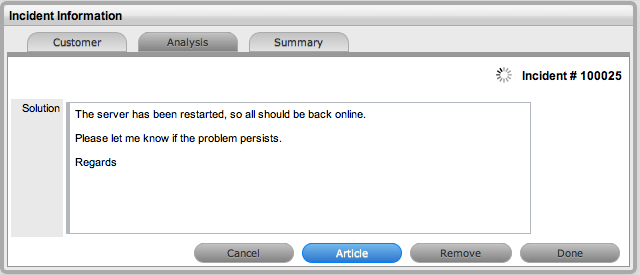
Remove Button
When a Solution has been applied or proposed for a request, the Solution or Knowledge Base Solution Article is visible within the Analysis tab. To disassociate a Solution from a request, with the Analysis tab in Edit mode, click the Remove button. The Analysis tab will now only display the default drop-down list options.
Workaround Article
Workarounds are temporary fixes applied to a Problem until the Problem is resolved.
To assign a Workaround to a Problem, the User can apply a Proposed Workaround presented by the application or use the Search Workaround facility. If a Workaround Article does not exist, a Workaround can be created within this screen. Once a Workaround is applied to the Problem it can be accessed via the Analysis tab under the View Workaround option.
The Workaround options included in the Analysis tab are:
|
Analysis Tab Options |
|
|---|---|
|
Proposed Workarounds |
Displays a list of all Workarounds with a search based on Problem Description, Item Type and Classification. To assign a Workaround, select the Article number to display the Workaround in full. Click Resolve if the Workaround is relevant. This will assign the Workaround to the Problem. After a Workaround has been assigned, the View Workaround option will become visible within the Analysis options |
|
Search Workarounds |
Allows User to enter full text or ID number to search for possible Workaround Articles. To assign a Workaround, select the Article number to display the Workaround in full. Click Resolve if the Workaround is relevant. This will assign the Workaround to the Problem. After a Workaround has been assigned, the View Workaround option will become visible within the Analysis options |
|
New Workaround |
Displays Knowledge Base editor to allow User to enter a new Workaround. Define visibility, enter a Summary, a Description and Save. |
Creating a Workaround Article
Within a Problem:
-
Select the Analysis tab
-
Click Edit
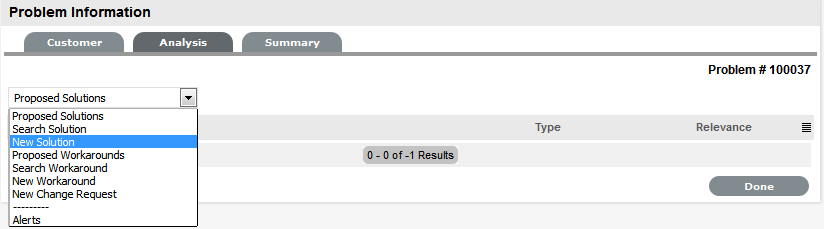
-
Select the New Workaround option within the drop-down list
The screen defaults to the expanded Solution Article editor with the Visibility and Status locked down.
Visibility Options
Description
Assigned Request
The default visibility. This means that the solution is only visible relative to the Problem through which it was created.
Users
Visible by internal Users only (i.e., not Customers).
Users & Customers
Visible to internal Users and Customers logged into the
application.
Everyone
Available publicly, without logging into the system.
-
Enter a Review Date or leave blank for the field to be automatically populated when saved
The Item Category, Classification and Item Type are all drawn from the related request.
-
Edit the Problem content if required
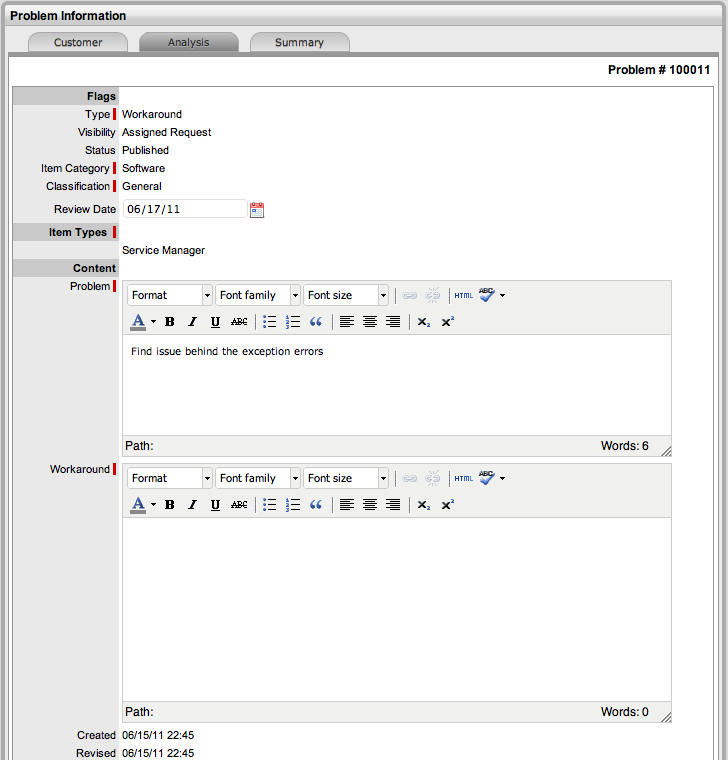
-
Enter the Workaround content
-
Upload an relevant Attachments, within the Attachments tab
-
Click Save.
Requests Tab
Workaround Articles generated within requests, include a Requests tab. This tab enables the User to view details of the request related to the Article. For detailed information about Knowledge Base Articles.
Summary Tab
Summary
The Summary tab provides comprehensive details related to an Incident and gives access to the tabs required to work on the Incident. To view the details of a Customer, select the Customer name link within the Incident Information screen. The Customer and Item assigned to the Incident can be updated within the Customer tab by selecting , when in Edit mode.
The Incident Information Summary tab includes the following:
|
Summary Tab |
Description |
|---|---|
|
Details |
The following details are displayed:
|
|
Assignments |
The following details are displayed:
|
|
Notification |
The following details are displayed:
|
|
Incident |
The following details are displayed:
|
|
Service Terms |
The following details are displayed:
|
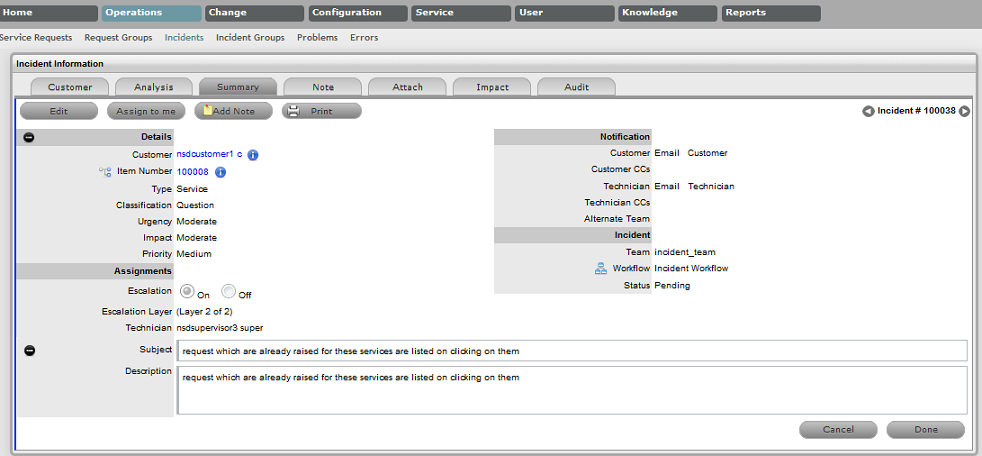
NOTE:Only Technicians assigned to the Team can edit the Incident.
|
Summary Tab Buttons |
|
|---|---|
|
|
Edit opens the Incident in edit mode. This allows the Incident details to be amended, Notes to be added and time is automatically recorded against the Incident whilst in edit mode. |
|
|
Changes the default assignee of an incident to a different technician.This right is available only for technicians belonging to the same layer or team. |
|
|
Opens the Incident in edit mode and moves directly to the New Note editor. |
|
|
Duplicate creates a copy of the Incident and links the copy to the original Incident. The User can then amend the Customer or Item details, if required. |
|
|
Print opens a summary of the Incident in a Print View window. This includes a Description and all Notes added to the Incident. It is a good alternative for viewing Incident information within one window when adding a new Note. NOTE:To remove Private Notes from the output, remove the tick in the 'Show Private Notes' box. |
|
|
Allows the User to create or view reminders related to the Incident. When published it will be displayed like the normal alert icon. |
|
|
The escalation buttons allow the User to escalate the Incident to next layer within the Team, or de-escalate the Incident to the lower level, if required. |
Changing an Incident's Customer or Item
After an Incident has been created, it may be necessary to change the assigned Customer or Item. This may be the case when the Unknown Item is associated with a request, or a Service Item has been assigned to the Incident and the relevant hardware, software or network Item needs to be associated with the Incident. When the "Allow Unknown" option is disabled in the Setup>Privileges>Requests tab and a Incident that is assigned to the Unknown Item is opened in Edit mode, the User will be prompted to update the Item assigned to the Incident before the Save button action can successfully record changes to the Incident.
NOTE:This option is required when an Incident is created through Email, as the Item assigned may be the system's default Unknown Item or the Org Unit's default Item.
To change the Item:
-
Click the Incident's Edit button
-
Select the Incident's Customer tab
-
Click the Item Number
The Find Item option appears.
-
Search and select a new Item
-
Click
-
Select the Summary tab to continue working on the Incident, or click Cancel and Done to close the Incident with the newly assigned Item.
NOTE:Technicians do not have the ability to delete Incidents or Customers.
To change the Customer:
-
Click the Incident's Edit button
-
Select the Incident's Customer tab
-
Click
next to the Customer Name
-
Search and select a Customer
-
Click
If the Incident's Item needs to be altered as a result of the Customer change the Find Item field appears. Search and select the appropriate Item using the Find Item search.
-
Select the Summary tab, to continue working on the request
-
Click Save.
Converting an Incident to a Service Request
An Incident that has been logged against a Service Item, can be converted to a Service Request within the Analysis tab. This action results in the Service Request maintaining the same request identification number and audit trail, which records the conversion.
To convert an Incident logged against a Service Item to a Service Request:
-
Select Edit within the Analysis tab
-
Select the Convert to Service Request option.
The Incident ID # is associated with a new Service Request and the Request is assigned the Entry State of a relevant Service Request Workflow. The audit trail of the Service Request records the conversion time and date. The customer is not notified about the Process amendment.
Item Relationship Map and Assignment
Selecting opens a pop-up window that displays a map of Items that are related to the Request Item that can be navigated by clicking on the icons within the map. To view related Item information, scroll over the relevant Item icon.
Updating the Item associated with the Request
The Item associated with the request can be updated when in the request is in Edit mode:
-
Select
-
Navigate the map to move the relevant Item icon to the central point of the map
Select the Item icon label in the Map to move it to the central node.
-
Click the icon label when it is in the middle of the map
A warning message is displayed, prompting the confirmation of the Item change.
-
Select OK and the Item association will be updated
(If the Enable Item Shadow option is enabled by the Administrator in the Setup>Privileges>Customer tab, the change of Item information will not be visible on the Customer Portal.)
-
Select
to close the window.
The Item assignment change is recorded in the Audit tab.
Notes Tab
Notes
The Incident Notes tab displays entries made by a User or Customer regarding an Incident. New Notes are date-stamped automatically and associated with the User logging the Note.
The number of Notes recorded against an Incident is displayed in brackets on the Notes tab, and if a Note has been added by a Customer or a Technician other than the Technician assigned to the Incident, an asterisk will also be visible on the Notes tab until the assigned Technician opens the Note.
Add Note
The Add Note button can be used to open the Incident in Edit mode and automatically access a new Note window, as shown in Step 4 below.
Viewing All Notes
Use an Incident's Print button to access a list of all Incident Notes in one screen. To hide Private Notes in the Print output, remove the tick from the Show Private Notes box.
Adding a Note
When the first Note is created for an Incident, the Incident Description automatically populates the New Note editor allowing the Technician to enter their response.
To add a Note:
-
Click the Incident ID Number
The Incident Information> Summary tab appears.
-
Click Edit
-
In the Notes tab, click New
-
Enter the Note details
Or, select a Template if a relevant pre-configured response has been set for the Item Type or Category for the Item assigned to the Incident.
-
Enter Note Time
The time entered represents the amount of time accumulated to formulate the Note's content or time spent working on a request away from the system. If no additional time has been spent on the Incident away from the application this field will be automatically populated with the Logged Time when the Incident is in Edit mode, if the Manual Request Time option is disabled in the Setup> Privileges> User tab. When this option is disabled,
is visible next to the Incident number in the top right corner of the Summary Tab screen when the Incident is in Edit mode. (See: Contracts Logged Time.)
-
Adjust the time and date work was completed, if relevant
-
Add attachments to be sent with the Note, if required
A maximum of two attachments can be added per Note.
-
Adjust the Note visibility, if relevant
The default Private or Public visibility for Email Notes is set within Admin> Setup > Privileges > Requests, and can be adjusted on a per Note basis.
-
Refine the Email Recipient options as required
The default Request Notifications for Notes is set within the Team assigned to the Request, and can be adjusted on a per Note basis.
Vendors, as Email Recipients, is displayed as an option if the Incident is in a State associated with an Underpinning Contract.
-
Click
.
The Note editor screen will close and the Note will be emailed to recipients, if defined.
Create Knowledge
NOTE:This option is only visible for Public Notes.
When a new Note is created for an Incident it can be added to the Knowledge Base by selecting the Create Knowledge option. By selecting this option and then clicking the Propose or Solution button, the system automatically moves the Incident to the default Closed State for the Workflow and creates a Solution Knowledge Base Article with a visibility of Assigned Request. This visibility allows Customers of a shared Incident to view the Solution. For the Solution to be available to other Customers of the same Item Type, the visibility must be adjusted to Technicians and Customers within the Analysis tab of the Incident or the Knowledge Tab.
Solution
If an Incident Note resolves the issue, the Note can be saved as the Solution. This will convert the Note into a Solution Article (found under Incidents > Analysis tab), by enabling the Create Knowledge option before selecting the Solution button. Clicking the Solution button will automatically move the Incident to the default Closed State. If a Solution is applied to an Incident containing attachments, the attachments are included in the Solution email.
To save a Note as the Solution:
-
Enter the Note details
-
Select Create Knowledge, if the Note content is to be available in the Knowledge Base
-
Click Solution.
For Create Knowledge enabled Notes the content will be recorded as the solution under the Analysis tab. The Status of the Incident will change to the default Exit State of the assigned Workflow.
NOTE:This option is not available if the Handshaking facility is enabled in Admin> Setup> Privileges> Requests.
Propose Handshake
If a Note is a possible solution to an Incident, it can be sent to the Customer with a notice stating the Incident will be closed in a set number of days if no correspondence is received from the Customer. (The time span, in days, is specified by the Administrator in Setup>Privileges>Requests or within the Organizational Unit information screen).
To send a Public Note with a Handshake Notification:
-
Within the Notes Editor, enter the possible solution
-
At the bottom of the Notes field, click the Propose button.
The proposed solution and handshake notification will be sent to the Customer. The Incident will automatically change status to On Hold - Pending Approval.
NOTE:For a Customer to re-open an Incident using the link in the handshake email, the web server must be using Port 80.
Draft Note
Use the Draft button to save an incomplete Note entry, which will be displayed in the Notes list. When a Note is saved as a draft, the Status will be displayed as . If the Add Note button is selected when a draft Note has been recorded against a request, a warning will be displayed. To continue working on a draft Note, open the request in Edit mode and select the Note No. hyperlink.
Changing the Status of an Incident Note
-
When the Incident Note is created, it can be either public or private. After the Note is saved, it is possible to switch visibility
-
If a Note is marked Private, a padlock graphic is visible. To change the status to Public, click
to display
-
To change the Public Incident Note to Private, click
to display .
Viewing a Note
To view a Note:
-
Select an Incident ID Number
-
Select the Notes tab
-
Click on the Incident Note Number hyperlink.
When Notes are viewed without opening the Request in Edit mode by clicking the Note No. link, the User can scroll through the Notes list by selecting inside the top right corner of the Notes window.
Replying to a Note
To reply via email to a Customer Note:
-
Click the required Incident ID number.
The Incident Information screen appears.
-
Select Edit
-
Select Notes tab
-
Click on the Note number
The Note appears.
-
Click Reply
The new Notes editor is opened and includes the Customer Note.
-
Enter the Note content
-
Adjust the Visibility and Recipients settings, accordingly
-
Select Add Note to send the Note, or click Draft to finish the Note later.
Emailing Saved Incident Notes
To email a Customer after a Note has been saved:
-
Click the required Incident ID number
The Incident Information screen appears.
-
Select Edit
-
Select Notes tab
-
Click on the Note number
The Note is displayed.
-
Click Email to send the Note to the Customer and any other Users added to the notification list.
Adding Notes to Groups
When a Note is created for an Incident that belongs to a Group, the Apply to Group option is visible within the Notes tab. If the new Note is to be assigned to all requests within the Group, select the Apply to Group option.
NOTE:Any new requests added to the Group at a later date will also have all pre-existing Notes, with this option selected, applied to the newly grouped request.
When the Apply to Group option is selected, the Add Note Time to Group option is displayed. Select this checkbox to also apply the Note Time to each of the requests.
Selecting the Apply to Group option and then clicking the Solution button, closes all Incidents within the Group.
Attachments Tab
Attachments
All Users can attach files to an Incident. Any type of file can be attached either by a User, Customer or via email.
Adding an Attachment
To add an Attachment:
-
Select an Incident number ID
-
Click Edit
-
Select the Attachment tab
-
Click

-
Click Choose File to browse and select a file
-
Mark Private, if the attachment is not to be available on the Customer Portal
-
Enter a file Description, if necessary
-
Select
to upload the file or to cancel the process.
The uploaded Attachment is automatically date stamped and shown as a file name link along with its file size.
To open an Attachment, select the file name hyperlink.

NOTE:Incidents that are part of a Group and have attachments uploaded within the Group Details Screen, display
within the Share Column.
Deleting an Attachment
To delete an Attachment, select the checkbox beside the File Description then click Delete. The addition or removal of Attachments is recorded within the Audit Trail of the Incident.
Impact Tab
Impact
The Impact tab provides the capability to measure the progress of an Incident relative to agreed Service Level targets and Workflow time estimates. It also includes a quick reference for identifying other Services or Items affected by the Incident. This tab displays a summary of the following:
-
Service targets
-
Workflow estimates
-
The impact of the current Incident on related infrastructure.
The drop-down filter options within the Impact tab include:
|
Options |
Description |
|---|---|
|
Service Targets |
Displays the target response, restoration and resolution times based on the Service Level Agreement/OLA assigned to the Incident. |
|
Service Level Breaches |
Displays service level breaches that have occurred and allows Users to assign a breach code and explanation for the breach. |
|
Services Affected |
Displays the Service Item Number, the Service SLA and number of Affected Users for any Services related to the Item associated with the Request. |
|
Estimates |
Provides a summary of the time estimated for each state of the Workflow based on the OLA assigned to the Incident. |
|
Contract Monitor |
If the current Incident Workflow State is assigned an Underpinning Contract or OLA, a table is displayed outlining the response, restoration and resolution milestones. When a milestone is met, the User is required to check the relevant checkbox. The application will automatically calculate the actual time accrued to achieve the milestone. The value displayed here is used for the Contract reports. |
|
Purchases |
When Purchase Orders are enabled in the system, any Purchase Orders associated with Items assigned to the Incident are accessible through this option. |
Service Targets
The details displayed here are drawn from the Service Level assigned to the Incident. These include the target Response, Restoration and Resolution times for an Incident, based on the Priority assigned. If an Underpinning contract or OLA has been assigned to the Incident's current State then the targets for that contract will also be listed.

For more information on Service Targets, see: Service Level Agreements.
Service Level Breaches
When an Incident Service Level Agreement is violated, a service level breach is recorded against the Incident. The User assigned to the Incident will be notified and asked to provide a reason for the breach and assign a breach code.
To assign a Breach Code:
-
Click the Incident number
-
Click Edit
-
Select Impact > Service Level Breaches
-
Click Edit
-
Assign a Breach Code
(The available codes are created by the Supervisor within the Service tab.)
-
Add any additional information, if required
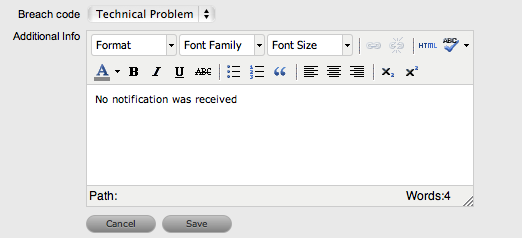
-
Click Save.
All breach information is used for reporting on Service Level Agreements.
Services Affected
When the request is logged against an Item that is associated with Services within the Item Relationships tab, the Services Affected option displays the Service Item Number, the Service SLA and number of Affected Users.
Estimates
The Estimates option allows Users to view an indication of the approximate amount of time that an Incident should remain in each State of the assigned Workflow, the amount of time logged in each State and the length of time the Incident resided in each State.
|
Options |
Description |
|---|---|
|
Estimate |
Indicates the approximate length of time the Incident will spend in the Workflow State. This field is automatically completed if an OLA or UC is assigned to the Workflow State. |
|
Logged |
Is a combination of time accrued against the Incident when in edit mode with the automatic timers enabled, and the sum total of Note Times manually entered by Users. |
|
Total |
The total time an Incident has resided in the Workflow State. |
|
% Active |
The percentage of the Total Time that the Incident was actively worked on when in the State. The calculation is, (Logged time divided by Total time) x 100. |
To manually add an estimated time frame for a Workflow State:
-
Select an Incident number ID
-
Click Edit
-
Move to the Impact tab
-
Select Estimates from the drop-down list
-
Select the State hyperlink within the Status column of the Estimate Time to be adjusted
An editor box is displayed.
-
Enter the Estimated time in the available field
-
Click Save within the editor box
-
Make any other time adjustments, if required
-
Select Save to record all manually entered time adjustments against the Incident.
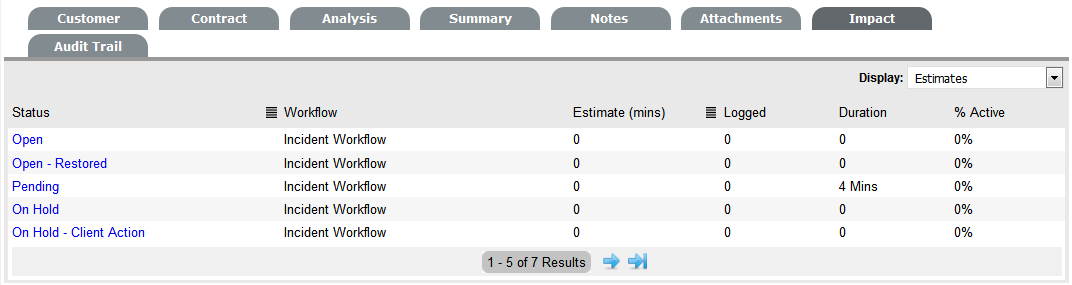
Contract Monitor
When a Workflow State with an OLA or Underpinning Contract is assigned to the Incident, the Contract Monitor displays the details of the Contract.
The information is used for reporting purposes and includes:
|
Details |
Description |
|---|---|
|
Contract Type |
Specifies if the Contract Type is an OLA or Underpinning Contract. |
|
Start Time |
Auto-generated time the Incident moved to the current Workflow State. |
|
Milestones |
|
|
Expected Response Time |
Response Time calculated using the Contract target parameters. |
|
Responded |
Actual Response Time auto-calculated when the User checks the box. |
|
Expected Restoration Time |
Restoration Time calculated using the Contract target parameters. |
|
Restored |
Actual Restoration Time auto-calculated when the User checks the box. |
|
Expected Resolution Time |
Resolution Time calculated using the Contract target parameters. |
|
Resolved |
Actual Resolution Time auto-calculated when the User checks the box. |
|
Comments |
Allows for additional comments, if required. |
NOTE:If Milestones are breached the Response, Restoration and Resolution times are assigned a red marking.
Audit Tab
Audit
The Audit tab lists all activities that occur within the lifecycle of an Incident, the resources used and the history of the Incident's Item.
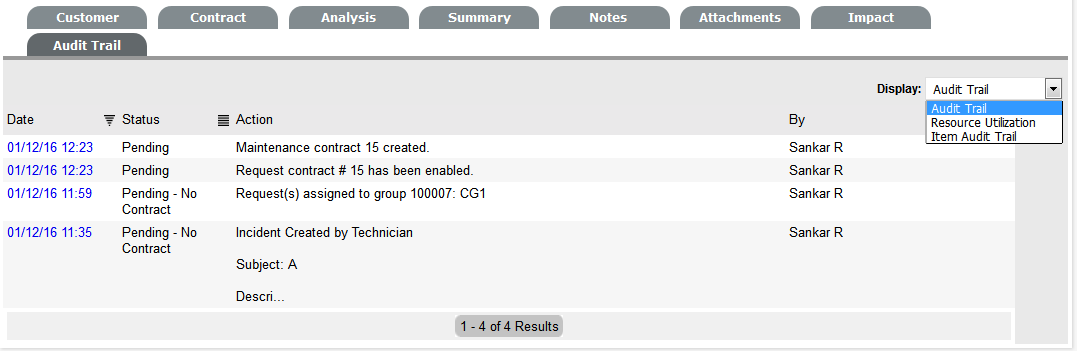
Audit Trail
The Audit Trail option records all changes made to an Incident. The logged changes, which can be exported via PDF include:
-
Date and time the Incident was assigned and/or reassigned to Technicians
-
When the Incident was escalated to a new layer of support, or had its priority or due date changed
-
Details of Notes added
-
Attachments activity
-
Status change
-
Classification change
-
Logged time.
Resource Utilization
The Resource Utilization option displays a breakdown of the time an Incident was worked on at each level of support. It details the User's name, the escalation layer they belong to and the amount of time they have spent on the Incident.
Item Audit Trail
The history of the Item associated with the Incident is detailed within Item Audit Trail. To access more information regarding an Item Audit Trail entry, select the ID number hyperlink.
Service Terms
The Service Terms sidebar displays the Service Level Agreement (SLA) assigned to the Incident and provides details of key dates.

By default the application calculates the Due Date based on the Priority of the SLA assigned to the Customer, Organizational Unit or Item. The email reminders and escalations are then managed accordingly. If an SLA is not associated with the Incident via the Customer, Org Unit or Item, the system default SLA will be automatically assigned to the Incident but can be manually adjusted by the Technician. Once the Workflow is moved from the default Open State, the SLA can no longer be edited.
|
Service Terms |
|
|---|---|
|
Agreement |
Displays the Service Level Agreement assigned to the Incident. The service level is derived from either the Customer, Organizational Unit or Item. When Contracts are not enabled, the Agreement field can be edited, when the Incident is in edit mode. |
|
Service Manager |
Displays the User assigned as the Service Manager for the assigned SLA. |
|
Progress |
Visually displays how the Incident is tracking against the assigned SLA. The grey progress bar is gradually filled in based on the status of the SLA:
|
|
Open Date |
The open date field is automatically populated when the Incident is created. |
|
Due Date |
By default the application calculates the Due Date based on the SLA Target for the Priority assigned to the Incident, and email reminders are sent accordingly. |
|
Fix Date |
Auto-filled when the Incident moves into a Workflow State that is defined as meeting the SLA Resolution Time. |
|
Remaining |
Auto-filled and visible when there is SLA time remaining. |
|
Time Overdue |
Auto-filled and visible when the SLA is overdue. |
|
Close Date |
Auto-filled when the Status of an Incident is set to Closed. This date is fixed. |
|
Resolution Time |
Auto-filled with the number of minutes it took for the Incident to move from the first SLA active State to a Workflow State that is defined as meeting the SLA Resolution Time. |
|
Last Action Date |
Auto-filled when Done or Save is selected after the Incident has been modified or opened in edit mode. As changes may be made to an Incident after it has been Closed, this date may fall after the Close Date. |
|
Time Recorded |
Displays the sum total of automatically logged time, when the Incident is in edit mode plus any manually entered Note Times. |
|
Affects |
Number of Customers assigned to the Item associated with the Incident. |
NOTE:Each User can customize the date format within the My Account sub-menu option. To change the date format go to Home>My Account, click Edit and select the preferred format.
Time Recorded
Time Recorded uses a combination of auto-timing and manual Note Time entries to measure and monitor the time spent working on an Incident.
The Auto-timer is activated when an Incident is opened in Edit mode, if enabled by the Administrator in the Admin>Setup>Privileges>User>Manual Incident Time. When the Incident is saved after any amendments have been made, the timer stops and records the length of time the Incident has been worked on. This total is added to the sum total of any manual Note Time entries made by Technicians when they are adding Notes.
The Time Recorded is used by the system when the Contracts functionality is in use.
Related Requests
The Related Requests sidebar is automatically displayed when an Incident is linked to other requests.
Incidents can be linked in the following ways:
-
Using the Group button within the Incident list
-
Within the Incident Groups option under the Incident tab
-
Linking requests within the Analysis tab of an Incident
-
A result of multi-Item request creation.
Any Incidents that belong to a Group can be viewed within the Related Requests sidebar window, inside the Incident Information screen. Within this window, all related requests are listed and can be controlled as one. For example, Notes can be applied to all related Incidents, or the entire Group can be closed.
Managing Related Requests
The details of a related request can be viewed by hovering the mouse over the colored icon. Click on the same icon, and the system moves to the Incident Information screen of that related request.
Bulk Updates
The Bulk option allows one or more related requests to have the following information updated simultaneously:
-
Priority, Workflow, Status, Team, Escalation Layer & Technician
-
Notification method and recipients
-
Request Classification
-
Items
-
Description, Attachments and Notes.
To bulk update for any of the above elements:
-
Select Operations>Incidents
Or, within Operations>Incident Groups select the Group Number and move to the Related sidebar.
-
Click on the Request # hyperlink of the relevant grouped request
-
Tick the checkboxes of the appropriate requests in the Related sidebar that are to be updated
-
Select
The system displays the Bulk Editor screen.
NOTE:The system does not allow requests with a Status of Pending-No Contract to be updated
If the bulk update is only associated with Requests of this Status, an error message is displayed.
-
Amend the appropriate element as per the above list
-
Click Save.
Remove Related Requests
To remove a request from a Group:
-
Go to Operations>Incidents
Or, within Incident>Incident Groups select the Group # link and move to the Elements tab
-
Click on the Request # hyperlink of a Grouped Request
-
Click
The Incident opens in Edit mode and checkboxes become available next to the Incidents in the Related sidebar.
-
Tick the checkboxes of the requests to be removed
-
Select
.
The marked requests are removed from the Group.
Closing Incidents within Groups
Requests within the Related sidebar can be closed individually by moving the Workflow State to a Exit/Closed State within the Incident Information Screen. Grouped requests can also be closed as a group, by changing the request Status to a Exit/Closed State as part of a Bulk update. (See Bulk Updates above.)
Alternatively, all Incidents can be closed by using the Solution button within the Notes tab of an Incident. This option is available if the Handshaking facility has not been enabled for the system, within the Administrator>Setup>Privileges>Requests tab.
To close related Incidents using this method:
-
Go to Operations>Incidents
Or, within Operations>Incident Groups select the Group Number and move to the Elements tab.
-
Select the Incident # hyperlink of a request in the relevant Group
-
Click
-
Enter the Note details of the Solution
The Visibility option must be set to Public to access the Solution or Propose button.
-
Check the Apply to Group option
If relevant, add Note Time across the Group.
-
If relevant, enable Create Knowledge
This will move the content of the Note field to a Solution Knowledge Base Article with the Visibility of Assigned Request.
-
Click
.
The related requests are automatically closed and the Note content is also made available in the Knowledge Base if the Create Knowledge option was enabled.
NOTE:When an Incident has a Solution applied to it, the
 icon is visible next to the exit Status, within the Incident Summary Tab. To view the Solution, click the icon.
Status
Incident Workflows are a combination of any number of stages or States that cover the lifecycle of an Incident. A Supervisor creates new Incident States for the default Incident Workflow or builds new Workflows in the Service >Workflows tab. For more information about configuring Workflows. See: Workflows.
Within the Incident Information Summary page, the assigned stage of the Workflow is displayed within the Status field, with the Next Action field displaying the options of where the Incident can move to. To view an assigned Workflow in its entirety select .
The system provides the following States:
|
Status |
Description |
|---|---|
|
SLA Timers On |
|
|
Open |
The Incident is open. Incident timers are running and the automated SLA reminders, warnings and escalations will fire relative to the Triggers configured for the SLA. |
|
Open - Restored |
The Incident is still open as the issue is yet to be resolved, but a satisfactory temporary solution has been put in place. SLA triggers will fire for the SLAs Resolution Time, but the Restoration targets have been met for the Incident. |
|
Pending |
Work on the Incident has not yet begun. The Response-Time SLA trigger will fire for Incidents with this Status. |
|
SLA Timers Off |
|
|
Pending - No Contract |
A valid contract is not in place and one needs to be created or processed before work can commence on the Incident. Any changes to the Status will be recorded in the History tab. |
|
Closed Restored |
Though the basic issue remains, a satisfactory temporary solution has been reached and the Incident has been closed. SLA triggers will not fire for Incidents with this Status. |
|
Closed Resolved |
The issue has been resolved and the Incident has been closed. SLA triggers will not fire for Incidents with this Status. |
|
On Hold |
The Incident has been put on hold for some reason. SLA triggers will not fire for Incidents with this Status. |
|
On Hold - Pending Approval* |
An Incident automatically moves to this State when the "Propose" button is used for sending an Incident Note. This means the CloseRequest email is sent to the Customer asking them to verify the proposed Solution. If the Customer does not respond to the email, the Incident is automatically closed by the number of days set within the Handshaking Privilege. (The email handshaking option is set by the Administrator in Setup>Privileges> Requests.) By clicking on the URL provided in the email, the Customer ensures the Incident retains an open and active State. |
|
On Hold - Process Escalated* |
An Incident moves into this State when a Service Request, Problem or Change has been created within the Analysis tab of the Incident. The timer stops and there are no future States as the Incident will be closed when the related Problem or Change is closed. |
|
Cancelled |
The Incident has been cancelled. SLA triggers will not fire for Incidents with this Status. |
NOTE:When an Incident is created and assigned the default Incident Workflow, it is automatically assigned the Default Open State defined for the Workflow. The Default Open State can be customized for the Incident Workflow within Service > Workflows.
Updating an Incident's Status
To manually change an Incident's Status:
-
Select Operations > Incidents
-
Select the Request # hyperlink for the relevant Incident
-
Click Edit
-
From the Next Action drop-down list select the Incident's next Status
The States listed in Next Action are based on the Incident workflow and its lifecycle. To view the Workflow in its entirety click
.
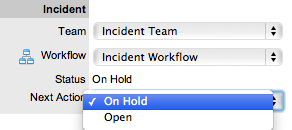
-
Click Save.
The system can automatically move an Incident into another State through the following actions:
-
Using the Handshaking feature when a Note is added by selecting the Propose button to send and save a Note
-
Closing an Incident when adding a Note using the Solution button
-
Escalating an Incident to a Problem or Change Request
-
When Billing is enabled and payment is not received.
Incidents with a Pending-No Contract Status
Incidents logged with the system that do not have a valid Contract are assigned the Pending - No Contract Status. These Incidents are locked until a valid Contract is applied, and if relevant, paid. See: Create a Contract
Viewing a Status Note
When Incidents move into a State with a Status Note, is displayed beside the assigned Status within the Summary tab of the Incident. Scroll over , to view the contents of the Status Note. If the Status Note includes an attachment, click the attachment name link in the pop-up window to download it. Click to close the window.
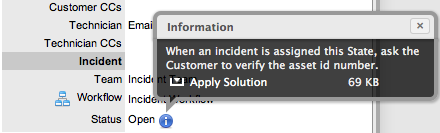
SLA Triggers and Incident Status
SLA Triggers fire for Incidents that are in a Workflow State that have the Service Timer Active option set to Yes. The default Timer Active set for systems States can be changed if relevant for the organization. For example, it may not be appropriate for an organization to have SLA Triggers fire when an Incident is moved to the system default On Hold State.
The following icons displayed in the Service Terms box, visually indicate how the Incident is tracking against the SLA and if the SLA timers are active:
|
Current SLA Status |
|
|---|---|
|
|
Workflow is in an SLA paused State. Triggers will not fire. |
|
|
Workflow is in an SLA timers on State. Triggers will fire. |
|
|
Workflow is in an Exit State and the SLA has been successfully met. |
|
|
Assigned SLA has been breached and Workflow is in an Exit State. |
Supervisor Users can verify the Timer Active status of a Workflow by scrolling over the Status in the Workflow map available in the Summary Information screen, or within the Service>Workflows>selected Workflow> Lifecycle>selected Status screen.
Priority
The Priority determines the timeframe in which an Incident should be handled and sets the service level targets adopted by the Incident that drive the SLA triggers and actions. It represents the degree of importance of the Incident to the Customer and also indicates the urgency of the request to the Technician.
An Incident can have one of four possible Priorities:
-
Urgent
-
High
-
Medium
-
Low.
Setting Incident Priority
The Administrator configures the options for determining the Priority within the Setup>Privileges>Request tab. The Priority options include:
-
Selected Priority - where the system configured default Priority is applied to the request but can be manually adjusted by the User
-
Derived Priority - where the Impact is derived from the Item Criticality and the User enters the Urgency, enabling the system to calculate the Priority.
Urgency: The value selected reflects how quickly a resolution is required
Impact: The value selected indicates the impact the Incident has on the User and Organization. The higher the Impact the higher the Priority to resolve the Incident.
If the Administrator has set the Request Priority option to Derived, the Priority of an Incident results from the Impact being mapped from the Criticality of the Item and then combined with the selected Urgency. However, if required, the Impact can be manually adjusted within the Incident Information screen to affect the Priority.
The following table displays the calculations applied by the system using the Item Criticality mapped directly to the Incident Impact, to determine an Incident's Priority:
The above calculations result in the following Priorities:
Incident Assignment and Escalation
When an Incident is logged within the system, it is allocated to the Team that is associated with the SLAs and Workflows applied to the Incident or to the default Team assigned to a Workflow State.
The appropriate Incident Workflow is assigned within the Incident Summary tab, by selecting an option from the Workflows drop-down list. This list is derived from the SLA assigned to the Customer, Organizational Unit and Item. Once the Workflow is selected, the associated Teams are available for assignment. Based on the Team assigned, a Technician in Layer One of escalation is allocated to work on the Incident. This can be adjusted manually, if required.
The Incident is automatically escalated according to the SLA assigned to the Incident and the triggers configured within the Priority of the SLA. An Incident is escalated if the assigned User exceeds the Escalation trigger point defined for the Response, Restoration or Resolution time of the assigned SLA, when the assigned Workflow State is an SLA Active State. Or, it can be manually escalated by a User, if required.
Incident Assignment
When an Incident is assigned to a User, the system follows a series of steps to look for the most appropriate Technician for the job, based on skill set, location and workload. The order of business logic is as follows:
-
The system will identify the Team associated with the Incident's SLA and associated Workflows
-
The system will find Technicians/Supervisors assigned to the Team
-
If Users are assigned to an Organizational Unit, the system will identify the Users that belong to the same Organizational Unit as associated with the Incident by the Customer assignment
-
If Classifications/Skills are assigned to Users, the system will find Technicians/Supervisors assigned to the Incident's selected Classification
-
Based on the Team configuration, if the Live Priority option is enabled for the Team, the system will look for a User who is logged into the system
-
The system verifies Work Hours/Availability of Users within the Team for appropriate Incident assignment
-
The system will assign the Request to the User who has the lowest workload, i.e., the fewest number of Open or Pending Incidents
-
If there is a tie, the system randomly allocates the Request to a User in the tie.
If a more appropriate Team member is available, the User assigned to the Incident can re-assign it manually by selecting a Technician from the drop-down Technician list in the Incident Information screen.
Note, if the Self Assign option is enabled for the Team, the system assignment logic is ignored and the User creating the request is automatically assigned the Incident.
Automated Escalation
An Incident's Service Level Agreement includes trigger points that set the rate at which automated escalations will occur for an Incident. Auto-escalation is triggered when the number of support hours specified for either an Incident's Service Level Response, Restoration or Resolution time is exceeded and the SLA Trigger action is set to Escalate. When it is escalated, the Incident is reassigned to a Technician in the next escalation level and an email is sent to the newly assigned Technician. This process repeats itself until either the Incident Status changes to an inactive State, for example, Closed - Resolved, On Hold, Closed Change Request, or until all of the Team's available escalation layers are exhausted.
Manual Escalation
If the Incident Team has more than one escalation layer, the Technician assigned to the Incident can escalate it to the next escalation layer by clicking the escalate icon next to the Technician name. If the Incident is allocated to a second layer of escalation or higher, the Incident can be returned to a lower escalation state by clicking the de-escalate button next to the Technician name.
An Incident's Technician and the Technician's Supervisor are able to reassign the Incident to one of the listed Technicians in the Technicians drop-down list by selecting their name and clicking Save to accept the change.
Escalation Control
If the Escalation Control functionality is enabled in Admin>Setup>Privileges>Requests, there is the option to enable or disable escalation within the Incident Information Summary screen.
NOTE:This option is only visible to Supervisor Users. Once an Incident is created, a Supervisor can elect to switch the Escalation option to Off. This means all SLA timers stop, which prevents escalation. Switching the option back to On will re-start the timer and reactivate the SLA triggers.
Notification
The Notify option sets the method of messaging used by the application to notify Customers and Technicians of the following changes to an Incident:
-
Incident created
-
Incident closed
-
Incident deleted
-
Incident Note added
-
Incident escalated (Technician only).
The default Notification status of Incidents is set on a per Team basis, within the Users>Teams>Team Information screen, with the default recipients of new Notes being configured by the Administrator in the Setup>Email>Setup tab. However, this can be adjusted on a per Incident basis within the Notification Method field and on a per Note basis, when new Notes are created.
The methods of Notification can be set for Customers and Technicians, and include:
-
None, which ensures no messages are sent
-
Email, which means an email is sent containing the Incident detail updates
-
SMS notifications, which sends an SMS message to Technicians and Customers about the Incident update. This is only available to Customers and Users who have a mobile number and a service provider entered in their User and Customer Information screen.
Notifications can be sent to:
-
Customer - the Customer who logged the Incident
-
All Owners - all Customers who share the Item assigned to the Incident
-
Customer CC's - email addresses to receive Customer email correspondence when the CC field is selected in the New Notes screen
This field may be automatically populated by the system with email addresses included in the CC list of the original email used to create the Incident. Multiple addresses should be separated by a comma.
-
Current Team - notifications can be switched off, sent to all members within the Team assigned to the Incident, or restricted to members within the layer of escalation to which the Incident is assigned
-
Technician CC's - enter any User account email addresses that are to be sent Incident Notifications. Multiple addresses should be separated by a comma
-
Alternate Team - this option is visible if the Notify Alternate Team option is enabled in the Admin>Email>Setup tab. Notifications can be sent to a Team within the related Process, by the User selecting an option within the drop-down list.
The following is a sample email sent by the system to the Customer and assigned Technician, confirming the creation of an Incident. The message and template sent can be customized by the system Administrator:
Email Sample
Workflow
When an Incident is created it is assigned a Workflow that governs the lifecycle of the Incident. The SLA allocated to the Incident determines the Workflow options made available for the Incident. Before saving the Incident, the User can adjust the system assigned Workflow, if more than one Workflow option is available.
After the Workflow is assigned to the Incident, all stages of the assigned Workflow can be viewed by selecting . The Workflow map displays the entry points (blue boxes), transitional States (orange boxes) and exit points (red boxes).
The User moves the Incident through the Workflow Lifecycle by adjusting the options displayed in the Next Action field.
Moving through the Workflow
To move an Incident through the stages of the Workflow, in the Summary tab of the Incident Information screen:
-
Click Edit
The Next Action field with a drop down list of Status options is displayed below the Status field.
-
Click on the Next Action field
The Status options are displayed. This list is based on the configuration of the assigned Workflow.
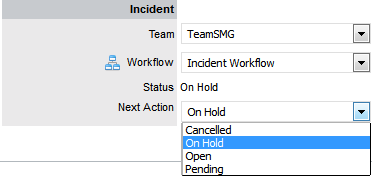
-
Select a State
-
Click Save.
The selected Status is assigned to the Incident with the updated logic applied (i.e., the SLA Timers may now be active or inactive based on the newly assigned State configuration.
Assigning a State with an Underpinning Contract
Each State of a Workflow can be customized for either internal support contract management that is monitored by an OLA, or out-sourced to an external support provider, which is monitored by an Underpinning Contract.
When an Incident moves into a State that is governed by an Underpinning Contract, for internal contract control the Incident can be assigned to a Service Level Manager. This allows the Manager to maintain control of the Incident and to easily follow up with the external service provider, if required. The assigned SLM will be able to adjust the current Status, add Notes and update the Contract Monitor information in the Impact tab.

Alternatively, the Workflow State can be configured for the Technician assigned at the time the Incident is moved to the Underpinning Contract State to maintain Incident editing privileges and manage adherence to the assigned service agreement. If the Workflow is configured for the responsibility of the Incident to be maintained by the Technician when the Incident is in an external contract state the Technician will be able to adjust the current Status, add Notes and, if the Technician is assigned the Internal Process of Service Level Management amend the Contract Monitor information in the Impact tab.
OLA Status Due
Within the Summary screen, the Status Due field is visible when a Workflow status is monitored by an OLA. The time, date and percentage remaining information displayed is calculated using the OLA's Target Resolution time.
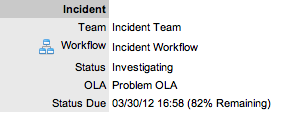
Team Assignment during the Workflow Lifecycle
To ensure that all Incidents are managed throughout the Workflow, the Team assigned to the Incident when it is first logged within the system is set as the default Team. If an Incident moves to a State that has an OLA assigned with a Team, the Incident is re-assigned to that OLA's Team. When the Incident moves out of the OLA State to a State where no OLA or Team is assigned, the Incident is re-assigned to the default Team.
Pending - No Contract Status
When the Contracts or Invoices functionality is enabled and an Incident is created, the system will verify the service entitlement status of the Customer and if a valid contract is not in place, the new Incident is assigned a Status of Pending-No Contract and locked until a valid contract is associated with the Incident.
In a request Group where the Customer and Organizational Unit does not have a Contract, if an Item applied to a request has a Contract and another does not, a relevant Status will be applied to each request. The User will be able to edit the request with a valid Contract, but the request without a Contract will be locked down to a Pending - No Contract Status, until a valid Contract is applied to the Incident.
The Customer is automatically sent the NoContractCreateRequestSummary email when the Incident is saved with the Status. A reminder email can be sent by the Technician from within the Summary tab by clicking ![]() , when the Incident maintains this Workflow Status assignment.
, when the Incident maintains this Workflow Status assignment.
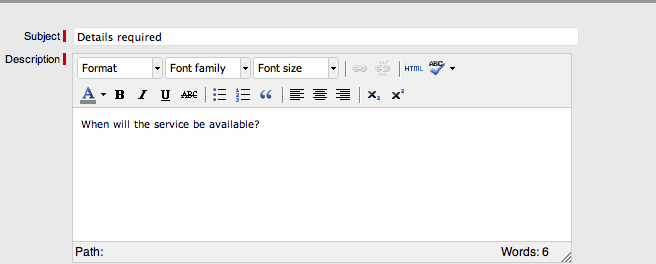
Entering a Request via Email
The system processes requests via email when the Administrator has enabled the following options, under the Administrator>Setup>Email>Setup tab:
-
Email Polling
-
Create/Update via Email.
The Customer sends an email to the support system email address or to an alias account that has been assigned to a Team of Technicians. The application uses the Customer's email address to verify they have an account, and populates the Description with the body of the email. Any attachments sent with the email are uploaded to the Attachments tab of the newly entered request.
By default, when the application is installed a Classification of General exists. If required, this Classification can be renamed. However, when a new request is received via email, it is assigned the General or the renamed Classification. The Priority is set to Medium and the Item assigned to the request is set to Unknown, unless the Customer only owns one Item in the system, in which case that Item will be assigned to the request. The Classification and Item can be changed by the assigned User when they open the request in edit mode.
NOTE:If the Allow Unknown option is set to No in the Admin>Setup>Privileges>Requests tab, when a request that is assigned the Unknown Item is opened in Edit mode, the User will not be allowed to save changes to the request without replacing the Unknown Item with an actual Item.
Notification that a request has been received is sent to the User assigned to the request, and a confirmation email is sent to the Customer. For further information see Email Polling and Request Creation.
Managing Requests via Email
Customers can manage requests via email by including the Incident # followed by the specific request number in the Subject field of the email. The request is referenced by its number, and a Note is created in the system using the main text of the email, with any email attachments saved to the Attachments tab.
The audit history of the request is updated and notifications are sent based on the request settings.
Editing Incidents created by Email
To edit an Incident, click the Incident number or problem report hyperlink. The selected Incident will default to the Incident Information tab.
To edit your selection:
-
Click on the Edit button
-
Make the required changes such as: Assign the correct Item, Classification and Status
-
Click Save.
Grouping Incidents
Incidents can be linked together to form project Groups when Incidents are related in some way (e.g., Incidents that have the same solution). New Groups must consist of Incidents that are not already linked.
Creating a New Group via the Incidents Tab
Within the Incidents list in the Incidents tab:
-
Tick the check boxes in the far left-hand column corresponding to unlinked Incidents
-
Click Link to group the Incidents.
A Group Number will be assigned and an instant Group hyperlink will appear under the Group column.

Adding Incidents to an Existing Group
To add Incidents to an existing Group within the Incidents list:
-
Check the boxes of the Incidents that are to be added to an existing Group and at least one Incident already included in the Group
-
Click Link.
NOTE:This will not work if Incidents representing more than one group are included. For instance, if you have two Groups (A and B) each with two Incidents (A1, A2, B1and B2), and you want to add two unlinked Incidents to Group A, click the check boxes for the unlinked Incidents and either A1 or A2 or both. If B1or B2 is also clicked, the linking process will fail because it will not know which group to add the two new Incidents to.
Merging Incident Groups
Existing Incident Groups can be merged within the Incident Groups tab, to allow all related Incidents within the Groups to be managed as one. To combine Incident Groups:
-
Go to Operations>Incident Groups
-
Check the fields next to the relevant Group #'s
-
Click Merge
The screen defaults to the Details tab for the Merge Group.
-
Set the Name, Item Type, Classification, Status, Priority and Description that best defines all associated Incidents
-
Click Save.
The History tab records details of the Groups merged to form the new Group. Click the No. hyperlink to view the details. The Impact tab records the Type and Number of requests associated with the Group.
Grouping Incidents
Incidents can be grouped by selecting the checkboxes next to the Request # column, followed by the Link button.
NOTE:Within the Home tab, the type of request Group created is based on the Request Type assigned to the Group.
-
If the Group contains Incidents, it is an Incident Group
-
If the Group contains Incidents/Change, it is a Change Group
-
If the Group contains Incidents/Problem/Change, it is a Change Group
-
If the Group contains Incidents/Problem, it is a Problem Group
-
If the Group contains Problem/Change, it is a Change Group.
The system views the request hierarchy from low to high as Service Request, Incident, Problem and Change Request, and if a related request of a higher type is closed, all the lesser type requests are automatically closed, or if the handshaking facility is enabled for the system, moved to the Pending-Approval State.
Related Requests
Incidents that are included in an Incident Group, list the associated Incidents in the Related sidebar of the Incident Summary tab.
Grouping Incidents
Incidents can be linked together to form project Groups when Incidents are related in some way (e.g., Incidents that have the same solution). New Groups must consist of Incidents that are not already linked.
Creating a New Group via the Incidents Tab
Within the Incidents list in the Incidents tab:
-
Tick the check boxes in the far left-hand column corresponding to unlinked Incidents
-
Click Link to group the Incidents.
A Group Number will be assigned and an instant Group hyperlink will appear under the Group column.
Adding Incidents to an Existing Group
To add Incidents to an existing Group within the Incidents list:
-
Check the boxes of the Incidents that are to be added to an existing Group and at least one Incident already included in the Group
-
Click Link.
NOTE:This will not work if Incidents representing more than one group are included. For instance, if you have two Groups (A and B) each with two Incidents (A1, A2, B1and B2), and you want to add two unlinked Incidents to Group A, click the check boxes for the unlinked Incidents and either A1 or A2 or both. If B1or B2 is also clicked, the linking process will fail because it will not know which group to add the two new Incidents to.
Merging Incident Groups
Existing Incident Groups can be merged within the Incident Groups tab, to allow all related Incidents within the Groups to be managed as one. To combine Incident Groups:
-
Go to Operations>Incident Groups
-
Check the fields next to the relevant Group #'s
-
Click Merge
The screen defaults to the Details tab for the Merge Group.
-
Set the Name, Item Type, Classification, Status, Priority and Description that best defines all associated Incidents
-
Click Save.
The History tab records details of the Groups merged to form the new Group. Click the No. hyperlink to view the details. The Impact tab records the Type and Number of requests associated with the Group.
Grouping Incidents
Incidents can be grouped by selecting the checkboxes next to the Request # column, followed by the Link button.
NOTE:Within the Home tab, the type of request Group created is based on the Request Type assigned to the Group.
-
If the Group contains Incidents, it is an Incident Group
-
If the Group contains Incidents/Change, it is a Change Group
-
If the Group contains Incidents/Problem/Change, it is a Change Group
-
If the Group contains Incidents/Problem, it is a Problem Group
-
If the Group contains Problem/Change, it is a Change Group.
The system views the request hierarchy from low to high as Service Request, Incident, Problem and Change Request, and if a related request of a higher type is closed, all the lesser type requests are automatically closed, or if the handshaking facility is enabled for the system, moved to the Pending-Approval State.
Related Requests
Incidents that are included in an Incident Group, list the associated Incidents in the Related sidebar of the Incident Summary tab.
Billing/Contracts
Incident Groups
Incidents that are related can be linked together to form Groups. Once the Group has been created, the Incidents can be managed together. This may be relevant when mulitple Incidents are:
-
logged by Users of one department
-
logged by one Customer
-
related to a common Description or Solution.
NOTE:New Groups can only consist of Incidents that are not already associated with an existing Incident Group, unless the merge facility is used to combine existing Groups.
Users can group Incidents together manually through the Incident Group tab (as outlined below) or within the Incident List (see: Grouping Incidents). Incidents that have multiple Items assigned to them during the Incident creation process, are also listed within the Incident>Groups tab.
The system can also use its Analysis Engine to automatically link Incidents together based on criteria defined by the Administrator. Incidents auto-linked using the Analysis criteria result in the creation of a Problem Group, listed under the Problem tab.

Creating a New Group via the Incident Group Option
To create a new Group via the Incident Group Option:
-
Select Operations>Incident Groups Tab
-
Click New
-
Enter a Name for the Group
-
Assign an Item Type, if applicable
-
Assign a Classification if an Item Type is selected
-
Assign a Group Priority
The Status is set by default to Open.
-
Enter a Group Description
-
Click Save
The screen will default to the Analysis Tab, which allows the User to Group existing requests. The information displayed can be adjusted by using the Filter options.
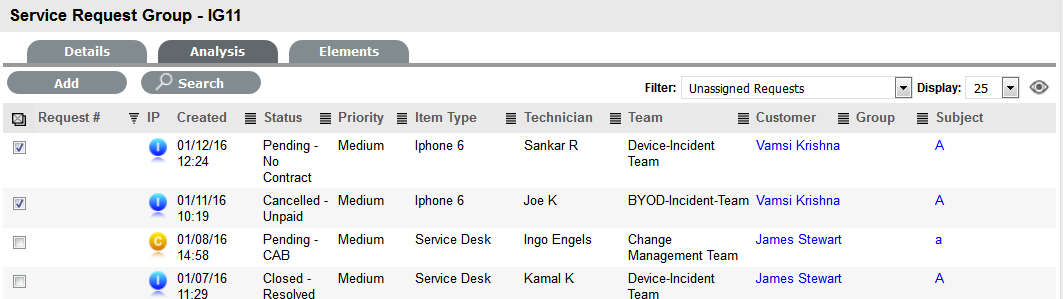
-
Check the field next to the relevant Request # to add the request to the Group
-
Select Add
-
Click Done to record the new Incident Group.
Creating an Incident Group using a Group Template
An Incident Group can be created using a Group Template. A Group Template contains a series of tasks in the form of Quick Calls. For more information, see: Group Templates.
Tasks within the Group Template can be created simultaneously or sequentially in the system. If the In Sequence option is used, the first task within the Group Template is created when the Template is selected. When the first task is closed, the next Task within the Template is automatically created and so goes the auto-creation process until all tasks within the Template have been created and closed in sequence.
To create a new Group using a Group Template:
-
Select Operations>Incident Groups tab
-
Click New
The New Group editor is displayed.
-
Select the Use Template checkbox
A list of Group Templates is displayed.
-
Select an appropriate Template
The Group details are listed.
-
Enter a Name, as unique identifier for this Group
The selected requests for the Group are displayed. These requests are the Quick Calls assigned to the Group Template.
-
Click Next
-
Search and select the Customer to be associated with the tasks included in the template
(If the Customer details are not in the database and are to be created as part of the tasks included in the template, assign a default customer and update the details in the Customer tab of the Request, when the Customer details exist in the system.)
-
The Selected Requests for the Group are displayed.
These requests are the Quick Calls assigned to the Group Template. To exclude any of the requests from the newly created Group, deselect the checkbox next to the Template name.
-
Select the Creation option:
-
On Save for all the requests to be created when the Request Group is saved
-
In Sequence for the first request to be created when the Request Group is saved.
-
-
Click Save
The Group is created including all Quick Call Requests. To add or remove Incidents to or from the Group, use the Analysis and Elements tabs (Covered below).
The type of Group created, whether it be a Service Request, Incident or Change Group will depend on the Quick Call tasks assigned to the Group Template.
For example:
If there is a mix of Service Request and Incident Quick Calls, the Group will become an Incident Group;
If there is at least one Change Quick Call, the Group will become a Change Group.
If an Incident is related to a Problem or Change Request within a Group and that related request in the other Process is closed, the Incident will be automatically closed. The system views the request hierarchy from low to high as Service Request, Incident, Problem and Change Request, and if a related request of a higher type is closed, all the lesser type requests are automatically closed.
Analysis Tab
Incidents can be linked to a Group within the Analysis screen of an Incident Group. To search for Incidents to add to the Group, use the system filters or the Search option. The system filter includes the following:
|
Unassigned Requests |
Description |
|---|---|
|
Project Requests |
Incidents that have been assigned to the Incident Group/Project. |
|
Unassigned Requests |
All Incidents that exist in the system and have not been assigned to the Group. |
|
Potential Requests - Item Type & Classification |
Incidents in the system that match the Item Type and/or Classification of the Group. |
|
Potential Requests- Keyword match |
Incidents with keywords that match between the Incident Description and the Group Description. NOTE:The match is only performed on the first 250 characters of the description. |
|
All Incidents (sys) |
Lists all Incidents in the system irrespective of Workflow State or User assignment. Note that this option is not visible to Technicians when the privilege to View All Requests is disabled by the Administrator. |
|
Incident Queue (sys) |
Displays Incidents assigned to the System User by default, which Technicians can reassign after viewing. (This is only available if the functionality is enabled for the system and Team.) |
|
My Incidents (Active) (sys) |
Displays all Incidents in an active Workflow State that are assigned to the logged-in User. |
|
My Incidents (All) (sys) |
Displays all Incidents, in active and inactive Workflow States, that are assigned to the logged-in User. |
|
My Teams Incidents (Active) (sys) |
Displays all Incidents in an active Workflow State, allocated to the Teams with which the User is associated. |
|
My Teams Incidents (All) (sys) |
Displays all the Incidents, in active and inactive Workflow States, allocated to the Teams with which the User is associated. |
To link Incidents within the Incident Group Analysis tab:
-
Go to Operations>Incident Groups
-
Select the Incident Group # link
-
Move to the Analysis tab
-
Choose the Filter option
-
Select the Incident checkbox on the left
-
Click the Add button
-
Click Done.
The screen defaults to the Groups list.
Elements Tab
The Elements tab displays all the requests that belong to the Incident Group. From this screen, any request can be removed.
To remove a request:
-
Go to Operations>Incident Groups
-
Select the Incident Group # link
-
Move to the Elements tab
-
Select the checkbox of the relevant Incident.
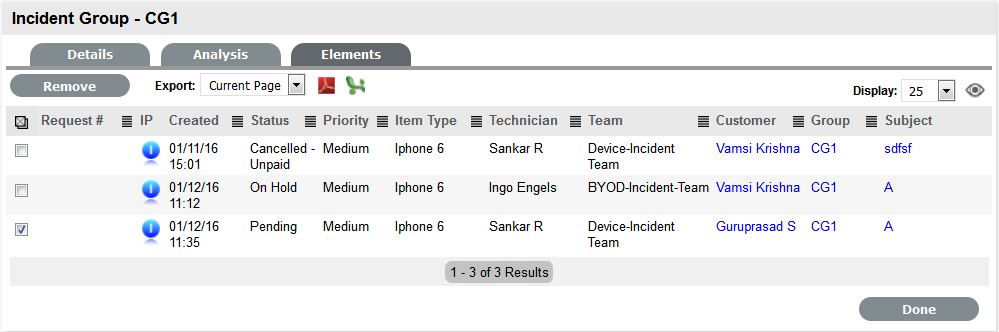
-
Click the Remove button.
Merging Incident Groups
Existing Incident Groups can be merged within the Incident Groups tab, to allow all related Incidents within the Groups to be managed as one.
To combine Incident Groups:
-
Go to Operations>Incident Groups
-
Check the fields next to the relevant Group #'s
-
Click Merge
The screen defaults to the Details tab for the Merge Group.
-
Set the Name, Item Type, Classification, Priority and Description that best defines all associated Incidents
-
Click Save.
The History tab records details of the Groups merged to form the new Group. Click the No. hyperlink to view the details. The Impact tab records the Type and Number of requests associated with the Group.
Closing an Incident Group
An Incident Group is automatically closed when all Incidents included in the Group are closed.
To close a Group:
-
Go to Operations>Incident Groups
-
Select the Incident Group # link
-
Move to the Elements tab
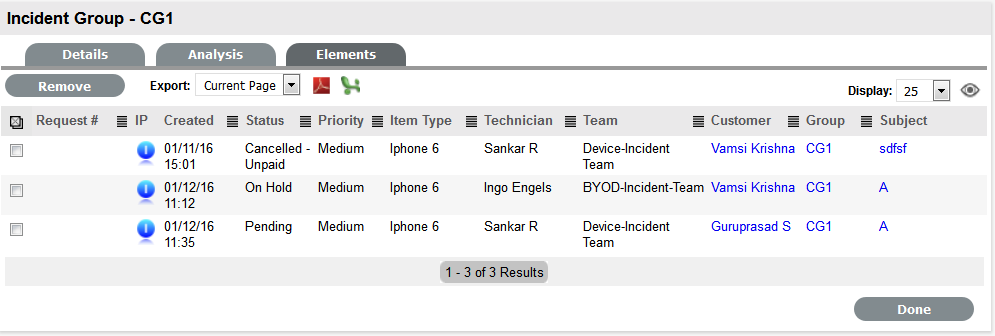
-
Select a Request # hyperlink
The Summary tab of the Incident is displayed.
-
Click Edit
-
Within the Related sidebar check all related Incidents
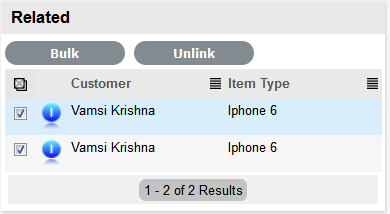
-
Select the Bulk option
The Bulk Editor screen is displayed.
-
Select the Status of Closed - Resolved or desired Workflow Exit State
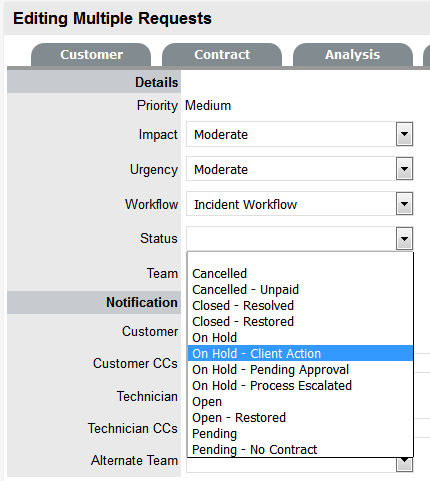
-
Click Save
-
Click Save and Done.
The Details tab of the Group now displays a Status of Closed - Resolved.
Duplicated Incidents
When an Incident is duplicated, the new Incident is linked with the original Incident creating an Incident Group. Incidents can be unlinked in the Group's Elements tab.
Multi-Item Requests
Displayed within the Incident Groups List View are any Groups that are created as Multi-Item Requests. These requests allow for multiple Items to be assigned during the Incident creation process, and result in separate Incidents being created for each Item assigned to the initial Incident, which are then displayed within the Related Requests window of the Incident Information screen.
The Incidents are managed as individual Incidents to cater for any special requirements relative to each Item. For example, consider a situation where a Team rolls-out an update in an organization. In this instance, during the Incident creation process multiple Items are assigned to a single Incident, which the system automatically allocates to separate Incidents that are then managed on an individual basis. This allows appropriate Teams/ Technicians to be assigned to the Incidents relative to their skill-set or departmental assignments. The implementation process more effectively differentiates between the tasks and Items being modified and ensures each Item has its own Audit Trail, Attachments and Notes for future reference.
Multi-Item Requests are also listed as separate Incidents within the Incidents List View.
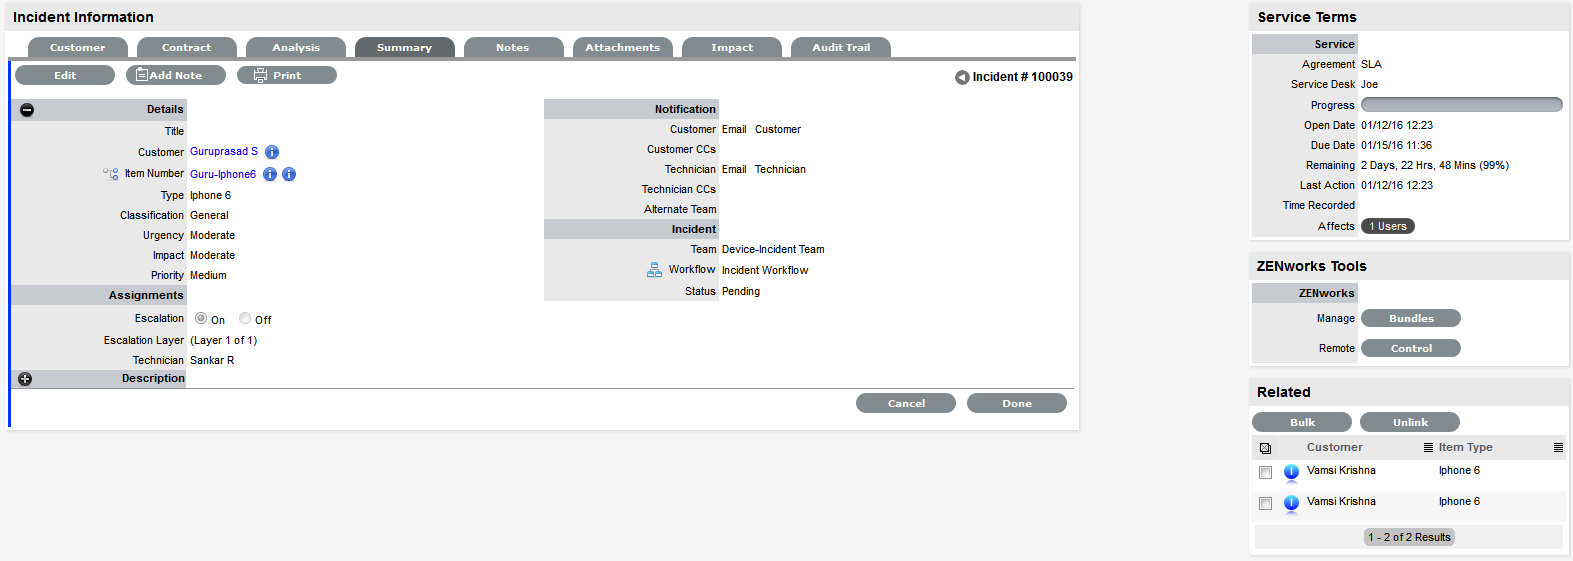
Multi-Item Requests are created like a single Item Request, but have more than one Item assigned during the Incident creation process.
Multi-Item Request Item Assignment
After assigning a customer to an Incident move to the Find Item field to assign Items to the Incident.
-
Click the relevant Item link if listed below the Find Item search box
Or, Search for an Item or click
to Create an Item.
NOTE:The option to create an Item is only available to Technicians if the system Administrator has enabled the Create Items option within the Setup>Privileges>User screen.
-
Click Next to move to the Details tab if only one Item is to be assigned to the Incident
Or, select Add to assign additional Items. If Add is selected, a Request Selections window will be displayed that lists all the current Items assigned to the Incident.
-
Continue to add all the relevant Items to the Incident and then select Next to move to the Details tab
Within the Details tab the Incident is profiled by assigning a Classification and Description.
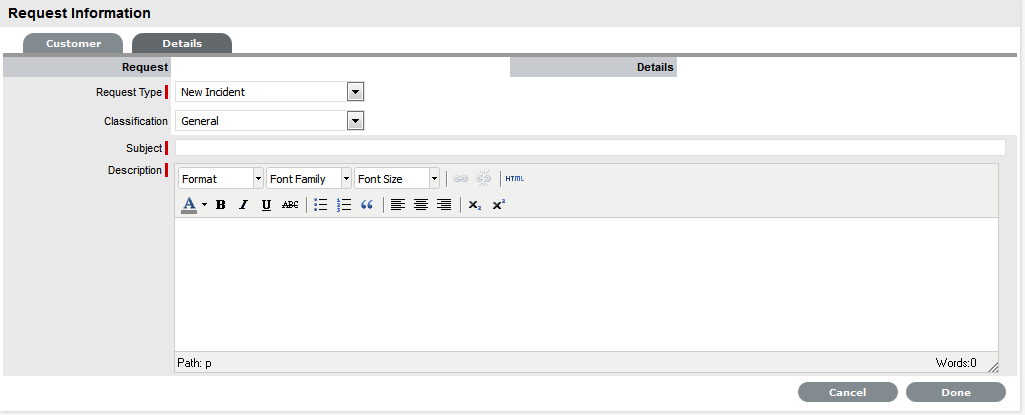
-
Select the Classification, enter the Subject and Description
-
Click Done to enter all Requests simultaneously.
The Requests are created individually and automatically applied to a Group.
2.4.3 Problem Management
Problem Management extends the process of Incident Management. An Incident is a non-standard operational event with the potential to harm the quality of an IT service. Incidents are reported by end-Users, encountered by technicians and system/database Administrators, or automatically detected by system management tools. In all instances, Incidents should be reported to the Service Desk.
A Problem describes the underlying cause of one or more Incidents that are being investigated. However, not all Incidents are investigated as Problems. For example, if the power-supply in a desktop computer blew up, it should be treated as an Incident, and the power-supply replaced. (Although if the power-supply is controlled by Change Management, it would need to be treated as a minor change request.) However, if there was a spate of burnt-out power-supplies in the same model desktop, then an underlying Problem with the desktop may possibly exist and further investigation into the cause and potential solutions may be required.
For Incidents to be correctly categorized as a Problem, organizations must define the evaluation criteria. For example, raise a Problem if more than 10 Incidents are logged in the space of three hours that refer to the same Configuration Item.
After the underlying cause of a Problem has been diagnosed, it is referred to as a Known Error. At this point, the root cause of the Problem is known, and the most appropriate course of action is to be determined. This may take the form of a structural resolution by raising a request for change (RFC). Alternatively, it may be decided, after consultation with Users and Customers, to implement a workaround or recovery action.
In the case of the above example:
-
Problem: Brand X Desktops no longer operating
-
Root Cause: Faulty power-supply in July ’09 models
-
Known Error: Warranty - replace with new power-supply.
As part of the Problem Management Process, if a Problem is related to a Change Request and that related Change Request is closed, the Problem will be automatically closed. The system views the request hierarchy from low to high as Service Request, Incident, Problem and Change Request, and if a related request of a higher type is closed, all the lesser type requests are automatically closed.
Implementing Problem Management
To set up the Problem Management Process in the system, the following steps are to be completed:
-
Assign the Problem Management Process to the relevant Users within the User Information screen under the User>Users tab. (See:Create a User.)
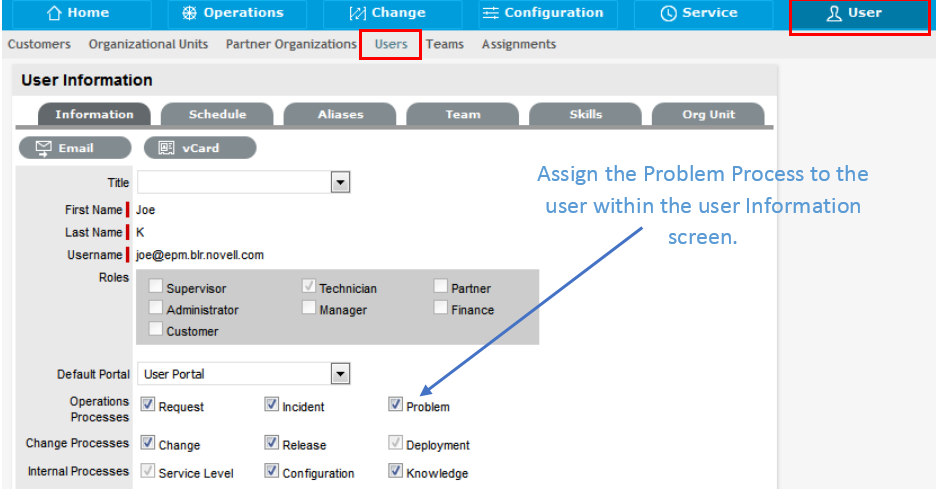
-
Create or review the SLA within the Service>SLAs tab, and associate the Problem Management Workflow to the SLA in the SLAs Workflow tab. (NB: The Supervisor User setting up the SLA must be assigned the Internal Process of Service Level in their User Information screen to complete this action.)
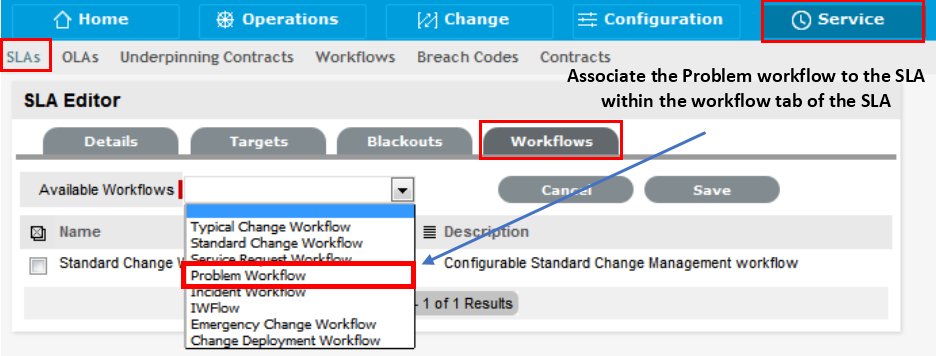
-
Review the Problem Management Workflow within the Service>Workflows tab. (See: Problem Management Workflow.)
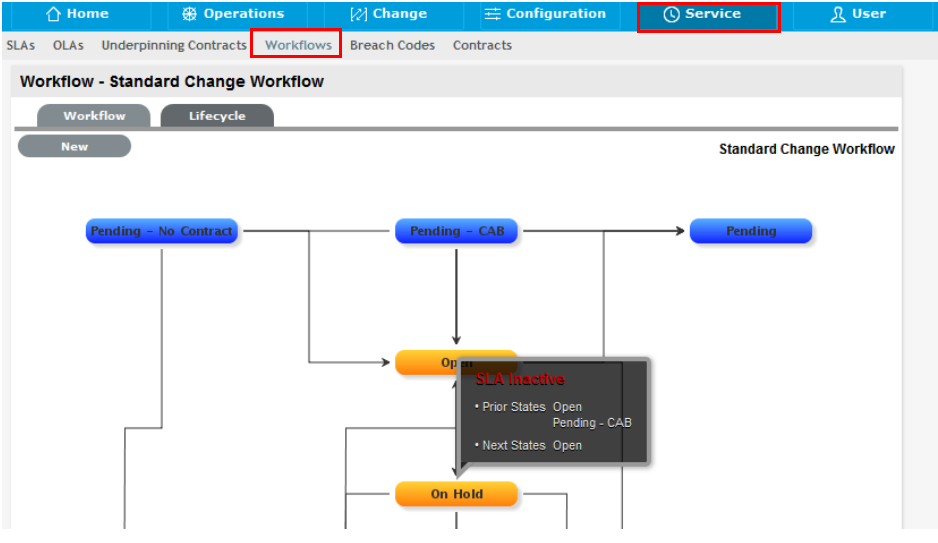
-
Create a Problem Management Team within the User>Teams screen. (See: Problem Management Team.)
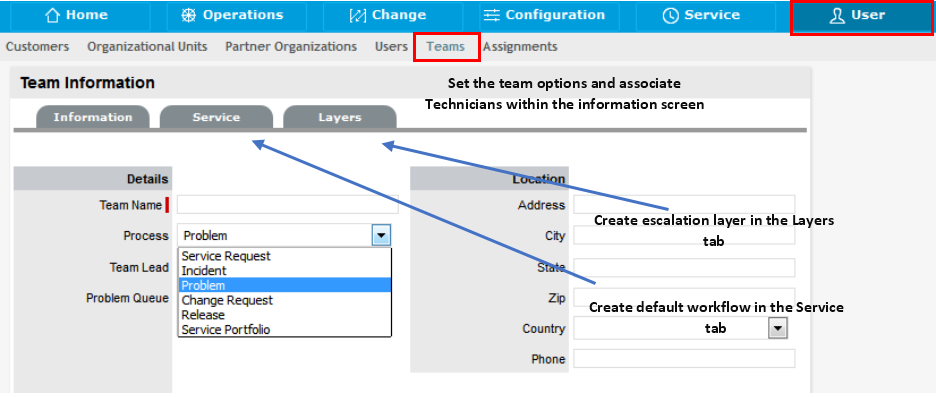
-
Associate the SLA to an Item or Customer or Org Unit. This final step ties all the elements together when a Problem is created, as the SLA associated with the Item, Customer or Org Unit assigned to the Problem determines the Workflow, Team and Technicians that are made available within the Problem Information screen.
Problems

The Problem tab defaults to display all Problems logged with the system. The other available List Filters include:
|
Filter |
Description |
|---|---|
|
All Problems |
Displays all Problems logged in the system regardless of their Status or Assignment. |
|
My Problems (Active) |
Displays all Problems in an active Workflow State that are assigned to the logged-in User. |
|
My Problems (All) |
Displays all Problems, in active and inactive Workflow States, that are assigned to the logged-in User. |
|
My Teams Problems (Active) |
Displays all Problems in an active Workflow State, allocated to the Teams with which the User is associated. |
|
My Teams Problems (All) |
Displays all the Problems, in active and inactive Workflow States, allocated to the Teams with which the User is associated. |
|
Problem Queue |
Displays Problems assigned to the System User by default, which Technicians can reassign after viewing. (This is only available if the functionality is enabled for the system and Team.) |
The default display is ten Problems per batch. The list can be re-sorted by clicking on a column header and the number of Problems displayed per batch can be altered using the Display pop-up option.
Problems - Individual or Group
Problem Management is :
-
Used to manage an ongoing or immediate situation where there is significant impact to business services or IT infrastructure
-
Created when more than one Incident has been raised around the same issue
-
Used to find a solution to all the related Incidents
-
Differentiated from an Incident group, in that, a Problem is created to work on the cause of the Incidents within the Problem
-
An internal service management investigation process, which does not typically involve any Customer updates, except upon resolution.
Problem Management can also be used pro-actively to prevent Problems by identifying related or recurring Incidents.
When a Problem is created, a Problem Group is automatically generated. The Group is used as a container for all requests that relate to the same underlying issue. The name assigned to the Group is the Problem ID e.g. Problem #100067. The Problem Group can be edited under the Error tab or via the Problem itself.
Creating a Problem:
To create a Problem within the Problem>Problems tab, the following information is required:
Problem Queue
Problems that are created by the Users through the User Portal can be forwarded to a holding bay or queue, if this functionality is required by the Service Desk. The capability can be enabled system-wide but applied on a per Problem Team basis, as needed.
See: Queues.
Problem Search Tips:
-
The Problem search option has a default Status to search only Active requests. To ensure search success, select the relevant Incident Status, if unsure, select All
-
To search for multiple Problem numbers at once, insert a comma separator between Problem numbers
-
To search based on a Problem status, select the Problem Workflow option from the Workflow drop-down list. Once selected, a list of States is displayed
-
To search by Classification, select an Item category from the Category drop-down list. After the category is chosen, a list of Problem Classifications is displayed
-
To search based on the content of a Problem Description, select the Full Text option within the Search and enter a relevant term (See: Full text searches.)
-
To search using an Item's Custom field information, select the Item Category to display any Custom Fields enabled for that Item.
RSS Feeds
To easily access up to the minute details regarding Problem activity within an RSS feed browser bookmark, Users can subscribe to RSS feeds by selecting the RSS button within the Problems list. When the RSS button is selected, Users are presented with the application options for subscribing to receive the information and where the Recent Activity information is to be accessed. To readily access the information through a browser window, save the feed the to the Bookmark Bar.
The following is an example of the information obtained by clicking on the RSS bookmark:
For each Problem, the following tabs are available:
Customer Tab
The first step in creating a new Problem requires that a Customer be assigned to the Problem. There are two ways to assign a Customer to a Problem, either search and select an existing Customer or create a new Customer.
Create a Problem for an existing Customer
To search for and assign a Customer who already exists in the system:
-
Go to Problem>Problems
-
Click New
-
Search and select a Customer
Within the Find Customer field, enter any known Customer details or leave the search field blank to access the complete Customer list. If Custom Fields have been enabled in the Customer Information screen, the Advanced Search option can be used to search on data recorded within these fields.
-
Click
to search the Customer database
-
Select the relevant Customer Name hyperlink to assign the Customer details to the Problem.
The screen will open the Find Item field.
Create a Problem for a new Customer
If the Customer does not exist within the system, an account can be created when entering the Problem:
-
Select Problem> Problem
-
Click New
-
Within the Find Customer field, select
An expanded editable Customer Details form is displayed.
-
Enter the Customer details
-
Click Save
The form will revert to a non-editable screen of the newly entered details.
-
Click Next to assign an Item to the Problem. Or select Quick Call if a template is to be used.
Supported Org Units Only option
This option is visible within the Find Customer search field, if the logged in User has been assigned to support specific Organizational Units. Uncheck the option, if search results are to include Customers belonging to all Organizational Units recorded in the system.
Item Information
After the Customer details are assigned to the Problem, an Item is assigned to the Problem. This assignment associates all the relationships of the Item, including service level agreements and assigned support Team, to the Problem.
If the Customer assigned to the Problem owns any Items they will be listed below the Find Item search box. By default, the list is defined by the All Assigned Items option. It is also possible to search by:
-
All Items
(Only visible if the Search All Items option is enabled within Admin>Setup>Privileges>User tab.)
-
All Assigned Items (Customer and Organizational Unit)
-
Assigned Items by Customer
-
Assigned Items by Organizational Unit.
The list can be filtered using the Include Global* Items option. This will display Items that are available to all Users in the system, as they have not been assigned to a specific Customer or Organizational Unit. It can also be filtered using the Active Items Only option, which means only Items that are assigned an active lifecycle state are displayed if the option is checked.
Problem Item Assignment
To assign an Item to the Problem:
-
Click the relevant Item link if listed below the Find Item search box
Or, Search for an Item or Click
to Create an Item
NOTE:The option to create an Item is only available to Technicians if the system Administrator has enabled the Create Items option within the Setup>Privileges>User screen
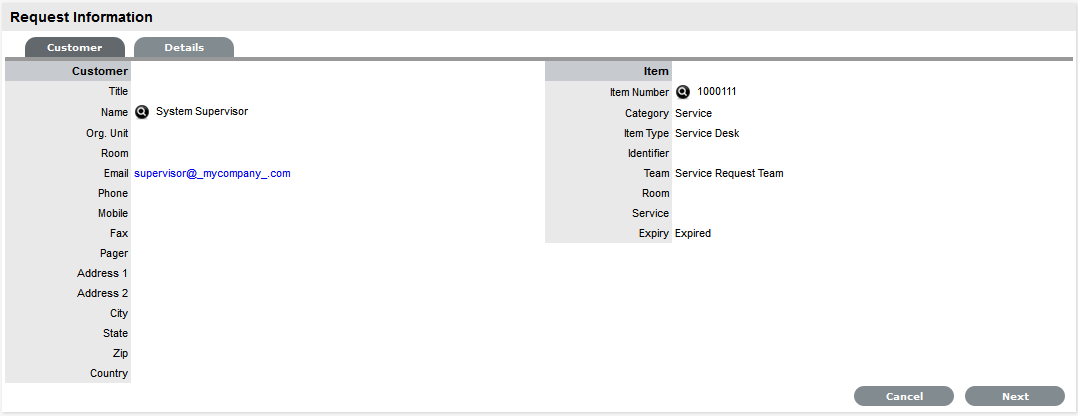
-
When the Item is assigned to the Problem, click Next to move to the Details tab.
The Classification and Description are now to be entered for the Problem.
Quick Calls
Quick Calls are used for common requests that are logged using a template during the Problem creation process.
If the Quick Call functionality is enabled for the system, after the Customer and, if relevant, Item details are assigned to a Problem, within the Details tab the Quick Call options are displayed below the dashed line in the Request Type drop-down list.
Quick Calls and Item Assignment
If the Item is to be assigned to the Problem using the Quick Call Template configuration, the User simply selects the Next button after assigning the Customer information to the Problem. The application moves to the Details tab and within the Request Type options, the list displayed only includes Templates that have Items preset.
NOTE:The Next button will only be visible after the Customer has been assigned to the Problem, if Quick Call templates that have Items assigned are configured in the system.
If a specific Item is associated with the Quick Call Request within the Customer tab, the options displayed within the Request Type drop-down list will include Quick Call templates associated with the Item Type already assigned to the Problem, and templates assigned the Unknown Item..
For Problems created with multiple Items assigned that use different Items, Quick Call templates with no Items assigned are displayed. For Problems where the same Item is assigned on multiple occasions, Quick Call templates that have the matching Item and no Items assigned are made available in the Request Type drop-down list.
To create a Problem Request using a Quick Call:
-
After allocating a Customer and Item(s) if required, click Next to move to the Details tab

-
Within the Request Type drop-down list, select the relevant Quick Call template displayed below the dashed line
-
Select the Classification
-
Click Done.
All Problem details will be populated according to the Quick Call template. Any amendments can be made through the Problem Summary screen.
NOTE:When saved, the Problem created using the Quick Call template can be duplicated, to minimise data entry requirements for multiple similar Problems.
Contract Tab
When Contracts are enabled for the system, the Contract tab is visible within the Problem Information screen.
The Contract tab of a Problem includes the details of the Contract Type and SLA assigned to the Problem. If a valid contract is active for the Customer, Item or Organizational Unit assigned to the Problem, then the details of the contract will be displayed. If an SLA is not assigned to the Customer, Item or Org Unit and the Billing functionality is not enabled, the system automatically applies a default SLA based on the Item Type or the system default SLA.
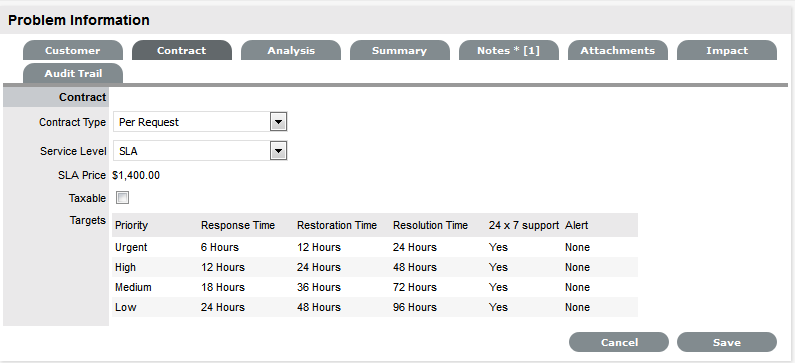
When Billing is enabled and the Contracts or Invoices functionality is active, the system verifies the service entitlement status of the Customer assigned to the Problem, and if a valid contract is not in place, the Problem is assigned a status of Pending-No Contract and locked until a valid contract is associated with the Problem. The assigned Technician is automatically sent the NoContractCreateRequestSummary email when the Problem is saved with this Status. If the Self Mail option is enabled, the message is sent to the Technician who logged the Problem and the assigned Technician.
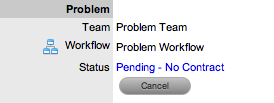
For more detailed information about contracts and billing, see Contracts.
Details Tab
To successfully create a Problem, the Problem must be profiled by completing the Request Type, Classification and Description details. Within the Details tab, there is also the option to select any relevant Quick Call Templates that have been configured for the Item Type assigned to the Problem.
Entering a Problem Description
To profile the Problem:
-
Define the Request Type
The New Problem option is locked in if there are no Quick Call templates available for the Item or Process.
-
Select a Classification
-
Complete any required customized fields
-
Define the Subject content, if desired
-
Enter all relevant information within the Description field
This is a mandatory field.
-
Click Done to enter the new Problem into the database.
A unique reference number is automatically generated for the request at this point. When a Problem is submitted successfully, the Problem Summary Tab is displayed. If the Force Analysis functionality is enabled in the application's Setup, the system will move to the Analysis Tab.
Request Subject
It is recommended that a summary be included in the Subject field, as the details recorded in the Subject field are displayed in scroll-over summaries throughout the application. For example, when a new Problem is being entered for a Customer, a Recent Customer Requests list is displayed during the Problem creation process for all Items the Customer owns either directly or via shared ownership. The Requests list includes a scroll-over summary where Subject content is displayed, if the Subject is completed for a Problem. Subject information can also be included within a column in the Problems List View, for a quick glance summary of a Problem.
Analysis
The Analysis tab is used to search for Solutions, Workarounds or to escalate the current Problem to a Change Request. The drop-down options include:
|
Analysis Tab Options |
|
|---|---|
|
Proposed Solution |
Displays a list of all Solutions with a search based on the Problem Description, Item Type and Classification. To assign a Solution, select the Solution ID number to display the Solution in full. Click Resolve if the Solution is relevant. This will close the Problem and notify the Customer. |
|
Search Solution |
Allows User to enter full text or ID number to search for possible Solution Articles. To assign a Solution, select the Solution ID number to display the Solution in full. Click Resolve if the Solution is relevant. This will close the Problem and notify the Customer. |
|
New Solution |
Displays Knowledge Base editor to allow User to enter a new Solution. Define visibility, enter a Summary, a Description and Save. |
|
Proposed Workarounds |
Displays a list of all Workarounds with a search based on Problem Description, Item Type and Classification. To assign a Workaround, select the Article number to display the Workaround in full. Click Resolve if the Workaround is relevant. This will assign the Workaround to the Problem. After a Workaround has been assigned, the View Workaround option will become visible within the Analysis options |
|
Search Workarounds |
Allows User to enter full text or ID number to search for possible Workaround Articles. To assign a Workaround, select the Article number to display the Workaround in full. Click Resolve if the Workaround is relevant. This will assign the Workaround to the Problem. After a Workaround has been assigned, the View Workaround option will become visible within the Analysis options |
|
New Workaround |
Displays Knowledge Base editor to allow User to enter a new Workaround. Define visibility, enter a Summary, a Description and Save. |
|
New Change Request |
Allows the User to create a new ‘Change Request’ and links the RFC and Problem into the new Group. The Problem status moves to ‘On Hold - Process Escalated’. |
|
Alerts |
Allows the User to create an Alert directly related to the Problem. Displays any reminder alerts that have been created in the Summary tab of the Problem. Select the Alerts option to view Alerts list, and click on an Alert Publish Date to view Alert Content. |
Problem Workarounds
Workarounds are temporary fixes applied to a Problem until the Problem is resolved.
To assign a Workaround to a Problem, the User can apply a Proposed Workaround presented by the application or use the Search Workaround facility. If a Workaround Article does not exist, a Workaround can be created within this screen. Once a Workaround is applied to the Problem it can be accessed via the Analysis tab under the View Workaround option. Searching for a Workaround
To search for a Workaround:
-
Click on the number of the required Problem
The Problem Information screen appears.
-
Select the Analysis tab
-
Click Edit
The drop-down list will become active.
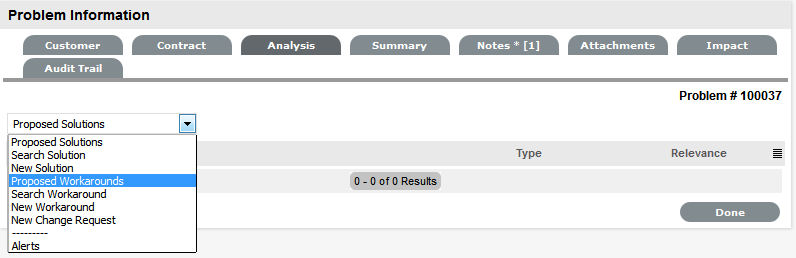
-
Select an option:
Analysis Tab Options
Proposed Workarounds
Displays a list of all Workarounds with a search based on Problem Description, Item Type and Classification. To assign a Workaround, select the Article number to display the Workaround in full. Click Resolve if the Workaround is relevant. This will assign the Workaround to the Problem. After a Workaround has been assigned, the View Workaround option will become visible within the Analysis options
Search Workarounds
Allows User to enter full text or ID number to search for possible Workaround Articles. To assign a Workaround, select the Article number to display the Workaround in full. Click Resolve if the Workaround is relevant. This will assign the Workaround to the Problem. After a Workaround has been assigned, the View Workaround option will become visible within the Analysis options
New Workaround
Displays Knowledge Base editor to allow User to enter a new Workaround. Define visibility, enter a Summary, a Description and Save.
-
Click Save.
Problem Solutions
To assign a Solution or Known Error to a Problem, the User can apply Proposed Solutions presented by the application or use the Search Solution facility to access the Known Error database. If a Known Error does not exist, it can be created within this screen. Once a Known Error is applied to the Problem, the application automatically closes the Problem.
Searching for a Solution/Known Error
To Search for a Solution/Known Error:
-
Click on the number of the required Problem
The Problem Information screen appears.
-
Select the Analysis tab
-
Click Edit
The drop-down list will become active.
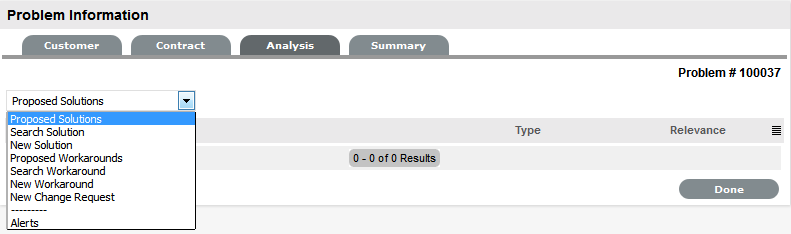
-
Select from the available options, as follows:
Analysis Tab Options
Proposed Solution
Displays a list of all Solutions using a search based on the Problem Description, Item Type and Classification. To assign a Solution, select the Solution ID number to display the Solution in full. Click Resolve if the Solution is relevant. This will close the Problem and notify the Customer.
Search Solution
Allows User to enter full text or ID number to search for possible Solution Articles. To assign a Solution, select the Solution ID number to display the solution in full. Click Resolve if the Solution is relevant. This will close the Problem and notify the Customer.
New Solution
Displays Knowledge Base editor to allow User to enter a new Solution. Define visibility, enter a Summary, a Description and Save.
-
Click Save.
Creating a Change Request from a Problem
Change Requests can be generated within the Analysis tab of a Problem screen. This will move the current Problem status to On Hold and link the new Change Request to the selected Change group.
To create a related RFC for a Problem, within the Analysis tab:
-
Select Edit
The Proposed Solution drop-down list opens in Edit Mode
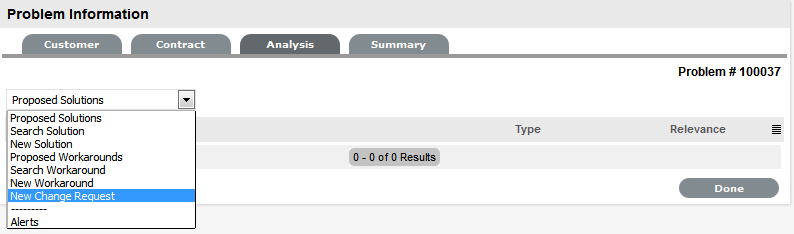
-
Select the New Change Request option
The RFC is automatically created and the Problem status changed to On Hold - Process Escalated.

Creating an Alert
Within the Analysis tab, an Alert that is associated with the Problem can be created by:
-
Select Edit within the Analysis tab
-
Select the Alerts option in the drop-down list
The New button is made accessible.
-
Click New
-
Refine the content for each required field:
Alert Details
Description
Created
The current date and time.
Publish
The date the Alert is published. Use the calendar icon to the right of the field, to select a Publish date.
Set to a date in the future, or use the default to publish the Alert immediately.
Dismiss
The date the Alert ceases to be available. Use the calendar icon to the right of the field, to select a Publish date. On this date, the Alert will disappear from a User's Alert list.
Severity
The type of Alert to be published. The choices are:
-
Information – for general Alerts
-
Warning – to warn Users of potential issues
-
Urgent – to publish an urgent actionable message.
The icon appearing with the message will depend on the type of Alert.
User
The User type to receive the Alert, which include:
-
Specific Customer or User - In the Find User or Customer list, click search to select the recipient from the drop-down list.
-
User Role - An Alert sent to a User Role will go to all Users with that Role.
-
Personal Alert - A personal Alert appears on the User's own screen at the Publish date.
-
Organizational Units - In the Find Org. Unit field, search and select the recipients.
Title
Enter the title of the Alert.
Message
Enter the main content of the Alert.
-
-
Click Save.
Related Requests
The Related sidebar is automatically displayed when a Problem is linked to other requests.
Problems can be linked to other requests in the following ways:
-
Using the Group option within the My Tasks list, using a Problem assigned to the Group
-
Using the Problem Group feature under the Problem > Errors tab
-
Linking requests within the Problem's Analysis tab.
Any requests that belong to a Group can be viewed within the Related Requests sidebar window, inside the Problem Information screen. Within this window, all related requests are listed and can be controlled as one. For example, Notes can be applied to all related requests, or the entire Group can be closed.
Managing Related Requests
The details of a related request can be viewed by hovering the mouse over the colored icon. Click on the same icon, and the system moves to the Problem Information screen of that related request.
Bulk Updates
The Bulk option allows one or more related requests to have the following information updated simultaneously:
-
Priority, Workflow, Status, Team, Escalation Layer & Technician
-
Notification method and recipients
-
Request Classification
-
Items
-
Description, Attachments and Notes.
To bulk update for any of the above elements:
-
Select Operations>Problems
-
Click on the Request # link of the relevant grouped request
-
Tick the checkboxes of the requests in the Related sidebar that are to be updated
-
Select
The system displays the Bulk Editor screen.
The system does not allow requests with a status of Pending-No Contract to be updated
If the Bulk update is only associated with requests of this Status, an error message is displayed.
-
Amend the appropriate element as per the above list
-
Click Save.
Remove Related Requests
To remove a request from a Group:
-
Go to Operations>Problems
-
Click on the Request # hyperlink of a Grouped Request
-
Click
The Problem opens in Edit mode and checkboxes become available next to the requests in the Related sidebar.
-
Tick the checkboxes of the requests to be removed
-
Select
.
The marked requests are removed from the Group.
Closing Requests within Groups
Requests within the Related sidebar can be closed individually by moving the Workflow State to a Closed State within the Problem Information Screen. Grouped requests can also be closed as a group, by changing the request Status to a Closed State as part of a bulk update. (See Bulk Updates above.)
Status
Problem Workflows are a combination of any number of stages or States that cover the lifecycle of an issue to be investigated. A Supervisor creates new Problem States for the default Problem Workflow or builds new Workflows in the Service >Workflows tab. For more information about configuring Workflows.
Within the Problem Information Summary page, the assigned stage of the Workflow is displayed within the Status field, with the Next Action field displaying the options of where the Problem can move to. To view an assigned Workflow in its entirety select .
The system provides the following States:
|
Status |
Description |
|---|---|
|
SLA Timers On |
|
|
Open |
The Problem is open. SLA timers are running and the automated SLA reminders, warnings and escalations will fire relative to the Triggers configured for the SLA. |
|
Open Restored |
The Problem is still open and the issue has yet to be resolved, but a satisfactory temporary solution has been put in place. SLA triggers will fire for the SLAs Resolution Time, but the Restoration targets have been met for the Problem. |
|
Pending |
Work on the Problem has not yet begun. The Response-time SLA trigger will fire for Problems with this status. |
|
SLA Timers Off |
|
|
On Hold |
The Problem has been put on hold for some reason. SLA triggers will not fire for Problems with this Status. |
|
On Hold - Client Action |
Can be thought of as an awaiting Customer confirmation state that will allow a Problem to remain open but prevent SLA triggers from firing. (This was called Open Resolved in previous releases). |
|
On Hold - Process Escalated* |
The Problem has been transferred to some external process. SLA reminders, warnings and escalations will not fire for the assigned SLA. |
|
Pending - No Contract* |
A valid contract is not in place and one needs to be created or processed before work can commence on the Problem. |
|
Closed Restored |
Though the basic issue remains, a satisfactory temporary solution has been reached and the Problem has been closed. SLA triggers will not fire for Problems with this Status. |
|
Closed Resolved |
The issue has been resolved and the Problem has been closed. SLA triggers will not fire for Problems with this Status. |
|
Cancelled |
The Problem has been cancelled. SLA triggers will not fire for Problems with this Status. |
*Denote System States that cannot be deleted.
NOTE:When a Problem is created, it is automatically assigned the Default Open Status, as configured within the assigned Workflow.
Any changes to the Status Type will be recorded in the Audit Trail tab.
Updating a Problem's Status
To manually change a Problem's Status:
-
Select Operations> Problem
-
Select a Request # hyperlink for the relevant Problem
-
Click Edit
-
From the Next Action drop-down list select the Problem's next Status
The States listed in Next Action are based on the Problem Workflow and its lifecycle. To view the complete Workflow lifecycle click
.
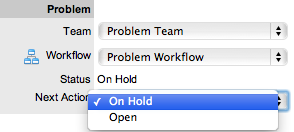
-
Click Save.
The system can automatically move a Problem into another State through the following actions:
-
Closing a Problem by adding a Note
-
Escalating a Problem to a RFC
-
When Billing is enabled and payment is not received.
Requests with a Pending-No Contract Status
Requests logged with the system that do not have a valid Contract are assigned the Pending - No Contract status. These requests are locked until a valid Contract is applied, and if relevant, paid.
Viewing a Status Note
When Problems move into a State with a Status Note, is displayed beside the Status within the Summary tab of the Problem. Scroll over to view the contents of the Status Note. If the Status Note includes an attachment, click the attachment name link in the pop-up window to download it. Click to close the window.
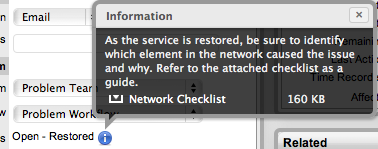
SLA Triggers and Problem Status
SLA Triggers fire for Problems that are in a Workflow State that have the Service Timer Active option set to Yes. The default Timer Active set for systems States can be changed if relevant for the organization. For example, it may not be appropriate for an organization to have SLA Triggers fire when a Problem is moved to the system default On Hold - Pending Approval State.
The following icons displayed in the Service Terms box, visually indicate how the Problem is tracking against the SLA and if the SLA timers are active:
|
Current SLA Status |
|
|---|---|
|
|
Workflow is in an SLA paused State. Triggers will not fire. |
|
|
Workflow is in an SLA timers on State. Triggers will fire. |
|
|
Workflow is in an Exit State and the SLA has been successfully met. |
|
|
Assigned SLA has been breached and Workflow is in an Exit State. |
Supervisor Users can verify the Timer Active status of a Workflow by scrolling over the Status in the Workflow map available in the Summary Information screen, or within the Service>Workflows>selected Workflow> Lifecycle>selected Status screen.
Priority
The Priority determines the timeframe in which a Problem should be handled and sets the service level targets adopted by the Problem that drive the SLA triggers and actions. It represents the degree of importance of the Problem to the Customer and also indicates the urgency of the Problem to the Technician.
A Problem can have one of four possible priorities:
-
Low
-
Medium
-
High
-
Urgent.
Setting Problem Priority
The Administrator configures the options for determining the Priority within the Setup>Privileges>Request tab. The Priority options include:
-
Selected Priority - where the system configured default Priority is applied to the Problem but can be manually adjusted by the User
-
Derived Priority - where the Impact is derived from the Item Criticality and the User enters the Urgency, enabling the system to calculate the Priority.
Urgency: The value selected reflects how quickly a resolution is required
Impact: The value selected indicates the impact the Problem has on the User and Organization. The higher the Impact the higher the Priority to resolve the Problem.
If the Administrator has set the Request Priority option to Derived, the Priority of a Problem results from the Impact being mapped from the Criticality of the Item and then combined with the selected Urgency. However, if required, the Impact can be manually adjusted within the Problem Information screen to affect the Priority.
The following table displays the calculations applied by the system using the Item Criticality mapped directly to the Problem Impact, to determine a Request's Priority:
The above calculations result in the following Priorities:
Summary Tab
Summary
The Summary tab provides comprehensive details related to a Problem and gives access to the tabs required to work on the Problem.
IMPORTANT:In the Summary page, you can view or update the available details:
-
To view details of a Customer, select the Customer name link within the Problem Information screen.
-
To update details of the and the assigned to the Problem, click
within the Summary tab when the Problem is in Edit mode.
The Problem Information Summary tab includes the following:
|
Summary Tab |
Description |
|---|---|
|
Details |
The following details are displayed:
|
|
Assignments |
The following details are displayed:
|
|
Notification |
The following details are displayed:
|
|
Problem |
The following details are displayed:
|
|
Service Terms |
The following details are displayed:
|
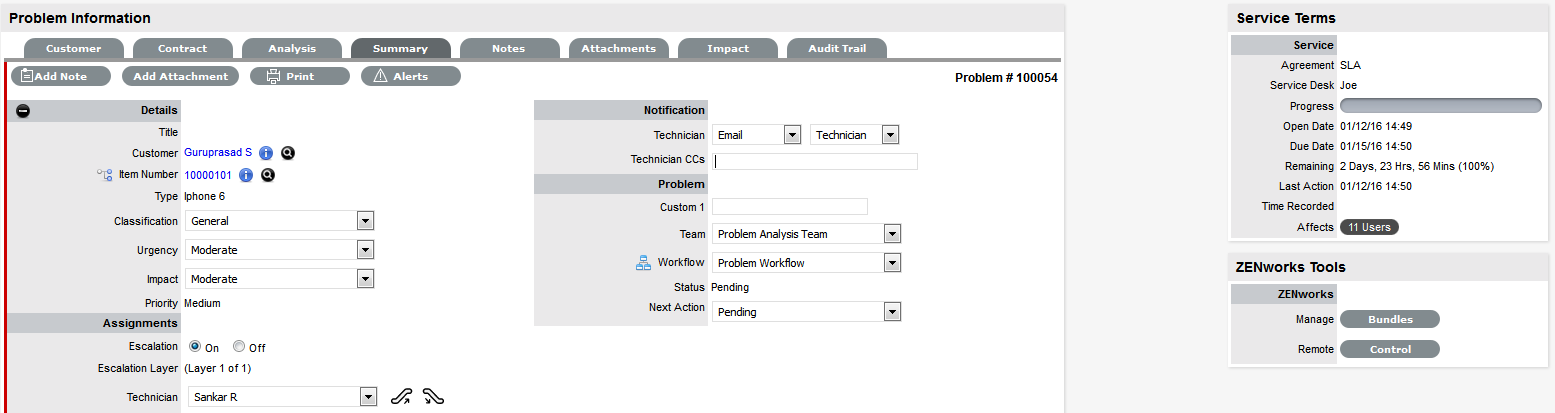
NOTE:Only Technicians assigned to the Team can edit the Problem.
|
Summary Tab Buttons |
|
|---|---|
|
|
Edit opens the Problem in edit mode. This allows the Problem details to be amended, Notes to be added and time is automatically recorded against the Problem whilst in edit mode. |
|
|
Changes the default assignee of a problem to a different technician.This right is available only for technicians belonging to the same layer or team. |
|
|
Opens the Problem in edit mode and moves directly to the New Note editor. |
|
|
Duplicate creates a copy of the Problem and links the copy to the original Problem. The User can then amend the Customer or Item details, if required. |
|
|
Print opens a summary of the Problem in a Print View window. This includes a Description and all Notes added to the Problem. It is a good alternative for viewing Problem information within one window when adding a new Note. |
|
|
Allows the User to create or view reminders related to the Problem. When published it will be displayed like the normal alert icon. |
|
|
The escalation buttons allow the User to escalate the Problem to the next layer within the Team, or de-escalate the Request to the lower level, if required. |
Changing a Problem's Customer or Item
After a Problem is created, it may be necessary to change the assigned Customer or Item. This may be the case when the Unknown Item is associated with a Problem, or a Service Item has been assigned to the Problem and the relevant hardware, software or network Item needs to be associated with the request. When the "Allow Unknown" option is disabled in the Setup>Privileges>Requests tab and a Request that is assigned to the Unknown Item is opened in Edit mode, the User will be prompted to update the Item assigned to the Problem before the Save button action can successfully record changes to the Problem.
NOTE:This option is also required when a Problem is generated for a request created via email, which results in the Item assigned being the system's default Unknown Item or the Org Unit's default Item.
To change the Item:
-
Click the Problem's Edit button
-
Select the Problem's Item tab
-
Click the Item Number
The Find Item option appears.
-
Search and select a new Item
-
Click Apply to update the Problem
-
Select the Summary tab to continue working on the Problem.
Or, click Cancel and Done to close the Problem with the newly assigned Item.
To change the Customer:
-
Click the Problem's Edit button
-
Select the Problem's Customer tab
-
Click
next to the Customer Name
-
Search and select a Customer
-
Click
If the Problem's Item needs to be altered as a result of the Customer change the Find Item field appears. Search and select the appropriate Item using the Find Item search.
-
Select the Summary tab, to continue working on the Problem
-
Click Save.
NOTE:Technicians do not have the ability to delete Problems or Customers.
Item Relationship Map and Assignment
Selecting opens a pop-up window that displays a map of Items that are related to the Request Item that can be navigated by clicking on the icons within the map. To view related Item information, scroll over the relevant Item icon.
Updating the Item associated with the Request
The Item associated with the request can be updated when in the request is in Edit mode:
-
Select
-
Navigate the map to move the relevant Item icon to the central point of the map
Select the Item icon label in the Map to move it to the central node.
-
Click the icon label when it is in the middle of the map
A warning message is displayed, prompting the confirmation of the Item change.
-
Select OK and the Item association will be updated
(If the Enable Item Shadow option is enabled by the Administrator in the Setup>Privileges>Customer tab, the change of Item information will not be visible on the Customer Portal.)
-
Select
to close the window.
The Item assignment change is recorded in the Audit tab.
See: Item Relationships.
Notes Tab
Notes
The Problem Notes tab displays entries made by a User regarding a Problem. New Notes are date-stamped automatically and associated with the User logging the Note. Problem Management is considered an internal support process, therefore Notes are not made visible or sent to Customers.
The number of Notes recorded against a Problem is displayed in brackets on the Notes tab, and if a Note has been added by a Technician other than the Technician assigned to the Problem, an asterisk is visible on the Notes tab until the assigned Technician opens the Note.
Adding a Note
When the first Note is created for a Problem, the Problem Description automatically populates the New Note editor allowing the Technician to enter their response.
To add a Note:
-
Click the Problem ID Number
The Problem Information>Summary tab appears.
-
Click Edit
-
In the Notes tab, click New
-
Enter the Note details
Or, select a Template if a relevant pre-configured response has been set for the Item Type or Category for the Item assigned to the Problem.
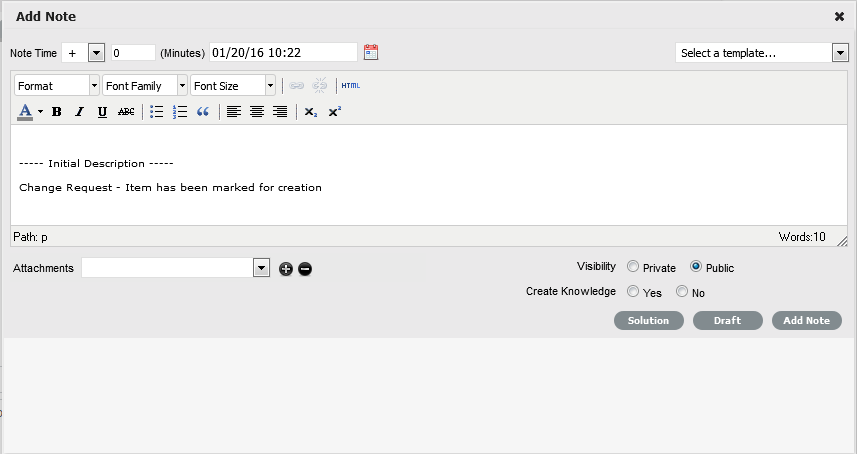
-
Enter Note Time
The time entered represents the amount of time accumulated to formulate the Note's content or time spent working on a request away from the system. If no additional time has been spent on the Problem away from the application this field will be automatically populated with the Logged Time when the Problem is in Edit mode, if the Manual Request Time option is disabled in the Setup>Privileges>User tab. When this option is disabled,
is visible next to the Problem number in the top right corner of the Summary Tab screen when the Request is in Edit mode.
-
Adjust the time and date of work completed, if required
-
Add attachments to be sent with the Note, if required
A maximum of two attachments can be added per Note.
-
Adjust Email Recipients and Group Options, if required
Vendors, as Email Recipients, is displayed as an option if the Problem is in a State associated with an Underpinning Contract.
-
Click
.
The Note editor screen will close.
Draft Note
Use the Draft button to save an incomplete Note entry, which will be displayed in the Notes list. When a Note is saved as a draft, the Status will be displayed as . If the Add Note button is selected when a draft Note has been recorded against a request, a warning will be displayed. To continue working on a draft Note, open the request in Edit mode and select the Note No. hyperlink.

Add Note
The Add Note button can be used to open the Problem in Edit mode and automatically access a new Note window, as shown in Step 4 below.
Viewing All Notes
Use a Problem's Print button to access a list of all Problem Notes in one screen.
Solution/Known Error
If a Problem Note is the resolution for the issue, the Note can be saved as the Solution/Known Error. This will convert the Note into a Solution Article (found under Problem>Analysis tab), by enabling the Create Knowledge option before selecting the Solution button. Clicking the Solution button will automatically move the Problem to the default Closed State and all related Incidents or Service Requests are automatically closed. When the handshaking facility is enabled for the system and a Solution is recorded for a Problem, the Problem is automatically moved to the default Closed State for the assigned Workflow but all related Incidents and Requests are moved to a Pending-Approval State.
If a Solution is applied to a Problem containing attachments, the attachment is included in the Solution.
To save a Note as the Solution:
-
Enter the Note details
-
Select Create Knowledge, if the Note content is to be available in the Knowledge Base
-
Click Solution.
For Create Knowledge enabled Notes the content will be recorded as the solution under the Analysis tab. The Status of the Problem will change to default Closed State for the assigned Workflow.
Viewing a Note
To view a Note:
-
Select a Problem ID Number
-
Select the Notes tab
-
Click on the Problem Note Number hyperlink.

When Notes are viewed without opening the Request in Edit mode by clicking the Note No. link, the User can scroll through the Notes list by selecting inside the top right corner of the Notes window.
Adding Notes to Grouped Problems
When a Note is created for a Problem that belongs to a Group, the Apply to Group option is visible within the Notes tab. If the new Note is to be assigned to all requests within the Group, select the Apply to Group box.
NOTE:Any new requests added to the Group at a later date will also have all pre-existing Notes, with this option selected, applied to the newly grouped request.
When the Apply to Group option is selected, the Add Note Time to Group option is displayed. Select this checkbox to also apply the Note Time to each of the requests.
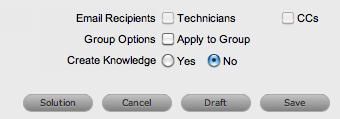
The Solution option is not visible if the Problem is included in a group of requests that includes Change Requests.
Attachments Tab
Attachments
All Users can attach any type of file to a Problem.
Adding an Attachment
To add an Attachment:
-
Select a Problem ID
-
Click Edit
-
Select the Attachment tab
-
Click

-
Browse and select a file
-
Enter a file Description, if necessary
-
Select
to upload the file or to cancel the process.
The Attachment is automatically date stamped and shown as a file name link along with its file size.
To open an Attachment, select the File Name hyperlink.

NOTE:Requests that are part of a Group and have attachments uploaded within the Group Details Screen, display
within the Share Column.
Deleting an Attachment
To delete an Attachment, select the checkbox beside the file Description then click Delete. The addition or removal of Attachments is recorded within the Audit Trail of the Problem.
Impact Tab
Impact
The Impact tab provides the capability to measure the progress of a Problem relative to agreed Service Level targets and Workflow time estimates. It also includes a quick reference for identifying other Services or Items affected by the Problem. This tab displays a summary of the following:
-
Service targets
-
Workflow estimates
-
The impact of the current Problem on related infrastructure.
The drop-down filter options within the Impact tab include:
|
Options |
Description |
|---|---|
|
Service Targets |
Displays the target response, restoration and resolution times based on the Service Level Agreement/OLA assigned to the Problem. |
|
Service Level Breaches |
Displays service level breaches that have occurred and allows Users to assign a breach code and explanation for the breach. |
|
Services Affected |
Displays the Service Item Number, the Service SLA and number of Affected Users for any Services related to the Item associated with the Problem. |
|
Estimates |
Provides a summary of the time estimated for each State of the Workflow based on the OLA assigned to the Problem. |
|
Contract Monitor |
If the current Incident Workflow State is assigned an Underpinning Contract or OLA, a table is displayed outlining the response, restoration and resolution milestones. When a milestone is met, the User is required to check the relevant checkbox. The application will automatically calculate the actual time accrued to achieve the milestone. The value displayed here is used for the Contract reports. |
|
Purchases |
When Purchase Orders are enabled in the system, any Purchase Orders associated with Items assigned to the Problem are accessible through this option. |
Service Targets
The details displayed here are drawn from the Service Level assigned to the Problem. These include the target Response, Restoration and Resolution times for a Problem, based on the Priority assigned. If an Underpinning contract or OLA has been assigned to the Problem's current state then the targets for that contract will also be listed.
For more information on Service Targets, see: Service Level Agreements.
Service Level Breaches
When a Problem Service Level Agreement is violated, a service level breach is recorded against the Problem. The User assigned to the request will be notified and asked to provide a reason for the breach and assign a breach code.
To assign a breach code:
-
Click the Problem number
-
Click Edit
-
Select Impact > Service Level Breaches
-
Click Edit
-
Assign a Breach Code
(The available codes are created by the Supervisor within the Service tab.)
-
Add any additional information, if required
-
Click Save.
All breach information is used for reporting on Service Level Agreements.
Services Affected
When the request is logged against an Item that is associated with Services within the Item Relationships tab, the Services Affected option displays the Service Item Number, the Service SLA and number of Affected Users.
Estimates
The Estimates option allows Users to view an indication of the approximate time a Problem should remain in each State of the Problem Workflow, the amount of time logged in each State and the length of time the Problem resided in each State.
|
Options |
Description |
|---|---|
|
Estimate |
Indicates the approximate length of time the Problem will spend in the Workflow State. This field is automatically completed if an OLA or UC is assigned to the Workflow State. |
|
Logged |
Is a combination of time accrued against the Problem when in edit mode with the automatic timers enabled, and the sum total of Note Times manually entered by Users. |
|
Total |
The total time a Problem has resided in the Workflow State. |
|
% Active |
The percentage of the Total Time that the Problem was actively worked on when in the State. The calculation is, (Logged time divided by Total time) x 100. |
-
Select a Problem ID
-
Click Edit
-
Move to the Impact tab, select Estimates from the drop-down list
-
Select the State hyperlink within the Status column of the Estimate Time to be adjusted
An editor box is displayed.
-
Enter the adjusted time in the available field
-
Click Save within the editor box
-
Make any other time adjustments, if required
-
Select Save to record all manually entered time adjustments against the Problem.
NOTE:The Actual Time is automatically calculated by the system using the Logged Time accrued in each state for the Workflow. The time is recorded and displayed when the Problem moves to the next stage of the Workflow.
Contract Monitor
When a Workflow State with an OLA or Underpinning Contract is assigned to the Problem, the Contract Monitor displays the details of the Contract.
The information is used for reporting purposes and includes:
|
Details |
Description |
|---|---|
|
Contract Type |
Specifies if the Contract Type is an OLA or Underpinning Contract. |
|
Start Time |
Auto-generated time the Problem moved to the current Workflow State. |
|
Milestones |
|
|
Expected Response Time |
Response Time calculated using the Contract target parameters. |
|
Responded |
Actual Response Time auto-calculated when the User checks the box. |
|
Expected Restoration Time |
Restoration Time calculated using the Contract target parameters. |
|
Restored |
Actual Restoration Time auto-calculated when the User checks the box. |
|
Expected Resolution Time |
Resolution Time calculated using the Contract target parameters. |
|
Resolved |
Actual Resolution Time auto-calculated when the User checks the box. |
|
Comments |
Allows for additional comments, if required. |
NOTE:If Milestones are breached the Response, Restoration and Resolution times are assigned a red marking.
Audit Tab
Audit
The Audit tab lists all activities that occur within the lifetime of a Problem, the resources used and the history of the Problem's Item.
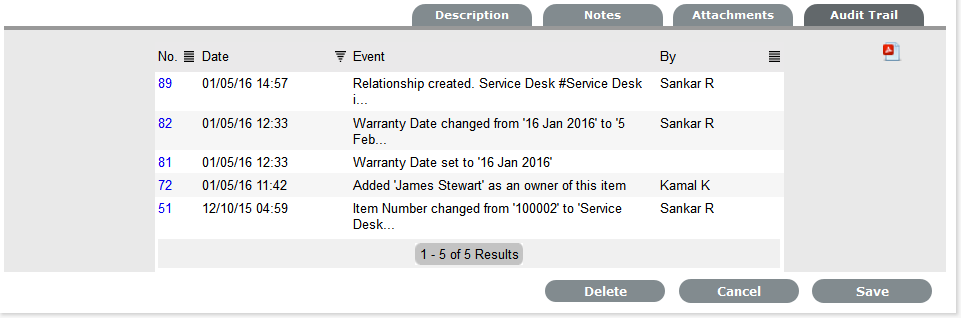
Audit Trail
The Audit Trail option records all changes made to a Problem. The logged amendments, which can be exported to PDF include:
-
Date and time the Problem was assigned and/or reassigned to technicians
-
When the Problem was escalated to a new layer of support, or had its priority or due date changed
-
Details of Notes added
-
Attachments activity
-
Status change
-
Classification change
-
Logged time.
Resource Utilization
The Resource Utilization option displays a breakdown of the time a Problem was worked on at each level of support. It details the User's name, the escalation layer they belong to, and the amount of time they have spent on the Problem.
Item Audit Trail
The history of the Item associated with the Problem is detailed within Item Audit Trail. To access more information regarding an Item Audit Trail entry, select the ID number hyperlink.
Service Terms
The Service Terms sidebar displays the Service Level Agreement (SLA) assigned to the Problem and provides details of key dates.
By default the application calculates the Due Date based on the Priority of the SLA assigned to the Customer, Organizational Unit or Item. The email reminders and escalations are then managed accordingly. If an SLA is not associated with the Problem via the Customer, Org Unit or Item, the system default SLA will be automatically assigned to the Problem but can be manually adjusted by the Technician. Once the Workflow is moved from the default Open State, the SLA can no longer be edited.
|
Service Terms |
|
|---|---|
|
Agreement |
Displays the Service Level Agreement assigned to the Problem. The service level is derived from either the Customer, Organizational Unit or Item. When Contracts are not enabled, the Agreement field can be edited, when the Problem is in edit mode. |
|
Service Manager |
Displays the User assigned as the Service Manager for the assigned SLA. |
|
Progress |
Visually displays how the Problem is tracking against the assigned SLA. The grey progress bar is gradually filled in based on the status of the SLA:
|
|
Open Date |
The Open Date field is automatically populated when the Problem is created. |
|
Due Date |
By default the application calculates the Due Date based on the SLA Target for the Priority assigned to the Problem, and email reminders are sent accordingly. |
|
Fix Date |
Auto-filled when the Problem moves into a Workflow State that is defined as meeting the SLA Resolution Time. |
|
Remaining |
Auto-filled and visible when there is SLA time remaining. |
|
Time Overdue |
Auto-filled and visible when the SLA is overdue. |
|
Close Date |
Auto-filled when the Status of a Problem is set to Closed. This date is fixed. |
|
Resolution Time |
Auto-filled with the number of minutes it took for the Problem to move from the first SLA active state to a Workflow State that is defined as meeting the SLA Resolution Time. |
|
Last Action Date |
Auto-filled when Done or Save is selected after the Problem has been modified or opened in edit mode. As updates may be made to a Problem after it has been Closed, this date may fall after the Close Date. |
|
Time Recorded |
Displays the sum total of automatically logged time, when the Problem is in edit mode plus any manually entered Note Times. |
|
Affects |
Number of Customers assigned to the Item associated with the Problem. |
NOTE:Each User can customize the date format within the My Account sub-menu option. To change the date format go to Home > My Account, click Edit and select the preferred format.
Time Recorded
Time Recorded uses a combination of auto-timing and manual Note Time entries to measure and monitor the time spent working on a Problem.
The Auto-timer is activated when a Problem is opened in edit mode, if enabled by the Administrator in the Admin>Setup>Privileges>User>Manual Incident Time. When the Problem is saved after any amendments have been made, the timer stops and records the length of time the Problem has been worked on. This total is added to the sum total of any manual Note Time entries made by Technicians when they are adding Notes.
The Time Recorded is used by the system when the Contracts functionality is in use.
Elements Tab
The Elements tab displays all the requests that belong to the Problem Group. Within this screen, any request can be removed from the Group.
To remove a request:
-
Move to the Elements tab
-
Select the checkbox of the relevant request

-
Click the Remove button.
Merging Problem Groups
Existing Problem Groups can be merged within the All Known Error or All Problem Groups filter view of the Errors screen, to allow all related requests within the Groups to be managed as one. To combine Problem Groups:
-
Go to Operations>Errors
-
Check the fields next to the relevant Group #'s
-
Click Merge
The screen defaults to the Details tab for the Merge Group.
-
Set the Name, Item Type, Classification, Status, Priority and Description that best defines all associated requests
-
Click Save.
The History tab records details of the Groups merged to form the new Group. Click the No. hyperlink to view the details. The Impact tab records the Type and Number of requests associated with the Group.
Closing a Problem Group
To close the Problem Group:
-
Go to Operations>Errors
-
Select the Problem Group # link
-
Click Edit
-
Click Close
-
Click Done.
To close the related requests, within the Elements tab select a Problem and move it to a Closed State. All related Incidents and Service Requests are automatically closed, or if the handshaking facility is enabled for the system, moved to the Pending-Approval State.
Grouping Requests
Requests can be grouped by selecting the checkboxes next to the Request #, followed by the Link button.
NOTE:The type of request Group created is based on the request type assigned to the Group.
-
If the Group contains Service Requests, it is a Service Request Group
-
If the Group contains Incidents, it is an Incident Group
-
If the Group contains Incidents/Change, it is a Change Group
-
If the Group contains Incidents/Problem/Change, it is a Change Group
-
If the Group contains Incidents/Problem, it is a Problem Group
-
If the Group contains Problem/Change, it is a Change Group.
The system views the request hierarchy from low to high as Service Request, Incident, Problem and Change Request, and if a related request of a higher type is closed, all the lesser type requests are automatically closed, or if the handshaking facility is enabled for the system, moved to the Pending-Approval State.
2.4.4 Problem Assignment and Escalation
When a Problem is logged within the system, it is allocated to the Team that is associated with the SLAs and Workflows applied to the Problem or to the default Team assigned to a Workflow State.
The appropriate Problem Workflow is assigned within the Problem Summary tab, by selecting an option from the Workflows drop-down list. This list is derived from the SLA assigned to the Customer, Organizational Unit and Item. Once the Workflow is selected, the associated Teams are available for assignment. Based on the Team assigned, a Technician in Layer One of escalation is allocated to work on the Problem. This can be adjusted manually, if required.
The Problem is automatically escalated according to the SLA assigned to the Problem and the triggers configured within the Priority of the SLA. An Incident is escalated if the assigned User exceeds the Escalation trigger point defined for the Response, Restoration or Resolution time of the assigned SLA, when the assigned Workflow State is an SLA Active State. Or, it can be manually escalated by a User, if required.
Problem Assignment
When a Problem is assigned to a User, the system follows a series of steps to look for the most appropriate Technician for the job, based on skill set, location and workload. The order of business logic is as follows:
-
The system will identify the Team associated with the Problem's SLA and associated Workflows
-
The system will find Technicians/Supervisors assigned to the Team
-
If Users are assigned to an Organizational Unit, the system will identify the Users that belong to the same Organizational Unit as associated with the Incident by the Customer assignment
-
If Classifications/Skills are assigned to Users, the system will find Technicians/Supervisors assigned to the Problem's selected Classification
-
Based on the Team configuration, if the Live Priority option is enabled for the Team, the system will look for a User who is logged into the system
-
The system verifies Work Hours/Availability of Users within the Team for appropriate Problem assignment
-
The system will assign the Request to the User who has the lowest workload, i.e., the fewest number of Open or Pending Problems
-
If there is a tie, the system randomly allocates the Request to a User in the tie.
If a more appropriate Team member is available, the User assigned to the Problem can re-assign it manually by selecting a Technician from the drop-down Technician list in the Problem Information screen.
Note, if the Self Assign option is enabled for the Team, the system assignment logic is ignored and the User creating the request is automatically assigned the Problem.
Automated Escalation
A Problem's Service Level Agreement includes trigger points that set the rate at which automated escalations will occur for a Problem. Auto-escalation is triggered when the number of support hours specified for either a Problem's Service Level Response, Restoration or Resolution time is exceeded and the SLA Trigger action is set to Escalate. When it is escalated, the Problem is reassigned to a Technician in the next escalation level and an email is sent to the newly assigned Technician. This process repeats itself until either the Problem Status changes to an inactive State, for example, Closed - Resolved, On Hold, Closed Change Request, or until all of the Team's available escalation layers are exhausted.
Manual Escalation
If the Problem Team has more than one escalation layer, the Technician assigned to the Problem can escalate it to the next escalation layer by clicking the escalate icon next to the Technician name . If the Problem is allocated to a second layer of escalation or higher, it can be returned to a lower escalation state by clicking the de-escalate button next to the Technician name.
A Problem's Technician and the Technician's Supervisor are able to reassign the Problem to one of the listed Technicians in the Technicians drop-down list by selecting their name and clicking Save to accept the change.
Escalation Control
If the Escalation Control functionality is enabled in Admin>Setup>Privileges>Requests, there is the option to enable or disable escalation within the Problem Information Summary screen.
NOTE:This option is only visible to Supervisor Users. Once a Problem has been created, a Supervisor can elect to switch the Escalation option to Off. This means all SLA timers stop, which prevents escalation. Switching the option back to On will re-start the timer and reactivate the SLA triggers.
Notification
The Notify option sets the method of messaging used by the application to notify Technicians of the following changes to a Problem:
-
Problem created
-
Problem closed
-
Problem deleted
-
Problem Note added
-
Problem escalated.
The default notification status of Problems is set on a per Team basis, within the Users>Teams>Team Information screen, with the default recipients of new Notes being configured by the Administrator in the Setup>Email>Setup tab. However, this can be adjusted on a per request basis within the Notification Method field and on a per Note basis, when new Notes are created.
The methods of Notification can be set for Technicians, and include:
-
None, which ensures that no messages are sent
-
Email, which means an email is sent containing the Problem detail updates
-
SMS notifications, which sends an SMS message to Technicians about the Problem update. This is only available to Users who have a mobile number and a service provider entered in their User Information screen.
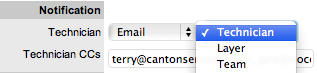
Using Problem Management as an internal service management process, notifications can be sent to the:
-
Technician - notifications can be sent to all members within the Team assigned to the request, or restricted to members within the Group to which the request is assigned
-
Technician CC's - enter any User account email addresses that are to be sent request Notifications
Multiple addresses should be separated by a comma.
-
Alternate Team - this option is visible if the Notify Alternate Team option is enabled in the Admin>Email>Setup tab and other Teams assigned to the same Process are configured in the system. Notifications can be sent to a Team within the related Process, by the User selecting an option within the drop-down list.
Workflow
When a Problem is created it is assigned a Workflow that governs the lifecycle of the Problem. The SLA allocated to the Problem determines the Workflow options made available for the Problem. Before saving the Problem, the User can adjust the system assigned Workflow, if more than one Workflow option is available.
After the Workflow is assigned to the Problem, all stages of the assigned Workflow can be viewed by selecting. The Workflow map displays the entry points (blue boxes), transitional States (orange boxes) and exit points (red boxes). To move a Problem through the Workflow select a Status in the Next Action field, when the Problem is in Edit Mode.
The User moves the Problem through the Workflow Lifecycle by adjusting the options displayed in the Next Action field.
Moving through the Workflow
To move a Problem through the stages of the Workflow, in the Summary tab of the Problem Information screen:
-
Click Edit
The Next Action field with a drop down list of Status options is displayed below the Status field.
-
Click on the Next Action field
The Status options are displayed. This list is based on the configuration of the assigned Workflow.
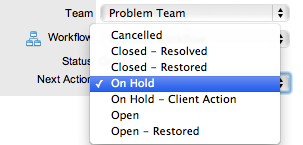
-
Select a State
-
Click Save.
The selected Status is assigned to the Problem with the updated logic applied (i.e., the SLA Timers may now be active or inactive based on the newly assigned State configuration.
Assigning a State with an Underpinning Contract
Each State of a Workflow can be customized for either internal support contract management that is monitored by an OLA, or out-sourced to an external support provider, which is monitored by an Underpinning Contract.
When a Problem moves into a State that is governed by an Underpinning Contract, for internal contract control the Problem is assigned to a Service Level Manager. This allows the Manager to maintain control of the Problem and to easily follow up with the external service provider, if required. The assigned SLM will be able to adjust the current Status, add Notes and update the Contract Monitor information in the Impact tab.
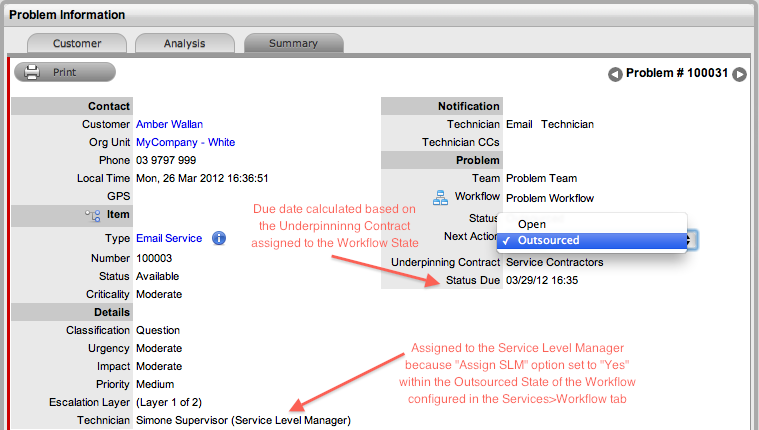
Alternatively, the Workflow State can be configured for the Technician assigned at the time the Problem is moved to the Underpinning Contract State to maintain Problem editing privileges and manage adherence to the assigned service agreement. If the Workflow is configured for the responsibility of the Problem to be maintained by the Technician when the Problem is in an external contract state the Technician will be able to adjust the current Status, add Notes and, if the Technician is assigned the Internal Process of Service Level Management, amend the Contract Monitor information in the Impact tab.
OLA Status Due
Within the Summary screen, the Status Due field is visible when a Workflow Status is monitored by an OLA. The time, date and percentage remaining information displayed is calculated using the OLA's Target Resolution time.
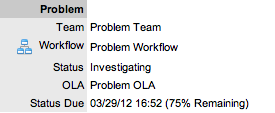
Team Assignment during the Workflow Lifecycle
To ensure that all Problems are managed throughout the Workflow, the Team assigned to the Problem when it is first logged within the system is set as the default Team. If a Problem moves to a State that has an OLA assigned with a Team, the Problem is re-assigned to that OLA's Team. When the Problem moves out of the OLA State to a State where no OLA or Team is assigned, the Problem is re-assigned to the default Team.
Pending - No Contract Status
When the Contracts or Invoices functionality is enabled and a Problem is created, the system will verify the service entitlement status of the Customer and if a valid contract is not in place, the new Problem is assigned a Status of "Pending-No Contract" and locked until a valid contract is associated with the Problem.
In a Request Group where the Customer and Organizational Unit does not have a Contract, if an Item applied to a request has a Contract and another does not, a relevant Status will be applied to each request. The User will be able to edit the request with a valid Contract, but the request without a Contract will be locked down to a Pending - No Contract Status, until a valid Contract is applied to the Problem.
The assigned Technician is automatically sent the NoContractCreateRequestSummary when the request is saved with the Status.
2.4.6 Known Errors
The Errors tab allows the User to view existing Problem Groups and Known Errors. Problem Groups is a management tool for investigating Problems and related Incidents that provides summary information within the Details tab and related requests in the Elements tab.
When a Problem is resolved it becomes a Known Error. Known Errors denote the successful identification of the root cause of a Problem. These can be used for future Problem resolutions, and accessed as successful Workarounds and Solutions.
Known Errors and Problem Groups that are related can also be easily merged within the relevant Filter view within the Errors tab using the Merge button.
Creating a Known Error
When a Solution is assigned to a Problem, the Problem Group is converted into a Known Error and all linked requests are consequently closed. It should be noted that if the Handshaking facility is enabled for the system, the related Incidents and Requests are moved to a Pending-Approval State, when the associated Problem is moved to the Exit State.
To assign a Solution, creating a Known Error:
-
Select Operations>Problems
-
Select a Problem ID# to assign the solution
The Problem Summary page is displayed.
-
Move to the Analysis tab
-
Click Edit
-
If a proposed solution is appropriate, select the Article number and click the Apply button
Or, assign a new Solution, by selecting the New Solution option and completing the Solution field. See Analysis Tab for more information.
-
Click Save.
The system will confirm that the Solution has been assigned and a Known Error created.

Viewing a Known Error
Errors are used to identify known Problems. An Error can be used to close a Problem, or groups of Problems.
To view Known Errors:
-
Select Operations>Errors
The Groups screen appears.

-
Use the All Known Errors list filter
-
Select the Group # Number, or Title to open the group editor.
The Known Error details are displayed, including all assigned requests within the Elements tab and the final fix in the Solution tab.
Editing a Problem Group
While a Problem remains open, additional requests can be added to the Group within the Errors tab. To add or remove requests:
-
Select Operations>Errors
-
Select the Group # Number, or Title to open the group editor
-
Move to the Analysis tab to add requests
The Unassigned Requests are displayed by default. Tick any requests that are to be added to the group and select the Add button.
-
Move to the Elements tab, to remove requests
Tick any requests that are to be removed from the group and select the Remove button.
-
Click Done.
Analysis Tab
Requests can be linked to a Group within the Analysis screen of a Problem Group. To search for requests to add to the Group, use the system filters or the Search option.
The system filter includes the following:
|
Unassigned Requests |
Description |
|---|---|
|
Project Requests |
Requests that have been assigned to the Problem Group/Project. |
|
Unassigned Requests |
All requests that exist in the system and have not been assigned to the Group. |
|
Potential Requests - Item Type & Classification |
Requests in the system that match the Item Type and/or Classification of the Group. |
|
Potential Requests- Keyword match |
Requests with keywords that match between the request Description and the Group Description. NOTE:The match is only performed on the first 250 characters of the Description. |
|
All Problems (sys) |
Lists all Problems in the system irrespective of Workflow State or User assignment. Note that this option is not visible to Technicians when the privilege to View All Requests is disabled by the Administrator. |
|
My Problems (Active) (sys) |
Displays all Problems in an active Workflow State that are assigned to the logged-in User. |
|
My Problems (All) (sys) |
Displays all Problems, in active and inactive Workflow States, that are assigned to the logged-in User. |
|
My Teams Problems (Active) (sys) |
Displays all Problems in an active Workflow State, allocated to the Teams with which the User is associated. |
|
My Teams Problems (All) (sys) |
Displays all the Problems, in active and inactive Workflow States, allocated to the Teams with which the User is associated. |
To link requests:
-
Go to Operations > Problems
-
Select the Problem Group # hyperlink
-
Go to the Analysis tab
-
Choose the relevant Filter option
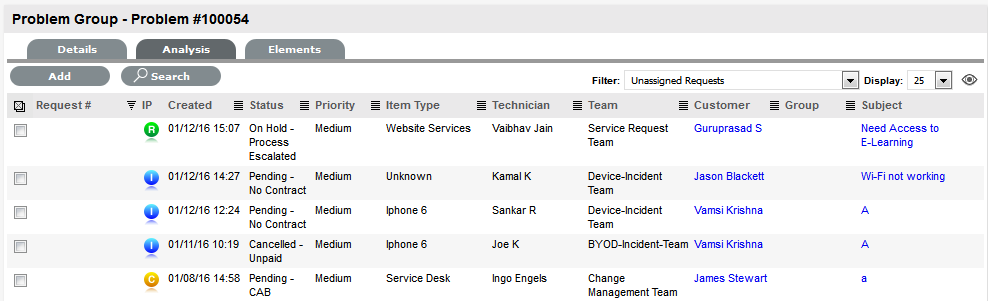
-
Select the request checkbox on the left
-
Click the Add button
-
Click Done.
The screen defaults to the Groups list.